Chapters
Table of Contents

Related Manuals for Vermeiren Trigo Series


Summary of Contents for Vermeiren Trigo Series
- Page 1 VERMEIREN Trigo INSTALLATION MANUAL MANUEL D'INSTALLATION INSTALLATIEHANDLEIDING INSTALLATIONSANLEITUNG MANUALE DI INSTALLAZIONE MANUAL DE INSTALACIÓN INSTRUKCJA INSTALACJI PŘÍRUČKU PRO INSTALACI...
- Page 2 Tento návod k obsluze je součástí způsobem (tisk, kopie, mikrofilm nebo jiný způsob) bez dodávky a musí být součástí každého písemného souhlasu vydavatele, nebo zpracování, prodaného produktu. duplikace či distribuce prostřednictvím elektronických Verze: A, 2019-02 systémů je zakázáno. © Vermeiren Group, 2019...
- Page 3 English Français Nederlands Deutch Italiano Español Polski Czech Installation manual Manuel d'installation Installatiehandleiding Installationsanleitung Manuale di installazione Manual de instalación Instrukcja instalacji Příručku pro instalaci Language index...
- Page 4 This page is intentionally left blank...
-
Page 5: Table Of Contents
Trigo 2019-02 Content Content Preface ......................2 This product ..................3 Scope of delivery ................. 4 Assembly and adjustments ..............5 3.1 Tools ....................... 5 3.2 Adjusting the wheelchair to the user ............6 3.2.1 Seat height ..................6 3.2.2 Seat depth ..................7 3.2.3 Seat inclination ................ -
Page 6: Preface
To support you on the installation and repairs of this manual wheelchair, we provide you with this installation manual. Please read it carefully. If you still have questions after reading this manual, do not hesitate to contact Vermeiren. The information in this manual applies to the following wheelchair(s): •... -
Page 7: This Product
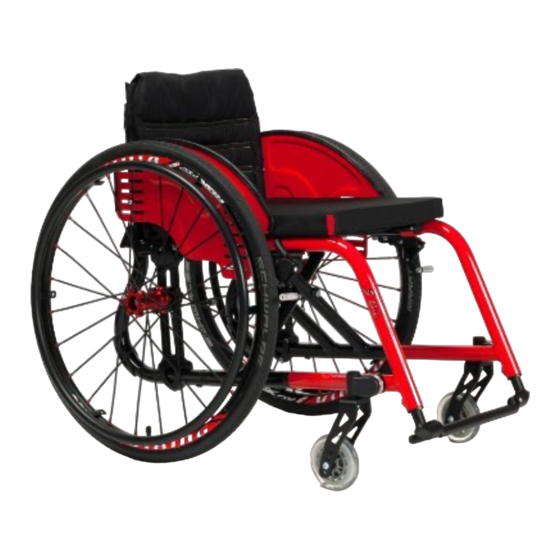
Trigo 2019-02 This product This product 1. Backrest 2. Side plate (with optional armrest) 3. Seat 4. Frame 5. Fixed footplate 1x (S-line) 6. Removable footplate 2x (T-line) 7. Front wheel 8. Rear wheel 9. Fixed footrest (S-line) 10. Removable footrest (T-line) 11. -
Page 8: Scope Of Delivery
Trigo 2019-02 Scope of delivery Scope of delivery The following items are part of the delivery: • Framework • Sideplates • Rear and front wheels • Seat and back cushion • Footrests (*) • Tools • User manual of wheelchair •... -
Page 9: Assembly And Adjustments
Read the user manual of this wheelchair. • Be aware of the technical details and limits of intended use; see the user manual. • For more information, contact your nearest Vermeiren facility. Tools To (dis)assemble and adjust the wheelchair, the following tools are needed: •... -
Page 10: Adjusting The Wheelchair To The User
Trigo 2019-02 Assembly and adjustments Adjusting the wheelchair to the user Risk of injuries CAUTION • Take the possible rear wheel-front wheel configurations into account regarding seat height, as mentioned in Table 1. • Make sure that both front wheels and both rear wheels are mounted in the same position. -
Page 11: Seat Depth
Trigo 2019-02 Assembly and adjustments Table 1: Wheel configurations regarding seat height SEAT HEIGHT FRONT (in mm) 3" 4" ... -
Page 12: Backrest Inclination
Trigo 2019-02 Assembly and adjustments 3.2.4 Backrest inclination The backrest can be adjusted into 5 angle positions: 1. Gently pull the back strap (11) until the backrest is unlocked. 2. Remove the outer screw (12) of the hinging point (13). 3. -
Page 13: Fixed Side Plate
Trigo 2019-02 Assembly and adjustments 3.2.6 Fixed side plate Depth of side plate (22) Loosen socket screws (19+20+21). Slide side plate forward/backward and retighten the socket screws. Height of side plate (22) Remove socket screws (19+20+21). Move the side plate up/down to the desired height and retighten it with socket screws (19+20) in one of its openings. -
Page 14: Footplate Height
Trigo 2019-02 Assembly and adjustments 3.2.8 Footplate height S-line (steps of 10 mm) Remove the M6 screw from the back of the footrest (26). Slide the footplate (27) up/down in the front-frame tube (28) until the desired height. Make sure the holes of the inner and outer tube align. -
Page 15: Footplate Depth (Only For Trigo S-Line, Folding Footplate)
Trigo 2019-02 Assembly and adjustments For the opening footplate: 1. On the main tube (31), loosen the M6 screws (32) on both sides of the footplate. 2. Turn the footplate until the desired angle is reached. 3. Firmly retighten both screws (32). 3.2.10 Footplate depth (only for Trigo S-line, folding footplate) 1. -
Page 16: Changing Pneumatic Tyres
Inflate the tyre using inflating equipment which complies to regulations and with a pressure indication in “bar”. • Only use replacement parts approved by Vermeiren. To change the tyre or inner tube, proceed as follows: 1. Let all the air out of the inner tube. - Page 17 Trigo 02/2019 Table des matières Table des matières Préface ......................2 Ce produit .................... 3 Portée de la livraison ................4 Montage et réglages ................5 3.1 Outils ...................... 5 3.2 L'adaptation du fauteuil à l'utilisateur ............ 6 3.2.1 Hauteur du siège ................6 3.2.2 Profondeur du siège .................
-
Page 18: Préface
Veuillez le lire attentivement. Si vous avez encore des questions après la lecture de ce manuel, n’hésitez pas à prendre contact avec Vermeiren. Les informations fournies dans ce manuel s'appliquent au(x) fauteuil(s) roulant(s) : •... -
Page 19: Ce Produit
Trigo 02/2019 Ce produit Ce produit 1. Dossier 2. Plaque latérale (avec accoudoir en option) 3. Siège 4. Cadre 5. Palette repose-pieds fixe 1x (S-line) 6. Palette repose-pieds amovible 2x (T-line) 7. Roue avant 8. Roue arrière 9. Repose-pieds fixe (S-line) 10. -
Page 20: Portée De La Livraison
Trigo 02/2019 Portée de la livraison Portée de la livraison Les éléments suivants sont compris dans la livraison : • Cadre • Plaques latérales • Roues arrière et avant • Coussin du siège et dossier • Repose-pieds (*) • Outils •... -
Page 21: Montage Et Réglages
Veuillez garder à l’esprit les détails techniques et les limites de l'utilisation prévue ; cf. le manuel d'utilisation. • Pour de plus amples informations, prenez contact avec l'établissement Vermeiren le plus proche. Outils Pour (dé)monter et régler le fauteuil roulant, les outils suivants sont nécessaires : •... -
Page 22: L'adaptation Du Fauteuil À L'utilisateur
Trigo 02/2019 Montage et réglages L'adaptation du fauteuil à l'utilisateur Risque de blessures ATTENTION • Tenez compte des configurations de roues avant et arrière pour la hauteur de siège, comme mentionné dans Tableau 1 • Assurez-vous que les deux roues avant et arrière sont montées dans la même position. -
Page 23: Profondeur Du Siège
Trigo 02/2019 Montage et réglages Tableau 1 : Configurations de roues par rapport à la hauteur du siège HAUTEUR DE SIÈGE AVANT (en mm) 3" ... -
Page 24: Inclinaison Du Dossier
Trigo 02/2019 Montage et réglages 3.2.4 Inclinaison du dossier Le dossier peut être réglé dans 5 angles différents : 1. Tirez délicatement la sangle arrière (11) jusqu’à ce que le dossier soit déverrouillé. 2. Retirez la vis extérieure (12) du point d’articulation (13). 3. -
Page 25: Plaque Latérale Fixe
Trigo 02/2019 Montage et réglages 3.2.6 Plaque latérale fixe Profondeur de plaque latérale (22) Desserrez les vis à six pans (19+20+21). Faites glisser la plaque latérale vers l'avant/arrière et serrez les vis à six pans. Hauteur de la plaque latérale (22) Retirez les vis à... -
Page 26: Hauteur De Palette Repose-Pieds
Trigo 02/2019 Montage et réglages 3.2.8 Hauteur de palette repose-pieds S-line (pas de 10 mm) Retirez la vis M6 de l’arrière du repose-pieds (26). Faites glisser la palette repose-pieds (27) vers le haut/bas dans le tube du cadre avant (28) jusqu'à la hauteur désirée. -
Page 27: Profondeur De Palette Repose-Pieds (Uniquement Pour Trigo S-Line, Palette Repose-Pieds Pliable)
Trigo 02/2019 Montage et réglages Pour l’ouverture de la palette repose-pieds : 1. Sur le tube principal (31), desserrez les vis M6 (32) sur les deux côtés de la palette repose-pieds. 2. Tournez la palette repose-pieds jusqu’à obtention de l’angle désiré. -
Page 28: Changer Les Pneumatiques
« bar ». • Utilisez uniquement des pièces de rechange approuvées par Vermeiren. Pour changer le pneu ou la chambre à air, procédez comme suit : 1. Laissez s'échapper l’air de la chambre à air. - Page 29 Trigo 2019-02 Inhoud Inhoud Voorwoord ...................... 2 Dit product ..................3 Omvang van de levering ..............4 Montage en afstelling ................5 3.1 Gereedschap ..................5 3.2 De rolstoel aanpassen aan de gebruiker ..........6 3.2.1 Zithoogte ..................6 3.2.2 Zitdiepte ..................7 3.2.3 Zitinclinatie ..................
-
Page 30: Voorwoord
Lees deze informatie zorgvuldig door. Indien u na het lezen van deze handleiding nog vragen heeft, aarzel dan niet om contact op te nemen met Vermeiren. De informatie in deze handleiding heeft betrekking op de volgende rolstoel(en): •... -
Page 31: Dit Product
Trigo 2019-02 Dit product Dit product 1. Rugsteun 2. Zijplaat/armsteun 3. Zit 4. Frame 5. vaste voetplaat 1x (S-line) 6. Afneembare voetplaat 2x (T-line) 7. Voorwiel Trigo S-line Figuur 1 8. Achterwiel 9. vaste voetsteun (S-line) 10. Afneembare voetsteun (T-line) 11. -
Page 32: Omvang Van De Levering
Trigo 2019-02 Omvang van de levering Omvang van de levering De volgende onderdelen maken deel uit van de levering: • Frame • Zijplaten • Achter- en voorwielen • Rug- en zitkussen • Voetsteunen (*) • Gereedschap • Gebruiksaanwijzing van de rolstoel •... -
Page 33: Montage En Afstelling
Lees de gebruiksaanwijzing van deze rolstoel. • Houd rekening met de technische details en limieten van het vooropgestelde gebruik; zie de gebruiksaanwijzing. • Voor meer informatie, neem contact op met uw dichtstbijzijnde Vermeiren- vestiging. Gereedschap Om de rolstoel te (de)monteren, is volgend gereedschap nodig: •... -
Page 34: De Rolstoel Aanpassen Aan De Gebruiker
Trigo 2019-02 Montage en afstelling De rolstoel aanpassen aan de gebruiker Gevaar voor letsel VOORZICHTIG • Houd rekening met de mogelijke voorwiel- en achterwielconfiguraties met betrekking tot de zithoogte, zie Tabel 1. • Zorg ervoor dat beide voorwielen en beide achterwielen in dezelfde positie zijn gemonteerd. -
Page 35: Zitdiepte
Trigo 2019-02 Montage en afstelling Tabel 1: Wielconfiguraties met betrekking tot zithoogte ZITHOOGTE VOORKANT (in mm) 3" 4" ... -
Page 36: Inclinatie Van De Rug
Trigo 2019-02 Montage en afstelling 3.2.4 Inclinatie van de rug De rugsteun kan aangepast worden in 5 hoekpositioneringen: 1. Trek zachtjes aan de rugband (11) om de rugsteun te ontgrendelen. 2. Verwijder de buitenste schroef (12) uit het scharnierpunt (13). 3. -
Page 37: Vaste Zijplaat
Trigo 2019-02 Montage en afstelling 3.2.6 Vaste zijplaat Diepte van de zijplaat (22) Maak inbusschroeven (19+20+21) los. Schuif de zijplaat voorwaarts/achterwaarts en draai de schroeven weer aan. Hoogte van de zijplaat (22) Verwijder de inbusschroeven (19+20+21). Verplaats de zijplaat tot de gewenste hoogte en zet vast door de schroeven (19+20) weer stevig aan te draaien in de overeenkomstige openingen. -
Page 38: Hoogte Van De Voetplaat
Trigo 2019-02 Montage en afstelling 3.2.8 Hoogte van de voetplaat S-line (stappen van 10 mm) Verwijder de M6-schroef uit de achterkant van de voetsteun (26). Schuif de voetplaat (27) omhoog/omlaag in de framebuis (28) tot de gewenste hoogte. Zorg ervoor dat de gaten in de binnen- en buitenbuis overlappen. -
Page 39: Voetplaat Diepte (Enkel Voor Trigo S-Line, Vouwbare Voetplaat)
Trigo 2019-02 Montage en afstelling Voor de wegklapbare voetplaat: 1. Op de hoofdbuis (31), draai de M6-schroeven (32) aan beide kanten van de open voetplaat los. 2. Draai de voetplaat tot de gewenste hoek. 3. Draai beide schroeven (32) weer stevig aan. 3.2.10 Voetplaat diepte (enkel voor Trigo S-line, vouwbare voetplaat) 1. -
Page 40: De Pneumatische Banden Vervangen
Gebruik voor het oppompen van de band enkel geschikte pompen die voldoen aan de regelgeving, en met een afleesschaal in "bar". • Gebruik enkel vervangingsonderdelen die werden goedgekeurd door Vermeiren. Om de banden te vervangen, gaat u als volgt te werk: 1. Laat alle lucht uit de binnenband. - Page 41 Trigo 2019-02 Inhalt Inhalt Vorwort ......................2 Dieses Produkt ..................3 Lieferumfang ..................4 Montage und Einstellungen ..............5 3.1 Werkzeuge ..................... 5 3.2 Benutzerspezifische Einstellung des Rollstuhls ........6 3.2.1 Sitzhöhe ................... 6 3.2.2 Sitztiefe .................... 7 3.2.3 Sitzneigung ..................8 3.2.4 Neigung der Rückenlehne ..............
-
Page 42: Vorwort
Rollstuhls bereitgestellt. Lesen Sie sie daher bitte aufmerksam durch. Sollten Sie nach der Lektüre dieses Handbuchs noch Fragen haben, können Sie sich jederzeit an Vermeiren wenden. Die Hinweise in dieser Anleitung beziehen sich auf folgende/n Rollstuhl/Rollstühle: • Trigo S-Line mit allen seinen Konfigurationen •... -
Page 43: Dieses Produkt
Trigo 2019-02 Dieses Produkt Dieses Produkt 1. Rückenlehne 2. Seitenteil (mit optionaler Armlehne) 3. Sitz 4. Rahmen 5. Feste Fußplatte 1x (S-Line) 6. Abnehmbare Fußplatte 2x (T-Line) 7. Vorderrad 8. Hinterrad 9. Feste Fußstütze (S-Line) 10. Abnehmbare Fußstütze (T-Line) 11. Bremse 12. -
Page 44: Lieferumfang
Trigo 2019-02 Lieferumfang Lieferumfang Folgende Teile gehören zum Lieferumfang: • Rahmen • Seitenteile • Hinter- und Vorderräder • Sitz und Rückenpolster • Fußstützen (*) • Werkzeuge • Benutzerhandbuch für den Rollstuhl • Zubehör (sofern zutreffend) Überprüfen Sie vor dem Gebrauch, ob alle Teile vorhanden und unbeschädigt sind. Beachten Sie bitte, dass diese Basiskonfiguration in verschiedenen europäischen Ländern abweichen kann. -
Page 45: Montage Und Einstellungen
Trigo 2019-02 Montage und Einstellungen Montage und Einstellungen VORSICHT Gefahr von Personen- oder Sachschäden • Der Rollstuhl muss von einem Fachhändler gemäß den Anweisungen in diesem Abschnitt (de)montiert und eingestellt werden. • Verwenden Sie ausschließlich die in diesem Handbuch beschriebenen Teile. •... -
Page 46: Benutzerspezifische Einstellung Des Rollstuhls
Trigo 2019-02 Montage und Einstellungen Benutzerspezifische Einstellung des Rollstuhls VORSICHT Verletzungsgefahr • Berücksichtigen Sie die möglichen Hinterrad-Vorderrad-Konfigurationen bezüglich der Sitzhöhe, wie in Tabelle 1 erwähnt. • Stellen Sie sicher, dass beide Vorderräder und beide Hinterräder in derselben Position montiert sind. 3.2.1 Sitzhöhe Der Sitz kann durch Ändern der Radposition, des Durchmessers der Vorder- und der Hinterräder angehoben oder abgesenkt werden. -
Page 47: Sitztiefe
Trigo 2019-02 Montage und Einstellungen 3. Stellen Sie den Winkel des Vorderrads mit der Rastklemme (7) ein. Die Gabelbefestigung (8) sollte senkrecht zum Boden stehen. 4. Ziehen Sie die M8-Schraube wieder fest an und setzen Sie die Abdeckung wieder auf (6). -
Page 48: Sitzneigung
Trigo 2019-02 Montage und Einstellungen 3.2.3 Sitzneigung Die Sitzneigung kann durch Ändern der Konfiguration der Vorder- und Hinterräder eingestellt werden. Siehe 3.2.1 für die Anweisungen zum Ändern der Position der Räder. 3.2.4 Neigung der Rückenlehne Die Rückenlehne kann in 5 Winkelpositionen eingestellt werden: 1. -
Page 49: Festes
Trigo 2019-02 Montage und Einstellungen Höhe des kompletten Seitenteils (18) Nehmen Sie das Seitenteil vom Rollstuhl ab. Entfernen Sie die Innensechskantschraube (17) . Setzen Sie die Innensechskantschraube entsprechend der gewünschten Höhe in ein anderes Loch ein (5 Positionen verfügbar). Ziehen Sie die Innensechskantschraube wieder fest an. Wiederholen Sie die obigen Einstellungen für das zweite Seitenteil. -
Page 50: Höhe Der Fußplatte
Trigo 2019-02 Montage und Einstellungen 4. Befestigen Sie den Befestigungsblock (24) im richtigen Winkel, indem Sie die Schrauben-Mutterverbindung (23) in den entsprechenden Bohrungen fest anziehen. 5. Bringen Sie das Hinterrad an. 6. Wiederholen Sie dies für das andere Rad. Stellen Sie sicher, dass beide Hinterräder auf dem gleichen Sturzwinkel eingestellt sind. -
Page 51: Fußplattenwinkel
Trigo 2019-02 Montage und Einstellungen 3.2.9 Fußplattenwinkel Trigo T-Line (20° in Schritten von 5°) 1. Lösen Sie die M6-Schraube (29) an der Außenseite der Fußplatte. 2. Drehen Sie die Fußplatte in den gewünschten Winkel. Die Winkelangabe erfolgt durch Striche an der Außenseite der Rasterklemme. -
Page 52: Fußplattentiefe (Nur Für Trigo S-Line, Faltbare Fußplatte)
Trigo 2019-02 Montage und Einstellungen 3.2.10 Fußplattentiefe (nur für Trigo S-Line, faltbare Fußplatte) 1. Entfernen Sie die vier M5-Schrauben (33) von der Fußplatte. 2. Setzen Sie die Fußplatte bis zur gewünschten Tiefe nach vorne/hinten (2 Positionen verfügbar). 3. Ziehen Sie die M5-Schrauben (33) wieder fest an. Stellen Sie sicher, dass die Fußplatte fest gesichert ist. -
Page 53: Luftreifen Wechseln
Pumpen Sie den Reifen mit einem Pumpgerät auf, das den Bestimmungen entspricht und über eine Druckanzeige in „bar“ verfügt. • Verwenden Sie ausschließlich von Vermeiren zugelassene Ersatzteile. Um den Reifen oder den Schlauch zu wechseln, gehen Sie wie folgt vor: 1. Lassen Sie die gesamte Luft aus dem Schlauch ab. - Page 55 Trigo 2019-02 Sommario Sommario Premessa ......................2 Questo prodotto .................. 3 Oggetto della fornitura ................ 4 Montaggio e regolazioni ..............5 3.1 Attrezzi ....................5 3.2 Regolazione della carrozzina in funzione all'utente ........ 6 3.2.1 Altezza del sedile ................6 3.2.2 Profondità...
-
Page 56: Premessa
Questo manuale di installazione viene fornito a supporto delle attività di installazione e riparazione di questa carrozzina manuale. Leggerlo attentamente. Per eventuali ulteriori domande successive alla lettura di questo manuale, rivolgersi a Vermeiren. Le informazioni contenute in questo manuale sono valide per la seguente carrozzina (o le seguenti carrozzine): •... -
Page 57: Questo Prodotto
Trigo 2019-02 Sommario Questo prodotto Schienale Piastra laterale (con bracciolo opzionale) Sedile Telaio Pedana fissa, 1x (linea S) Pedana rimovibile, 2x (linea T) Ruota anteriore Ruota posteriore Poggiapiedi fisso (linea S) 10. Poggiapiedi rimovibile (linea T) 11. Freno 12. Maniglia di spinta (opzionale) 13. -
Page 58: Oggetto Della Fornitura
Trigo 2019-02 Oggetto della fornitura Oggetto della fornitura Gli articoli indicati di seguito fanno parte della fornitura standard: • Telaio • Piastre laterali • Ruote anteriori e posteriori • Cuscino del sedile e posteriore • Poggiapiedi (*) • Attrezzi • Manuale di istruzioni della carrozzina •... -
Page 59: Montaggio E Regolazioni
• Prestare attenzione ai dettagli tecnici e ai limiti dell'uso previsto; vedere il manuale di istruzioni. • Per ulteriori informazioni, rivolgersi alla più vicina sede Vermeiren. Attrezzi Per (s)montare e regolare la carrozzina sono necessari i seguenti attrezzi: • Serie di chiavi n. 8 •... -
Page 60: Regolazione Della Carrozzina In Funzione All'utente
Trigo 2019-02 Montaggio e regolazioni Regolazione della carrozzina in funzione all'utente Rischio di lesioni ATTENZIONE • In relazione all'altezza del sedile, tenere conto delle possibili configurazioni delle ruote anteriori e posteriori, come indicato nella Tabella 1. • Accertarsi che sia le ruote anteriori, sia quelle posteriori siano montate nella stessa posizione. -
Page 61: Profondità Del Sedile
Trigo 2019-02 Sommario 4. Serrare nuovamente a fondo la vite M8 e reinstallare il coperchio (6). 5. Ripetere l’operazione per l'altra ruota. Accertarsi che entrambe le ruote siano regolate alla stessa angolazione. Tabella 1: Configurazioni delle ruote in relazione all'altezza del sedile ALTEZZA DEL SEDILE, LATO ANTERIORE (in mm) ... -
Page 62: Inclinazione Dello Schienale
Trigo 2019-02 Montaggio e regolazioni 3.2.4 Inclinazione dello schienale È possibile regolare lo schienale su 5 posizioni angolari: 1. Tirare delicatamente la cinghia posteriore (11) fino a quando lo schienale si sblocca. 2. Rimuovere la vite esterna (12) del punto di incernieramento (13). -
Page 63: Piastra Laterale Fissa
Trigo 2019-02 Sommario Accertarsi che entrambi i pannelli e le piastre laterali siano regolati alla stessa altezza e profondità, e che siano fissati saldamente. 3.2.6 Piastra laterale fissa Profondità della piastra laterale (22) 1. Allentare le viti a brugola (19 + 20 + 21). 2. -
Page 64: Altezza Della Pedana
Trigo 2019-02 Montaggio e regolazioni 3.2.8 Altezza della pedana Linea S (intervalli di 10 mm) 1. Rimuovere la vite M6 dal lato posteriore del poggiapiedi (26). 2. Fare scorrere verso l'alto / il basso la pedana (27) nel tubo (28) del telaio anteriore, fino all'altezza desiderata. Accertarsi che i fori del tubo interno e di quello esterno siano allineati. -
Page 65: Profondità Della Pedana (Solo Per I Modelli Della Linea Trigo S Con Pedana Ripiegabile)
Trigo 2019-02 Sommario Per la pedana apribile: 1. Sul tubo principale (31), allentare le viti M6 (32) presenti su entrambi i lati della pedana. 2. Ruotare la pedana fino a raggiungere l'angolazione desiderata. 3. Serrare nuovamente a fondo entrambe le viti (32). 3.2.10 Profondità... -
Page 66: Sostituzione Degli Pneumatici
Gonfiare lo pneumatico con un'apparecchiatura di gonfiaggio a norma di legge, che indichi la pressione in "bar". • Utilizzare esclusivamente ricambi approvati da Vermeiren. Per cambiare il copertone o la camera d'aria, procedere come segue: 1. Fare fuoriuscire tutta l'aria dalla camera d'aria. - Page 67 Trigo 2019-02 Contenido Contenido Introducción ....................2 El producto ..................3 Paquete de entrega ................4 Montaje y ajustes ................5 3.1 Herramientas ..................5 3.2 Ajustar la silla de ruedas al usuario ............6 3.2.1 Altura del asiento ................6 3.2.2 Profundidad del asiento ..............
-
Page 68: Introducción
Le ofrecemos este manual de instalación para ayudarle con la instalación y cualquier reparación de esta silla de ruedas manual. Por favor léalo detenidamente. Si todavía tiene alguna duda después de leer este manual, contacte con Vermeiren. La información contenida en este manual es aplicable a la(s) siguiente(s) silla(s) de ruedas: •... -
Page 69: El Producto
Trigo 2019-02 El producto El producto 1. Respaldo 2. Placa lateral (con reposabrazos opcional) 3. Asiento 4. Bastidor 5. 1 reposapiés fijo (S-line) 6. 2 reposapiés desmontables (T-line) 7. Rueda delantera 8. Rueda trasera 9. Reposapiés fijo (S-line) 10. Reposapiés desmontable (T-line) 11. -
Page 70: Paquete De Entrega
Trigo 2019-02 Paquete de entrega Paquete de entrega Los siguientes objetos forman parte de la entrega: • Bastidor • Placas laterales • Ruedas traseras y delanteras • Cojín de asiento y respaldo • Reposapiés (*) • Herramientas • Manual de instrucciones de la silla de ruedas •... -
Page 71: Montaje Y Ajustes
Téngase siempre en cuenta los detalles técnicos y los límites de uso previsto; ver el manual de usuario. • Para más información, contacte con su centro de Vermeiren más cercano. Herramientas Para montar, ajustar y desmontar la silla de ruedas, se necesitan las siguientes herramientas: •... -
Page 72: Ajustar La Silla De Ruedas Al Usuario
Trigo 2019-02 Montaje y ajustes Ajustar la silla de ruedas al usuario PRECAUCIÓN Riesgo de lesiones • Téngase en cuenta las posibles configuraciones de las ruedas delanteras y traseras en lo que respecta a la altura del asiento, tal y como se menciona en la Tabla 1. •... -
Page 73: Profundidad Del Asiento
Trigo 2019-02 Montaje y ajustes 4. Volver a apretar con firmeza el tornillo M8 y coloque de nuevo la carcasa (6). 5. Repetir el proceso con la otra rueda. Asegurarse de que ambas ruedas están ajustadas en el mismo ángulo. Tabla 1: Configuraciones de las ruedas en lo que respecta a la altura del asiento ALTURA DEL ASIENTO - RUEDAS DELANTERAS (en mm) ... -
Page 74: Inclinación Del Respaldo
Trigo 2019-02 Montaje y ajustes 3.2.4 Inclinación del respaldo El respaldo se puede ajustar en 5 ángulos de inclinación diferentes: 1. Tirar suavemente de la cincha trasera (11) hasta que se afloje el respaldo. 2. Retirar el tornillo exterior (12) del punto de articulación (13). 3. -
Page 75: Placa Lateral Fija
Trigo 2019-02 Montaje y ajustes 3.2.6 Placa lateral fija Profundidad de la placa lateral (22) Aflojar los tornillos (19 +20 +21). Deslizar la placa lateral hacia adelante/atrás y volver a apretar los tornillos. Altura de la placa lateral (22) Retirar los tornillos (19 +20 +21). Deslizar la placa lateral hacia arriba/abajo hasta alcanzar la altura deseada y volver a fijarla apretando los tornillos (19+20) en uno de los orificios. -
Page 76: Altura De La Paleta Del Reposapiés
Trigo 2019-02 Montaje y ajustes 3.2.8 Altura de la paleta del reposapiés S-line (tramos de 10 mm) Retirar el tornillo M6 de la parte trasera del reposapiés (26). Deslizar la paleta (27) hacia arriba o abajo por el tubo del bastidor delantero (28) hasta alcanzar la altura deseada. -
Page 77: Profundidad De La Paleta (Solo Para Trigo S-Line, Paleta Plegable)
Trigo 2019-02 Montaje y ajustes En el caso de la paleta extensible: 1. En el tubo principal (31), aflojar los tornillos M6 (32) de ambos lados de la paleta. 2. Girar la paleta hasta alcanzar el ángulo deseado. 3. Volver a apretar ambos tornillos (32). 3.2.10 Profundidad de la paleta (solo para Trigo S-line, paleta plegable) 1. -
Page 78: Cambio De Neumáticos
Hinchar el neumático usando una herramienta de hinchado que cumpla las normativas vigentes y con un indicador de presión en «bar». • Utilizar solo piezas de repuesto aprobadas por Vermeiren. Para cambiar el neumático o la cámara, siga estos pasos: 1. Deshinchar totalmente la cámara. - Page 79 Trigo 2019-02 Spis treści Spis treści Przedmowa ........................2 Ten produkt ..................... 3 Zakres dostawy ....................4 Montaż i regulacja .................... 5 Narzędzia ......................5 Regulacja wózka inwalidzkiego do użytkownika ............ 6 Wysokość siedziska ..................6 3.2.1 Głębokość siedziska ..................7 3.2.2 Nachylenie siedziska ...................
-
Page 80: Przedmowa
Niniejsza instrukcja instalacji stanowi pomoc w instalacji i naprawach tego ręcznego wózka inwalidzkiego. Proszę ją dokładnie przeczytać. Jeżeli wciąż mają Państwo pytania związane z niniejszą instrukcją, proszę niezwłocznie skontaktować się z firmą Vermeiren. Informacje zamieszczone w niniejszej instrukcji dotyczą następujących wózków inwalidzkich: •... -
Page 81: Ten Produkt
Trigo 2019-02 Ten produkt Ten produkt 1. Oparcie 2. Płyta boczna opcjonalnym podłokietnikiem) 3. Siedzisko 4. Rama 5. Stały podnóżek 1x (S-line) 6. Zdejmowany podnóżek 2x (T-line) 7. Przednie koło 8. Tylne koło 9. Stały podnóżek (S-line) 10. Zdejmowany podnóżek (T-line) 11. -
Page 82: Zakres Dostawy
Trigo 2019-02 Zakres dostawy Zakres dostawy Poniższe pozycje stanowią część dostawy: • Rama • Płyty boczne • Koła tylne i przednie • Poduszka siedziska i oparcia • Podnóżki (*) • Narzędzia • Instrukcja obsługi wózka inwalidzkiego • Akcesoria (jeżeli dotyczy) Przed użyciem sprawdzić, czy wszystko zostało dołączone do kompletu i czy żaden produkt nie jest uszkodzony. -
Page 83: Montaż I Regulacja
Należy zwracać uwagę na szczegóły techniczne oraz ograniczenia użytkowania zgodnie z przeznaczeniem; patrz instrukcja użytkownika. • Aby uzyskać dodatkowe informacje proszę skontaktować się z najbliższym przedstawicielem Vermeiren. Narzędzia Do (de)montażu i regulacji wózka inwalidzkiego niezbędne są następujące narzędzia: • Zestaw kluczy nr 8 •... -
Page 84: Regulacja Wózka Inwalidzkiego Do Użytkownika
Trigo 2019-02 Montaż i regulacja Regulacja wózka inwalidzkiego do użytkownika UWAGA Ryzyko odniesienia obrażeń • Uwzględnić ewentualną konfigurację tylne koło - przednie koło odnośnie wysokości siedziska, jak przedstawiono w Tabela 1. • Upewnić się, że zarówno przednie, jak i tylne koła zostały zamontowane w tej samej pozycji. -
Page 85: Głębokość Siedziska
Trigo 2019-02 Montaż i regulacja Tabela 1: Konfiguracja kół dla wysokości siedziska WYSOKOŚĆ SIEDZISKA Z PRZODU (w mm) 3" 4" ... -
Page 86: Nachylenie Oparcia
Trigo 2019-02 Montaż i regulacja 3.2.4 Nachylenie oparcia Oparcie można wyregulować w 5 pozycjach kątowych: 1. Delikatnie pociągnąć tylny pasek (11) do momentu odblokowania oparcia. 2. Odkręcić tylną śrubę (12) punktu zaczepu (13). 3. Przesunąć wewnętrzną tuleję z drugą śrubą do innego otworu, odpowiednio do żądanego kąta. -
Page 87: Stała Płyta Boczna
Trigo 2019-02 Montaż i regulacja 3.2.6 Stała płyta boczna Głębokość płyty bocznej (22) 1. Odkręcić śruby gniazdem imbusowym (19+20+21). 2. Przesunąć płytę boczną do przodu / do tyłu i dokręcić śruby z gniazdem imbusowym. Wysokość płyty bocznej (22) 1. Wyjąć śruby z gniazdem imbusowym (19+20+21). 2. -
Page 88: Wysokość Podnóżka
Trigo 2019-02 Montaż i regulacja 3.2.8 Wysokość podnóżka S-line (w stopniach co 10 mm) 1. Odkręcić śrubę M6 w tylnej części podnóżka (26). 2. Przesunąć podnóżek (27) w górę/w dół na rurze ramy przedniej (28) do wymaganej wysokości. Upewnić się, że otwory wewnętrznej i zewnętrznej rury zostały wyrównane. -
Page 89: Głębokość Podnóżka (Tylko Dla Trigo S-Line, Składany Podnóżek)
Trigo 2019-02 Montaż i regulacja Otwieranie podnóżka: 1. Na rurze głównej (31) odkręcić śruby M6 (32) z obu stron podnóżka. 2. Obrócić podnóżek do uzyskania żądanego kąta. 3. Dokręcić mocno obie śruby (32). 3.2.10 Głębokość podnóżka (tylko dla Trigo S-line, składany podnóżek) 1. -
Page 90: Wymiana Opon Pneumatycznych
Napompować oponę za pomocą pompki zgodnej z przepisami i ze wskazaniem ciśnienia w „bar”. • Używać tylko części zamiennych zatwierdzonych przez Vermeiren. Aby wymienić oponę lub dętkę, należy postępować w następujący sposób: 1. Spuścić całe powietrze z dętki. 2. Włożyć łyżkę do opon pomiędzy oponę i obręcz. - Page 91 Trigo 2019-02 Obsah Obsah Předmluva ....................... 2 Tento výrobek ..................3 Rozsah dodávky ................... 4 Montáž a seřízení ................. 5 3.1 Nástroje ....................5 3.2 Seřízení invalidního vozíku pro uživatele ..........6 3.2.1 Výška sedadla .................. 6 3.2.2 Hloubka sedadla ................7 3.2.3 Náklon sedadla ................
-
Page 92: Předmluva
Tento návod k instalaci slouží k tomu, aby vám pomáhal s instalací a opravami tohoto ručně ovládaného invalidního vozíku. Řádně si jej přečtěte. Máte-li po přečtení tohoto návodu nějaké dotazy, obraťte se bez obav na společnost Vermeiren. Informace v tomto návodu platí pro všechny následující invalidní vozíky: •... -
Page 93: Tento Výrobek
Trigo 2019-02 Tento výrobek Tento výrobek 1. Opěradlo 2. Boční deska (s volitelnou područkou) 3. Sedadlo 4. Rám 5. Pevná podnožka 1x (S-line) 6. Odstranitelná podnožka 2x (T-line) 7. Přední kolo 8. Zadní kolo 9. Pevná podnožka (S-line) 10. Odstranitelná podnožka (T-line) 11. -
Page 94: Rozsah Dodávky
Trigo 2019-02 Rozsah dodávky Rozsah dodávky Součástí dodávky jsou následující položky: • Rám • Boční desky • Zadní a přední kola • Sedadlo a polštář opěradla • Podnožky (*) • Nástroje • Návod k obsluze invalidního vozíku • Příslušenství (případné) Před použitím zkontrolujte, že nic nechybí... -
Page 95: Montáž A Seřízení
Přečtěte si návod k obsluze tohoto invalidního vozíku. • Uvědomte si technické údaje a limity zamýšleného použití; viz návod k obsluze. • O další informace požádejte svůj nejbližší podnik Vermeiren. Nástroje Pro (de)montáž a seřízení invalidního vozíku jsou potřeba následující nástroje: •... -
Page 96: Seřízení Invalidního Vozíku Pro Uživatele
Trigo 2019-02 Montáž a seřízení Seřízení invalidního vozíku pro uživatele UPOZORNĚNÍ Riziko zranění • Berte v úvahu možné konfigurace zadních a předních kol s ohledem na výšku sedadla, jak je uvedeno v Tabulka 1. • Ujistěte se, že jsou obě přední kola a obě zadní kola namontovaná ve stejné poloze. 3.2.1 Výška sedadla Sedadlo lze zvednout nebo snížit změnou polohy kol, průměru předních kol a průměru zadních kol. -
Page 97: Hloubka Sedadla
Trigo 2019-02 Montáž a seřízení Tabulka 1: Konfigurace kol s ohledem na výšku sedadla VÝŠKA SEDADLA VPŘEDU (v mm) 3" 4"... -
Page 98: Náklon Opěradla
Trigo 2019-02 Montáž a seřízení 3.2.4 Náklon opěradla Opěradlo je možné nastavit do 5 úhlových poloh: 1. Jemně zatáhněte za zadní řemínek (11), abyste odjistili opěradlo. 2. Vymontujte vnější šroub (12) závěsného bodu (13). 3. Přemístěte vnitřní pouzdro s druhým šroubem do jiného otvoru podle požadovaného úhlu. -
Page 99: Pevná Boční Deska
Trigo 2019-02 Montáž a seřízení 3.2.6 Pevná boční deska Hloubka boční desky (22) Povolte inbusové šrouby (19+20+21). Posuňte boční desku dopředu nebo dozadu a znovu utáhněte inbusové šrouby. Výška boční desky (22) Vymontujte inbusové šrouby (19+20+21). Posuňte boční desku nahoru nebo dolů do požadované výšky a utáhněte opět inbusové... -
Page 100: Výška Stupátka
Trigo 2019-02 Montáž a seřízení 3.2.8 Výška stupátka S-line (kroky 10 mm) Vymontujte šroub M6 ze zadní strany podnožky (26). Posuňte stupátko (27) v trubce (28) předního rámu nahoru nebo dolů do požadované výšky. Ujistěte se, že otvory vnitřní a vnější trubky lícují. Vraťte zpět šroub M6 (26). -
Page 101: Hloubka Stupátka (Jen Pro Trigo S-Line, Sklopné Stupátko)
Trigo 2019-02 Montáž a seřízení Pro rozevírací stupátko: 1. Na hlavní trubce (31) povolte šrouby M6 (32) na obou stranách stupátka. 2. Otočte stupátko, dokud nedosáhnete požadovaného úhlu. 3. Pevně opět utáhněte oba šrouby (32). 3.2.10 Hloubka stupátka (jen pro Trigo S-line, sklopné stupátko) 1. -
Page 102: Výměna Pneumatik
Nafoukněte pneumatiku nafukovacím zařízením, které je v souladu s nařízeními a ukazuje tlak v barech. • Používejte jen náhradní díly schválené společností Vermeiren. Při výměně pneumatiky nebo duše postupujte následujícím způsobem: 1. Vypusťte z duše všechen vzduch. 2. Vložte montážní páku mezi pneumatiku a ráfek. - Page 104 Vermeiren GROUP Vermeirenplein 1 / 15 B-2920 Kalmthout website: www.vermeiren.com © Vermeiren Group 2019...
Need help?
Do you have a question about the Trigo Series and is the answer not in the manual?
Questions and answers