Table of Contents
Advertisement
Quick Links
Advertisement
Table of Contents

Related Manuals for Parker OSP-L


Summary of Contents for Parker OSP-L
- Page 1 Modular Pneumatic Linear Drives OSP-L Operating Instructions ORIGA SYSTEM PLUS...
-
Page 2: Table Of Contents
Re-commissioning after long periods without operation ............. 11 Removal from plant Service / Maintenance OSP-L 10.1 Maintenance intervals ....................12 10.2 Cleaning........................12 10.3 Dismantle, clean, repair and assemble cylinder OSP-L ............13 Disposal Trouble shooting Declaration of incorporation Spare Parts Lists OSP-L 14.1 Replacement Kits...................... -
Page 3: Foreword To The Operating Instructions
Foreword to the Operating Instructions The purpose of these Operating Instructions is to assist you in familiarising yourself with the OSP-L and to make use of the functions it has been designed for. The Operating Instructions contain important advice so that you can use the OSP-L safely, reliably and eco- nomically. -
Page 4: Safety
See also chapter 8! Personnel The operator of the complete plant must ensure that work on the OSP-L is carried out only by authorized and qualified personnel. Authorized personnel are trained engineers of the operator, the manufacturer and the service partner. -
Page 5: Warranty
OSP-L. This identification plate shall not be removed or destroyed in any way. A liability of Messrs Parker Hannifin GmbH – irrespective of the legal reason – exists only in the event of intentional or gross negligence, culpable injury to life, body, health, in the event of deficiencies with malicious intent of deception or faults the absence of which has been expressly guaranteed. -
Page 6: Transport And Storage
Avoid deflection of the OSP-L! • If necessary, carry long and thin cylinders with several persons. Transport of the packaged OSP-L with a crane or a forked-lift truck. (see illustrations on the right side) • Apply ropes of appropriate length with a load application ratio as shown or position the fork-lift truck at the appropriate points. -
Page 7: Technical Description Of The Basic Cylinder Osp-L
4 m/s Compressed air requirements: Free of water and dirt. Additional lubrication with oil mist is not necessary. Noise level: The sound emission values (sound level) of the OSP-L are below 70 dB(A). Installation: In any position. Temperature range: from -20°... -
Page 8: Design And Function
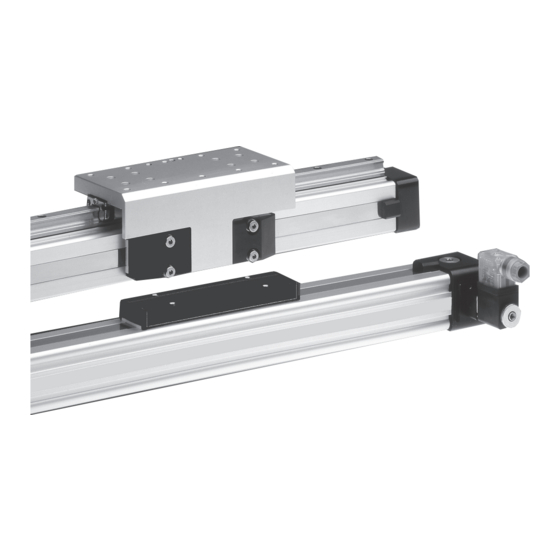
6.2.1 General design • The OSP-L is a pneumatic working cylinder without a piston rod. • The slot in the cylinder barrel is sealed on the inside with a permanently elastic plastic (PU) band and protected by a corrosion-resistant steel band (cover) on the outside. -
Page 9: Installation In Machine Or Plant
• the type plate is legible on the cylinder. Any potential hazards that may exist between Parker Origa products and customer’s items of equipment must be eliminated by the user as required. 7.2 Installation of OSP-L... -
Page 10: Connection Diagram
Magnetic switches, offered in our catalogue, allow contactless position sensing of the linear drives in their intermediate and end positions. For further information refer to the OSP-L catalogue Commissioning Installation work and commissioning must be carried through by trained personnel! The linear drive can produce quick linear movements with high force. -
Page 11: Commissioning Of A Complete Plant
Adjust speed with throttle non-return valve. • Adjust end cushioning with cushioning adjustment screws. Check the permissible weights and speeds in accordance with cushioning diagram in catalogue OSP-L. 8.3 Re-commissioning after long periods without operation • Slowly move the piston from left to right and back manually without compressed air. -
Page 12: Service / Maintenance Osp-L
Modular Pneumatic Linear Drives OSP-L 10 Service / Maintenance OSP-L Attention! 10.3.1 Maintenance and repair works must be carried out by trained personnel only! Secure the machine and the working area! Danger of crushing Carry out maintenance work only with the machine switched off and the compressed air system depressurized. -
Page 13: Dismantle, Clean, Repair And Assemble Cylinder Osp-L
10.3 Dismantle, clean, repair and assemble cylinder OSP-L Procedure: • Depressurise cylinder/plant. • Remove load. 10.3.1 Dismantle of cylinder Check the position of the parts as shown on the exploded view drawing on page 21. Remove end cap • Remove screws (36) and remove end caps (35) on both sides. - Page 14 Modular Pneumatic Linear Drives OSP-L Inserting the magnet strips (see diagram) Note: With cylinders from Ø 40, the magnet strips can slip out of the cylinder profile. Insert these into the cylinder profile as follows: • Push one magnet strip in, leaving 5 cm sticking out (it must lie on its small side) –...
- Page 15 Install the piston at Standard-cylinder with one piston (Tandem see page 17) Information Piston seals have a sensitive sealing lip which should only be inserted into the cylinder barrel by pulling ac- tion. For that reason the fitting sequence must be carried out as follows: •...
- Page 16 Modular Pneumatic Linear Drives OSP-L Insert the second cushion spigot (20) • Grease the base of the O-ring slot (21), insert the O-rings and grease them thoroughly. • Grease the cushion spigots. • Insert the nuts (26) with the teeth pointing upward in the cushion spigot.
- Page 17 Install the piston at Tandemversion with 2 pistons Information Piston seals have a sensitive sealing lip which should only be inserted into the cylinder barrel by pulling ac- tion. For that reason the fitting sequence must be carried out as follows: •...
-
Page 18: Disposal
Modular Pneumatic Linear Drives OSP-L Insert the second cushion spigot (20) • Grease the base of the O-ring slot (21), insert the O-rings and grease them thoroughly. • Grease the cushion spigots. • Insert the nuts (26) with the teeth pointing upward in the cushion spigot. Make sure the elevated offset is pointing outward. -
Page 19: Trouble Shooting
Install additional shock-absorbers, see admis- Possibly overload. sible weights and speeds in cushioning diagram Cylinder impacts too hard at one or of OSP-L catalogue. both end positions. Cushioning seal (23), O-rings at endcap (18, 19), cushion spigot (21), Check parts and replace if necessary. -
Page 20: Declaration Of Incorporation
DIN EN 983, Requirements of Fluid Powers Plants and Components Commissioning of the OSP-L is forbidden until it has been established that the machine/plant in which it ist o be installed complies with the requirements of the EU Machines Directives. -
Page 21: Spare Parts Lists Osp-L
14 Spare Parts Lists OSP-L... -
Page 22: Replacement Kits
Modular Pneumatic Linear Drives OSP-L 14.1 Replacement Kits IDENT-NO. * ITEM Ø 25 Ø 32 Ø 40 Ø 50 Ø 63 DESCRIPTION 7,8,18,19,21 SEAL KIT STANDARD 14339 14340 14341 14342 14343 22,23,24,24a, (INCL. TUBE GREASE) 28,31 7,8,18,19,21 SEAL KIT TANDEM VERSION... -
Page 23: Lubrication
AL-KEEPER FOR MAGNET 11922 11923 11924 11925 11926 PLUG FOR VALVE NEEDLE HOLE — — — — 3434 14.4 Lubrication IDENT-NO. * TUBE GREASE, 25 G 14338 Please use this order pattern: IDENT-NO. + „FIL“, example: 14111FIL *** ode.technicalsupport@parker.com, Tel.:+49 (0)7158 1703-0... -
Page 24: Assembly Instructions
Guides OSP-L Assembly Instructions 15.1 Slideline (SL25 / SL32 / SL40 / SL50 / SL63) For fitting and removal of the guide system the complete cylinder unit should be removed from the machine or plant. Ø63 Ø25 to Ø50 SL25 – SL32 – SL40 – SL50... - Page 25 Guides OSP-L Adjustment of Play and Final Assembly • Tighten the self-locking adjusting screws (14), individually from the middle working outwards, with the specified torque. If non-self-locking screws are used (14), use a locking medium (Loctite low-strength is recommended) and tighten the screws from the middle working outwards until the guide carriage can no longer be moved by hand.
-
Page 26: Starline
Slide clamping profile (4) into the groove of the cylinder barrel. Mind position at the cylinder barrel! • Fix end cap (35) of the OSP cylinder. For procedure see operating instructions OSP-L (page 17). Mounting of the Guide Rail (5) •... - Page 27 Guides OSP-L Note: Guide rail screws(6) must be secured against incidental loosening. (Medium-tight type liquid screwlocking, e.g. Loctite 243, should be used.) ® • Loosely fix screws, align. • Tighten screws (6) in accordance with the torque table: Item OSP-STL25...
- Page 28 Guides OSP-L Lubrication There are grease nipples at the front of the carriers (8) for re-lubrication. The re-lubrication intervals depend on the environmental influences such as dirt, vibrations, impact load etc. Determine the lubrication intervals in accordance with your individual case of application use ensuring that there is always enough grease in the carriers.
-
Page 29: Replacement Parts Guides
Guides OSP-L Replacement Parts Guides 16.1 Slideline (SL25 / SL32 / SL40 / SL50 / SL63) Ø25 to Ø50 Ø63 16.1.1 Modules for OSP IDENT-NO. ** ITEM DESCRIPTION SL 25 SL 32 SL 40 SL 50 SL 63 SLIDELINE PLAIN BEARING GUIDE 20342... - Page 30 Guides OSP-L IDENT-NO. * ITEM DESCRIPTION SL 25 SL 32 SL 40 SL 50 SL 63 SCREW 11615 11616 11616 11616 11617 SCREW, STAINLESS 11615 11616 11616 11616 11617 DRIVE BLOCK 10643 10644 10644 10645 11541 WIPER COVER, OUTER —...
-
Page 31: Starline
Please contact our product support specialists ! *** SCREW PLUG FOR GUIDE RAIL Please use this order pattern: IDENT-NO. + „FIL“, example: 10643FIL ** Please use this order pattern: IDENT-NO. + stroke length [mm, 5 digits], example (1 m stroke): 21112-01000 *** ode.technicalsupport@parker.com, Tel.:+49 (0)7158 1703-0... -
Page 32: Assembly Instruction Voe-Valves
VOE-Valves OSP-L 17 Assembly Instruction VOE-Valves 17.1 Modification and rigging notices The design of the integrated 3/2 way VOE valves enables their subsequent modification for installation in a machine or system: - in respect to the position of the air connection, - in respect to the pilot valve and magnet alignment. -
Page 33: Replacement Parts Valves Voe
VOE-Valves OSP-L 17.2 Replacement Parts Valves VOE cushioning cushioning adjustment screw adjustment screw OSP-L25 / OSP-L32 OSP-L40 / OSP-L50 17.2.1 Modules for OSP IDENT-NO. * ITEM DESCRIPTION OSP-L25 OSP-L32 OSP-L40 OSP-L50 INTEGRATED 3/2 WAy VALVE VOE 24V, COMPLETE 20914 20916 20918 20920 IINTEGRATED 3/2 WAy VALVE VOE 230V, COMPLETE... - Page 34 VOE-Valves OSP-L 17.2.3 Replacement Assemblies IDENT-NO. * ITEM DESCRIPTION OSP-L25 OSP-L32 OSP-L40 OSP-L50 6,7,8 COMPLETE INTEGRATED 3/2 WAy VALVE VOE 11840 11866 11855 11857 14,15 BUT WITHOUT: PLUG , KNURLED NUT, SOLENOID AND END CAP SCREWS 17.2.4 Lubrication IDENT-NO. * ITEM...
- Page 35 Notes...
- Page 36 Tel: +27 (0)11 961 0700 Tel: +36 23 885 470 parker.southafrica@parker.com parker.hungary@parker.com © 2014 Parker Hannifin Manufacturing Germany GmbH & Co. KG GmbH - The right to introduce technical modifications is reserved. P-A7P018GB 05/2014 Parker Hannifin Manufacturing Germany GmbH & Co. KG Pneumatic Division Europe –...
Need help?
Do you have a question about the OSP-L and is the answer not in the manual?
Questions and answers