Datavideo TLM-700HD Instruction Manual
7" hd/sd tft lcd monitor
Hide thumbs
Also See for TLM-700HD:
- Instruction manual (15 pages) ,
- Quick start manual (14 pages) ,
- User manual (17 pages)
Table of Contents
Advertisement
Quick Links
Download this manual
See also:
User Manual
Advertisement
Table of Contents

Subscribe to Our Youtube Channel
Related Manuals for Datavideo TLM-700HD


Summary of Contents for Datavideo TLM-700HD
- Page 1 TLM-700HD 7" TFT LCD MONITOR VOL . SOURCE ASPECT PATTERN BLUE MENU ENTER POWER 7" HD/SD TFT LCD MONITOR TLM-700HD Instruction Manual...
-
Page 2: Table Of Contents
) .............. 14 DVANCE ISPLAY ESET IRMWARE ERSION 4. CALIBRATING DATAVIDEO MONITORS ..............15 5. TALLY LIGHT INDICATION..................15 6. TLM-700HD MODEL & BATTERY PLATE VARIATIONS ..........16 7. DIMENSIONS......................17 8. SPECIFICATIONS ....................... 18 SERVICE & SUPPORT ....................20... - Page 3 Further advice on the content of this manual or on the product can be obtained by contacting your local Datavideo Office or dealer.
-
Page 4: Fcc Compliance Statement
AC adapter. If you are not sure of the type of power available, consult your Datavideo dealer or your local power company. Do not allow anything to rest on the power cord. Do not locate this unit where the power cord will be walked on, rolled over, or otherwise stressed. -
Page 5: Warranty
Warranty Standard Warranty Datavideo equipment are guaranteed against any manufacturing defects for one year from the date of purchase. The original purchase invoice or other documentary evidence should be supplied at the time of any request for repair under warranty. -
Page 6: Three Year Warranty
Card are covered for 1 year. The three-year warranty must be registered on Datavideo's official website or with your local Datavideo office or one of its authorized distributors within 30 days of purchase. Disposal For EU Customers only - WEEE Marking This symbol on the product or on its packaging indicates that this product must not be disposed of with your other household waste. -
Page 7: Introduction
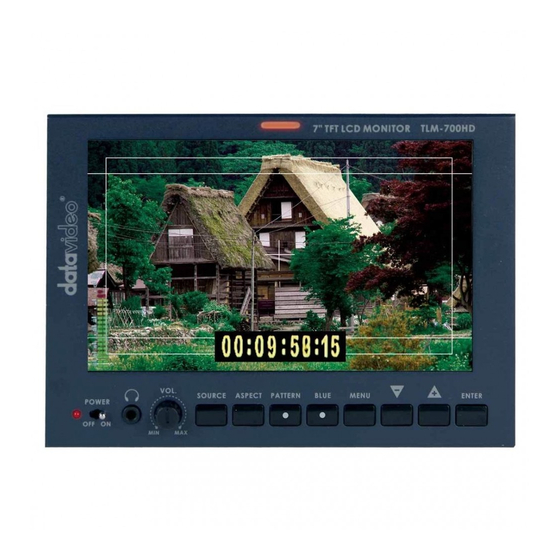
1. Introduction The Datavideo TLM-700HD is a 7 Inch monitor designed for use in the field or in a studio. The TLM-700HD can be powered from a standard V-Mount battery connection or by mains power. It is rugged and easy to carry with a variety of professional features and connections that make it easy for set up and intuitive to use. -
Page 8: Connections And Controls
2. Connections and Controls 2.1 Front Panel Power Switch Switches the power ON / OFF. Stereo Headphone Mini Jack Socket The level is adjusted by headphone volume control. Listen to embedded audio from HDMI or SDI sources. Headphone Volume Control Allows you to adjust the headphone volume. - Page 9 Source Button Selects input from SDI, YPbPr, CVBS, and HDMI. Aspect Ratio Button Selects from 4:3, 15:9 or 16:9 Pattern Generate colour bars Blue For blue only display to allow accurate chroma and phase adjustments with NTSC signals. Menu Calls up the on-screen adjustment menu (See menu options section for more details) Up / Down Menu navigation controls...
-
Page 10: Rear Panel
2.2 Rear Panel HD / SD – SDI Input BNC connector for SDI Input. YUV Input BNC connectors for analogue (component) video inputs. - Page 11 Composite Video Input BNC connector for analogue (composite) video input. HDMI IN Interface Supports HDMI 1.1 Tally IN Sends in red and amber colour tally signal to tally LED. Red means on-air, amber means standby. DC IN Socket Connects the supplied 12V 1A PSU to this socket. The connection can be secured by screwing the outer fastening ring of the DC IN plug to the socket.
-
Page 12: Menu Options
3. Menu Options 3.1 Picture (Screen Setup) Picture Setting Press the MENU button once to display the Picture setting menu. Press the ENTER button to highlight the Brightness setting. Press the UP or DOWN button to highlight the setting that needs to be adjusted. Brightness ... -
Page 13: Setup (On Screen Display, Time Code)
Keep pressing the MENU button to cycle through the main menu options. Press the SOURCE button to exit the menu mode. 3.4 Setup (On Screen Display, Time Code) Press the MENU button four times to display the Setup setting menu. OSD Timer ... -
Page 14: Advance (Lcd Display, Reset Firmware Version)
Press ENTER button to cycle through the possible time code font sizes on the screen (Large or Small). Keep pressing the MENU button to cycle through the main menu options. Press the SOURCE button to exit the menu mode. 3.5 Advance (LCD Display, Reset Firmware Version) ... -
Page 15: Calibrating Datavideo Monitors
5. Tally Light Indication The TLM-700HD has a tally input connector on the rear panel; many digital video switchers can provide tally light signals to this connector. The Datavideo range of intercom systems can also be used to pass on these tally signals. -
Page 16: Tlm-700Hd Model & Battery Plate Variations
6. TLM-700HD Model & Battery Plate Variations There are several versions of TLM-700HD TLM-700HD-C monitor with different battery connection with Canon Battery Mount plates. TLM-700HD TLM-700HD-P with V-mount Battery Plate with Panasonic Battery Mount TLM-700HD-A TLM-700HD-S1 & S2 with Anton Bauer Battery Mount... -
Page 17: Dimensions
7. Dimensions All measurements in millimeters (mm) -
Page 18: Specifications
8. Specifications Model Name TLM-700HD Product Name 7" HD/SD TFT LCD Monitor 7" LED Backlit Screen Chassis Camera Mount Resolution 800 x 480 (H) +70/-70° Viewing Angle (V) +50/-70° 300 cd/m² Luminance/Contrast 500:1 1 x HD/SD-SDI 1 x HD/SD-YUV Video Inputs... - Page 19 Dimensions (LxWxH) 186 x 132 x 51 mm Weight 1.1 kg Operating Temp. Range 0 – 40 °C Power DC 12V, 8W...
-
Page 20: Service & Support
Datavideo Technologies Co., Ltd. All rights reserved 2020 Jul-25.2019 Ver: E11...
Need help?
Do you have a question about the TLM-700HD and is the answer not in the manual?
Questions and answers