Table of Contents
Advertisement
Quick Links
Advertisement
Table of Contents

Related Manuals for R&S SMW200A


Summary of Contents for R&S SMW200A
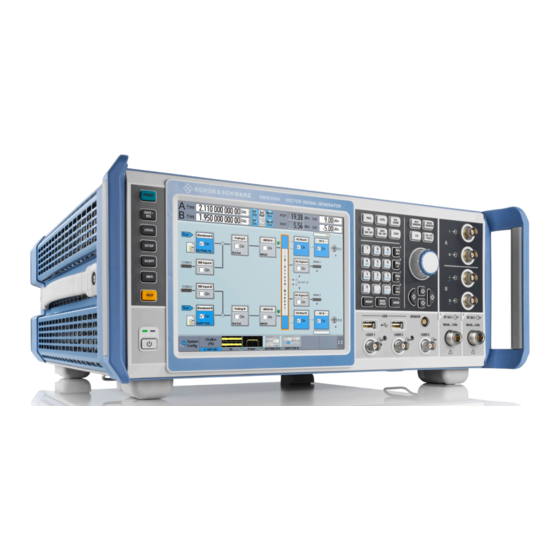
- Page 1 ® R&S SMW200A Vector Signal Generator Getting Started (><êD2) 1412922002...
- Page 2 ® This document describes the R&S SMW200A, stock no. 1412.0000.02 and its options. © 2019 Rohde & Schwarz GmbH & Co. KG Mühldorfstr. 15, 81671 München, Germany Phone: +49 89 41 29 - 0 Fax: +49 89 41 29 12 164 Email: info@rohde-schwarz.com...
-
Page 3: Table Of Contents
® Contents R&S SMW200A Contents 1 Safety Information..............7 2 Key Features................9 3 Documentation Overview............11 3.1 Getting Started Manual...............11 3.2 User Manuals and Help...............11 3.3 Tutorials....................12 3.4 Service Manual..................12 3.5 Instrument Security Procedures............12 3.6 Basic Safety Instructions..............12 3.7 Data Sheets and Brochures............... - Page 4 ® Contents R&S SMW200A 4.3 Setting Up a Network (LAN) Connection.......... 25 4.3.1 Connecting the Instrument to the Network..........26 5 Instrument Tour..............29 5.1 Front Panel Tour..................29 5.1.1 Touchscreen..................30 5.1.2 Keys...................... 32 5.1.2.1 Utility Keys.................... 32 5.1.2.2 On/Standby................... 33 5.1.2.3 Function Keys..................33 5.1.2.4 Keypad....................34...
- Page 5 ® Contents R&S SMW200A 6.9 Using the System Configuration Capabilities for MIMO Setups..77 7 System Overview..............83 7.1 Brief Introduction to the Instrument's Concept....... 83 7.1.1 The Signal Flow at a Glance..............83 7.1.2 Internal Baseband Source ("Baseband" Blocks)........86 7.1.3 Digital Baseband Input and Output ("BB Input" and "I/Q Digital" Blocks) ......................
- Page 6 ® Contents R&S SMW200A 8.3.3 Taskbar....................102 8.3.4 Additional Display Characteristics............103 8.4 Accessing the Functionality............105 8.5 Entering Data..................106 8.5.1 Entering Numeric Parameters.............107 8.5.2 Entering Alphanumeric Parameters............ 107 8.5.3 Undo and Redo Actions..............108 8.6 Getting Information and Help............108 8.6.1 Using the Tutorials................
-
Page 7: Safety Information
® Safety Information R&S SMW200A Safety Information The product documentation helps you to use the R&S SMW safely and efficiently. Follow the instructions provided here and in the printed "Basic Safety Instruc- tions". Keep the product documentation nearby and offer it to other users. - Page 8 ® Safety Information R&S SMW200A Getting Started 1412.9220.02 ─ 21...
-
Page 9: Key Features
® Key Features R&S SMW200A Key Features The R&S SMW is a new high-performance signal generator developed to meet demanding customer requirements. Offering excellent signal characteristic and straightforward and intuitive operation, the signal generator makes signal genera- tion fast and easy. - Page 10 ® Key Features R&S SMW200A Getting Started 1412.9220.02 ─ 21...
-
Page 11: Documentation Overview
® Documentation Overview R&S SMW200A User Manuals and Help Documentation Overview This section provides an overview of the R&S SMW user documentation. Unless specified otherwise, you find the documents on the R&S SMW product page at: www.rohde-schwarz.com/manual/smw200a Getting Started Manual Introduces the R&S SMW and describes how to set up and start working with the... -
Page 12: Tutorials
® Documentation Overview R&S SMW200A Data Sheets and Brochures Tutorials The R&S SMW provides interactive examples and demonstrations on operating the instrument in form of tutorials. A set of tutorials is available directly on the instrument. Service Manual Describes the performance test for checking the rated specifications, module replacement and repair, firmware update, troubleshooting and fault elimination, and contains mechanical drawings and spare part lists. -
Page 13: Release Notes And Open Source Acknowledgment (Osa)
® Documentation Overview R&S SMW200A Application Notes, Application Cards, White Papers, etc. www.rohde-schwarz.com/brochure-datasheet/smw200a Release Notes and Open Source Acknowledg- ment (OSA) The release notes list new features, improvements and known issues of the cur- rent firmware version, and describe the firmware installation. - Page 14 ® Documentation Overview R&S SMW200A Application Notes, Application Cards, White Papers, etc. Getting Started 1412.9220.02 ─ 21...
-
Page 15: Preparing For Use
® Preparing for Use R&S SMW200A Putting into Operation Preparing for Use ● Putting into Operation..................15 ● Connecting USB Devices................24 ● Setting Up a Network (LAN) Connection............25 Putting into Operation This section describes the basic steps to be taken when setting up the R&S SMW for the first time. -
Page 16: Emi Suppression
® Preparing for Use R&S SMW200A Putting into Operation Instrument damage caused by electrostatic discharge Electrostatic discharge (ESD) can damage the electronic components of the instrument and the device under test (DUT). Electrostatic discharge is most likely to occur when you connect or disconnect a DUT or test fixture to the instrument's test ports. -
Page 17: Unpacking And Checking The Instrument
® Preparing for Use R&S SMW200A Putting into Operation ● Use the cable R&S SMU-Z6 for connection to the DIG I/Q interfaces of the instrument. The required cable is available under part number 1415.0201.02. ● For connection to the HS DIG I/Q interfaces of the instrument, use: –... -
Page 18: Placing Or Mounting The Instrument
® Preparing for Use R&S SMW200A Putting into Operation ● Power cable ● Getting Started printed manual 4.1.4 Placing or Mounting the Instrument The R&S SMW is designed for use under laboratory conditions, either on a bench top or in a rack using the standard rackmount kit. - Page 19 ® Preparing for Use R&S SMW200A Putting into Operation Risk of injury when stacking instruments A stack of instruments can tilt over and cause injury if not stacked correctly. Furthermore, the instruments at the bottom of the stack can be damaged due to the load imposed by the instruments on top.
-
Page 20: Connecting Ac Power
® Preparing for Use R&S SMW200A Putting into Operation 4.1.5 Connecting AC Power The R&S SMW is equipped with an AC power supply connector, that can be oper- ated with different AC power voltages. Once it is connected, the instrument auto- matically adjusts to the given voltage. - Page 21 ® Preparing for Use R&S SMW200A Putting into Operation To start the R&S SMW Starting the R&S SMW requires that it is connected turned ► At the front panel, press the [On/Standby] key briefly. The instrument boots the operating system and starts the instrument firmware.
-
Page 22: Functional Check
® Preparing for Use R&S SMW200A Putting into Operation To shut down and turn off the R&S SMW Risk of losing data If you switch off the running instrument using the rear panel switch or by disconnecting the power cord, the instrument loses its current settings. Fur- thermore, program data can be lost. -
Page 23: Default Settings
® Preparing for Use R&S SMW200A Putting into Operation ● Self-test A self-test is provided for service purposes ("System Config > Setup > Mainte- nance > Selftest"). ● Test points If necessary for service purposes, internal test points can be queried. These tests are protected test procedures, which can be accessed if protection level 2 is disabled. -
Page 24: Checking The Supplied Options And Licenses
® Preparing for Use R&S SMW200A Connecting USB Devices For more information and an overview of the settings affected by the preset and factory preset function, see section "Restoring the (Default) Instrument Configuration" in the user manual. User-defined instrument states can be stored and called up using the "Setup >... -
Page 25: Setting Up A Network (Lan) Connection
® Preparing for Use R&S SMW200A Setting Up a Network (LAN) Connection Connecting a USB storage device When a USB storage device like a memory stick, a CD-ROM drive, or a hard disk is connected, it is detected automatically. The device is made available as a new drive (/usb). -
Page 26: Connecting The Instrument To The Network
® Preparing for Use R&S SMW200A Setting Up a Network (LAN) Connection 4.3.1 Connecting the Instrument to the Network There are two methods to establish a LAN connection to the instrument: ● A non-dedicated network (Ethernet) connection from the instrument to an existing network ●... - Page 27 ® Preparing for Use R&S SMW200A Setting Up a Network (LAN) Connection Risk of network connection failure Network cables and cable connectors of poor quality, or failures in the auto- negotiation process, can cause network connection failures. If the network connection to the instrument fails, check the network infra- structure and contact your network administrator.
- Page 28 ® Preparing for Use R&S SMW200A Setting Up a Network (LAN) Connection Getting Started 1412.9220.02 ─ 21...
-
Page 29: Instrument Tour
® Instrument Tour R&S SMW200A Front Panel Tour Instrument Tour The following topics help you get familiar with the instrument and perform the first steps: ● Front Panel Tour ● Rear Panel Tour This section explains the control elements and the connectors of the R&S SMW with the aid of the front and rear views. -
Page 30: Touchscreen
® Instrument Tour R&S SMW200A Front Panel Tour 6 = Navigation controls 7 = I/Q input connectors 8 = USB connectors 9 = SENSOR connector 10 = USER x input/output connectors 11 = RF A/RF B output connectors 5.1.1 Touchscreen The block diagram and the most important settings are displayed on the screen on the front panel. - Page 31 ® Instrument Tour R&S SMW200A Front Panel Tour 1 = Status bar (frequency and level display) 2 = Block diagram 3 = Taskbar/softkey bar A touchscreen is a screen that is touch-sensitive. It reacts in a specified way when a particular element on the screen is tapped by a finger. Any user interface element that can be clicked by a mouse pointer can also be tapped on the screen to trigger the same behavior.
-
Page 32: Keys
® Instrument Tour R&S SMW200A Front Panel Tour Risk of touchscreen damage Inappropriate tools or excessive force can damage the touchscreen. Observe the following instructions when operating the touchscreen: ● Never touch the screen with ball point pens or other sharp objects, use your fingers instead. -
Page 33: On/Standby
® Instrument Tour R&S SMW200A Front Panel Tour 5.1.2.2 On/Standby The [On/Standby] key switches the instrument from the standby to the ready state or vice versa. ● In the ready state, the LED is green. The instrument is ready for operation. -
Page 34: Keypad
® Instrument Tour R&S SMW200A Front Panel Tour 5.1.2.4 Keypad The keypad is used to enter alphanumeric parameters, including the correspond- ing units. It contains the following keys: Table 5-3: Keys on the keypad Type of key Description Alphanumeric keys Enter numbers and (special) characters in edit dialog boxes. -
Page 35: Rotary Knob
® Instrument Tour R&S SMW200A Front Panel Tour Rotary Knob The rotary knob has several functions: ● Increments (clockwise direction) or decrements (counterclockwise direction) the instrument parameter at a defined step width in the case of a numeric entry. ● Moves the selection, e.g. to a function block in the block diagram ●... -
Page 36: Connectors
® Instrument Tour R&S SMW200A Front Panel Tour Table 5-5: Display keys Display key Assigned functions [NEXT WINDOW] Toggles between the active dialogs [RESIZE WINDOW] Adjusts the size of the active dialog to use the whole height of the display. - Page 37 ® Instrument Tour R&S SMW200A Front Panel Tour SENSOR Connector for R&S NRP sensors. A power sensor is connected to the R&S SMW by inserting the male connector. To disconnect, pull the connector by its sleeve. You cannot disconnect the sensor simply by pulling at the cable or the rear part of the connector.
-
Page 38: Rear Panel Tour
® Instrument Tour R&S SMW200A Rear Panel Tour Required option Connector type RF A: R&S SMW-B120 Test port adapter, PC 3.5 mm female RF B: R&S SMW-B220 RF: R&S SMW-B131/-B140/-B140N Test port adapter, PC 2.92 mm female RF: R&S SMW-B144/-B144N PC 1.85 mm female, including protective... - Page 39 ® Instrument Tour R&S SMW200A Rear Panel Tour BBMM Figure 5-3: Rear panel view of instrument equipped with R&S SMW-B10 and R&S SMW- B13T (standard baseband) 1, 2 = Connectors for use in a rack = IEC 625/IEEE 488 connector...
-
Page 40: Connectors
® Instrument Tour R&S SMW200A Rear Panel Tour BBMM Figure 5-4: Detail view: Rear panel of instrument equipped with R&S SMW-B9 and R&S SMW-B13XT (wideband baseband) = R&S SMW-B9, R&S SMW-B13XT and R&S SMW-B15 boards location = Board designation (CODER, BBMM, FADER) - Page 41 ® Instrument Tour R&S SMW200A Rear Panel Tour The IEC 625 interface is in compliance with IEEE488 and SCPI. A computer for remote control can be connected via this interface. To set up the connection, we recommend that you use a shielded cable.
- Page 42 ® Instrument Tour R&S SMW200A Rear Panel Tour Local oscillator input and output for phase-coherent RF signal: ● LO IN: Input of phase coherence signal ● LO OUT: Output of phase coherence signal NOTICE! Risk of damaging components. Always use an appropriate 8 mm torque wrench to tighten SMA connectors.
- Page 43 ® Instrument Tour R&S SMW200A Rear Panel Tour T/M/C Multipurpose input/output trigger/marker/clock connectors. The number of connectors depend on the installed baseband options: ● Standard baseband generator (R&S SMW-B10): One T/M/C and two T/M connectors per board. ● Wideband baseband generator (R&S SMW-B9): One T/M/C and one T/M connectors per board The input/output signal has to be defined.
- Page 44 ® Instrument Tour R&S SMW200A Rear Panel Tour Table 5-11: Overview of the DIG I/Q interfaces and the required options Location Designation Required option CODER boards CODER 1/2 In R&S SMW-B10, standard baseband generator R&S SMW-B9, wideband baseband generator, if "System Config > Mode = Advanced"...
- Page 45 ® Instrument Tour R&S SMW200A Rear Panel Tour See also "Analog I/Q Output Settings" in the user manual. ADV DATA/CTRL Option: R&S SMW-B9/-B13XT and R&S SMW-K503/-K504 Interface for exchanging of external data and control signals. See user manual R&S SMW-K501/-K502/-K503/-K504 Extended and Real-Time Sequencing, Real-Time Control Interface.
- Page 46 ® Instrument Tour R&S SMW200A Rear Panel Tour NOTICE! Risk of damaging the HS DIG I/Q interface. Use active optical QSFP+ cable with max. power class 2 module (2.0 W max. power consumption). ● To plug in the cable: Hold the QSFP+ plug by its panes. The release tab must be upwards oriented.
-
Page 47: Trying Out The Instrument
® Trying Out the Instrument R&S SMW200A Trying Out the Instrument This chapter introduces the most important functions and settings of the R&S SMW step by step. The complete description of the functionality and its usage is given in the R&S SMW user manual. Basic instrument operation is described in Chapter 8, "Instrument... -
Page 48: Generating An Unmodulated Carrier
® Trying Out the Instrument R&S SMW200A Generating an Unmodulated Carrier Generating an Unmodulated Carrier We start out by generating a simple unmodulated signal. The R&S SMW in this example can be a base unit in its minimal configuration. 1. On the R&S SMW front panel, press the [PRESET] key to start out in a defined instrument configuration. - Page 49 ® Trying Out the Instrument R&S SMW200A Generating an Unmodulated Carrier Figure 6-1: Block diagram: Generating an unmodulated signal Tip: Alternative way to access the instrument functions. To fulfill the same task, you can use other hot spots in the block diagram, the provided functions under the "RF"...
- Page 50 ® Trying Out the Instrument R&S SMW200A Generating an Unmodulated Carrier To enable signal generation, enable the "RF On". ● Use the [FREQ], [LEVEL], and [RF ON/OFF] key on the front panel. See also Chapter 8, "Instrument Control", on page 97.
-
Page 51: Generating A Digitally Modulated Signal
® Trying Out the Instrument R&S SMW200A Generating a Digitally Modulated Signal Generating a Digitally Modulated Signal This example shows you how to generate a simple WCDMA-3GPP (QPSK 45° offset) signal with the help of the "Custom Digital Modulation" functionality. The minimum requirement for R&S SMW in this example is a base unit. - Page 52 ® Trying Out the Instrument R&S SMW200A Generating a Digitally Modulated Signal 4. Select the "Modulation" tab and observe the used "Modulation Type". Figure 6-3: Display of the used modulation type The instrument activates automatically "I/Q Mod A", uses the internal trigger and clock signals, and generates a WCDMA-3GPP signal, modulated with a QPSK 45°...
-
Page 53: Triggering The Instrument With An External Signal
® Trying Out the Instrument R&S SMW200A Triggering the Instrument with an External Signal Figure 6-4: Block diagram: Generating a digitally modulated signal Triggering the Instrument with an External Sig- The example configurations are rather theoretical cases, because you rarely use the R&S SMW as a stand-alone instrument. - Page 54 ® Trying Out the Instrument R&S SMW200A Triggering the Instrument with an External Signal Signal", on page 51 by the configuration of the required trigger signal and con- nector settings. In this example, we use the global USER connectors. Alternatively, you can...
- Page 55 ® Trying Out the Instrument R&S SMW200A Triggering the Instrument with an External Signal The instrument uses its internal trigger and clock signals, and the default map- ping of the marker signals to the connectors. 2. To access the related connector settings, perform one of the following: ●...
- Page 56 ® Trying Out the Instrument R&S SMW200A Triggering the Instrument with an External Signal Figure 6-5: Signal mapping to the global connectors The "Global Connectors" dialog displays the current connectors configuration. The settings are configurable, but in this example we use the default mapping.
- Page 57 ® Trying Out the Instrument R&S SMW200A Triggering the Instrument with an External Signal To reconfigure the trigger settings We assume that the instrument is configured as described in Chapter 6.2, "Gen- erating a Digitally Modulated Signal", on page 51 and the default connector map-...
- Page 58 ® Trying Out the Instrument R&S SMW200A Triggering the Instrument with an External Signal To connect the instrument and the external trigger source 1. Use a suitable cable to connect the external trigger source to the USER 3 connector of the R&S SMW, see Figure 6-6.
- Page 59 ® Trying Out the Instrument R&S SMW200A Triggering the Instrument with an External Signal Figure 6-6 depicts the location of the connectors and explains the con- nection as principle. In practice, you would rather "substitute" the analyzer by a DUT, like a base station (BS). Other than in the example, the DUT can be the source for the reference signal.
-
Page 60: Enabling And Configuring A Marker Signal
® Trying Out the Instrument R&S SMW200A Enabling and Configuring a Marker Signal To learn more about this topic, refer to: ● Chapter "Local and Global Connectors" in the user manual ● Chapter "Regular Trigger Signals" in the user manual... -
Page 61: Routing The Signal Through The Instrument And Defining The Output Connectors
® Trying Out the Instrument R&S SMW200A Routing the Signal through the Instrument and Defining the Output Connectors I OUT USER 1 (Rear Panel) Signal Marker 1 Figure 6-7: Simplified representation of a test setup for signal monitoring** ** = The figure depicts the cabling as a general principle 4. - Page 62 ® Trying Out the Instrument R&S SMW200A Routing the Signal through the Instrument and Defining the Output Connectors To configure a composed baseband signal 1. In the first baseband, generate a WCDMA-3GPP signal as described in Chap- ter 6.2, "Generating a Digitally Modulated Signal",...
- Page 63 ® Trying Out the Instrument R&S SMW200A Routing the Signal through the Instrument and Defining the Output Connectors 3. In the block diagram, select "Baseband B > Misc > Custom Digital Mod...", select "Set acc. to standard > 3GPP FDD" and enable "Custom Digital Modu- lation >...
- Page 64 ® Trying Out the Instrument R&S SMW200A Routing the Signal through the Instrument and Defining the Output Connectors b) Enter "Baseband B > Frequency Offset > -5 MHz". c) Enter "Baseband B > Path Gain > -30 dB". d) Close the "Baseband Offsets" dialog.
- Page 65 ® Trying Out the Instrument R&S SMW200A Routing the Signal through the Instrument and Defining the Output Connectors To map the I/Q stream and define the output connector The term stream describes the signal at the input of the "I/Q Stream Mapper" up to the output connectors of the instrument.
-
Page 66: Verifying The Generated Signal With The Graphics Display
® Trying Out the Instrument R&S SMW200A Verifying the Generated Signal with the Graphics Display The generated composed signal (stream A) is output at the analog RF A con- nector and routed to the I/Q Out 1 connector. The block diagram confirms this routing and displays the letter "A"... - Page 67 ® Trying Out the Instrument R&S SMW200A Verifying the Generated Signal with the Graphics Display This example shows you how to use this graphical display to verify the generated signal. Use the signal generated in Chapter 6.5, "Routing the Signal through the Instrument and Defining the Output Connectors",...
- Page 68 ® Trying Out the Instrument R&S SMW200A Verifying the Generated Signal with the Graphics Display A new thumbnail (minimized view) indicating the active diagram appears in the "Taskbar". 4. Press the thumbnail graphic. The graphic enlarges and the diagram is displayed in a normal size...
- Page 69 ® Trying Out the Instrument R&S SMW200A Verifying the Generated Signal with the Graphics Display The "Power Spectrum" displays two signals, both 3GPP FDD signals are fre- quency shifted and the right one is also attenuated. 5. To retrieve more information, zoom in the spectrum and select "Show Marker"...
-
Page 70: Saving And Recalling Settings
® Trying Out the Instrument R&S SMW200A Saving and Recalling Settings Saving and Recalling Settings To restore the results of our measurements later, we saved the instrument set- tings to a file. To save the instrument settings to a file We assume, a test configuration as described in Chapter 6.5, "Routing the Signal... - Page 71 ® Trying Out the Instrument R&S SMW200A Saving and Recalling Settings 3. Tap the "Save" button. The file MyTestSignal.savrcltxt is saved in the default directory /var/ user. To load saved instrument settings You can restore the settings to the instrument at any time using the settings file.
- Page 72 ® Trying Out the Instrument R&S SMW200A Saving and Recalling Settings 4. Tap the "Recall" button. All instrument settings are restored and the display resembles Figure 6-8, which shows the instrument display right before the settings were saved. How to display all parameters with values different to their preset val- When you load a file to your instrument, you may do not have enough infor- mation on the changed settings.
-
Page 73: Generating An Eutra/Lte Signal
® Trying Out the Instrument R&S SMW200A Generating an EUTRA/LTE Signal Generating an EUTRA/LTE Signal The main application field of the R&S SMW is the generation of digital signals in accordance with several telecommunication and wireless standards, like WCDMA, EUTRA/LTE or WLAN, to name a few. This example uses the digital standard EUTRA/LTE to introduce the way you can access and interact with the instrument and experience the advantages provided by the additional options. - Page 74 ® Trying Out the Instrument R&S SMW200A Generating an EUTRA/LTE Signal To generate a downlink test signal The main focus of the following example is not on the R&S SMW capabilities and the features provided by the firmware option. The example aims rather to help you get familiar with the settings and configuration principle common for the digi- tal standards.
- Page 75 ® Trying Out the Instrument R&S SMW200A Generating an EUTRA/LTE Signal Tip: To display the dialog in its maximal height, press the [RESIZE WINDOW] key on the front panel. 3. In the "EUTRA/LTE General" tab, select "Test Models". The test models is a function for quick selection and settings adjustment according to one of the various EUTRA test models (E-TM).
- Page 76 ® Trying Out the Instrument R&S SMW200A Generating an EUTRA/LTE Signal Close the dialog. 6. On the "Status Bar", tap the "Freq" and "Lev" fields and enter new values, for example 2.143 GHz and -20 dBm. Select "RF A > On".
-
Page 77: Using The System Configuration Capabilities For Mimo Setups
With these first steps, you have gained an impression of the provided func- tionality. For a comprehensive description of the full range of capabilities, refer to the user manual "EUTRA/LTE Digital Standard for R&S SMW200A". Using the System Configuration Capabilities for MIMO Setups The R&S SMW supports versatile MIMO configurations and provides comfortable... - Page 78 ® Trying Out the Instrument R&S SMW200A Using the System Configuration Capabilities for MIMO Setups To access the "System Configuration" function 1. Perform one of the following: a) On the "Taskbar", select "System Config > System Configuration" b) In the block diagram, select "Fading > MIMO > System Configuration"...
- Page 79 ® Trying Out the Instrument R&S SMW200A Using the System Configuration Capabilities for MIMO Setups Figure 6-9: System Configuration in the default Standard Mode 1 = Standard or advanced mode; the last is required for configuration of complex LxMxN MIMO scenarios...
- Page 80 ® Trying Out the Instrument R&S SMW200A Using the System Configuration Capabilities for MIMO Setups Figure 6-10: System Configuration in the Advanced Mode (1x2x2 configuration) 1 = Advanced mode, required for configuration of complex LxMxN MIMO scenarios 2 = Current signal routing; 2x2 MIMO configuration...
- Page 81 ® Trying Out the Instrument R&S SMW200A Using the System Configuration Capabilities for MIMO Setups To generate an EUTRA/LTE signal in the 2x2 MIMO scenario 1. In the block diagram, select "Baseband > EUTRA/LTE", select "State > On", and close the dialog.
- Page 82 ® Trying Out the Instrument R&S SMW200A Using the System Configuration Capabilities for MIMO Setups To enable the generation of scheduled data, further configurations are required; these configurations are, however, outside the scope of this description. For further information, refer to the user manual "EUTRA/LTE Digital Stan- dard for R&S SMW".
-
Page 83: System Overview
® System Overview R&S SMW200A Brief Introduction to the Instrument's Concept System Overview This section helps you to get familiar with the R&S SMW. It provides an introduc- tion to the general concept of the instrument with a sample of the possible appli- cation fields. - Page 84 ® System Overview R&S SMW200A Brief Introduction to the Instrument's Concept ● Two examples of a fully equipped (standard baseband) instrument. The first one shows the default instrument state and the second one - an advanced configuration with more abstract representation.
- Page 85 ® System Overview R&S SMW200A Brief Introduction to the Instrument's Concept – The block diagram depicting a 4x4 MIMO scenario with coupled baseband sources is a more abstract representation. Each stage of the signal gener- ation is still represented by a functional block but the signal routing is dis- played in a conceptional manner.
-
Page 86: Internal Baseband Source ("Baseband" Blocks)
® System Overview R&S SMW200A Brief Introduction to the Instrument's Concept Table 7-1: Required options per functional block (excerpt) Functional block Required option "Baseband A" R&S SMW-B10 "Baseband B" Second option R&S SMW-B10 "BB Input A" Included in R&S SMW-B10 "BB Input B"... -
Page 87: Digital Baseband Input And Output ("Bb Input" And "I/Q Digital" Blocks)
® System Overview R&S SMW200A Brief Introduction to the Instrument's Concept ● The signal routing (in the standard "classic" mode of a standard baseband generator) Signals from the baseband generators can be routed between the available paths, and added (possibly with frequency, phase and power offsets). -
Page 88: Fading Simulator ("Fading" Blocks)
® System Overview R&S SMW200A Brief Introduction to the Instrument's Concept 7.1.4 Fading Simulator ("Fading" Blocks) The "Fading" block is displayed only in instruments equipped with the option R&S SMW-B14, Fading Simulator. This block controls the fading module and, in standard mode, the signal routing at the output of this module. -
Page 89: I/Q Modulator ("I/Q Mod" Blocks)
® System Overview R&S SMW200A Brief Introduction to the Instrument's Concept 7.1.7 I/Q Modulator ("I/Q Mod" Blocks) The "I/Q Mod" blocks represent the I/Q modulators. These functional blocks are the access point to: ● The I/Q modulation of the internal baseband signal ●... -
Page 90: Applications Examples Of The R&S Smw
® System Overview R&S SMW200A Applications Examples of the R&S SMW Applications Examples of the R&S SMW Due to its modular design, the R&S SMW can be optimally adapted to the requirements of different applications: ● Generation of digitally modulated signal The main field of application of the R&S SMW is the generation of digitally... -
Page 91: Transmit Diversity Test (Miso Scenario)
® System Overview R&S SMW200A Applications Examples of the R&S SMW 7.2.1 Transmit Diversity Test (MISO Scenario) The block diagram in this example depicts the generation of a test signal using both internal baseband generators and 1 RF output (RF A). -
Page 92: Receive Diversity Test (Simo Scenario)
® System Overview R&S SMW200A Applications Examples of the R&S SMW 7.2.2 Receive Diversity Test (SIMO Scenario) The block diagram in this example depicts the generation of a test signal using one internal baseband generator (Baseband A) and distributing the signal to both RF outputs. -
Page 93: Generation Of Signals For Testing Of Wcdma Handover (Two Cells)
® System Overview R&S SMW200A Applications Examples of the R&S SMW 7.2.3 Generation of Signals for Testing of WCDMA Handover (Two Cells) The block diagram in this example depicts the generation of a test signal using both internal baseband generators and both RF outputs, for example for hand- over tests. -
Page 94: Generation Of An Eutra/Lte 8X2 Mimo Signal For Ue Tests
® System Overview R&S SMW200A Applications Examples of the R&S SMW 7.2.4 Generation of an EUTRA/LTE 8x2 MIMO Signal for UE Tests The block diagram in this example depicts the generation of an EUTRA/LTE test signal in a 8x2 MIMO scenario, for example for UE tests. The instrument uses a coupled internal baseband source to generate all required baseband signals. -
Page 95: Generation Of An Lte Test Signal With Carrier Aggregation And 2X2 Mimo Each Component Carrier
® System Overview R&S SMW200A Applications Examples of the R&S SMW 7.2.5 Generation of an LTE Test Signal with Carrier Aggregation and 2x2 MIMO each Component Carrier The block diagram in this example depicts the generation of an EUTRA/LTE test signal with two component carriers (intra-band carrier aggregation) and 2x2 MIMO fading each, for example for UE tests. -
Page 96: Generation Of A Wlan 802.11Ad Signal With 1.76 Ghz Bandwidth
® System Overview R&S SMW200A Applications Examples of the R&S SMW 7.2.6 Generation of a WLAN 802.11ad Signal with 1.76 GHz Bandwidth The block diagram in this example depicts the generation of a WLAN 802.11ad test signal with 1.76 GHz bandwidth. The instrument uses one internal wideband baseband generator with 2 GHz bandwidth and one RF output. -
Page 97: Instrument Control
® Instrument Control R&S SMW200A Possible Ways to Operate the Instrument Instrument Control This chapter provides an overview on how to work with the R&S SMW. It covers the following topics: ● Possible Ways to Operate the Instrument............97 ● Means of Manual Interaction................98... -
Page 98: Means Of Manual Interaction
® Instrument Control R&S SMW200A Means of Manual Interaction Means of Manual Interaction For the manual interaction with the R&S SMW, you have several methods that you can use as an alternative to perform a task: ● Touchscreen: Touchscreen operation is the most direct way to interact. Almost all control elements and actions on the screen are based on the standard operating sys- tem concept. -
Page 99: Understanding The Display Information
® Instrument Control R&S SMW200A Understanding the Display Information Throughout the manual, the term "select" refers to any of the described methods, i.e. using a finger on the touchscreen, a mouse pointer in the display, or a key on the instrument or on a keyboard. -
Page 100: Status Bar
® Instrument Control R&S SMW200A Understanding the Display Information ● Status Bar..................... 100 ● Block Diagram....................100 ● Taskbar......................102 ● Additional Display Characteristics..............103 8.3.1 Status Bar The status bar at the top of the screen indicates the RF frequency and the level of the output signal provided to the DUT. - Page 101 ® Instrument Control R&S SMW200A Understanding the Display Information = Status indicator = Functional block 3a / 3b = Control signal block = Signal line (digital) 5a / 5b = Graphics indicator = Signal line (analog) 7a / 7b / 7c / 7d / 7e = Connector icons (RF, analog, digital)
-
Page 102: Taskbar
® Instrument Control R&S SMW200A Understanding the Display Information Legend Item Description Control signal block Indicates information on the control signals like signal content, input or output and provides quick access to the corresponding configuration dialog. A dedicated control block is displayed for each baseband (3a) and RF block (3b). -
Page 103: Additional Display Characteristics
® Instrument Control R&S SMW200A Understanding the Display Information Whenever you open a settings or graphics dialog, it is automatically assigned to the "Taskbar". The softkeys shown in the following figure represent the variants. Figure 8-3: Taskbar fully assigned 1 = System configuration 2 = Remote control connections 3 = R&S NRP power sensors... - Page 104 ® Instrument Control R&S SMW200A Understanding the Display Information ● Appearance of active elements – Active elements like On/Off switches, state buttons have a blue back- ground. – Selected elements are framed or highlighted orange. – Inactive elements are gray.
-
Page 105: Accessing The Functionality
® Instrument Control R&S SMW200A Accessing the Functionality Accessing the Functionality All functionalities are provided in dialog boxes as known from computer pro- grams. You can control the instrument intuitively with the touchscreen. This sec- tion provides an overview of the accessing methods. -
Page 106: Entering Data
® Instrument Control R&S SMW200A Entering Data To select an option in a list If many options are available - for example, for the trigger mode - the options are provided in a list. The current selection is shown on the list button. -
Page 107: Entering Numeric Parameters
® Instrument Control R&S SMW200A Entering Data Aborting the entry ► Press the [ESC] key. The dialog box closes without changing the settings. 8.5.1 Entering Numeric Parameters To enter values with the on-screen keypad For numeric settings, the instrument displays the numeric keypad. The units specified correspond to the units of the parameter. -
Page 108: Undo And Redo Actions
® Instrument Control R&S SMW200A Getting Information and Help 8.5.3 Undo and Redo Actions Accessed via the context-sensitive menus, "Undo" allows you to restore one or more actions on the instrument. Depending on the available memory, the "Undo" steps can restore all actions. - Page 109 ® Instrument Control R&S SMW200A Getting Information and Help Contents of the help dialog box The help dialog box covers two main areas: ● "Contents" - contains a table of help contents ● "Topic" - contains a specific help topic The help system also provides an "Index"...
-
Page 110: Using The Tutorials
® Instrument Control R&S SMW200A Getting Information and Help 2. To display a help topic, tap on the topic name or double click on the topic name or press the [Enter] key. 3. To follow a cross-reference, tap on the link text. - Page 111 ® Instrument Control R&S SMW200A Getting Information and Help The "Tutorials" dialog opens. 3. Select "File > Load Predefined Tutorial". 4. Tap on a tutorial from the list and confirm with "Select". If the file contains a description, it is displayed.
- Page 112 ® Instrument Control R&S SMW200A Getting Information and Help 5. Use the default mode, that is "Execution Mode > Interactive". 6. Tap on the "Start" button. 7. Observe the information displayed in the "Info" line (bottom of the display). 1 = Information on the performed action 2 = Progress bar 3 = "Next Step": confirms the execution of the step...
-
Page 113: Remote Control
® Instrument Control R&S SMW200A Remote Control The instrument performs the configurations step-by-step and expects your confirmation. Dialogs are opened and closed; changed parameters are high- lighted in orange. Additional information is displayed in the "Info" line. To stop the tutorial The demonstration can be terminated at any time. -
Page 114: Remote Operation Over Vnc
® Instrument Control R&S SMW200A Remote Operation over VNC ● Using the LXI browser interface in a LAN network ● Connecting a PC via the IEC-bus (IEEE 488) interface ● Remote control via the USB interface For remote control over LAN or USB, you can use the R&S VISA (Virtual Instrument Software Architecture) library provided for download at the Rohde &... -
Page 115: Index
® Index R&S SMW200A Index INST TRIG x ........41 LAN ............. 42 Abort LF OUT x ..........44 Tutorial ..........113 LO IN ..........41 AC supply ..........20 LO OUT ..........41 Active elements ........103 MARKER ..........43 Alphanumeric parameters ..... - Page 116 ® Index R&S SMW200A Diversity Down ...........35 Rx ............92 Emulation .......... 114 Tx ............91 Enter ........... 34 Documentation overview ......11 ESC ..........34, 36 FREQ ..........33 Connector (for future use) ....42 HCOPY ..........32 HELP ..........32 INFO ...........
- Page 117 ® Index R&S SMW200A Remote control ........113 Remote operation ........114 Navigation keys ........35 Reopen Network connection Tutorial ..........113 Error ............ 27 Reset instrument settings ......23 Numeric data entry ........ 106 Rotary knob ..........35 Numeric parameters ......107 Safety instructions ........
- Page 118 ® Index R&S SMW200A Using in a LAN ........114 White papers ........... 13 Getting Started 1412.9220.02 ─ 21...
Need help?
Do you have a question about the SMW200A and is the answer not in the manual?
Questions and answers