Table of Contents
Advertisement
Quick Links
Advertisement
Table of Contents

Subscribe to Our Youtube Channel
Related Manuals for Polk Mono UM2


Summary of Contents for Polk Mono UM2
- Page 1 Installation and Operation Manual...
-
Page 2: Table Of Contents
CONTENTS Copyrights and Trademarks Warnings and Compliance ..................1 Sirius XM and all related marks and logos are trademarks of Sirius XM Radio Inc. Introduction ......................3 and its subsidiaries. Visit www.siriusxm.com/xmlineup for updates. All Safety Information ....................4 programming/channel lineup/ XM service subject to change or preemption. All Installation ...................... -
Page 3: Warnings And Compliance
WARNINGS AND COMPLIANCE Safety Health Administration (OSHA) has issued headphone usage recommendations for maximum daily exposure and sound pressure levels Important Safety Instructions (measured in decibels (dB)). A decibel is a unit of measure of sound, and decibels READ these instructions. increase exponentially as sound gets louder. - Page 4 FCC Compliance Notice This device complies with Part 15 of the FCC Rules. Operation is subject to the following two conditions: (1) This device may not cause harmful interference, and (2) This device must accept any interference received,including interference that may cause undesired operation. Any changes or modifications not expressly approved by the party responsible for compliance could void the user’s authority to operate the equipment. ...
-
Page 5: Introduction
INTRODUCTION HARDWARE KIT CONTENTS System Features Features of the Polk UM2 marine audio system include: • 4.3” color TFT display • AM/FM US/EURO Tuner with 30 Presents (12 AM, 18 FM) • SiriusXM-Ready™ • USB Playback of MP3 and WMA files •... -
Page 6: Safety Information
SAFETY INFORMATION WARNING: TO REDUCE THE RISK OF FIRE OR ELECTRIC SHOCK AND INTERFERENCE, When Boating USE ONLY THE RECOMMENDED ACCESSORIES. Keep the volume level low enough to be aware of your surroundings. Protect from Water Do not submerge the product in water, as this can cause electric shorts, fire or other damage. -
Page 7: Installation
INSTALLATION Bracket Mount Before You Begin Always disconnect the negative battery terminal Important Notes Lock nuts • Before final installation, test the wiring connections to make sure the unit is connected properly and the system works. • Mounting Bracket Consult with your nearest dealer if installation requires the drilling of holes or Mounting other modifications to your vessel. - Page 8 Removing the Unit STAINLESS STEEL #8 SCREWS (INCLUDED) To remove the commander, remove bracket mount or remove trim ring and 1/8” PILOT HOLES FOR SUPPLIED SELF-STARTING SCRWS mounting screws, then slide wired commander out of the mounting hole. .180 PILOT HOLES WHEN USING THREADED MACHINE SCREWS Tuner / Amplifier Module Mounting Choose a mounting area for the tuner/amplifier module that will provide plenty of ventilation to prevent the amplifier from overheating.
-
Page 9: Wiring
WIRING COMMANDER TUNER/AMP MODULE... -
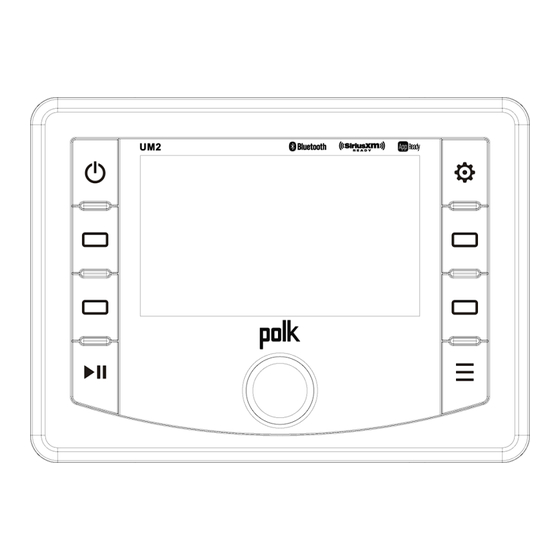
Page 10: Basic Operation
BASIC OPERATION Audio Menu Press the Menu button (9) on the control panel to access the audio menu. You can navigate through the audio menu items by rotation the Encoder Knob and pressing the Encoder Knob to make selection. Rotate the Encoder Knob clockwise to increase and counter-clockwise to decrease. - Page 11 LCD may decrease slightly. The LCD display will return to Bluetooth Pair: Press Encoder Knob to confirm selection and put normal when the temperature increases to a normal range. the UM2 into pairing mode. • Battery Alarm (On/ Off) Back Key (Swoop Arrow) •...
-
Page 12: Tuner Operation
TUNER OPERATION Press the Autosave soft button to automatically select strongest stations and store them in the preset list for the selected Band. The new stations replace any stations already stored in that band. Scan Press the Scan soft button to scan stations stored in the current band list. The unit will pause for ten seconds at each preset station. - Page 13 Press the PTY soft button access search for stations in your area broadcasting RBDS information. NOTE: Radio stations broadcasting RBDS may not be available in your listening area. In FM radio mode, press the PTY soft button to list the following Program Type (PTY) options: ANY / News / Information / Sports / Talk / Rock / Classic Rock / Adult Hits / Soft Rock / Top 40 / Country / Oldies / Soft / Nostalgia / Jazz / Classical / R&B / Soft R&B / Language / Religious Music / Religious Talk / Personality /...
-
Page 14: Weather Band Operation
WEATHER BAND OPERATION LIST Press the Presets soft button to display the preset list. What is the NOAA Weather Radio/Weatheradio Canada? NOAA (National Oceanic and Atmospheric Administration) is a nationwide system Recall a Station that broadcasts local weather emergency information 24 hours a day via the Rotate the Encoder Knob (5) to navigate the preset list and highlight the desired National Weather Service (NWS) network. -
Page 15: Siriusxm Operation
SIRIUS XM OPERATION SiriusXM preview channel even if your service is not activated. About SiriusXM In SiriusXM mode, press and hold the Encoder Knob button (5) to select Direct Channel Entry mode. Sirius, XM and all related marks and logos are trademarks of Sirius XM Radio Inc. Rotate the Encoder Knob to select each digit. - Page 16 Manual Tuning and tune to the corresponding stored channel. Press the Tune soft button. Press the |<< (3) or >>| (2) soft buttons to decrement/ increment channels down/ up step by step. CATEGORY Category mode options are Cat+, Cat- and Info. Rapid Tuning Press and hold |<<...
- Page 17 Setting the User Passcode Reset SiriusXM Channel Lock Code Press and hold the Menu button (9) for more than 3 seconds to enter the If you forget your Parental Control lock code, use the following directions to reset system menu. the code to the default “0000”.
- Page 18 Advisory Messages Reported by the SiriusXM Vehicle Tuner On-Screen Display Advisory Message Cause Explanation/Solution • Verify that the antenna cable is connected to the SiriusXM Check Antenna The radio has detected a fault with the SiriusXM antenna. The Check Antenna Tuner.
- Page 19 Advisory Messages Reported by the SiriusXM Vehicle Tuner (Continued) On-Screen Display Advisory Message Cause Explanation/Solution Channel Locked The channel that you have requested is Locked by the radio See the section on Parental Control, page 15 for more information Chan Locked Parental Control feature.
-
Page 20: Usb Mp3 Operation
USB MP3 OPERATION Removing a USB Device Press the Mode button to select another mode and then remove the USB device from the USB connector. NOTE: After loading a USB device, files and folders are accessed in the order in which they were written to the device. Therefore, the playing order may not be the same as the order in which they are expected to be played. - Page 21 folder sequentially. Press the Intro soft button again to stop Intro Scan and resume normal playback of the current file. Repeat Play Press the Repeat soft button (2) during song play to repeat the current file. Press the Repeat soft button again to stop repeat play. Random Play Press the Random soft button (3) to play all files in the current folder in random, shuffled order.
-
Page 22: Bluetooth Operation
Bluetooth Audio mode. Bluetooth Audio (A2DP) When connected, a Bluetooth enabled device is able to stream audio to the UM2. Press and hold the MENU button (9) to enter menu adjustment mode. Rotate the To access Bluetooth mode and play songs stored on your phone, press the Mode Encoder Knob (5) to navigate the menu list to “Bluetooth Setup”... -
Page 23: App Operation
Connecting and using Ultramarine app After downloading and installing Ultramarine app on your apple device, pair your device to the UM2 as stated above for Bluetooth pairng. Once your device is paired you can open the app and use with your UM2 radio. -
Page 24: Specifications
SPECIFICATIONS TROUBLESHOOTING General Symptom Cause Solution Operating Voltage ......... . .DC 12 Volts No Power The vessel’s accessory If the power supply is... - Page 25 www.asaelectronics.com v.290918...
Need help?
Do you have a question about the UM2 and is the answer not in the manual?
Questions and answers