Table of Contents
Advertisement
Advertisement
Table of Contents

Related Manuals for IKEA HYGIENISK


Summary of Contents for IKEA HYGIENISK
- Page 1 HYGIENISK...
- Page 2 ENGLISH Please refer to the last page of this manual for the full list of IKEA appointed After Sales Service Provider and relative national phone numbers.
- Page 3 ENGLISH...
-
Page 4: Table Of Contents
Troubleshooting Programmes Technical information Options Environmental concerns Settings IKEA guarantee Before first use Subject to change without notice. Safety information Before the installation and use of the appliance, carefully read the supplied instructions. The manufacturer is not responsible for any injuries or damages that are the result of incorrect installation or usage. - Page 5 ENGLISH Children shall not carry out cleaning and user maintenance of • the appliance without supervision. General Safety This appliance is intended to be used in household and • similar applications such as: farm houses; staff kitchen areas in shops, offices and other –...
-
Page 6: Safety Instructions
ENGLISH Safety instructions • This appliance complies with the E.E.C. Installation Directives. Warning! Only a qualified • UK and Ireland only. This appliance is person must install this fitted with a 13 A mains plug. If it is appliance. necessary to change the mains plug fuse, use only a 13 A ASTA (BS 1362) fuse. -
Page 7: Product Description
ENGLISH • Do not remove the dishes from the • To replace the internal lighting, contact appliance until the programme is the Authorised Service Centre. complete. Some detergent may remain Service on the dishes. • The appliance can release hot steam if •... -
Page 8: Control Panel
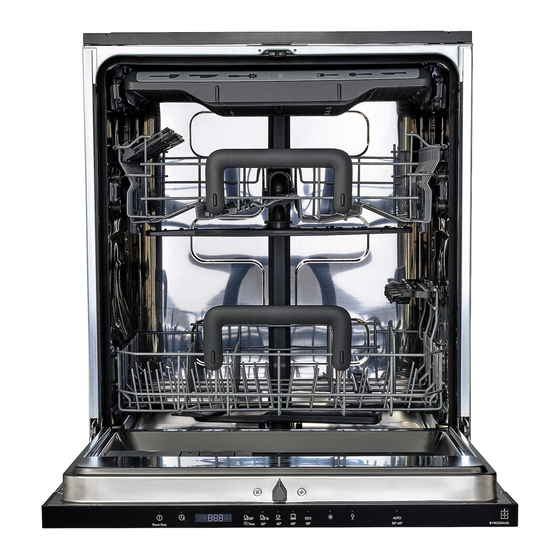
ENGLISH Rating plate Lower basket Salt container Upper basket Air vent Cutlery drawer Rinse aid dispenser Detergent dispenser TimeBeam When AutoOpen is activated during the drying phase, the TimeBeam displays the following projection on the floor may not information on the floor below the be completely visible. -
Page 9: Programmes
ENGLISH DryPlus button Indicators RESET button Indicators Indicator Description End indicator. Rinse aid indicator. It is always off while the programme operates. Salt indicator. It is always off while the programme operates. Programmes Programme Degree of soil Programme phases Options Type of load •... - Page 10 ENGLISH Programme Degree of soil Programme phases Options Type of load • Normal soil • Prewash • DryPlus • Crockery and • Wash 50 °C cutlery • Rinse • Dry 1) The appliance senses the degree of soil and the quantity of items in the baskets . It automatically adjusts the tem- perature and the quantity of water, the energy consumption and the programme duration.
-
Page 11: Options
ENGLISH For any other questions regarding your Information for test institutes dishwasher please refer to the service book To receive the necessary information for provided with your appliance. conducting performance tests (e.g. according to EN60436), send an email to: info.test@dishwasher-production.com In your request please include the product number code (PNC) found on the rating plate. -
Page 12: Settings
ENGLISH Settings Press and hold RESET until the appliance is Programme selection mode and user in programme selection mode. mode When the appliance is in programme How to enter user mode selection mode it is possible to set a Make sure the appliance is in programme programme and to enter user mode. - Page 13 ENGLISH German degrees French degrees mmol/l Clarke de- Water softener level (°dH) (°fH) grees 19 - 22 33 - 39 3.3 - 3.9 23 - 27 15 - 18 26 - 32 2.6 - 3.2 18 - 22 11 - 14 19 - 25 1.9 - 2.5 13 - 17...
- Page 14 ENGLISH quantity) and level 6 (maximum quantity). How to deactivate the acoustic signal for Level 0 deactivates the rinse aid dispenser the end of programme and no rinse aid is released. Make sure the appliance is in user mode. Factory setting: level 4. 1.
-
Page 15: Before First Use
ENGLISH If children, pets or people with disabilities have access to the appliance, deactivate AutoOpen. The automatic opening of the door may pose a danger and expose possible hazards inside the appliance (such as knives, sharp objects, chemicals). How to deactivate AutoOpen Make sure the appliance is in user mode. - Page 16 ENGLISH Filling the salt container Filling the rinse aid dispenser Put 1 litre of water Put 1 kg of salt in Fill the rinse aid in the salt container the salt container. dispenser until the (only for the first rinse aid reaches time).
-
Page 17: Daily Use
ENGLISH Daily use 1. Open the water tap. 2. Press the on/off button to activate the appliance. Make sure that the appliance is in programme selection mode. • If the salt indicator is on, fill the salt container. • If the rinse aid indicator is on, fill the rinse aid dispenser. -
Page 18: Hints And Tips
ENGLISH programme you want to start. The Cancelling the delay start while the display will show the programme countdown operates number for approximately 3 seconds When you cancel the delay start you have and next the programme duration. to set the programme and options again. 4. - Page 19 ENGLISH available) or select a programme with a What to do if you want to stop using multi- prewash phase. tablets • Always use the whole space of the Before you start to use separately baskets. detergent, salt and rinse aid do the •...
-
Page 20: Care And Cleaning
ENGLISH 1. Let the dishes cool down before you Before starting a programme remove them from the appliance. Hot Make sure that: dishes are easily damaged. 2. First remove items from the lower basket • The filters are clean and correctly then the upper basket. - Page 21 ENGLISH Cleaning the filter of the inlet hose To remove filters (B) Remove filter (A). and (C) turn the Wash the filter with Close the water tap. Disconnect the hose. handle water. Turn the fastener A counterclockwise clockwise. and remove. Pull apart filter (B) and (C).
- Page 22 ENGLISH External cleaning • Clean the appliance with a moist soft cloth. • Only use neutral detergents. • Do not use abrasive products, abrasive cleaning pads or solvents. Internal cleaning • Carefully clean the appliance, including the rubber gasket of the door, with a soft damp cloth.
-
Page 23: Troubleshooting
ENGLISH Troubleshooting If the appliance does not start or it stops With some problems, the display shows during operation, first check if you can solve an alarm code. the problem by yourself with the help of the The majority of problems that can occur information in the table or contact an can be solved without the need to contact Authorised Service Centre. - Page 24 ENGLISH Problem and alarm code Possible cause and solution • If the delayed start option is set, cancel the delay setting The program lasts too long. or wait for the end of the countdown. • This is not a defect. The appliance is working correctly. The remaining time in the display increases and skips nearly to the end of pro-...
- Page 25 ENGLISH Problem Possible cause and solution • Tableware has been left for too long inside a closed Poor drying results. appliance. • There is no rinse aid or the dosage of rinse aid is not enough. Set the rinse aid dispenser to a higher level. •...
-
Page 26: Technical Information
ENGLISH Problem Possible cause and solution • The detergent tablet got stuck in the dispenser and There are residues of deter- therefore was not completely washed away by water. gent in the dispenser at the • Water cannot wash away the detergent from the dis- end of the programme. -
Page 27: Environmental Concerns
Replaced parts will not extend the guarantee period for the become the property of IKEA. appliance. What will IKEA do to correct the problem? Who will execute the service? IKEA appointed service provider will IKEA service provider will provide the... - Page 28 IKEA appliances: • Transportation damages. If a customer transports the product to their home or Please do not hesitate to contact IKEA After other address, IKEA is not liable for any Sales Service to: damage that may occur during transport.
- Page 29 How to reach us if You need our service Please refer to the last page of this manual for the full list of IKEA appointed contacts and relative national phone numbers. In order to provide You with a...
- Page 30 Hétköznap 8 és 10 óra között 0900 235 45 32 en/of 15 cent/min., starttarief 4.54 cent ma - vr 08.00 - 20.00, Nederland 0900 BEL IKEA en gebruikelijke belkosten zat 09.00 - 20.00 (zondag gesloten) Norge 22 72 35 00...
- Page 32 21552 © Inter IKEA Systems B.V. 2018 AA-1939324-2...
Need help?
Do you have a question about the HYGIENISK and is the answer not in the manual?
Questions and answers