Table of Contents
Advertisement
Quick Links
Advertisement
Table of Contents

Related Manuals for IKEA HYGIENISK 704.804.21


Summary of Contents for IKEA HYGIENISK 704.804.21
- Page 1 HYGIENISK 704.804.21...
- Page 2 ENGLISH Please refer to the last page of this manual for the full list of IKEA appointed After Sales Service Provider and relative national phone numbers.
- Page 3 ENGLISH...
-
Page 4: Table Of Contents
Troubleshooting Control panel Technical information Programme selection Environmental concerns Basic settings IKEA guarantee Before first use Daily use Subject to change without notice. Safety information Before the installation and use of the appliance, carefully read the supplied instructions. The manufacturer is not responsible for any injuries or damage that are the result of incorrect installation or usage. - Page 5 ENGLISH Children shall not carry out cleaning and user maintenance • of the appliance without supervision. General Safety This appliance is intended to be used in household and • similar applications such as: farm houses; staff kitchen areas in shops, offices and –...
-
Page 6: Safety Instructions
ENGLISH Safety instructions Installation mains plug fuse, use only a 13 A ASTA (BS 1362) fuse (UK and Ireland only). Warning! Only a qualified person must install this appliance. Water connection • Remove all the packaging. • Do not cause damage to the water hoses. •... -
Page 7: Product Description
ENGLISH complete. Some detergent may remain • To replace the internal lighting, contact on the dishes. the Authorised Service Centre. • Do not store items or apply pressure on Service the open door of the appliance. • The appliance can release hot steam if •... -
Page 8: Control Panel
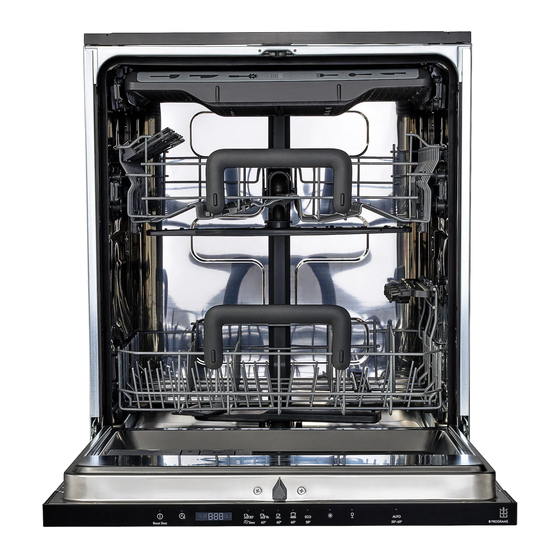
ENGLISH Ceiling spray arm Detergent dispenser Lower spray arm Lower basket Filters Upper spray arm Rating plate Upper basket Salt container Cutlery drawer Rinse aid dispenser Control panel On/Off button / Reset button Option buttons Delay start button AUTO programme button Display Programme buttons... -
Page 9: Programme Selection
ENGLISH Display A. Indicators B. Time indicator Indicators Indicator Description Rinse aid indicator. It is on when the rinse aid dispenser needs refilling. Re‐ fer to "Before first use". Salt indicator. It is on when the salt container needs refilling. Refer to "Be‐ fore first use". - Page 10 ENGLISH water consumption for crockery and changes in the wash temperature of the cutlery with normal soil. This is the selected programme and reduces it to 45 °C. standard programme for test institutes. This protects glassware in particular from damaging. Options AUTO You can adjust the programme selection to...
- Page 11 ENGLISH Programme Type of load Degree of soil Programme phases Options • Crockery • Normal • Prewash • • Cutlery • Lightly • Wash 50 °C • • Pots dried-on • Intermediate rinse • Pans • Final rinse 55 °C •...
-
Page 12: Basic Settings
ENGLISH Information for test institutes For any other questions regarding your dishwasher, refer to the service book To receive the necessary information for provided with your appliance. conducting performance tests (e.g. according to EN60436), send an email to: info.test@dishwasher-production.com In your request, include the product number code (PNC) from the rating plate. - Page 13 ENGLISH The order of the basic settings presented in your area. Your local water authority can the table is also the order of the settings in advise you on the hardness of the water in setting mode. your area. It is important to set the right level of the water softener to assure good The water softener washing results.
- Page 14 ENGLISH refilling rinse aid. However, for best drying Caution! If children, pets or performance, always use rinse aid. people with disabilities have access to the appliance, If standard detergent or multi-tablets deactivate AutoOpen. The without rinse aid are used, activate the automatic opening of the door notification to keep the rinse aid refill may pose a danger and expose...
-
Page 15: Before First Use
ENGLISH • DELAY and the countdown duration when A. Previous button the delay start begins. B. OK button • An alarm code when the appliance has a C. Next button malfunction. Use Previous and Next to switch between the basic settings and to change their value. When AutoOpen opens the door, Use OK to enter the selected setting and to TimeBeam is off. - Page 16 ENGLISH After starting the programme, the appliance recharges the resin in the water softener for up to 5 minutes. The washing phase starts only after this procedure is complete. The procedure is repeated periodically. The salt container Caution! Use rough salt designed for dishwashers only.
-
Page 17: Daily Use
ENGLISH To adjust the released quantity of rinse aid, turn the selector between position 1 (lowest quantity) and position 4 (highest quantity). Daily use 1. Open the water tap. 2. Press and hold until the appliance is activated. 3. Fill the salt container if it is empty. 4. - Page 18 ENGLISH When you use multi-tablets that contain salt By default, options must be and rinse aid, it is not necessary to fill the activated every time before you salt container and the rinse aid dispenser. start a programme. • Adjust the water softener to the lowest If the latest programme selection level.
-
Page 19: Hints And Tips
ENGLISH During the countdown, it is not possible to the energy consumption and the change the delay time and the programme programme duration. After closing the door, selection. the appliance continues from the point of interruption. When the countdown is complete, the programme starts. - Page 20 ENGLISH • You can use dishwasher detergent, rinse • Make sure that the water softener level is aid and salt separately or you can use the correct. If the level is too high, the multi-tablets (e.g. ''All in 1''). Follow the increased quantity of salt in the water instructions on the packaging.
-
Page 21: Care And Cleaning
ENGLISH • Do not wash in the appliance items made • Put light items in the upper basket. Make of wood, horn, aluminium, pewter and sure that the items do not move freely. copper as they could crack, warp, get •... - Page 22 ENGLISH • Do not use abrasive products, abrasive cleaning pads, sharp tools, strong chemicals, scourer or solvents. • To maintain the performance of your appliance, use a cleaning product designed specifically for dishwashers at least once every two months. Carefully follow the instructions on the packaging of the product.
- Page 23 ENGLISH Cleaning the filter of the inlet hose To remove the lower Wash the spray arm spray arm, pull it under running Close the water tap. Disconnect the hose. upwards. water. Use a thin Turn the fastener A pointed tool, e.g. a clockwise.
-
Page 24: Troubleshooting
ENGLISH The ceiling spray Release the stoppers Turn the mounting Wash the spray arm arm is placed on the on the sides of the element under running ceiling of the sliding rails of the counterclockwise water. Use a thin appliance. cutlery drawer and and pull the spray pointed tool, e.g. - Page 25 ENGLISH With some problems, the display shows an alarm code. Problem and alarm code Possible cause and solution You cannot activate the appli‐ • Make sure that the mains plug is connected to the mains ance. socket. • Make sure that there is no damaged fuse in the fuse box. The programme does not •...
- Page 26 ENGLISH Problem and alarm code Possible cause and solution The appliance door is difficult • The appliance is not levelled. Loosen or tighten the ad‐ to close. justable feet (if applicable). • Parts of the tableware are protruding from the baskets. The appliance door opens •...
- Page 27 ENGLISH The dishwashing and drying results are not satisfactory Problem Possible cause and solution Poor washing results. • Refer to "Daily use", "Hints and tips" and the basket loading leaflet. • Use more intensive washing programme. • Activate the Power Clean option to improve the washing results of a selected programme.
-
Page 28: Technical Information
ENGLISH Problem Possible cause and solution There are residues of deter‐ • The detergent tablet was stuck in the dispenser and gent in the dispenser at the therefore was not completely washed away by water. end of the programme. • Water cannot wash away the detergent from the dis‐ penser. -
Page 29: Environmental Concerns
TILLREDA - from the original date of faulty construction or material faults from purchase of your appliance at IKEA or from the date of purchase from IKEA or from the installation date with maximum limit of the installation date with maximum limit three months from the purchase date. - Page 30 • Repairs caused by installation which is by the customer faulty or not according to specification. What will IKEA do to correct the problem? • The use of the appliance in a non- domestic environment i.e. professional • IKEA appointed Service Provider will use.
- Page 31 • ask for clarifications on installation of the IKEA appliance in the dedicated IKEA kitchen furniture; • ask for clarification on functions of IKEA appliances. To ensure that we provide you with the best assistance, please read carefully the Assembly Instructions and/or the User Manual before contacting us.
- Page 32 UNITED ARAB EMIRATES & OMAN : رﻗﻢ ﻣﺠﺎﻧﻲ Toll free: 8 004 532 : ﻣﻮﻗﻊ اﻹﻧﺘﺮﻧﺖ Web: www.IKEA.com QATAR : رﻗﻢ ﻣﺠﺎﻧﻲ Toll free: 8 004 532 : ﻣﻮﻗﻊ اﻹﻧﺘﺮﻧﺖ Web: www.IKEA.qa : اﻟﺒﺮﻳﺪ اﻹﻟﻜﺘﺮوﻧﻲ e-mail: Ikea_qatar@alfuttaim.com EGYPT : اﻟﺨﻂ اﻟﺴﺎﺧﻦ...
- Page 36 21552 © Inter IKEA Systems B.V. 2021 AA-2189672-2...
Need help?
Do you have a question about the HYGIENISK 704.804.21 and is the answer not in the manual?
Questions and answers