Table of Contents
Advertisement
Advertisement
Table of Contents

Related Manuals for IKEA HYGIENISK


Summary of Contents for IKEA HYGIENISK
- Page 1 HYGIENISK...
- Page 2 ENGLISH Please refer to the chapter IKEA GUARANTEE for contact details of the after sales customer service centre.
- Page 3 ENGLISH...
-
Page 4: Table Of Contents
Troubleshooting Control panel Technical information Programme selection Environmental concerns Basic settings IKEA guarantee Before first use Daily use Subject to change without notice. Safety information Before the installation and use of the appliance, carefully read the supplied instructions. The manufacturer is not responsible for any injuries or damage that are the result of incorrect installation or usage. - Page 5 ENGLISH Children shall not carry out cleaning and user maintenance • of the appliance without supervision. General Safety This appliance is intended to be used in household and • similar applications such as: farm houses; staff kitchen areas in shops, offices and –...
-
Page 6: Safety Instructions
ENGLISH skin and eyes and keep children away from the dishwasher when the door is open. Check that the detergent receptacle is empty after • completion of the wash cycle. Safety instructions Installation • Connect the mains plug to the mains socket only at the end of the installation. -
Page 7: Product Description
ENGLISH household appliances, such as temperature, vibration, humidity, or are • Do not put flammable products or items intended to signal information about the that are wet with flammable products in, operational status of the appliance. They near or on the appliance. are not intended to be used in other •... -
Page 8: Control Panel
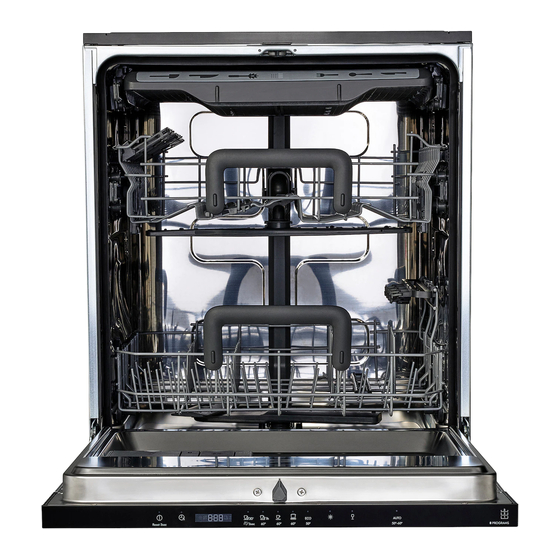
ENGLISH Ceiling spray arm Lower basket Lower spray arm Upper spray arm Filters Upper basket Rating plate Cutlery drawer Rinse aid dispenser Detergent dispenser Control panel On/Off button / Reset button Option buttons Delay start button AUTO programme button Display Programme buttons... -
Page 9: Programme Selection
ENGLISH Display A. Indicators B. Time indicator Indicators Indicator Description Rinse aid indicator. It is on when the rinse aid dispenser needs refilling. Re‐ fer to "Before first use". Machine Care indicator. It is on when the appliance needs internal cleaning with the Machine Care programme. - Page 10 ENGLISH Options changes in the wash temperature of the selected programme and reduces it to 45 °C. You can adjust the programme selection to This protects glassware in particular from your needs by activating options. damaging. Power Clean AUTO Power Clean improves the washing The AUTO program automatically adjusts the results of the selected programme.
- Page 11 ENGLISH Programme Type of load Degree of soil Programme phases Options • Crockery • Normal • Prewash • • Cutlery • Lightly • Wash 50 °C • • Pots dried-on • Intermediate rinse • Pans • Final rinse 55 °C •...
-
Page 12: Basic Settings
ENGLISH Information for test institutes For any other questions regarding your dishwasher, refer to the service book To receive the necessary information for provided with your appliance. conducting performance tests (e.g. according to EN60436), send an email to: info.test@dishwasher-production.com In your request, include the product number code (PNC) from the rating plate. - Page 13 ENGLISH When the rinse aid chamber is empty, the Caution! If children, pets or rinse aid indicator is turned on notifying to people with disabilities have refill rinse aid. If the drying results are access to the appliance, satisfactory while using multi-tablets only, it deactivate AutoOpen.
-
Page 14: Before First Use
ENGLISH • DELAY and the countdown duration when A. Previous button the delay start begins. B. OK button • An alarm code when the appliance has a C. Next button malfunction. Use Previous and Next to switch between the basic settings and to change their value. When AutoOpen opens the door, Use OK to enter the selected setting and to TimeBeam is off. -
Page 15: Daily Use
ENGLISH Filling the rinse aid dispenser To adjust the released quantity of rinse aid, turn the selector between position 1 (lowest quantity) and position 4 (highest quantity). Daily use 1. Open the water tap. 2. Press and hold until the appliance is activated. - Page 16 ENGLISH By default, options must be activated every time before you start a programme. If the latest programme selection is enabled, the saved options are activated automatically along with the programme. It is not possible to activate or When you use multi-tablets that contain deactivate options while a rinse aid, it is not necessary to fill the rinse programme is running.
-
Page 17: Hints And Tips
ENGLISH During the countdown, it is not possible to the energy consumption and the change the delay time and the programme programme duration. After closing the door, selection. the appliance continues from the point of interruption. When the countdown is complete, the programme starts. -
Page 18: Care And Cleaning
ENGLISH Using rinse aid and detergent • Do not wash in the appliance items made of wood, horn, aluminium, pewter and • Only use rinse aid and detergent copper as they could crack, warp, get designed for dishwasher. Other products discoloured or pitted. - Page 19 ENGLISH Machine Care External cleaning Machine Care is a programme designed to • Clean the appliance with a moist soft clean the appliance interior with optimal cloth. results. It removes limescale and grease • Only use neutral detergents. buildup. • Do not use abrasive products, abrasive cleaning pads or solvents.
- Page 20 ENGLISH Cleaning the lower spray arm We recommend to clean the lower spray arm regularly to prevent soil from clogging the holes. Clogged holes can cause unsatisfactory washing results. Put the flat filter (A) Reassemble the back in place. Make filters (B) and (C).
-
Page 21: Troubleshooting
ENGLISH The ceiling spray Release the stoppers Turn the mounting Wash the spray arm arm is placed on the on the sides of the element under running ceiling of the sliding rails of the counterclockwise water. Use a thin appliance. cutlery drawer and and pull the spray pointed tool, e.g. - Page 22 ENGLISH Troubleshooting Refer to the below table for information on possible problems. Warning! Improper repair of the With some problems, the display shows an appliance may pose a danger to alarm code. the safety of the user. Any repairs must be performed by qualified personnel.
- Page 23 ENGLISH Problem and alarm code Possible cause and solution Small leak from the appli‐ • The appliance is not levelled. Loosen or tighten the ad‐ ance door. justable feet (if applicable). • The appliance door is not centred on the tub. Adjust the rear foot (if applicable).
- Page 24 ENGLISH The dishwashing and drying results are not satisfactory Problem Possible cause and solution Poor washing results. • Refer to "Daily use", "Hints and tips" and the basket loading leaflet. • Use more intensive washing programme. • Activate the Power Clean option to improve the washing results of a selected programme.
-
Page 25: Technical Information
ENGLISH Problem Possible cause and solution There are residues of deter‐ • The detergent tablet was stuck in the dispenser and gent in the dispenser at the therefore was not completely washed away by water. end of the programme. • Water cannot wash away the detergent from the dis‐ penser. -
Page 26: Environmental Concerns
This guarantee is valid for 5 years from the original date of purchase of your appliance IKEA Pty Ltd at IKEA Pty Ltd, ABN 84006270757 or at IKEA Service Office Cebas Pty Ltd, ABN 15 009 156 003 (Both L1 Clock Tower, 630 Princes Highway Trading as IKEA). - Page 27 Australia. original parts have been used. What will IKEA do to correct the problem? • Repairs caused by installation which is faulty or not according to specification. IKEA appointed service provider will examine •...
- Page 28 You are also entitled to have the goods repaired or replaced if the goods fail to be of The IKEA after sales customer service centre acceptable quality and the failure does not will assist you on the phone with basic amount to a major failure.
- Page 32 21552 © Inter IKEA Systems B.V. 2021 AA-2189625-2...
Need help?
Do you have a question about the HYGIENISK and is the answer not in the manual?
Questions and answers