Parkside PLBS 30 B2 Operating And Safety Instructions Manual
Soldering iron set
Hide thumbs
Also See for PLBS 30 B2:
- Operation and safety notes (87 pages) ,
- Operating and safety instructions manual (20 pages) ,
- Operation and safety notes (75 pages)
Advertisement
Quick Links
Advertisement

Related Manuals for Parkside PLBS 30 B2


Summary of Contents for Parkside PLBS 30 B2
- Page 1 SOLDERING IRON SET PLBS 30 B2 Operating and safety instructions IAN 290363...
- Page 2 ✔ ✘...
-
Page 3: Table Of Contents
1. Introduction ............................2. Technical specifications ........................ Contents ........................................Features ........................................Technical specifications for mod. no. PLBS 30 B2 ....................Scope of use ......................................3. Before use ............................Assembling the soldering stand (fig. A/B) ........................Cleaning sponge and adjustable workpiece holders .................. -
Page 4: Introduction
1. Introduction Congratulations on the purchase of your new product. You have chosen a high quality product with this purchase. These operating instructions form an integral part of this product. They contain important instructions on safety, use and disposal of the product. Please familiarise yourself with all operating and safety instructions before using the product. - Page 5 Do not expose the soldering iron to moisture or rain. - We recommend that you work in the vicinity of the mains socket so that you can quickly pull the plug from the socket in the event of an emergency. Make sure that the tip is correctly fitted before heating the soldering iron.
-
Page 6: Technical Specifications
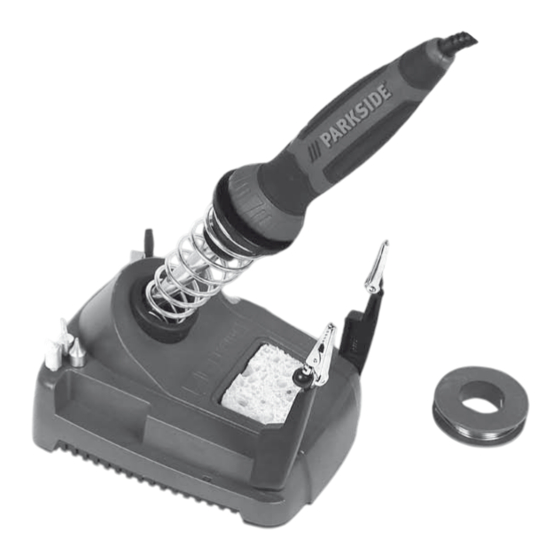
Tapered burning tip Mains cable with BS plug Solder Soldering iron holder Tip holder Technical specifications for mod. no. PLBS 30 B2 Rated voltage 230 V ~ / 50 Hz Rated power 30 W Solder Ø max. 2 mm Scope of use The soldering iron is designed for soft soldering of electrical wires and circuit boards as well as use as a woodburning pen. -
Page 7: Before Use
3. Before use Assembling the soldering stand (fig. A/B) • Fit the soldering iron holder (15) to the soldering stand (1). • After sliding the soldering iron holder (15) as far as it will go into the hole (1), turn it clockwise to fix it in place. -
Page 8: Using The Soldering Iron
4. Using the soldering iron Switching on and off • Connect the soldering iron to the mains to switch it on and to heat it up. • Disconnect the soldering iron from the mains to switch it off and to cool it down. CAUTION DANGER OF BURNS! The soldering iron, the soldering tip and the soldering iron holder remain hot for some time after disconnection from the mains! -
Page 9: Woodburning Pen
Woodburning pen • Firstly, make a sketch of the desired pattern on your workpiece with a pencil or alternatively apply a ready-made template to the workpiece. • Types of wood with smooth surfaces are particularly suitable for marking. • When marking wood with a rough surface, be aware that it can be difficult to guide the tip along the line required. -
Page 10: Troubleshooting
Troubleshooting Fault Possible cause Troubleshooting Soldering iron does not No power supply. Check that the mains supply heat up. (socket) functions correctly. Ask a competent person for advice if necessary. Mains cable or Have the mains cable replaced plug damaged. by the manufacturer or the manufacturer's representative. -
Page 11: Warranty
6. Warranty Warranty provided by Walter Werkzeuge Salzburg GmbH Dear customer, This appliance comes with a 3 year warranty from the date of purchase. In case of defects in the product you may be entitled to legal claims against the seller of the product. These legal claims are not restricted by the following warranty. -
Page 12: Service
Processing a warranty case To ensure quick processing of your issue, please follow the below instructions: • Please be ready with the sales receipt and the product number (e.g. IAN 12345) as proof or purchase for all queries. • You can refer the product number from the type label, , an engraving, on the cover sheet of your operating instructions (below left) or as sticker on the back or lower side. - Page 13 Walter Werkzeuge Salzburg GmbH Gewerbeparkstraße 9 5081 Anif, Austria V. 1.0 Last Information Update: 05/2018 IAN 290363...
Need help?
Do you have a question about the PLBS 30 B2 and is the answer not in the manual?
Questions and answers