
Related Manuals for Blizzard Lighting LOOP


Summary of Contents for Blizzard Lighting LOOP
- Page 1 Blizzard Lighting, LLC www.blizzardlighting.com Waukesha, WI USA Copyright (c) 2017...
-
Page 2: Table Of Contents
Motor/Factory Reset Runtime Info DMX Values In-Depth LED Identification 17 5. Appendix A Quick DMX Lesson Keeping Your LOOP™ As Good As New Returns (Gasp!) Shipping Issues Tech Specs Dimensions Page 2 LOOP™ User Manual - Rev. A (c) 2017 Blizzard Lighting, LLC... -
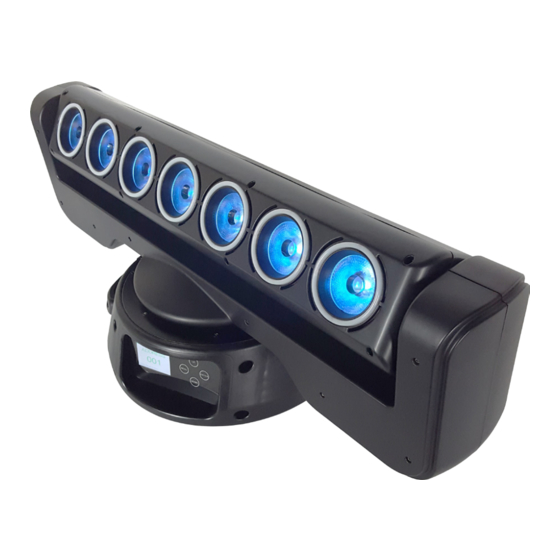
Page 3: Loop™ Led Moving Head
Congratulations on your purchase of LOOP™, the LED moving head packed with tons of beamy, loopy goodness! Now that you’ve got your LOOP™ (or hopefully LOOPs), you should carefully unpack the box and check the contents to ensure that all parts are pres- ent and in good condition. -
Page 4: Safety Instructions (Don't Stick Your Hand In The Toaster!)
Caution! There are no user serviceable parts inside the unit. Do not open the housing or attempt any repairs yourself. In the unlikely event your unit may require service, please open a support ticket at www. blizzardlighting.com/support. Page 4 LOOP™ User Manual - Rev. A (c) 2017 Blizzard Lighting, LLC... -
Page 5: Meet Loop
Ring 1 - Red Ring 1 - Green Ring 1 - Blue 53-67 Rings 2 thru 6 (R/G/B) Ring 7 - Red Ring 7 - Green Ring 7 - Blue Page 5 LOOP™ User Manual - Rev. A (c) 2017 Blizzard Lighting, LLC... -
Page 6: The Loop™ Pin-Up Picture
Carry TFT Color Handle Display Figure 2: The Rear Connections USB 9V Power 3-Pin RJ45 Input Input DMX In Fuse Power 3-Pin RJ45 Holder Output DMX Out Page 6 LOOP™ User Manual - Rev. A (c) 2017 Blizzard Lighting, LLC... -
Page 7: Setup
Reattach the fuse holder, and then reconnect power. Connecting A Bunch of LOOP™ Fixtures You will need a serial data link to run light shows using a DMX-512 controller or to run shows on two or more fixtures set to sync in mas- ter/slave operating mode. -
Page 8: Cable Connectors
Step 3: Connect other fixtures in the chain from output to input as above. Place a DMX terminator on the output of the final fixture to ensure best communication. Page 8 LOOP™ User Manual - Rev. A (c) 2017 Blizzard Lighting, LLC... -
Page 9: Installation
● Mount the fixture using suitable type clamps. The clamp should be rated to hold at least 10x the fixture’s weight to ensure structural stability. Do not mount to surfaces with unknown strength, and ensure properly “rated” rigging is used when mounting fixtures overhead. WARNING: With the exception of when the fixture is positioned on the floor, a safety cable must always be used. It must be securely fixed to the support structure of the projector and then connected to the fix- ing point at the center of the base. Page 9 LOOP™ User Manual - Rev. A (c) 2017 Blizzard Lighting, LLC... -
Page 10: Operating Adjustments
Press the <ENTER> button to select the menu function currently dis- played, or to enable a menu option. To return to the previous option or menu without changing the value, press the <MENU> button. Page 10 LOOP™ User Manual - Rev. A (c) 2017 Blizzard Lighting, LLC... -
Page 11: Control Panel Menu Structure
Ring LED Motor Rest YES/NO Factory Reset YES/NO Time Info Power on xxx (hours) Total Life Hours xxx (hours) Last Run Hours xxx (hours) Software Version Vx.x Page 11 LOOP™ User Manual - Rev. A (c) 2017 Blizzard Lighting, LLC... -
Page 12: Dmx / Art-Net Modes
1.) Navigate the main menu until you reach Run Mode, press <ENTER>. 2.) Use the <UP/DOWN> buttons to highlight Auto Program 1 or 2. 3.) Press the <ENTER> button to confirm your selection. Page 12 LOOP™ User Manual - Rev. A (c) 2017 Blizzard Lighting, LLC... -
Page 13: Sound Active Mode
3.) Press the <ENTER> button to confirm. Runtime Info 1.) Navigate to Utilities <ENTER>, then Time Info <ENTER>. 2.) Here you can view current Power On time, Total Life, and Last Run hours. Page 13 LOOP™ User Manual - Rev. A (c) 2017 Blizzard Lighting, LLC... -
Page 14: Dmx Values In-Depth
070 <-> 074 Orange 075 <-> 079 Straw 080 <-> 084 Pale Lavender 085 <-> 089 Pink 090 <-> 094 095 <-> 099 Green 100 <-> 104 Blue Page 14 LOOP™ User Manual - Rev. A (c) 2017 Blizzard Lighting, LLC... - Page 15 000 <-> 255 LED 4 Green Intensity (0% - 100%) 000 <-> 255 LED 4 Blue Intensity (0% - 100%) 000 <-> 255 LED 4 White Intensity (0% - 100%) Page 15 LOOP™ User Manual - Rev. A (c) 2017 Blizzard Lighting, LLC...
- Page 16 Color Ring Chase Speed 000 <-> 125 Backward (fast <--> slow) 126 <-> 130 Stop 131 <-> 255 Forward (slow <--> fast) 000 <-> 255 Color Ring Chase Fade Page 16 LOOP™ User Manual - Rev. A (c) 2017 Blizzard Lighting, LLC...
-
Page 17: Led Identification
000 <-> 255 Color Ring 7 Green 000 <-> 255 Color Ring 7 Blue LED Identification 1.) The drawing below illustrates each LEDs assigned ID number for pixel mapping: Page 17 LOOP™ User Manual - Rev. A (c) 2017 Blizzard Lighting, LLC... -
Page 18: Appendix
In summary, since its design and evolution in the 1980’s DMX has become the standard for lighting control. It is flexible, robust, and scalable, and its ability to control everything from dimmer packs to moving lights to foggers to lasers makes it an indispensable tool for any lighting designer or lighting performer. Page 18 LOOP™ User Manual - Rev. A (c) 2017 Blizzard Lighting, LLC... -
Page 19: Keeping Your Loop™ As Good As New
Keeping Your LOOP™ As Good As New The fixture you’ve received is a rugged, tough piece of pro lighting equip- ment, and as long as you take care of it, it will take care of you. That said, like anything, you’ll need to take care of it if you want it to operate as designed. -
Page 20: Tech Specs
2-year limited warranty, does not cover malfunction Warranty caused by damage to LEDs. DISCLAIMER: The power connectors fitted to the fixture and fixture cord are designed for compatibility with products manufactured by Neutrik AG, Neutrik USA and their related entities, however they are not manufactured by, affiliated with or endorsed by Neutrik AG, Neutrik USA, or any related entity. Neutrik® and power- CON® are registered trademarks of Neutrik AG. Page 20 LOOP™ User Manual - Rev. A (c) 2017 Blizzard Lighting, LLC... - Page 21 Dimensional Drawings 4.4" (112 mm) 4.6" (117 mm) 29.2" (742 mm) 24.8" (629.3 mm) 12.6" (319.6 mm) Page 21 LOOP™ User Manual - Rev. A (c) 2017 Blizzard Lighting, LLC...
- Page 22 This page is intentionally left blank. Page 22 LOOP™ User Manual - Rev. A (c) 2017 Blizzard Lighting, LLC...
- Page 23 This page is intentionally left blank. Page 23 LOOP™ User Manual - Rev. A (c) 2017 Blizzard Lighting, LLC...
- Page 24 Enjoy your product! Our sincerest thanks for your purchase! --The team @ Blizzard Lighting...
Need help?
Do you have a question about the LOOP and is the answer not in the manual?
Questions and answers