Miele CS 1312 Operating And Installation Instructions
Open barbeque grill
Hide thumbs
Also See for CS 1312:
- Operating and installation instructions (48 pages) ,
- Operating and installation instructions (48 pages) ,
- Operating and installation instructions (40 pages)
Table of Contents
Advertisement
Quick Links
Advertisement
Table of Contents

Related Manuals for Miele CS 1312


Summary of Contents for Miele CS 1312
- Page 1 Operating and installation instructions Open barbeque grill CS 1312 CS 1322 en - GB To avoid the risk of accidents or damage to the appliance it is essential to read these instructions before it is installed and used for the first time.
-
Page 2: Table Of Contents
CS 1312 ........ - Page 3 CS 1312 ........
-
Page 4: Guide To The Appliance
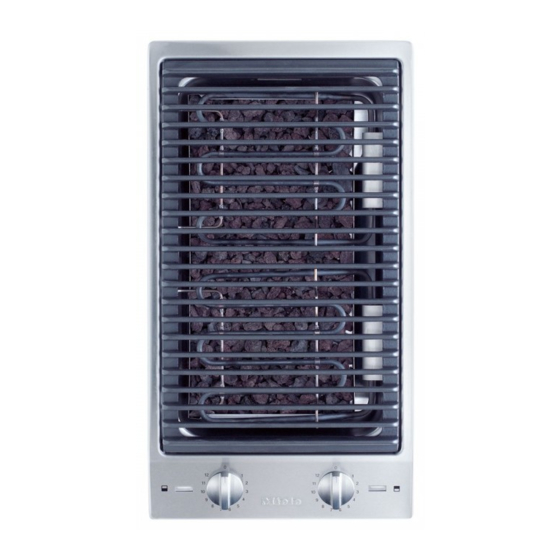
Guide to the appliance CS 1312 a Grill rack Controls for the heating elements: b Front heating element h Front c Rear heating element i Rear d Lava rock container e Drain tap Display f Symbols to indicate which heating element the control is for... - Page 5 Guide to the appliance CS 1322 a Grill racks Controls for the heating elements: b Front heating element h Front c Rear heating element i Rear d Lava rock container e Drain tap f Symbols to indicate which heating element the control is for g Display Display j In-operation indicator...
-
Page 6: Accessories Supplied
Guide to the appliance Accessories supplied Additional accessories can be ordered at extra cost. See "Optional accessories" for further details on ordering. Lava rocks... -
Page 7: Warning And Safety Instructions
Warning and Safety instructions Correct application This appliance complies with all This appliance is intended for current local and national safety domestic use only and may only be requirements. Improper use can, used as described in these instructions. however, present a risk of both Any other usage is at the owner's risk personal injury and material and could be dangerous. - Page 8 Warning and Safety instructions Safety with children Ensure that children cannot reach the drain tap where hot liquid could be This appliance is only intended for drained out. use by adults who have read these instructions. It is not a toy! To avoid the Packaging, e.g.
- Page 9 H 05 V V-F The manufacturer cannot be held liable (pvc insulated), available from Miele. for the consequences of an inadequate Never open the housing of the earthing system (e.g. electric shock).
- Page 10 Faulty components must only be the heating element in the raised replaced by genuine Miele original position. Due to the high temperatures spare parts. The manufacturer can only radiated, objects near the appliance guarantee the safety of the appliance could catch fire.
- Page 11 Warning and Safety instructions Do not use the appliance as a Clean the lava rocks regularly and resting place for anything else. The replace them when necessary. Rocks article could melt or catch fire if which are saturated catch fire easily. residual heat is still present or if the The grill trough and the lava rock appliance is switched on by mistake.
-
Page 12: Caring For The Environment
Caring for the environment Disposal of the packing Disposal of your old appliance material Electrical and electronic appliances often contain materials which, if The transport and protective packing handled or disposed of incorrectly, has been selected from materials which could be potentially hazardous to are environmentally friendly for human health and to the environment. -
Page 13: Before Using For The First Time
Before using for the first time Please stick the extra data plate for the appliance supplied with this documentation in the space provided in the "After sales service" section of this booklet. Cleaning for the first time ^ Remove any protective foil and adhesive labels. -
Page 14: Operation
Operation Grill chart The times given in the table serve as a guide, based on a pre-heated grill at settings 9 to 12. The grilling time required will depend on the type of food, its texture and thickness as well as personal taste. Food Time in minutes Meat and sausages... - Page 15 Operation Food Time in minutes Vegetables Aubergines 6 - 8 Jacket potatoes, pre-cooked 10 - 20 Vegetarian kebabs 5 - 6 Corn on the cob, pre-cooked 5 - 8 Peppers, cut into strips 2 - 3 Tomato halves 2 - 4 Fruit Pineapple slices 2 - 3...
-
Page 16: To Prepare The Grill
3.0 litres of water (CS 1312) approx. 4.5 litres of water (CS 1322). – when grilling with lava rocks with approx. 2.5 litres of water (CS 1312) approx. -
Page 17: Grilling
Operation Grilling Useful tips – Pat dry wet food with kitchen paper When grilling, keep an eye on the to absorb surplus moisture and avoid level of water in the trough. If spitting. necessary, add more water. – To prevent meat drying out, do not When grilling or keeping food warm, season with salt until after it has do not use grill pans, griddles,... -
Page 18: Safety Features
Safety features Overheating protection Safety switch-out A safety cut-out automatically switches A safety cut-out ensures that the grill the appliance off if the water level elements only heat up when they are drops too low. lying horzontally and not when they are raised up. -
Page 19: Cleaning And Care
Cleaning and care To avoid damaging the stainless Under no circumstances use a steel surfaces of your appliance, do steam cleaning appliance to clean not use: this appliance. The steam could – cleaning agents containing soda, attack the electrical components alkalines, ammonia, acids or and cause a short circuit. - Page 20 Cleaning and care Stainless steel Racks and lava rock container A non-abrasive stainless steel cleaner Wash the racks and lava rock container is suitable for cleaning stainless steel after every use in hot water and a little surfaces. washing-up liquid. Soak to remove To help prevent resoiling, we heavy soiling, and then scrub clean recommend a stainles steel conditioner...
- Page 21 Cleaning and care Grill trough Ensure that the underside of the grill ^ After grilling, allow the water in the is always easily accessible for trough to cool down before draining draining water. Always wait until the water has cooled down before ^ Place a container large enough to draining to avoid the danger of take the contents of the trough under...
-
Page 22: Problem Solving Guide
Proceed as described in "Overheating protection". dangerous. The manufacturer cannot be held liable for – the mains fuse has tripped. If it has, unauthorised work. contact a qualified electrician or the Miele Service Department. -
Page 23: Optional Accessories
Miele (see back cover for contact details) or from your Miele dealer. Griddle CSGP 1300 Cast-iron griddle to place on top of the CS 1312 grill, with a flat and a fluted side Griddle CSGP 1400 Cast-iron griddle to place on top of the CS 1322 grill,... - Page 24 Optional accessories Cleaning and care products Ceramic and stainless steel hob cleaner 250 ml Removes heavy soiling, limescale deposits and light discolouration Stainless steel conditioning agent 250 ml Removes water marks, flecks and finger prints. Helps keep the appliance looking good for longer. E-Cloth (microfibre cloth) Removes finger marks and light soiling.
-
Page 25: Safety Instructions For Installation
Safety instructions for installation Observe carefully the safety Fit the wall units and extractor hood distances given on the following pages. before fitting the barbecue grill to Do not use any sealant except avoid damaging the surface. where expressly instructed to do so. The seal underneath the appliance The veneer or laminate coatings of provides a sufficient seal for the... - Page 26 Safety instructions for installation Safety distance above the grill When two or more appliances are installed together below a cooker hood, e.g. a grill and an induction hob combiset, which have different safety distances given in the installation instructions, you should select the greater distance of the two.
- Page 27 Not recommended CS 1134 CS 1326 CS 1411 100 mm for CS 1012 CS 1013 150 mm for CS 1421 CS 1312 CS 1322 200 mm for CS 1034 250 mm for CS 1011 CS 1018 CS 1021 Not allowed...
- Page 28 Safety instructions for installation Safety distance when installing the appliance near a wall with additional niche cladding There must be a minimum distance of 50 mm between the niche cladding and the worktop cut-out. This distance is only necessary for niche cladding made of wood or any other combustible material.
-
Page 29: Appliance And Building-In Dimensions
Appliance and building-in dimensions CS 1312 a Fixing brackets b Front c Building-in depth d Mains connection box with mains connection cable, L = 2,000 mm e Drain tap... - Page 30 Appliance and building-in dimensions CS 1322 a Fixing brackets b Front c Building-in depth d Mains connection box with mains connection cable, L = 2,000 mm e Drain tap...
-
Page 31: Preparing The Worktop
Preparing the worktop ^ Make the worktop cut-out for one or more appliances as applicable. Remember to maintain a minimum safety distance from the back wall, as well as from any tall unit or side wall to the right or left of the appliance(s). -
Page 32: Installation Of Several Appliances
Installation of several appliances When installing two or more appliances next to each other a spacer bar b must be used between each one. See "Fitting the spacer bars and support brackets". Worktop cut-out Worktop cut-out - two appliances - three appliances When installing three appliances the When installing two appliances, the width of the cut-out required (D) is... - Page 33 Installation of several appliances Worktop cut-out calculation example for three appliances Appliance width Appliance Appliance width Worktop less 8 width less 8 cut-out 1032 1424 1124 1516 1136 1320 1136 All dimensions are given in mm...
- Page 34 Installation of several appliances a Spring clamps b Spacer bars c Gap between spacer bar and worktop The illustration shows a worktop cut-out with spring clamps a and spacer bars b for 3 appliances. An additional spacer bar is required for each additional appliance. The position for securing each additional spacer bar will depend on the width of appliance B (288 mm / 380 mm / 576 mm).
-
Page 35: Fixing The Spring Clamps And Spacer Bars
Fixing the spring clamps and spacer bars Wooden worktops Granite and marble worktops The screws are not required for 2 5 - 3 0 granite or marble worktops. 2 5 - 3 0 ^ Position the spring clamps supplied a and spacer bars b on the top edge of the cut-out in the positions ^ Position and secure the spring marked. - Page 36 Fixing the spring clamps and spacer bars ^ Coat the side edges and the lower edges of the spring clamps with silicone. ^ Then fill gap d between the spacer bars and the worktop with silicone from the tube supplied.
-
Page 37: Installing The Appliance
Installing the appliance ^ Feed the connection cable down through the cut-out. ^ Then drop the front edge of the appliance into the cut-out. ^ Using both hands, press down evenly on the sides of the hob until it clicks into position. When doing this make sure that the seal under the hob sits flush with the worktop on all sides. -
Page 38: General Installation Tips
General installation tips Do not use sealant between the frame of the top part of the hob and the worktop. This could cause difficulties if the hob ever needs to be taken out for servicing and possibly result in damage to the frame or the worktop. The sealing strip under the edge of the top part of the hob provides a sufficient seal for the worktop. -
Page 39: Electrical Connection
H 05 V V-F be provided for all poles. (pvc insulated), available from Miele. For extra safety it is advisable to install a suitable residual current device Installation, repairs and other work (RCD). - Page 40 Electrical connection Important The electrical safety of this appliance can only be guaranteed when continuity is complete between the appliance and an effective earthing system, which complies with local and national regulations. It is most important that this basic safety requirement is present and tested regularly and if there is any doubt the electrical wiring in the home should be inspected by a...
-
Page 41: After Sales Service, Data Plate
Please note that telephone calls may be monitored and recorded to improve our service. When contacting Miele, please quote the model and serial number of your appliance which are given on the data plate. Space in which to stick the extra data plate supplied with the appliance. Ensure... - Page 44 Alteration rights reserved/ 4807 M.-Nr. 07 180 420 / 00...
Need help?
Do you have a question about the CS 1312 and is the answer not in the manual?
Questions and answers