Miele TepanYaki CS 1327 Operating And Installation Instructions
Hide thumbs
Also See for TepanYaki CS 1327:
- Operating and installation instructions (40 pages) ,
- Operating and installation manual (36 pages) ,
- Operating and installation instructions (36 pages)

Related Manuals for Miele TepanYaki CS 1327


Summary of Contents for Miele TepanYaki CS 1327
- Page 1 Operating and Installation Instructions TepanYaki CS 1327 en - CA To prevent accidents and machine damage, read the Operating Manual before installation or use. M.-Nr. 09 054 630...
-
Page 3: Table Of Contents
Contents Warning and safety instructions ........4 Guide to the Tepan Yaki . -
Page 4: Warning And Safety Instructions
This will All other types of use are not permitted. prevent injury and appliance Miele cannot be held liable for damage damage. resulting from incorrect or improper use. Keep these operating instructions in... - Page 5 In case of doubt, have the electrical the appliance until it has cooled down. system checked by a qualified Danger of burns. electrician. Miele cannot be held liable Keep the spaces above and behind for damages resulting from an the barbecue clear of any items that inadequate grounding system (for could draw the interest of a child.
- Page 6 Installation, maintenance or repair work (type H 05 VV-F, PVC-insulated), which by unqualified persons could pose is available from Miele or from serious risks to the user for which Miele Technical Service. will not be held liable. Do not connect the appliance to the...
- Page 7 Do not use the appliance as a storage surface. Miele cannot be held liable for If it is accidentally turned on or there is damage caused by failure to comply residual heat, metallic objects can heat with these safety instructions and up and cause burns.
-
Page 8: Guide To The Tepan Yaki
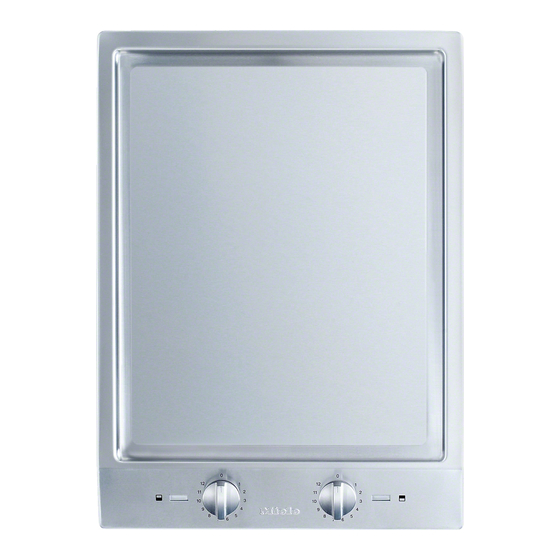
Guide to the Tepan Yaki a Rear cooking zone Display b Front cooking zone c Cooking zone indicators d Display g On/Off indicator e Control knob, rear cooking zone h Temperature control light f Control knob, front cooking zone i "Residual Heat" indicator Standard accessories 2 stainless steel spatulas... -
Page 9: Before Using For The First Time
Before using for the first time Attach the data plate found in the documents for your appliance in the locations indicated in "Data Plate." Initial cleaning ^ Remove any protective foil. ^ Clean the appliance with hot water and some dish liquid. Then dry all parts with a soft cloth. -
Page 10: Use
Turning On/Off The Tepan Yaki is divided into two heating areas, which can be used and Do not leave the appliance adjusted separately. For large quantities, you can use the entire unattended while in use. surface for cooking. For smaller To turn the Tepan Yaki on, turn the quantities, you can, for example, cook knob to the clockwise. -
Page 11: Settings
Settings Cooking Setting Range Keep cooked foods warm 1 - 2 Sauté fruit, e. g. diced apples, halved peaches, 2 - 4 sliced bananas, etc. Sauté vegetables, e. g. sliced mushrooms, onions, 5 - 7 peppers, etc. Gently fry fish 7 - 9 Quickly fry meat, firm fish, eggs, pancakes, 9 - 11... -
Page 12: Grilling Tips
Grilling tips Before each use, wipe the griddle with a damp cloth, to remove dust or other residue. – It is best to pre-heat the appliance for 8-10 minutes, at the preferred cooking temperature. For power settings 9 to 12, pre-heat at level 12. –... -
Page 13: Cleaning And Care
Cleaning and care To avoid damage to the surface do Do not use a steam cleaner to not use any clean the appliance. Steam could – cleaning agents containing soda, penetrate electrical components and ammonia, alkaline, acid or chloride, cause a short circuit. –... - Page 14 For stainless steel cleaners, follow panel the instructions on the package. Clean the stainless steel surround / control panel with a few drops of Miele Tepan plate ceramic and stainless steel cleaner Promptly remove any heavy soiling with (see "Optional accessories") and a soft, a spatula.
-
Page 15: Frequently Asked Questions
The manufacturer cannot be held responsible for unauthorized work. What if the appliance does not heat up after it is turned on? Possible fault Solution The circuit breaker has tripped. Check whether a fuse is blown. If the problem persists contact Miele. -
Page 16: Technical Service, Data Plate
Technical Service, Data Plate In the event of a fault which you cannot easily fix yourself, please contact the Miele Technical Service Department at the address on the back of this booklet. When contacting Technical Service please quote the serial number and model of the appliance. -
Page 17: Installation Instructions
Installation Instructions IMPORTANT: SAVE FOR THE LOCAL ELECTRICAL INSPECTOR'S USE... -
Page 18: Safety Instructions For Installation
Safety instructions for installation To avoid damage to the appliance, it should not be installed until the upper cabinet and exhaust hood have already been mounted. The countertop veneers must be affixed with heat-resistant glue (100°C), so that they do not become deformed or detached. - Page 19 Safety instructions for installation Upper clearance If there are several appliances beneath the exhaust hood, e.g., a gas appliance and an electric appliance, and there are different clearance distances listed in the Operating and installation instructions, always choose the greatest distance. The minimum clearance between the appliance and an exhaust hood above will be listed by the hood manufacturer.
- Page 20 Safety instructions for installation Safety distances to the sides of the appliance The appliance should only be installed as shown in the illustrations, while 2 " (50 mm) maintaining the required safety distances shown. Do not install the appliance between two tall cabinets, this is a fire hazard.
-
Page 21: Installation
Installation Safety distance from the wall covering If a wall covering is installed, a minimum safety distance must be maintained between the countertop cut-out and the covering, since high temperatures can damage these materials. If the covering is made of a combustible material (such as wood), the distance between the countertop cut-out and the wall covering must be a minimum of 2"... - Page 22 Installation Installation dimensions a Spring clips b Appliance front c Installation height d Power supply cable (encased in flexible metal conduit), L = 78 " (2000 mm) e Data plate...
-
Page 23: Cut Out
Installation Cut out If during installation the seal around ^ Make the worktop cut-out for one or the frame does not sit flush with the more appliances as applicable. countertop in the corners, the corner Remember to maintain a minimum radius, maximum "... -
Page 24: Installation Of Multiple Appliances
Installation Installation of multiple appliances When installing more than one combiset appliance, a support bar b must be installed between the appliances. Countertop cut-out Countertop cut-out two appliances three appliances For the installation of three appliances For the installation of two appliances the width of the countertop cut-out D is the width of the countertop cut-out D is the sum of A and B and C. - Page 25 Installation Sample calculations for a countertop cut-out for three appliances appliance width appliance width appliance width Countertop minus " (8 mm) minus " (8 mm) cut-out 11" " 11" " (280 mm) (280 mm) (848 mm) (288 mm) 11" 15" "...
- Page 26 Installation a Spring clips b Support bars c Space between support bar and countertop d Cover strip The illustration represents the attachment of spring clips a and support bars b for 3 appliances. An additional support bar is required for each additional appliance. The position for attachment of an additional support bar depends on the width of the appliance B (288 mm / 380 mm / 576 mm).
-
Page 27: Attaching The Spring Clips And Support Bars
Attaching the spring clips and support bars Wood countertop ^ Place the supplied spring clips a and the support bars b at the marked positions on the upper edge of the cut-out. ^ Use the supplied 3.5 x 25 mm screws to attach the spring clips and support bars. - Page 28 Attaching the spring clips and support bars Granite countertop Screws are not needed for stone countertops. ^ Coat the side and bottom edges of the spring clips a and support bars b with silicone. ^ Fill the space e between the support bars and the countertop with silicone.
-
Page 29: Installing The Appliance(S)
Installing the appliance(s) ^ Feed the appliance connection cable ^ Place the front edge of the next down through the worktop cut-out. appliance into the countertop cut-out. ^ Place the front edge of the appliance ^ Connect the appliance(s) to the into the countertop cut-out. -
Page 30: General Installation Tips
General installation tips Seal between appliance and Tiled surfaces countertop The grouting a and the shaded area The sealing strip under the edge of the top part of the appliance provides an below the appliance frame must be smooth and flat, so that the frame will adequate seal with the countertop. -
Page 31: Electrical Connection
Electrical connection Power supply CAUTION: Before installation or ^ Make sure your electrical supply servicing, disconnect the power matches the data plate. supply by either removing the fuse, shutting off the main power supply The combiset is equipped with a or manually "tripping"... -
Page 32: Help Protect Our Environment
Help protect our environment Disposal of packing materials Disposal of an old appliance The cardboard box and packing Old appliances contain materials that materials are biodegradable and can be recycled. Please contact your recyclable. Please recycle. local recycling authority about the possibility of recycling these materials. - Page 36 Alteration rights reserved / 4811 M.-Nr. 09 054 630 / 00 For the most updated manual, please visit the Miele web site.
Need help?
Do you have a question about the TepanYaki CS 1327 and is the answer not in the manual?
Questions and answers