European Home Electric Modern Compton 1000 User Manual
Hide thumbs
Also See for Electric Modern Compton 1000:
- Instruction manual (26 pages) ,
- Instruction manual (26 pages)
Table of Contents
Advertisement
Quick Links
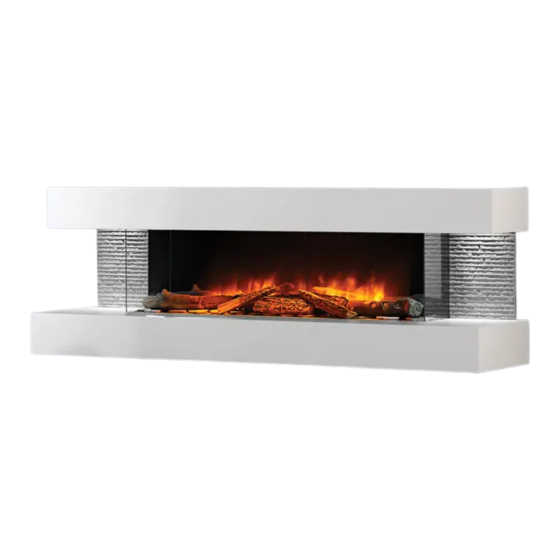
SUITES MODELS: Compton2 / Compton 1000
IMPORTANT SAFETY INFORMATION:
Always read this manual first before attempting to install or use this fireplace. For your safety, always comply with all warnings and safety instructions contained in this
manual to prevent personal injury or property damage.
Please note: This product is only suitable for well insulated spaces.
Esuites-170420
UL E54813, UL E228455
August 2018
UL E140692 & UL E54813
Advertisement
Table of Contents

Subscribe to Our Youtube Channel
Related Manuals for European Home Electric Modern Compton 1000


Summary of Contents for European Home Electric Modern Compton 1000
- Page 1 SUITES MODELS: Compton2 / Compton 1000 IMPORTANT SAFETY INFORMATION: Always read this manual first before attempting to install or use this fireplace. For your safety, always comply with all warnings and safety instructions contained in this manual to prevent personal injury or property damage. Please note: This product is only suitable for well insulated spaces.
-
Page 2: Important Instructions
IMPORTANT INSTRUCTIONS: When using electrical appliances, basic precautions should always be followed to reduce the risk of fire, electric shock, and injury to persons, including the following: ① Read all instructions before using this electric fireplace. ② This fireplace is hot when in use. To avoid burns, do not let bare skin touch hot surfaces. The trim around the heater outlet becomes hot during heater operation. DANGER: High temperatures may be generated under certain abnormal conditions. -
Page 3: Installation Requirements
INSTALLATION REQUIREMENTS: Review and consider all of the following conditions before installation: Ensure installation does not allow the electric fireplace to be in direct contact with building vapor barrier or insulation and meets all local building code. A 15 Amp, 120 Volt circuit is required. A dedicated circuit is preferred but not essential in all cases. A dedicated circuit will be required if, after installation, the circuit breaker trips or fuse blows on a regular basis when the heater is operating. -
Page 4: Installation Method
INSTALLATION METHOD: This product has been designed to be installed into a plaster board, drywalled, or existing masonry chimney breast. Please seek advice from a professional, with reference to the structural integrity of the installation site. The product should never be sealed into a opening with the use of silicones or adhesives as this can also alter the airflow and hinder any further servicing of the product. Installing Product: Fig:3—Wall Mount Bracket fitting points Fig:1—Wall Mount Bracket... - Page 5 Once the Wall Mount Bracket is securely in position, lift and hook the product onto the wall bracket, slotting the wall bracket into the x3 slots in the rear of the product (See Fig:4) ensuring to keep the product level. Once the product is secured to the wall, connect the power supply to the product—...
- Page 6 Operating Instructions for E-touch App Control...
- Page 7 (Please Note: The screen shots used in this manual are taken from OS operating system Downloading the E-touch App there will be some slight variations for Android operating systems). The E-touch app can be used with both smart phone and tablet devices (OS and/or Android).
- Page 8 Pairing your Fireplace to your Device Note: Fireplace pairs to your device via Bluetooth. Ensure that your Bluetooth setting is activated on your device before attempting to pair. Only one device can be paired to the fireplace at any given time. 3) Ensure that the fireplace unit is switched to the ‘ON’...
- Page 9 Pairing your Fireplace to your Device Continued: The E-touch App will then begin to scan for your Electric Modern fireplace. (Please note: To enable the E-touch app to find/discover your Electric Modern fireplace, the smart phone or tablet must be no more than 3 feet away from the product).
- Page 10 Pairing your Fireplace to your Device Continued: 5) Once the E-touch App has discovered your Electric Modern product, the above screen will appear. 6) To connect to your Electric Modern fireplace simply click on the Electric fire icon. Your electric fireplace is now paired and ready to operate.
- Page 11 Operating your Electric Fireplace A). On & Off Button - Single press to turn product on and off. B). Setup / Seven-day Programmable Timer Button - Used to navigate timer options. C). Heat High / Heat Low Buttons - Single press to select 1 or 2Kw of heat output.
- Page 12 Programming the Seven-Day Timer To access and program the seven-day programmable timer please follow the steps below: 1). Click the (TIME SET) button on the home screen. The options above image will appear. 2). Click the (WEEK MODE—OS) or (COMMON—Android) button and the timer summary screen will appear.
- Page 13 Programming the Seven-Day Timer Continued: A). Timer Group - Add one or more timing groups or (weeks). B). On Time - Set a time for the heater to switch (On). C). Off Time - Set a time for the heater to switch (Off). D).
- Page 14 Programming the Seven-Day Timer Continued: To set a timing program (ON TIME / OFF TIME) please follow the steps below: Select the time on which you would like the heater to activate (ON TIME). Select the time on which you would like the heater to de-activate (OFF TIME). Select your desired room temperature.
-
Page 15: Troubleshooting
Programming the Seven-Day Timer Continued: Troubleshooting: 1. E-touch app will not connect to product: Ensure that the rocker/power switch is in the on position on your product and re-scan for the product using the app. Ensure that the smart phone or tablet is within range of the product (3 feet). 2. -
Page 16: Product Operation
Product Operation: The appliance is operated by the E-touch App, the main standby power switch to the Suites product is located to the right of the heater outlet, which is marked with a light bulb image, to activate the product, this switch must be switch to the “ON” position. The first time the Suites product is activated both the illumination and heater will function, to switch the heater “Off”... - Page 17 LENGTH 10-1/4” 14-5/8” LOG SET 9-1/16” 7-5/16” 7-1/2” 15-3/8” Please Note: The images shown are suggested log layouts, the log sets can be arranged to personal preference. Compton2 / Compton 1000—LOG LAYOUT...
- Page 18 European Home warrants all Electric Modern electric fireplaces against defects in materials and workmanship for a period of TWO (2) YEARS from the date of original retail purchase. If a defect exists, European Home will, at its option, either (1) repair the product at no charge, using new or refurbished re-placement parts or (2) exchange the product with one which is new or which has been manufactured from new or serviceable used parts and is at least functionally equivalent to the original product.
Need help?
Do you have a question about the Electric Modern Compton 1000 and is the answer not in the manual?
Questions and answers