Table of Contents
Advertisement
Quick Links
SMART Board® 7000 and
7000 Pro series
interactive displays
USER GUIDE
SBID-7275-V2
|
SBID-7286-V2
SBID-7075
|
SBID-7086
|
SBID-7275
SBID-7075P
|
SBID-7086P
|
SBID-7275P
ID7075-2
|
ID7086-2
|
ID7075-1
Was this document helpful?
smarttech.com/docfeedback/171163
|
SBID-7275P-V2
|
SBID-7286P-V2
|
SBID-7286
|
SBID-7375
|
SBID-7286P
|
SBID-7375P
|
ID7086-1
|
SBID-7386
|
SBID-7386P
Advertisement
Table of Contents
Troubleshooting

Related Manuals for SMART Board SBID-7275-V2


Summary of Contents for SMART Board SBID-7275-V2
- Page 1 SMART Board® 7000 and 7000 Pro series interactive displays USER GUIDE SBID-7275-V2 SBID-7286-V2 SBID-7275P-V2 SBID-7286P-V2 SBID-7075 SBID-7086 SBID-7275 SBID-7286 SBID-7375 SBID-7386 SBID-7075P SBID-7086P SBID-7275P SBID-7286P SBID-7375P SBID-7386P ID7075-2 ID7086-2 ID7075-1 ID7086-1 Was this document helpful? smarttech.com/docfeedback/171163...
- Page 2 Learn more This guide and other resources for SMART Board 7000 and 7000 Pro series interactive displays are available in the Support section of the SMART website (smarttech.com/support). Scan this QR code to view these resources on your mobile device. Licenses The terms HDMI and HDMI High-Definition Multimedia Interface, and the HDMI logo are trademarks or registered trademarks of HDMI Licensing LLC in the United States and other countries.
-
Page 3: Important Information
Important information NOTE Refer to the SMART Board 7000 and 7000 Pro series interactive displays installation and maintenance guide (smarttech.com/kb/171164) for important information about installing and maintaining the display. WARNING Do not open or disassemble the display. You risk electrical shock from the high voltage inside the casing. -
Page 4: Federal Communication Commission Interference Statement
IMPORTANT INFORMATION Federal Communication Commission interference statement Supplier’s Declaration of Conformity 47 CFR § 2.1077 Compliance Information Unique Identifier: SBID-7075, ID7075-1, ID7075-2, ID7086-1, ID7086-2 Responsible Party – U.S. Contact Information SMART Technologies Inc. 1505 Westlake Ave N, Suite 700 Seattle, WA 98109 compliance@smarttech.com This device complies with Part 15 of the FCC Rules. -
Page 5: Innovation, Science And Economic Development Canada Statement
IMPORTANT INFORMATION Innovation, Science and Economic Development Canada statement This device complies with RSS-247 of the Innovation, Science and Economic Development Canada Rules. Operation is subject to the following two conditions: 1. This device may not cause harmful interference, and 2. -
Page 6: Eu Declaration Of Conformity
IMPORTANT INFORMATION EU declaration of conformity Hereby, SMART Technologies ULC declares that the radio equipment type Interactive Display SBID-7075, SBID-7075P, SBID-7086, SBID-7086P, ID7075-1, ID7086-1, SBID-7075-V2, SBID-7075P-V2, SBID-7086-V2, SBID-7086P-V2, ID7075-2, ID7086-2 and the interactive pen SBID-7000-PEN, SBID-7000P-PEN are in compliance with Directive 2014/53/EU. The full text of the EU declaration of conformity is available at the following Internet address: smarttech.com/compliance WARNING... -
Page 7: United Arab Emirates - Tra Registration Details
IMPORTANT INFORMATION United Arab Emirates – TRA registration details Pen – Regulatory models SBID-7000-Pen and SBID-7000P-PEN Panel 75" – Regulatory models SBID-7075 and ID7075-1 Panel 86" – Regulatory model ID7086-1 Panel 75" – Regulatory model ID7075-2 Panel 86" – Regulatory model ID7086-2 Microsoft®... -
Page 9: Table Of Contents
Contents Important information Federal Communication Commission interference statement Innovation, Science and Economic Development Canada statement EU declaration of conformity Compliance to Malaysia specification United Arab Emirates – TRA registration details Microsoft statement regarding Windows 10 operating system Chapter 1: Welcome About this guide Identifying your specific model Features... -
Page 11: Chapter 1: Welcome
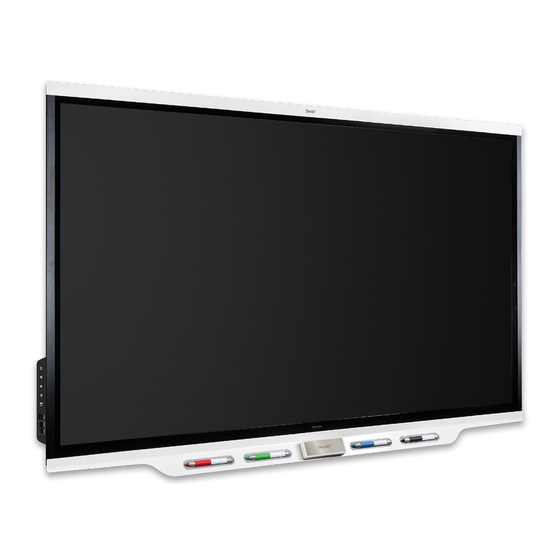
Chapter 1 Welcome About this guide Identifying your specific model Identifying your SMART Board 7000 or 7000 Pro series interactive display model Identifying your appliance model Features Components Screen IR and occupancy sensors Home button Pens and eraser Convenience panel Accessory slot Internal speakers Accessories SBA-100 projection audio system... -
Page 12: Identifying Your Specific Model
The following models of SMART Board 7000 and 7000 Pro series interactive display are available: Model Location of Frame style Screen size Embedded convenience and Windows 10 connector experience panels SBID-7000-V2 models SBID-7275-V2 Left side White 75" SBID-7286-V2 Left side White 86" SBID-7275P-V2 Left side Black 75"... -
Page 13: Features
CHAPTER 1 WELCOME Refer to the specifications for detailed technical information for these models, including product dimensions and weights (see More information on page 10). NOTES Functional differences between SBID-7000-V2 models and SBID-7000 models are highlighted throughout this guide. The easiest way to differentiate SBID-7000-V2 and SBID-7000 models is the location of the convenience and connector panels. - Page 14 CHAPTER 1 WELCOME The display includes the following features: Feature Description More information iQ experience The iQ experience provides one-touch access to Page 19 collaborative tools, including a whiteboard, wireless screen sharing and a web browser. The iQ experience is embedded in SBID-7000-V2 models and is available with the installation of an AM40 or AM50 appliance for SBID-7000 models.
-
Page 15: Components
CHAPTER 1 WELCOME Components The display consists of the following components: Name More information Pictured Screen Page 6 IR and occupancy sensors Page 7 Home button Page 8 Eraser Page 8 Pen (×4) Page 8 Convenience panel Page 8 Accessory slot Page 8 Side connector panel Page 24 Not pictured Bottom connector panel Page 24... -
Page 16: Screen
CHAPTER 1 WELCOME Screen The following are the dimensions of the screen: Model Diagonal Width Height SBID-7000-V2 models SBID-7275-V2 75" 65" (165.2 cm) 38 5/8" (93 cm) SBID-7286-V2 86" 74 7/8" (190.3 cm) 42" (107 cm) SBID-7275P-V2 75" 65" (165.2 cm) 38 5/8"... -
Page 17: Ir And Occupancy Sensors
CHAPTER 1 WELCOME IR and occupancy sensors SBID-7000-V2 models have an IR sensor (for an optional remote control) in the top-left corner of the frame and an occupancy sensor in the top-right corner. SBID-7000 models have occupancy sensors in the top-left and top-right corners of the frame. The occupancy sensors can detect people up to 16' (5 m) away when the display is in Standby mode. -
Page 18: Home Button
CHAPTER 1 WELCOME For more information, see Waking up the display and putting it back to sleep on page 12. Home button Tap the Home button to open the Home screen. From the Home screen, you can open the iQ experience apps as well as the settings. For more information about the Home screen and the iQ experience, see Using the iQ experience on page 19. -
Page 19: Accessories
CHAPTER 1 WELCOME Use the Identifying your appliance model wizard on the SMART support site to identify your appliance model. Internal speakers The display includes two 10 W integrated speakers. You can also connect an external audio system. Accessories Accessories for the display include: SBA-100 projection audio system SMART Audio 400 classroom amplification system Stands... -
Page 20: More Information
CHAPTER 1 WELCOME Stands If you want to move the display from place to place, you can install it on a SMART mobile stand. Alternatively, if you are installing the display on a wall that cannot support the display’s full weight, you can install the display on a SMART floor stand. -
Page 21: Chapter 2: Using The Display
Chapter 2 Using the display Waking up the display and putting it back to sleep Using the convenience panel Using the Power button to identify the display’s status Adjusting audio Freezing the screen Showing and hiding the screen shade Using touch Using the pens and eraser Using the pens Using the eraser... -
Page 22: Waking Up The Display And Putting It Back To Sleep
CHAPTER 2 USING THE DISPLAY Waking up the display and putting it back to sleep The display’s occupancy sensor (SBID-7000-V2 models) or sensors (SBID-7000 models) can detect people up to 16' (5 m) away when the display is in Sleep mode. Depending on how the display is configured, it either turns on or enters Ready mode when the sensor or sensors detect people. -
Page 23: Using The Power Button To Identify The Display's Status
CHAPTER 2 USING THE DISPLAY Name Procedure Power Press to enter or exit Standby mode. Press and hold for four seconds to turn off the display. Press and hold for 10 seconds to reset the display. Volume increase Press to increase the volume. Volume Press to decrease the volume. -
Page 24: Using Touch
CHAPTER 2 USING THE DISPLAY NOTE Freezing the screen does not pause any applications running on the connected computer. It simply freezes the display of those applications. To unfreeze the screen, press the Freeze button again. Showing and hiding the screen shade On SBID-7000-V2 models, you can temporarily hide the contents of the screen behind a virtual screen shade by pressing the Screen Shade button on the convenience panel. - Page 25 CHAPTER 2 USING THE DISPLAY You can also use gestures within applications. NOTE Not all gestures work in all applications. Refer to an application’s documentation to learn which gestures it supports. Pan (one finger) Pan (two fingers) / scroll Pinch to zoom in / scale (enlarge) Pinch to zoom out / scale (reduce) Rotate Flick...
-
Page 26: Using The Pens And Eraser
CHAPTER 2 USING THE DISPLAY Using the pens and eraser Using the pens The display comes with black, red, blue and green pens. Each pen has an attached eraser and an indicator light. The display’s bottom frame includes magnetic holders for the pens. Removing a pen from its holder activates it, and you can use the pen to draw or erase digital ink. -
Page 27: Using The Eraser
This pairs the pens with the display and charges them for testing purposes. If you previously paired a pen with a SMART Board 7000 or 7000 Pro series interactive display, you must pair it with another display to use it with that display. When you do this, the pen’s firmware may be updated to align with the other display’s software. - Page 28 CHAPTER 2 USING THE DISPLAY NOTES Up to four users can write or draw digital ink on the screen at the same time. Each pen writes and draws in its own color. The Pen ID™ feature enables you to assign different ink appearances to each pen.
-
Page 29: Using The Iq Experience
CHAPTER 2 USING THE DISPLAY Changing pen color, thickness and other properties You can change a pen’s default color, thickness and other properties: To change a pen’s properties while using the Whiteboard app or any of the other apps in the iQ experience, see Using the Whiteboard. -
Page 30: Using Whiteboard
CHAPTER 2 USING THE DISPLAY NOTE SMART Notebook Player is available on education models only. To open Files Library From the Home screen, tap Files Library To learn how to use the other features of Files Library, see Using the Files Library. -
Page 31: Using The Embedded Windows 10 Experience
CHAPTER 2 USING THE DISPLAY Using Screen Share You can share the screens from computers and mobile devices on the display wirelessly using Screen Share. Screen Share supports the following devices: Chromebook™ laptops, using Google™ Cast Chrome™ browser extension Windows computers, using Miracast , Google Cast Chrome browser extension, or AirParrot Mac computers and iOS devices, using AirPlay Android™... -
Page 32: Connecting And Using Computers
Connecting and using computers Installing SMART software on computers you want to connect to the display The following models come with a one-year subscription for SMART Learning Suite (including SMART Notebook software and SMART Learning Suite Online): SBID-7275-V2 SBID-7275 SBID-7286-V2 SBID-7286 SBID-7075... -
Page 33: Setting The Resolutions And Refresh Rates Of Computers You Want To Connect To The Display
CHAPTER 2 USING THE DISPLAY You can download SMART Meeting Pro software from smarttech.com/downloads and install the room license on the embedded Windows 10 experience or a room computer and the personal licenses on up to ten users’ laptops following the instructions in Installing and maintaining SMART Meeting Pro You can purchase additional copies of SMART software to install on other computers. -
Page 34: Connecting Computers To The Display
CHAPTER 2 USING THE DISPLAY Input source Resolution Refresh rate SBID-7000 models HDMI 1 3840 × 2160 60 Hz HDMI 2 3840 × 2160 30 Hz Display Port 3840 × 2160 30 Hz 1920 × 1080 60 Hz If possible, set any connected computers to these resolutions and refresh rates. See the connected computers’... -
Page 35: Viewing A Connected Computer's Input
CHAPTER 2 USING THE DISPLAY There is limited space between the side connector panel and the back of the convenience panel. When making connections within the limited space, use flexible, high-quality cables that do not include a larger strain relief feature. Computers with SMART software installed can be connected to SBID-7000 models as shown below. -
Page 36: Using Smart Software On Connected Computers
CHAPTER 2 USING THE DISPLAY To view a connected computer’s input 1. Connect the computer to the display. 2. Tap the Home button at the bottom of the screen. The Home screen appears. 3. Tap Input The display shows thumbnails of the devices that are connected to the display’s inputs: A gray thumbnail indicates no device is connected to an input. -
Page 37: Chapter 3: Troubleshooting
Chapter 3 Troubleshooting Resolving issues with power Resolving issues with the occupancy sensors Resolving issues with video Resolving issues with image quality Resolving issues with audio Resolving issues with touch and digital ink Resolving issues with the iQ experience Resolving issues with the embedded Windows 10 experience Resolving issues with software Referring to the SMART knowledge base for additional troubleshooting information Contacting your reseller for additional support... -
Page 38: Resolving Issues With Power
CHAPTER 3 TROUBLESHOOTING Resolving issues with power Issue Solutions The display doesn’t turn on and its Make sure the power cable is securely fastened to the power outlet and the power light isn’t lit. display. NOTE If the power cable is connected to a power bar, make sure the power bar is securely fastened to the power outlet and turned on. -
Page 39: Resolving Issues With Video
CHAPTER 3 TROUBLESHOOTING Resolving issues with video Issue Solutions You’re experiencing the following Make sure any connected computers are on and not in Standby mode. or similar issues with video: If the display has an appliance, make sure the appliance is securely installed in the accessory slot and its power light is on. - Page 40 CHAPTER 3 TROUBLESHOOTING Issue Solutions Colors don’t appear correctly. Be aware that if two or more displays are mounted side-by-side, there could be minor differences in colors across the displays. This issue is not unique to SMART products. If you’re using a VGA video input, use a different cable or connect a different source to see if the issue is with the cable or input source.
-
Page 41: Resolving Issues With Audio
CHAPTER 3 TROUBLESHOOTING Resolving issues with audio Issue Solutions You’re experiencing the following If you’re using an external audio system, make sure it is turned on. or similar issues with audio: Make sure the cables connecting the display to the computer are securely fastened. -
Page 42: Resolving Issues With Touch And Digital Ink
You’re experiencing issues with Use only SMART Board 7000 series or 7000 Pro series interactive display pens one or more of the display’s pens. with the display. Pens from other interactive displays aren’t compatible. -
Page 43: Resolving Issues With The Embedded Windows 10 Experience
CHAPTER 3 TROUBLESHOOTING Resolving issues with the embedded Windows 10 experience For information on resolving issues with the embedded Windows 10 experience, including the drivers, see Troubleshooting Windows 10 on Intel Compute Card. Resolving issues with software For information on resolving issues with SMART software, see the following pages in the Support section of the SMART website: Troubleshooting SMART Notebook 18 Troubleshooting SMART Learning Suite Online... -
Page 44: Finding The Appliance Serial Number
CHAPTER 3 TROUBLESHOOTING Finding the appliance serial number The appliance’s serial number is located on the appliance. NOTE You need to remove the appliance from the display to find the serial number. Finding serial numbers in iQ settings For SBID-7000-V2 models, the iQ settings include the serial number for the display. For SBID-7000 models, the iQ settings include the serial number for the appliance. - Page 46 SMART TECHNOLOGIES smarttech.com/support smarttech.com/contactsupport smarttech.com/kb/171163...
Need help?
Do you have a question about the SBID-7275-V2 and is the answer not in the manual?
Questions and answers