Table of Contents
Advertisement
Quick Links
ACX500 Universal Access Routers Quick
Start-ACX500 Indoor Routers
August 2015
Part Number: 530-061428
Revision 02
Contents
This document describes how to install the Juniper Networks
Routers-the ACX500 indoor routers.
ACX500 Routers Quick Start Description . . . . . . . . . . . . . . . . . . . . . . . . . . . . . . . . . 3
Step 1: Prepare the Site for Installation . . . . . . . . . . . . . . . . . . . . . . . . . . . . . . . . . . . 6
Step 2: Install the Router . . . . . . . . . . . . . . . . . . . . . . . . . . . . . . . . . . . . . . . . . . . . . . 8
Tools Required to Install the ACX500 Indoor Router in a Rack . . . . . . . . . . . . . 8
Install the Mounting Brackets . . . . . . . . . . . . . . . . . . . . . . . . . . . . . . . . . . . . . . . 8
Install the ACX500 Indoor Router in a Rack . . . . . . . . . . . . . . . . . . . . . . . . . . . 9
Step 3: Ground the ACX500 Indoor Router . . . . . . . . . . . . . . . . . . . . . . . . . . . . . . . 10
Tools Required to Ground the Router . . . . . . . . . . . . . . . . . . . . . . . . . . . . . . . . 10
Connect the Grounding Cable . . . . . . . . . . . . . . . . . . . . . . . . . . . . . . . . . . . . . . 10
Step 4: Connect External Devices and Cables . . . . . . . . . . . . . . . . . . . . . . . . . . . . . 12
Tools Required to Connect External Devices and Cables . . . . . . . . . . . . . . . . . 12
Management . . . . . . . . . . . . . . . . . . . . . . . . . . . . . . . . . . . . . . . . . . . . . . . . 12
Connect the ACX500 Router to a Management Console Device . . . . . . . . . . 12
Connect Network Interface Cables to the ACX500 Router . . . . . . . . . . . . . . . 12
Step 5: Connect Power to the ACX Series Router . . . . . . . . . . . . . . . . . . . . . . . . . . 14
Connect Power to an AC-Powered ACX500 Router . . . . . . . . . . . . . . . . . . . . 14
Connect Power to a DC-Powered ACX500 Router . . . . . . . . . . . . . . . . . . . . . 15
Step 6: Perform Initial Software Configuration . . . . . . . . . . . . . . . . . . . . . . . . . . . . 18
Enter Configuration Mode . . . . . . . . . . . . . . . . . . . . . . . . . . . . . . . . . . . . . . . . . 18
Configure User Accounts and Passwords . . . . . . . . . . . . . . . . . . . . . . . . . . . . . 18
Configure System Attributes . . . . . . . . . . . . . . . . . . . . . . . . . . . . . . . . . . . . . . . 19
Commit the Configuration . . . . . . . . . . . . . . . . . . . . . . . . . . . . . . . . . . . . . . . . . 19
Safety Warnings . . . . . . . . . . . . . . . . . . . . . . . . . . . . . . . . . . . . . . . . . . . . . . . . . . . . 21
Compliance Statements for NEBS . . . . . . . . . . . . . . . . . . . . . . . . . . . . . . . . . . . . . 22
Compliance Statements for EMC Requirements for ACX500 Routers . . . . . . . . . 23
Canada . . . . . . . . . . . . . . . . . . . . . . . . . . . . . . . . . . . . . . . . . . . . . . . . . . . . . . . 23
European Community . . . . . . . . . . . . . . . . . . . . . . . . . . . . . . . . . . . . . . . . . . . . 23
®
ACX500 Universal Access
1
Advertisement
Table of Contents

Related Manuals for Juniper ACX Series


Summary of Contents for Juniper ACX Series
-
Page 1: Table Of Contents
Connect Network Interface Cables to the ACX500 Router ....12 Step 5: Connect Power to the ACX Series Router ......14 Connect Power to an AC-Powered ACX500 Router . - Page 2 ACX500 Universal Access Routers Quick Start—ACX500 Indoor Routers Israel ............23 Japan .
-
Page 3: Acx500 Routers Quick Start Description
The routers have high-density Ethernet interfaces and high-capacity switching throughput. An ACX Series router has a built-in Routing Engine and one Packet Forwarding Engine. The Packet Forwarding Engine has one “pseudo” Flexible PIC Concentrator (FPC 0). - Page 4 ACX500 Universal Access Routers Quick Start—ACX500 Indoor Routers NOTE: You can mix and match the four RJ-45 and SFP COMBO ports as long as the port numbers are unique. For example, from the ports, you can use the SFP port along COMBO 0/1/0...
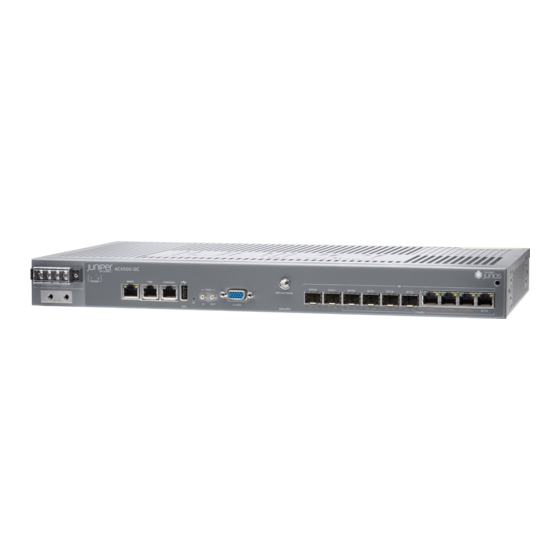
- Page 5 ACX500 Routers Quick Start Description Figure 2: Front Panel of the DC-Powered ACX500 Indoor Router 1— DC terminals 10— ESD point 2— DC power status LED 11— COMBO Gigabit Ethernet RJ-45 ports ( 3— Management Ethernet port 12— Gigabit Ethernet SFP ports ( COMBO 4—...
-
Page 6: Step 1: Prepare The Site For Installation
ACX500 Universal Access Routers Quick Start—ACX500 Indoor Routers Step 1: Prepare the Site for Installation Prepare your site for installation by observing the following guidelines: You can install the router in a four-post rack or cabinet or in an open-frame rack. The rack rails must be spaced widely enough to accommodate the chassis's external dimensions: 1.75 in. - Page 7 Step 1: Prepare the Site for Installation Figure 3: ACX500 Indoor Router Rack Clearance and Chassis Dimensions 2.16" (5.5 cm) .75" (2 cm) clearance required clearance required 3" (7.6 cm) for the cables for free airflow 9.4" (24 cm) 19.2" 17.5"...
-
Page 8: Step 2: Install The Router
ACX500 Universal Access Routers Quick Start—ACX500 Indoor Routers Step 2: Install the Router Tools Required to Install the ACX500 Indoor Router in a Rack on page 8 Install the Mounting Brackets on page 8 Install the ACX500 Indoor Router in a Rack on page 9 Tools Required to Install the ACX500 Indoor Router in a Rack To install the router in a rack, you need the following tools: Phillips (+) screwdriver, number 2... -
Page 9: Install The Acx500 Indoor Router In A Rack
Install the ACX500 Indoor Router in a Rack Install the ACX500 Indoor Router in a Rack The ACX500 indoor router can be installed horizontally in a rack or cabinet. The router can be accessed only from the front of the router. All components—such as ports, LEDs, power unit, and so on are located in the front of the ACX500 indoor router. -
Page 10: Step 3: Ground The Acx500 Indoor Router
ACX500 Universal Access Routers Quick Start—ACX500 Indoor Routers Step 3: Ground the ACX500 Indoor Router You must ground both the AC-powered and the DC-powered routers before connecting them to power. Tools Required to Ground the Router on page 10 Connect the Grounding Cable on page 10 Tools Required to Ground the Router To ground the router, you need the following tools: Phillips (+) screwdriver, number 2... - Page 11 Connect the Grounding Cable Figure 7: Grounding Points on the ACX500 Indoor Routers 1— Grounding lug 2— SAE 10-32 screw and washer...
-
Page 12: Step 4: Connect External Devices And Cables
ACX500 Universal Access Routers Quick Start—ACX500 Indoor Routers Step 4: Connect External Devices and Cables Tools Required to Connect External Devices and Cables on page 12 Connect the ACX500 Router to a Network for Out-of-Band Management on page 12 Connect the ACX500 Router to a Management Console Device on page 12 Connect Network Interface Cables to the ACX500 Router on page 12 Tools Required to Connect External Devices and Cables To connect external devices and cables to the router, you need the following tools:... - Page 13 Connect Network Interface Cables to the ACX500 Router WARNING: Do not look directly into a fiber-optic transceiver or into the ends of fiber-optic cables. Fiber-optic transceivers and fiber-optic cable connected to a transceiver emit laser light that can damage your eyes. CAUTION: Do not leave a fiber-optic transceiver uncovered except when inserting or removing cable.
-
Page 14: Step 5: Connect Power To The Acx Series Router
ACX500 Universal Access Routers Quick Start—ACX500 Indoor Routers Step 5: Connect Power to the ACX Series Router Depending on your configuration, your router uses either AC or DC power supplies. Perform the appropriate procedures for each power supply in your router. -
Page 15: Connect Power To A Dc-Powered Acx500 Router
The DC power supply has four terminals on the front panel, covered by a clear plastic cover. WARNING: You must ground the router before connecting the DC power cables. Table 1: ACX Series DC Power System Input Voltage Nominal Voltage Specification Operating range: +18 to +30 VDC –48 Operating range: –39 to –56 VDC... - Page 16 ACX500 Universal Access Routers Quick Start—ACX500 Indoor Routers For +24V: a. The cable with very low resistance (indicating a closed circuit) to chassis ground is the return cable ( – b. The cable with very large resistance (indicating an open circuit) to chassis ground is the DC input cable ( Remove the screws and flat washers from the terminals.
- Page 17 Connect Power to a DC-Powered ACX500 Router Figure 10: Connecting DC Power to the Router...
-
Page 18: Step 6: Perform Initial Software Configuration
ACX500 Universal Access Routers Quick Start—ACX500 Indoor Routers Step 6: Perform Initial Software Configuration This procedure connects the router to the network but does not enable it to forward traffic. For complete information about configuring the router to forward traffic, including examples, see the Junos OS configuration guides. -
Page 19: Configure System Attributes
Configure System Attributes root@# set system login user user-name class super-user Configure System Attributes For more information about configuring the backup routing and static routes, see the Junos OS Administration Library for Routing Devices. Configure the name of the router. If the name includes spaces, enclose the name in quotation marks (“... - Page 20 ACX500 Universal Access Routers Quick Start—ACX500 Indoor Routers root-authentication { authentication-method (password | public-key); name-server { address; interfaces { fxp0 { unit 0 { family inet { address address/prefix-length; Commit the configuration to activate it on the router. [edit] root@# commit (Optional) Configure additional properties by adding the necessary configuration statements.
-
Page 21: Safety Warnings
For a complete list of warnings for this router, including translations, see the ACX500 Universal Access Router Hardware Guide at http://www.juniper.net/techpubs/ CAUTION: To comply with intrabuilding lightning and surge requirements, intrabuilding wiring must be shielded, and the shield for the wiring must be grounded at both ends. -
Page 22: Compliance Statements For Nebs
ACX500 Universal Access Routers Quick Start—ACX500 Indoor Routers Mount the router at the bottom of the rack if it is the only unit in the rack. When mounting the router in a partially filled rack, load the rack from the bottom to the top with the heaviest component at the bottom of the rack. -
Page 23: Compliance Statements For Emc Requirements For Acx500 Routers
Compliance Statements for EMC Requirements for ACX500 Routers Compliance Statements for EMC Requirements for ACX500 Routers Canada on page 23 European Community on page 23 Israel on page 23 Japan on page 23 United States on page 23 Canada This Class A digital apparatus complies with Canadian ICES-003. Cet appareil numérique de la classe A est conforme à... - Page 24 ACX500 Universal Access Routers Quick Start—ACX500 Indoor Routers a commercial environment. This equipment generates, uses, and can radiate radio frequency energy and, if not installed and used in accordance with the instruction manual, may cause harmful interference to radio communications. Operation of this equipment in a residential area is likely to cause harmful interference in which case the user will be required to correct the interference at his own expense.
-
Page 25: Junos Os Documentation And Release Notes
7 days a week, 365 days a year. Self-Help Online Tools and Resources For quick and easy problem resolution, Juniper Networks has designed an online self-service portal called the Customer Support Center (CSC) that provides you with the following features: Find CSC offerings: http://www.juniper.net/customers/support/... -
Page 26: Opening A Case With Jtac
Juniper Networks, Junos, Steel-Belted Radius, NetScreen, and ScreenOS are registered trademarks of Juniper Networks, Inc. in the United States and other countries. The Juniper Networks Logo, the Junos logo, and JunosE are trademarks of Juniper Networks, Inc. All other trademarks, service marks, registered trademarks, or registered service marks are the property of their respective owners. -
Page 27: Product Description
ACX Series routers are optimized for converging mobile, business, and residential access features enhance QoE, while services on a single platform. The ACX Series devices come in space-efficient 1 and 2.5 U extensive OAM, built-in advanced chassis and support 6 to 2,560 Gbps of throughput, setting a new benchmark for port density SLA management, and rapid in its product category. - Page 28 Maintaining relative simplicity services to support a large-scale small cell deployment. in the access network, the ACX Series supports a rich suite of L2, L3, and IP/MPLS functionality to allow large-scale seamless MPLS Enhanced Service Assurance, SLA Management networks with simplified service provisioning and operations.
-
Page 29: Features And Benefits
The flexibility and upgradability (mix-and-match of interface a small cell router, whereas the ACX1x00 or ACX2x00 will types) makes the ACX Series ideal for a wide range of applications: be a macro cell site router. The backhaul traffic carried over Ethernet or IP/MPLS will be aggregated by the ACX5048 •... -
Page 30: Specifications
ACX500DC ACX1000 ACX1100 ACX2000 ACX2100 ACX2200DC ACX5048 ACX4000DC ACX5096 Specifications This section lists basic specifications for the ACX Series routers. For further details, please refer to the hardware installation manuals on www.juniper.net/techpubs. Specifications ACX500, ACX1000, ACX2000, ACX4000 ACX5048, ACX500-O, ACX1100... -
Page 31: Safety Approvals
Protected Locations, Class 4.2H operational efficiency while reducing costs and minimizing • ETS 300753 (1997)—Acoustic Noise Emitted by risk, achieving a faster time to value for your network. Juniper Telecommunications Equipment Networks ensures operational excellence by optimizing the NEBS network to maintain required levels of performance, reliability, •... -
Page 32: Ordering Information
ACX Series Universal Access Routers Data Sheet Ordering Information Model Number Name Model Number Name ACX2200-DC ACX2200 unit, 2x10GbE SFP+, 4xGbE ACX500-AC ACX500 indoor unit 2x1GbE (SFP) + 4x1GbE copper, 4xGbE combination (copper or (combo) with single AC PS, 1 U, temperature... -
Page 33: About Juniper Networks
Copyright 2015 Juniper Networks, Inc. All rights reserved. Juniper Networks, the Juniper Networks logo, Junos and QFabric are registered trademarks of Juniper Networks, Inc. in the United States and other countries. All other trademarks, service marks, registered marks, or registered service marks are the property of their respective owners.
Need help?
Do you have a question about the ACX Series and is the answer not in the manual?
Questions and answers