Table of Contents
Advertisement
Quick Links
ACX5448 Universal Metro Router
Quick Start Guide
ACX5448 Quick Start Description . . . . . . . . . . . . . . . . . . . . . . . . . . . . . . . . . . . . . . . . . . . . . . . . . . . . . . . . . . . . . . . . . . . . . . . . . . . . 1
Step 1: Prepare the Site for ACX5448 Installation . . . . . . . . . . . . . . . . . . . . . . . . . . . . . . . . . . . . . . . . . . . . . . . . . . . . . . . . . . . . . . . 3
Rack Requirements for an ACX5448 Router . . . . . . . . . . . . . . . . . . . . . . . . . . . . . . . . . . . . . . . . . . . . . . . . . . . . . . . . . . . . . . . . 3
Router Clearance Requirements . . . . . . . . . . . . . . . . . . . . . . . . . . . . . . . . . . . . . . . . . . . . . . . . . . . . . . . . . . . . . . . . . . . . . . . . . 4
Router Cooling and Airflow Requirements . . . . . . . . . . . . . . . . . . . . . . . . . . . . . . . . . . . . . . . . . . . . . . . . . . . . . . . . . . . . . . . . . 5
Tools Required to Prepare the ACX5448 Router for Installation . . . . . . . . . . . . . . . . . . . . . . . . . . . . . . . . . . . . . . . . . . . . . . . . 6
Step 2: Install the ACX5448 Chassis in the Rack . . . . . . . . . . . . . . . . . . . . . . . . . . . . . . . . . . . . . . . . . . . . . . . . . . . . . . . . . . . . . . . . 6
Step 3: Connect the Grounding Cable . . . . . . . . . . . . . . . . . . . . . . . . . . . . . . . . . . . . . . . . . . . . . . . . . . . . . . . . . . . . . . . . . . . . . . . . 8
Step 4: Connect Power Cables . . . . . . . . . . . . . . . . . . . . . . . . . . . . . . . . . . . . . . . . . . . . . . . . . . . . . . . . . . . . . . . . . . . . . . . . . . . . . . 9
Connect Power to an AC Router . . . . . . . . . . . . . . . . . . . . . . . . . . . . . . . . . . . . . . . . . . . . . . . . . . . . . . . . . . . . . . . . . . . . . . . . . 9
Connect Power to a DC Router . . . . . . . . . . . . . . . . . . . . . . . . . . . . . . . . . . . . . . . . . . . . . . . . . . . . . . . . . . . . . . . . . . . . . . . . . . 11
Step 5: Connect External Devices and Cables . . . . . . . . . . . . . . . . . . . . . . . . . . . . . . . . . . . . . . . . . . . . . . . . . . . . . . . . . . . . . . . . . . 13
Connect the Router to a Network for Out-of-Band Management . . . . . . . . . . . . . . . . . . . . . . . . . . . . . . . . . . . . . . . . . . . . . . 13
Connect the Router to a Console Device . . . . . . . . . . . . . . . . . . . . . . . . . . . . . . . . . . . . . . . . . . . . . . . . . . . . . . . . . . . . . . . . . . 14
Connect the Router to External Clocking and Timing Devices . . . . . . . . . . . . . . . . . . . . . . . . . . . . . . . . . . . . . . . . . . . . . . . . . 15
Step 6: Perform Initial Software Configuration . . . . . . . . . . . . . . . . . . . . . . . . . . . . . . . . . . . . . . . . . . . . . . . . . . . . . . . . . . . . . . . . . 15
Enter Configuration Mode . . . . . . . . . . . . . . . . . . . . . . . . . . . . . . . . . . . . . . . . . . . . . . . . . . . . . . . . . . . . . . . . . . . . . . . . . . . . . . 15
Configure User Accounts and Passwords . . . . . . . . . . . . . . . . . . . . . . . . . . . . . . . . . . . . . . . . . . . . . . . . . . . . . . . . . . . . . . . . . 16
Configure System Attributes . . . . . . . . . . . . . . . . . . . . . . . . . . . . . . . . . . . . . . . . . . . . . . . . . . . . . . . . . . . . . . . . . . . . . . . . . . . . 16
Commit the Configuration . . . . . . . . . . . . . . . . . . . . . . . . . . . . . . . . . . . . . . . . . . . . . . . . . . . . . . . . . . . . . . . . . . . . . . . . . . . . . . 17
Safety Warnings . . . . . . . . . . . . . . . . . . . . . . . . . . . . . . . . . . . . . . . . . . . . . . . . . . . . . . . . . . . . . . . . . . . . . . . . . . . . . . . . . . . . . . . . . 17
Compliance Statements for NEBS . . . . . . . . . . . . . . . . . . . . . . . . . . . . . . . . . . . . . . . . . . . . . . . . . . . . . . . . . . . . . . . . . . . . . . . . . . 19
Compliance Statements for EMC Requirements . . . . . . . . . . . . . . . . . . . . . . . . . . . . . . . . . . . . . . . . . . . . . . . . . . . . . . . . . . . . . . . 19
Canada . . . . . . . . . . . . . . . . . . . . . . . . . . . . . . . . . . . . . . . . . . . . . . . . . . . . . . . . . . . . . . . . . . . . . . . . . . . . . . . . . . . . . . . . . . . . 19
European Community . . . . . . . . . . . . . . . . . . . . . . . . . . . . . . . . . . . . . . . . . . . . . . . . . . . . . . . . . . . . . . . . . . . . . . . . . . . . . . . . . 19
Israel . . . . . . . . . . . . . . . . . . . . . . . . . . . . . . . . . . . . . . . . . . . . . . . . . . . . . . . . . . . . . . . . . . . . . . . . . . . . . . . . . . . . . . . . . . . . . . 19
Japan . . . . . . . . . . . . . . . . . . . . . . . . . . . . . . . . . . . . . . . . . . . . . . . . . . . . . . . . . . . . . . . . . . . . . . . . . . . . . . . . . . . . . . . . . . . . . . 19
United States . . . . . . . . . . . . . . . . . . . . . . . . . . . . . . . . . . . . . . . . . . . . . . . . . . . . . . . . . . . . . . . . . . . . . . . . . . . . . . . . . . . . . . . . 19
Contacting Customer Support . . . . . . . . . . . . . . . . . . . . . . . . . . . . . . . . . . . . . . . . . . . . . . . . . . . . . . . . . . . . . . . . . . . . . . . . . . . . . 20
ACX5448 Quick Start Description
This Quick Start Guide contains information you need to install and configure the router quickly. For complete installation
instructions, see the ACX5448 Universal Metro Router Hardware Guide at
QR code at the bottom of the page to go directly to the router product page.
The Juniper Networks ACX5448 Universal Metro Router is available as Juniper Networks' top-of-rack router solution for data
centers and campus distribution or aggregation environments. The ACX5448 router portfolio consists of high-performance
fixed-configuration routers that add higher port densities, additional scalability, and improved latency to the ACX Series. The
ACX5448 router offers a compact 1 U model that provides wire-speed packet performance, very low latency, and a rich set of
https://www.juniper.net/documentation/
, or scan the
Advertisement
Table of Contents

Related Manuals for Juniper ACX5448


Summary of Contents for Juniper ACX5448
-
Page 1: Table Of Contents
Tools Required to Prepare the ACX5448 Router for Installation ....... . - Page 2 Layer 2 and Layer 3 features. The router have a high-throughput Packet Forwarding Engine, and the performance of the control plane running on ACX5448 router is enhanced by the 1.9 Ghz six-core Intel CPU with 32 GB of memory and two 100 GB of enterprise grade solid-state drive (SSD) storage.
-
Page 3: Step 1: Prepare The Site For Acx5448 Installation
This Quick Start contains a summary of safety warnings in “Safety Warnings” on page 17. For a complete list of warnings for this router, including translations, see the ACX5448 Universal Metro Router Hardware Guide. Figure 4: ESD Point on the ACX5448 Router 1— ESD point... -
Page 4: Router Clearance Requirements
If you are mounting an ACX5448 in a rack with other equipment, ensure that the exhaust from the other equipment does not blow into the intake vents of the ACX5448 chassis. -
Page 5: Router Cooling And Airflow Requirements
Router Cooling and Airflow Requirements The ACX5448 router is available with either front-to-back airflow (air out, ports-to-FRUs or AFO), or back-to-front airflow (air in, FRUs-to-ports or AFI). In AFO models, the air is pulled through the front of the chassis toward the fan trays, from where it is exhausted out of the system. -
Page 6: Tools Required To Prepare The Acx5448 Router For Installation
ACX5448 Universal Metro Router Quick Start Guide Tools Required to Prepare the ACX5448 Router for Installation Mounting brackets, supplied with the router Twelve screws for securing the mounting brackets to the chassis, supplied with the router Eight mounting screws, not supplied... - Page 7 ACX5448 Universal Metro Router Quick Start Guide Figure 10: Router Secured by Front-Mounting Brackets On the rear of the chassis, slide the rear-mounting brackets on either side of the chassis until the rear-mounting brackets contact the rack rails (see Figure 11).
-
Page 8: Step 3: Connect The Grounding Cable
Connect the grounding strap to one of the ESD points on the chassis. Figure 13 shows the ESD point on the router. Figure 13: Grounding Point on the ACX5448 Router 1— Grounding point Place the grounding cable lug over the grounding point on the side of the chassis (see Figure 14). -
Page 9: Step 4: Connect Power Cables
Depending on the configuration, your router uses either AC or DC power supplies. Perform the appropriate procedures for each power supply in your router. The power supplies are hot-insertable and are field-replaceable units (FRUs). ACX5448 supports two power supply modules. The power supplies install in the rear of the chassis in the slots provided. - Page 10 ACX5448 Universal Metro Router Quick Start Guide Connect the power cord to the power supply source. NOTE: Each power supply must be connected to a dedicated AC power feed and a dedicated customer-site 2-pole circuit breaker. We recommend that you use a dedicated customer-site circuit breaker rated for 20 A (110 VAC) or 16 A (220 VAC) minimum, or as required by local code.
-
Page 11: Connect Power To A Dc Router
Figure 17: Connecting an AC Power Cord to an ACX5448 Connect Power to a DC Router Table 3 gives the DC power system input voltage for the ACX5448 router. Table 3: ACX5448 DC Power System Input Voltage Item Specification DC input voltage Rated operating voltage: –48 VDC to –60 VDC... - Page 12 The ACX5448 is designed to operate with a DC power supply that has a single, non-redundant, feed input. For source redundancy, two DC power supplies must be installed in ACX5448; connect source (A) to one power supply and connect source (B) to the second power supply.
-
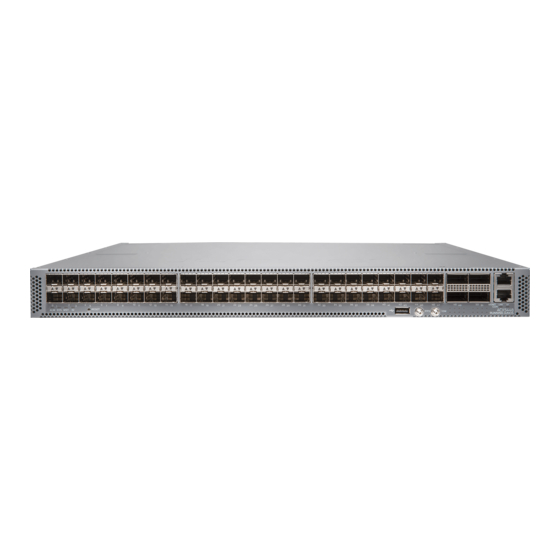
Page 13: Step 5: Connect External Devices And Cables
Step 5: Connect External Devices and Cables Figure 1 shows the front panel of the ACX5448 router. All the connections to the router are made through the front panel. Connect the Router to a Network for Out-of-Band Management on page 13... -
Page 14: Connect The Router To A Console Device
To Console port Console server Figure 21: Connecting the Router Directly to a Management Console Table 5 describes the console port for the ACX5448 router. Table 5: Console Port on the ACX5448 Router Label Callout Description Connect a laptop or console terminal to configure the router. -
Page 15: Connect The Router To External Clocking And Timing Devices
Ensure that the 10-MHz or 1-PPS source network equipment contains low voltage complementary metal oxide semiconductor (CMOS) or is compatible with low-voltage (3.3 V) transistor-transistor logic (TTL). Table 6 describes the clocking port on the ACX5448 router. Table 6: Clocking Port on the ACX5448 Router Label... -
Page 16: Configure User Accounts And Passwords
ACX5448 Universal Metro Router Quick Start Guide Configure User Accounts and Passwords For information about using an encrypted password or an SSH public key string (DSA or RSA), see Configuring the Root Password and authentication (Login). Add a password to the root administration user account. Enter a cleartext password. -
Page 17: Commit The Configuration
Safety Warnings WARNING: See installation instructions before connecting the router. This is a summary of safety warnings. For a complete list of warnings for this router, including translations, see the ACX5448 Universal Metro Router Hardware Guide at https://www.juniper.net/documentation/ WARNING: The intrabuilding port(s) of the router is suitable for connection to intrabuilding or unexposed wiring or cabling only. - Page 18 . Other services should be performed by authorized service personnel only. Read the installation instructions before you connect the router to a power source. Before installing the router, read the guidelines for site preparation in the ACX5448 Universal Metro Router Hardware Guide at https://www.juniper.net/documentation/ to make sure that the site meets power, environmental, and clearance requirements for the router.
-
Page 19: Compliance Statements For Nebs
ACX5448 Universal Metro Router Quick Start Guide Compliance Statements for NEBS The equipment is suitable for installation as part of the Common Bonding Network (CBN). The equipment is suitable for installation in locations where the National Electrical Code (NEC) applies. -
Page 20: Contacting Customer Support
Configuration data using one or more of the show commands Juniper Networks, the Juniper Networks logo, Juniper, and Junos are registered trademarks of Juniper Networks, Inc. and/or its affiliates in the United States and other countries. All other trademarks may be property of their respective owners. Juniper Networks assumes no responsibility for any inaccuracies in this document.
Need help?
Do you have a question about the ACX5448 and is the answer not in the manual?
Questions and answers