Grandstream Networks GXV3380 User Manual
Ip multimedia phone for android
Hide thumbs
Also See for GXV3380:
- Administration manual (102 pages) ,
- Quick installation manual (26 pages) ,
- Setup (2 pages)
Table of Contents
Advertisement
Quick Links
Download this manual
See also:
Administration Manual
Advertisement
Table of Contents

Related Manuals for Grandstream Networks GXV3380


Summary of Contents for Grandstream Networks GXV3380
- Page 1 Grandstream Networks, Inc. GXV3380 IP Multimedia Phone for Android User Guide...
- Page 2 Grandstream Networks, Inc. is not permitted. The latest electronic version of this guide is available for download here: http://www.grandstream.com/support Grandstream is a registered trademark and Grandstream logo is trademark of Grandstream Networks, Inc. in the United States, Europe and other countries. CAUTION Changes or modifications to this product not expressly approved by Grandstream, or operation of this product in any way other than as detailed by this guide, could void your manufacturer warranty.
-
Page 3: Fcc Statement
Caution Any changes or modification not expressly approved by the party responsible for compliance could void the user’s authority to operate the equipment. P a g e GXV3380 User Guide Version 1.0.1.5... -
Page 4: Ce Declaration Of Conformity
16QAM / 64QAM) DQPSK 802.11g/n: OFDM (BPSK / Bluetooth EDR 3Mbps: QPSK / 16QAM / 64 QAM) 8DPSK Operation 0 °C ~ +40 °C temperature Storage temperature -10 °C ~ +60 °C P a g e GXV3380 User Guide Version 1.0.1.5... - Page 5 20 cm between the radiator and your body. CE Authentication Hereby, Grandstream Networks, Inc. declares that the radio equipment GXV3380 is in compliance with Directive 2014/53/EU. The full text of the EU declaration of conformity is available at the following internet address: http://www.grandstream.com/support/resources/...
- Page 6 Frequency EIRP Power (dBm) Wi-Fi 2.4G 2.4~2.4835GHZ 18.70 5.15~5.25GHz 22.06 Wi-Fi 5G 5.25~5.35GHz 19.21 5.47~5.725GHz 18.24 Bluetooth Bluetooth version EIRP Power (dBm) 12.14 8.42 The power adapter is a power-off device. P a g e GXV3380 User Guide Version 1.0.1.5...
-
Page 7: Gnu Gpl Information
GNU GPL INFORMATION GXV3380 firmware contains third-party software licensed under the GNU General Public License (GPL). Grandstream uses software under the specific terms of the GPL. Please see the GNU General Public License (GPL) for the exact terms and conditions of the license. -
Page 8: Table Of Contents
Description of the GXV3380 ........................ 24 Front View ............................. 24 Back View ............................. 25 Side View ............................26 Connecting and Setting Up the GXV3380 ................... 26 Using the Phone Stand ......................... 26 Using the Slots for Wall Mounting ....................27 Connecting the GXV3380 ........................28 GETTING TO KNOW GXV3380.................. - Page 9 Notifications in Status Bar ........................40 System Settings in Status Bar ...................... 42 Use the GXV3380 Keys ........................43 Keypad Shortcut Functions ......................43 Use the On-Screen Keyboard ......................44 Use the Message Waiting Indicator ..................... 46 MAKE PHONE CALLS ....................47 Register SIP Accounts .........................
- Page 10 Add Contacts to Blacklist ......................85 Add Group ............................ 86 Add contacts to Group ........................86 Contacts Storage Status ....................... 86 GXV3380 SETTINGS ....................88 HARASSMENT INTERCEPTION ................. 90 Blocked Contacts ..........................90 Block History ............................90 Delete Block History ........................90...
- Page 11 Send Files ........................... 106 Delete Files ..........................106 Rename a File ..........................107 File Categories ........................... 108 GS MARKET ....................... 109 FTP SERVER ......................110 CAMERA ........................112 Take Picture ............................112 P a g e | 10 GXV3380 User Guide Version 1.0.1.5...
- Page 12 Wi-Fi Settings Shortcut ....................... 123 Bluetooth ............................124 Turn On/Off Bluetooth ......................... 124 Change Bluetooth Device Name ....................125 Pair GXV3380 with a Bluetooth Device ..................125 Unpair a Bluetooth Device ......................126 Bluetooth Settings Shortcut ......................126 EHS Headset ............................. 127 USB Headset .............................
- Page 13 Table of Tables Table 1: GXV3380 Features in a Glance ....................20 Table 2: GXV3380 Technical Specifications ....................20 Table 3: Equipment Packaging ........................23 Table 4: GXV3380 Front View ........................24 Table 5: GXV3380 Back View ........................25 Table 6: GXV3380 Side View ........................26 Table 7: GXV3380 Status Bar Notification Icons ..................
- Page 14 Figure 3: GXV3380 Back View........................25 Figure 4: GXV3380 Side View ........................26 Figure 5: Built in Stand and Mounting Slots on GXV3380 ................27 Figure 6: Tab on The Handset Cradle ......................27 Figure 7: GXV3380 Back / Side View ......................28 Figure 8: GXV3380 Default Home Screen ....................
- Page 15 Figure 62: Add Conference Members from Dial Screen 2 ................65 Figure 63: GXV3380 Conference Screen ....................66 Figure 64: GXV3380 Conference - Add Existing Call to Conference ............66 Figure 65: 3-Way Conference Call Established ..................67 Figure 66: Notification of joining the conference ..................67 Figure 67: Notification of exiting the conference ..................
- Page 16 Figure 97: List of blocked contacts ......................90 Figure 98: Block History ..........................90 Figure 99: GXV3380 Blacklist - Add Number to Blacklist ................91 Figure 100: Manually Add Number to Blacklist ................... 91 Figure 101: Intercept Anonymous Calls ...................... 92 Figure 102: GXV3380 Call History ......................
- Page 17 Figure 142: GXV3380 Web Browser-Bookmarks ..................119 Figure 143: GXV3380 Connect to Wi-Fi ....................122 Figure 144: GXV3380 Connect to Wi-Fi-Show Advanced Options ............122 Figure 145: Wi-Fi - Add network ....................... 123 Figure 146: Wi-Fi Settings Shortcut ......................123 Figure 147: Wi-Fi Shortcut - Wi-Fi List ......................
-
Page 18: Document Purpose
DOCUMENT PURPOSE This document describes how to configure the GXV3380 via phone's LCD menu and web UI menu to fully manipulate phone's features. learn advanced functions GXV3380, please visit http://www.grandstream.com/support to download the latest “GXV3380 Administration Guide”. This guide covers following topics: ▪... -
Page 19: Change Log
CHANGE LOG This section documents significant changes from previous versions of user guide for GXV3380. Only major new features or major document updates are listed here. Minor updates for corrections or editing are not documented here. Firmware Version 1.0.1.5 •... -
Page 20: Welcome
WELCOME . The GXV3380 IP Thank you for purchasing Grandstream GXV3380 IP Multimedia Phone for Android Video Phone for Android combines a 16-line IP video phone with a multi-platform video conferencing solution and the functionality of an Android tablet to offer an all-in-one communications solution. The phone features an 8”... -
Page 21: Product Overview
Runs the Android™ Operating System 7.1.1. GXV3380 Technical Specifications The following table resumes all the technical specifications including the protocols / standards supported, voice codecs, telephony features, languages and upgrade/provisioning settings for the phone GXV3380. Table 2: GXV3380 Technical Specifications Protocols/Standards... - Page 22 Security User and administrator level passwords, MD5 and MD5-sess based authentication, 256-bit AES encrypted configuration file, TLS, SRTP, HTTPS, 802.1x media access control, Kensington Security Slot (Kensington Lock) support P a g e | 21 GXV3380 User Guide Version 1.0.1.5...
- Page 23 Humidity Humidity: 10% to 90% Non-condensing Package Content GXV3380 phone, handset with cord, base stand, universal power supply, network cable, screen cleaning cloth, quick installation guide, brochure, GPL license Compliance FCC: Part 15 (CFR 47) Class B; UL 60950 (power adapter); Part68 (HAC)
-
Page 24: Getting Started
GETTING STARTED This chapter provides basic installation instructions including the list of the packaging contents and also information for obtaining the best performance with the GXV3380. Equipment Packaging Table 3: Equipment Packaging GXV3380 • 1x GXV3380 Main Case. • 1x Handset. -
Page 25: Description Of The Gxv3380
Description of the GXV3380 Front View Figure 2: GXV3380 Front Table 4: GXV3380 Front View Item Name Description Mega pixel front camera. The angle can be adjusted, and the Front Camera camera can be blocked by scrolling up/down the wheel on the back of the camera. -
Page 26: Back View
Back View Figure 3: GXV3380 Back View Table 5: GXV3380 Back View Item Name Description Camera Adjusting Wheel Scroll up/down to adjust the camera angle. Phone Stand (built-in) Adjust the phone stand angle to place the phone on the desk. -
Page 27: Side View
HDMI Input Interface Connect presentation device (e.g., a laptop). Connecting and Setting Up the GXV3380 The GXV3380 can be installed on the desktop using the built-in stand or attached on the wall using the slots for wall mounting. Using the Phone Stand The GXV3380 has a built-in phone stand. -
Page 28: Using The Slots For Wall Mounting
The LCD will display the booting up screen or firmware upgrading information. Before continuing, please wait for the main screen display to show up. Figure 5: Built in Stand and Mounting Slots on GXV3380 Using the Slots for Wall Mounting 1. -
Page 29: Connecting The Gxv3380
Connecting the GXV3380 To setup your GXV3380, please follow the steps below: 1. Connect the handset and main phone case with the phone cord; 2. Connect the LAN port of the phone to the RJ-45 socket of a hub/switch or a router (LAN side of the router) using the Ethernet cable;... -
Page 30: Getting To Know Gxv3380
Account information Widget. Up to 8 accounts/Programmable-keys be displayed. Figure 8: GXV3380 Default Home Screen Swipe from right to left to show the application menu of the phone. the settings and applications installed will be brought up as shown below. -
Page 31: Figure 10: Gxv3380 Finger Gestures On The Touch Screen
To fully manipulate the GXV3380 capacitive touch screen, use your fingers to operate the following on the GXV3380 icons, buttons, menu items, onscreen keyboard etc. Figure 10: GXV3380 Finger Gestures on the Touch Screen • Slightly touch the screen with fingertip to initiate menu, options or applications. For example, to select items on the screen (e.g., setting options, apps etc.);... -
Page 32: Use The Desktop
Widgets Add widgets to the desktop by touching and holding the widget from the widget menu. • Management Manage running applications on the GXV3380. For more details, please refer to section [ Manage Running Applications P a g e | 31 GXV3380 User Guide Version 1.0.1.5... -
Page 33: Add Widget To Desktop
Otherwise, the widget won't be added. Figure 12: Add Widget to the Desktop Manage Desktop Items On the GXV3380 desktop, users could tap on the desktop items to manage shortcuts and widgets. The following operations can be done: •... -
Page 34: Figure 13: Open Clock Widget
Lift your finger once done. To delete the item/widget, press on it for about 1 seconds then move it to the recycle bin on the top of the screen. P a g e | 33 GXV3380 User Guide Version 1.0.1.5... -
Page 35: Set Wallpapers
Press ok to uninstall or press cancel to abort. Set Wallpapers On the GXV3380 desktop, touch and press on an empty spot for about 2 seconds or users could press menu key and select "Wallpaper" to set up the wallpaper for the desktop. Users could select wallpaper from different categories: •... -
Page 36: Manage Running Applications
Figure 16: GXV3380 Choose Wallpaper Manage Running Applications On the GXV3380 desktop, press an empty spot for about 2 seconds then select “Management” or select "Management" after pressing Menu button Figure 17: GXV3380 Recent Applications Users could use the thread manager to do the following: •... -
Page 37: Idle Screen
Idle Screen Switch Idle Screens The GXV3380 supports multiple idle screens by sliding the screen horizontally. On the GXV3380 screen, slightly touch an empty area and slide to the left or right using your finger to switch between different idle screens. -
Page 38: Figure 20: Add An Idle Screen
Idle screen. Please make sure the apps, shortcuts or widgets on the idle screen are removed first. Otherwise, the icon won't show for the idle screen. Figure 21: Delete an Idle Screen P a g e | 37 GXV3380 User Guide Version 1.0.1.5... -
Page 39: Use The Status Bar
Use the Status Bar The status bar on the top of the GXV3380 screen provides visual notifications for the system settings and status, as well as quick access for important system settings. To access it, on the GXV3380 idle screen, slowly slide down from the top to the bottom of the screen as the following figure shows. -
Page 40: Figure 24: Gxv3380 Top Status Bar - Notification
For more information about specific features in the notification bars, you can press the bottom right of the feature in question. Figure 25: GXV3380 Top status Bar - Get more information For example, you can see the available Wi-Fi Networks. -
Page 41: Notifications In Status Bar
Figure 26: GXV3380 Top status Bar – Wi-Fi Notifications in Status Bar The following table describes the icons used on the status bar for notification purpose. Table 7: GXV3380 Status Bar Notification Icons Network connected via Ethernet cable. Trying to connect to the network via Ethernet cable. - Page 42 Downloading files via Internet connection. Unread voicemail to be retrieved. Incoming call from blacklist contact. Camera is disabled. Contact storage is full. HDMI cable is connected to display device. P a g e | 41 GXV3380 User Guide Version 1.0.1.5...
-
Page 43: System Settings In Status Bar
Turn on/off Bluetooth. Turn on/off LCD display. Turn on/off Wi-Fi. Turn on/off the voice of the phone Figure 27: System Settings in Status Bar P a g e | 42 GXV3380 User Guide Version 1.0.1.5... -
Page 44: Use The Gxv3380 Keys
For users that could not use remote upgrade or could not access the phone's Web GUI to upload firmware, upgrading via external SD card is an alternative. Follow the steps below to upgrade GXV3380 via SD card. 1. Download the firmware file to PC and save it in SD card. -
Page 45: Use The On-Screen Keyboard
(the third LCD key from the left : Home) at the same time, it will go into the upgrading process. 5. The GXV3380 will start upgrading and display the upgrading process in the screen. 6. Wait until the upgrading is done. -
Page 46: Figure 30: Gxv3380 Onscreen Keyboard - Lowercase And Uppercase
To switch input between lowercase and uppercase, tap on (lowercase) or (uppercase). Figure 30: GXV3380 Onscreen Keyboard - Lowercase and Uppercase • Number and symbols To input number and symbols, tap on the default keyboard to switch to number/symbols. Tap on to switch back. -
Page 47: Use The Message Waiting Indicator
Use the Message Waiting Indicator The GXV3380 message waiting indicator LED is on the upper right corner of the device. It could notify the users with different messages and status of the phone. Please refer to the status description below. The priority for the LED indicator is from high to low in the following table. -
Page 48: Make Phone Calls
MAKE PHONE CALLS Register SIP Accounts The GXV3380 supports up to 16 independent SIP accounts. Each account can have separate SIP servers, usernames and NAT configurations. Account Status On the idle screen, the account widget shows the account name, and registration status. -
Page 49: Configure Sip Account
On the shortcuts menu of the idle screen, tap on icon to open dial screen. Figure 34: GXV3380 Dial Screen If Enable Video Call option is unchecked, the Video Call option on GXV3380 dial screen won’t be available P a g e | 48 GXV3380 User Guide Version 1.0.1.5... -
Page 50: Dial A Number Directly
The timeout interval can be configured under web GUI→Account→Call Settings. • GXV3380 allows users to press # key as SEND key. This behavior can be disabled via option "Use # as Dial Key" under web GUI→Account→Call Settings. •... -
Page 51: Redial
2. Navigate in the contacts entries by sliding up/down on the screen. 3. Tap on the dial icon for the contact Figure 36: GXV3380 View Contacts Dial a Number via Call History 1. Access Call History by tapping on icon on the bottom of the idle screen. -
Page 52: Answer A Call
Figure 37: GXV3380 Call History Answer a Call Single Incoming Call • When the phone is in idle and there is an incoming audio call, the phone will show the call screen as below. Tap on "Answer" softkey to answer the call via speaker or pick up the handset the answer the call. -
Page 53: Figure 39: Single Incoming Call - Video
After previewing, end user can tap on Answer key to answer the video call, or “Reject” key to reject it. This feature should be supported by the SIP server. Please contact service provider for more information. Figure 40: Single Incoming Call – Preview-1 P a g e | 52 GXV3380 User Guide Version 1.0.1.5... -
Page 54: Figure 41: Single Incoming Call - Preview-2
“MPK” to select a destination. “Reject” key to reject it. This feature should be supported by the SIP server. Please contact service provider for more information. Figure 42: Single Incoming Call - Transfer -1 P a g e | 53 GXV3380 User Guide Version 1.0.1.5... -
Page 55: Multiple Calls/Call Waiting
3. Once the new call is answered, the current active call will be placed on hold. If the new call is rejected by tapping on "Reject" softkey, the current active call will not be interrupted. P a g e | 54 GXV3380 User Guide Version 1.0.1.5... -
Page 56: Call Progress Status
During an active call if Home Button is pressed, the phone will go back to the home screen and the call-in- progress status will be shown on the GXV3380 status bar, once clicking the bar it will go back to call screen. -
Page 57: Call Recording
1. During the call, users could record the conversation to the phone by tapping on “Record” 2. If need to stop the recording, tap on “Stop Recording” 3. The recording files can be retrieved from the GXV3380 Recorder application Figure 47: GXV3380 Call Recording... -
Page 58: Mute
During an active call, press “More” →”Mute” to mute the call. The mute icon will be displayed under the Caller Name and ID. Press “More” →”Unmute” to unmute the call. Figure 50: GXV3380 Call Mute P a g e | 57 GXV3380 User Guide Version 1.0.1.5... -
Page 59: Turn On Video During Audio Call
During an active audio call, on the call screen, tap on "More" and select "Video On", a video request will be sent to the other party. Figure 51: Turn on Video During Audio Call • Accept video request Figure 52: Accept Video During Audio Call P a g e | 58 GXV3380 User Guide Version 1.0.1.5... -
Page 60: Switch Audio Channel During Call
If the GXV3380 receives video request during the audio call, a message "Do you want to accept video?" will be prompted. Select "Yes" to establish video during the call. If the Enable Video Call Feature is disabled on GXV3380, the “Video On” option on GXV3380 will be hidden during the audio call. However, if the GXV3380 receives video request during the audio call, users could tap to accept the video request. -
Page 61: Call Transfer
Call Transfer A call can be transferred to another party during the call. The GXV3380 supports blind transfer and attended transfer. Blind Transfer 1. During the active call, tap on "More" softkey. 2. Select "Transfer" to bring up the transfer screen. -
Page 62: Attended Transfer
3. Enter the transfer target number, and then press the "Send" soft key on the right. 4. Before transfer target answers the call, GXV3380 hears the ringback tone, and the touch screen prompts shown as below. Users could tap on "Cancel" to cancel the transfer, tap on “Blind” or simply hang up the call to complete call transfer. -
Page 63: Figure 57: Attended Transfer - Split
5. After transfer target answers the call, the following screen will be shown up. If the user simply hangs up or taps on “End” soft key, the call wil be transferred, and GXV3380 will hang up the call. If the user taps on "Split"... -
Page 64: Transfer Via Mpks
1. During an active call, press the Transfer softkey then press on MPK Figure 59: Transfer via MPK 2. Choose the destination to transfer calls to from the MPKs list P a g e | 63 GXV3380 User Guide Version 1.0.1.5... -
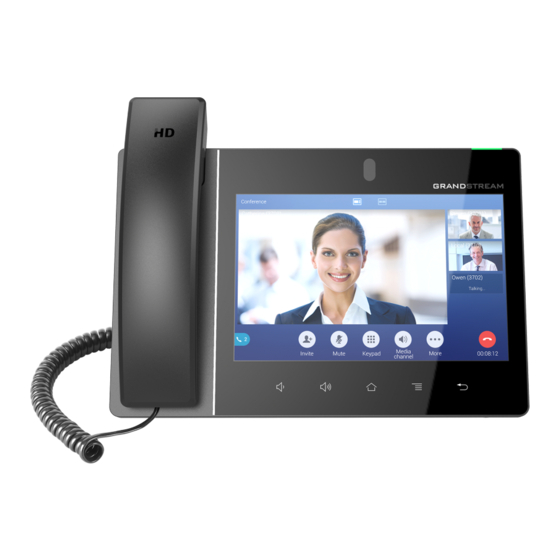
Page 65: 7-Way Conference
If users would like to cancel the transfer, press button to go back to the previous talking screen. 7-Way Conference The GXV3380 supports up to 7-way Audio conferencing and 3-way HD Video conferencing. Initiate Conference There are three ways to initiate a conference call. -
Page 66: Figure 61: Add Conference Members From Dial Screen
• Initiating conference directly using conference soft key 1. On idle screen, press conference soft key Tap on to add the members of the conference. P a g e | 65 GXV3380 User Guide Version 1.0.1.5... -
Page 67: Figure 63: Gxv3380 Conference Screen
If there are calls on hold, they will show up when adding member to the conference. Users could then tap on the call to add it to the conference directly. Figure 64: GXV3380 Conference - Add Existing Call to Conference 3. Repeat the above steps to add more parties into the conference. The following figure shows a 3-way conference established. -
Page 68: Remove Party From Conference
Note: Every time a conference participant joins or exits the conference when using Full screen, a notification will appear in order to make the GXV3380 host aware of the participant’s actions during the conference. Figure 66: Notification of joining the conference... -
Page 69: End Conference
GUI→Phone Settings→Call Settings→Call Features and set "Auto Conference" to "Yes". To esablish call with auto conference when there are 1 or more calls on the GXV3380, simply tap on "More" softkey and select "Conf". All the calls on GXV3380 will be brought into the conference. -
Page 70: Ucm Conference
Figure 69 : Join UCM conference room CCM: Conference Call Menu: During a UCM conference, Administrators can tap on the UCM conf menu Figure 70: UCM conference Menu P a g e | 69 GXV3380 User Guide Version 1.0.1.5... -
Page 71: Conference Call Operations
Administrators could view/invite members, bridge conference, remove bridge, mute, unmute and lock the conference Figure 71 : Conference Menu Options Conference Call Operations 1. Click on to list all the users currently in the conference Figure 72: Conference's members list P a g e | 70 GXV3380 User Guide Version 1.0.1.5... -
Page 72: Figure 73: Invite A Member
Figure 73: Invite a Member Click on to bridge another conference, Enter the conference number and password and Bridge request will be sent Figure 74: Conference Bridge P a g e | 71 GXV3380 User Guide Version 1.0.1.5... -
Page 73: Cei: Conference Event Indicator
• Member joined Figure 75: Member joined conference Event • Member left Figure 76 : Member Left the conference room Event P a g e | 72 GXV3380 User Guide Version 1.0.1.5... -
Page 74: Missed Call
Users can tap on the missed call entry to access the missed call log. To close the missed call screen and return to the idle screen, tap on on the upper right of the dialog. P a g e | 73 GXV3380 User Guide Version 1.0.1.5... -
Page 75: Dnd (Do Not Disturb)
DND (Do Not Disturb) When DND is on, the incoming calls to the GXV3380 will be blocked for all registered accounts with a reminder ring produced. To turn on/off DND: 1. Touch and drag the status bar down on the GXV3380 idle screen. -
Page 76: Call Forward
X→General Settings: "Voice Mail Access Number". This is the number that will be dialed out to access voicemail message when tapping on the account in Voice Mail screen. Call Forward Call forward feature can be set up from GXV3380 LCD or web GUI. • From LCD Go to onscreen Menu→Settings→Features→Call Forward. -
Page 77: Figure 82: Call Forward - Unconditional
➢ Call Forward on Busy / Call Forward No Answer / Call Forward on DND: The incoming call will be forwarded when the GXV3380 is busy or no answer after certain interval "Delayed Call Forward Wait Time (s)", or if the phone is on DND mode then the call will be forwarded to the configured destination number. -
Page 78: Call Features
Call Features The GXV3380 supports traditional and advanced telephony features including caller ID, caller ID with caller Name, call waiting, call forward etc. Before using the following feature codes, please make sure "Enable Call Features" option is set to "Yes" under web GUI→Account page→Call Settings. - Page 79 Dial *92 followed by the number to forward the call. The default timeout before the call is forwarded is 20 seconds. Cancel Delayed Call Forward. To cancel the delayed call forward: • Dial *93. P a g e | 78 GXV3380 User Guide Version 1.0.1.5...
-
Page 80: Contacts
3. Type First name, Last name, Phone number and other information for the new contacts. Please make sure the account number field is selected so the GXV3380 will use this account to dial out the new P a g e... -
Page 81: Import/Export Contacts
Figure 87: Add to Contacts from Dial Pad Import/Export Contacts If the users have the GXV3380 phonebook file saved in local storage or external storage device that has been plugged into the GXV3380, the phonebook file can be directly imported to the Contacts. There are two different formats supported for the phonebook file:"vcard", and "xml". -
Page 82: Figure 88: Gxv3380 Contacts - Import Contacts
Contacts screen. 3. Select "Export Contacts " to bring up dialog below. 4. Select the file encoding and file type for the exported phonebook file. By default, the GXV3380 is using "UTF-8" as the encoding method. -
Page 83: Download Contacts
For more details about GXV3380 phonebook, please refer to the following link: http://www.grandstream.com/sites/default/files/Resources/gxv33xx_xml_phonebook_guide.pdf To download phonebook: 1. Make sure the GXV3380 can connect to the HTTP/TFTP/HTTPS server and the phonebook.xml file in correct format is downloadable from the HTTP/TFTP/HTTPS server. 2. Open Contacts. 3. Tap on More on the upper right corner of the Contacts screen. -
Page 84: Use Contacts
Figure 91: GXV3380 Contacts - Search Contacts Use Contacts Once the contacts are added, users could navigate in the contacts list to make a call and manage the contacts furthermore. Make a Call to Contacts Scroll up/down to find the contact in the list and tap on to call this contact. -
Page 85: Add Contacts To Favorites
Figure 92: GXV3380 Contacts - Select Contacts Add Contacts to Favorites Select Contacts 1. Select the contact/contacts to be added as described in [ 2. Then tap on to add the contacts selected to Favorites There are two other methods to add contacts to favorites. -
Page 86: Edit Contacts
2. Select "Add to Blacklist" from the menu. • Add a batch of contacts to black list: Select Contacts 1. Select contacts as described in [ 2.Press on to add the selected contacts to the blacklist P a g e | 85 GXV3380 User Guide Version 1.0.1.5... -
Page 87: Add Group
Ringtone", this ring tone has the highest priority when there is an incoming call to the contact. Contacts Storage Status The GXV3380 default maximum contacts storage is up to 2000. To check contact storage status, tap on More on the upper right corner of the contacts screen to bring up contacts options, scroll down and select "Storage Status". -
Page 88: Figure 95: Gxv3380 Contacts - Storage Status
Figure 95: GXV3380 Contacts - Storage Status Note: Users could increase the number of maximum contacts storage to more than 2000 contacts on GXV3380. Users may access the phone through SSH and change the P value P1688 to another number (<=10000) to increase the default contacts storage. -
Page 89: Gxv3380 Settings
GXV3380 SETTINGS Users could access the GXV3380 Settings by taping on the icon Figure 96: GXV3380 Settings Users can find all the features and options that require configuration. Please, refer to the following table to have a clear idea about all the options available under this section: •... - Page 90 Default Application • Notification Center • Advanced Account Settings • System Updates • Syslog • System Security • Status Account Status • Network Status • System Info • Storage Status P a g e | 89 GXV3380 User Guide Version 1.0.1.5...
-
Page 91: Harassment Interception
“Features”, access “Harassment Interception”. Blocked Contacts The blocked Contacts are the contacts that were added to the blacklist, the GXV3380 will block any calls coming from these contacts. To show the blocked contacts tap on Blacklist from the Harassment Interception page. -
Page 92: Edit Blacklist
The blacklist can be added manually, from contacts, or from call history. Figure 99: GXV3380 Blacklist - Add Number to Blacklist 2. The following figure shows manually adding number to blacklist. Once Manually add option is selected, a window will be prompted for users to enter the phone number in the first field and name/note in the second field (optional). -
Page 93: Intercept Anonymous Calls
2. From the contacts menu, long press on the contact and press “Remove from Blacklist”. Intercept Anonymous calls The GXV3380 gives the possibility to intercept anonymous calls for each account registered: 1. Enter the harassment Interception Menu. 2. Check Intercept Anonymous Calls as shown on the figure below. -
Page 94: Call History
CALL HISTORY The GXV3380 supports local and BroadWorks Xsi Call history. Tap on idle screen to access Call history. The following figure shows the call history on the GXV3380. Figure 102: GXV3380 Call History Local Call History There are four different categories in the local call history. Users could tap on the icon on the top menu to access the corresponding call logs: •... -
Page 95: Dial Out From Call History
Touch and press the call history entry for about 2 seconds until more option window pops up • Users can edit this number before calling, add this number to contacts, add this number to balcklist etc… Figure 103: GXV3380 Call History – Options Delete Call History • Delete the entire call history... -
Page 96: Call History Details
Call History Details For each call history entry, users could tap on the entry to access the details. Figure 104: GXV3380 Call History - Details Users could find the following call details by tapping on the entry: • The Call date: the time when the call was initiated. -
Page 97: Sms
The GXV3380 has built-in SMS application to send/receive message, if the SIP server and the other party support SMS message. Users can create, edit draft, delete and check the storage status of SMS. Tap on from the phone's desktop to launch SMS application. -
Page 98: Create New Sms
• Enter the Number/Name of an existing contact to send the message. • Users could also select contact from GXV3380 Contacts by tapping on “Contacts” icon on the upper right of the page. See Figure 89. 3. Input content: Enter the message content on the bottom field of the screen. Tap on "Done" from the Keyboard once finished. -
Page 99: Sms Settings
• Storage Status: The SMS app supports up to 1000 messages, “storage status” helps users to verify the current number of messages on the GXV3380 and the storage space that still available. • Enable Quick Reply: Enable this feature in order to automatically send a quick reply when an incoming call is rejected. -
Page 100: Recorder
RECORDER GXV3380 Recorder application allows users to record audio and access recording files from call recordings. There is no time limit on the recorder as long as there is enough space to save the recording file. Tap on the phone's desktop to launch the Recorder application. -
Page 101: Figure 110: Recording Audio
The file will be saved and accessible under Recorder application. Users can tap on the recording file to play the recording. Figure 112: Recorded Files P a g e | 100 GXV3380 User Guide Version 1.0.1.5... -
Page 102: Recorder Settings
From the phone’s desktop page click on to open the recorder. Figure 113: Recorder Menu 2. Click on Menu icon on the top right as shown above 3. Tap on Settings Figure 114: Menu Options P a g e | 101 GXV3380 User Guide Version 1.0.1.5... -
Page 103: Figure 115: Recorder Settings
4. Users can enable and choose a password to be set for accessing the Recorder application by taping on Enable Password: Figure 116: Set Password 5. Users can change the preconfigured password by taping on Change password: Figure 117: Change Password P a g e | 102 GXV3380 User Guide Version 1.0.1.5... -
Page 104: Files Operations
,click on Edit and then select the file to operate on; choose for file export, to delete or to send via Bluetooth and 3 party APPs. Figure 119: Export/Delete files P a g e | 103 GXV3380 User Guide Version 1.0.1.5... -
Page 105: File Manager
Files Operations Copy and Paste Files Follow the steps below to copy and paste a file on the GXV3380: 1. Open file manager and navigate to the directory of the file to be copied. Touch and press on the file for about 2 seconds until the option s window pops up then press Copy. -
Page 106: Move Files
The steps to move a file are similar to the steps to copy/paste a file. The difference is once the file is moved, the file will not be kept in the source folder. Follow the steps below to move a file on the GXV3380. -
Page 107: Send Files
Bluetooth then choose the Bluetooth devices to send the files to. Figure 123: GXV3380 File Manager - Options Delete Files 1. Open file manager and navigate to the directory of the file to be deleted. Touch and press on the file for about 2 seconds until more options appear. -
Page 108: Rename A File
2 seconds until more options appear. 2. Tap on "Rename". A new dialog window will pop up for users to enter the new name. 3. Tap on OK. Figure 125: Rename File P a g e | 107 GXV3380 User Guide Version 1.0.1.5... -
Page 109: File Categories
Video: contains all the videos stored on the phone including recorded videos from camera and videos stored on external devices. • Downloads: in this category the phone will list all the downloaded files such as apps, document, music, videos …etc. P a g e | 108 GXV3380 User Guide Version 1.0.1.5... -
Page 110: Gs Market
GS MARKET The GXV3380 supports extensive amount of 3 party Android applications. Users could install those applications from the built-in GS Market. If Google Play application is installed from GS Market, users could log in and download all kinds of applications there as well. -
Page 111: Ftp Server
FTP SERVER The GXV3380 supports file transfer via FTP server. Once installed, users could access the GXV3380 file system from PC. There are two ways for accessing FTP Server application: • Users can either access the Built-in GXV3380 application in the application screen •... -
Page 112: Figure 128: Ftp Server - Stop
By default, when the users access the ftp server from a PC, a prompt will show asking for user name and password. The default user name and password are "admin". Figure 129: FTP Server – Settings P a g e | 111 GXV3380 User Guide Version 1.0.1.5... -
Page 113: Camera
CAMERA The GXV3380 has built-in Camera to support taking pictures and recording videos. The camera can be used for SIP video calls or video calls via 3 party applications. Note: During SIP video calls or video calls via 3 party applications, the camera cannot be accessed to take pictures or videos. -
Page 114: Angle Adjustment
4. To view the last recorded videos, swipe from right to left on camera screen. Angle Adjustment On the back of the GXV3380 camera, users could scroll the wheel up/down to adjust the camera angle. If users scroll the camera all the way up until the icon shows up on the status bar of the screen, the camera is turned off. -
Page 115: Figure 132: Edit Picture
Gallery page To access the Gallery, open the camera click on the circular key on the right top corner of the camera sceen. Figure 133: Access to the Gallery P a g e | 114 GXV3380 User Guide Version 1.0.1.5... -
Page 116: Figure 134: Gxv3380 Gallery
. A list of options will be available for users to select, including "Delete", “Slideshow”, "Edit", "Rotate left”, “Rotate right", "Crop" or "Set Picture as”, etc. Figure 135: GXV3380 Gallery - Picture Options P a g e | 115 GXV3380 User Guide... -
Page 117: Screensaver
• Take picture/video Tap on on the upper right of the Gallery page to start taking pictures or videos using the GXV3380 built-in camera. • Select multiple pictures Touch and press on one of the pictures for about 2 seconds until the picture is highlighted in blue. -
Page 118: Figure 137: Use Network Images
Figure 137: Use Network Images Click on Use network images and set the path of the remote screensaver folder. Figure 138: Network Image Path P a g e | 117 GXV3380 User Guide Version 1.0.1.5... -
Page 119: Browser
BROWSER GXV3380 browser could be used in a similar way as a PC-based web browser. Users can open web pages, bookmarks, view history, search …etc. Tap on the idle screen to launch the Browser application. Note: The default page in the GXV3380’s Browser is Google Search. -
Page 120: Figure 141: Open New Window In Browser
Figure 141: Open New Window in Browser • To open Bookmarks, History and Saved Pages, tap the icon on the upper right of the Browser. Figure 142: GXV3380 Web Browser-Bookmarks P a g e | 119 GXV3380 User Guide Version 1.0.1.5... -
Page 121: Action Url
ACTION URL GXV3380 supports ActionURL module, and it is used to set the URL for various kinds of phone events on phone web GUI, and when the corresponding event occurs on the phone, phone will send the configured URL to SIP server. To use ActionURL module, users need to know the supported events in this module, and also added the dynamic variables of the supported events on phone web GUI. -
Page 122: Connect To Network And Devices
3. Tap on "IPV4 Address Type" to select DHCP, Static IP or PPPoE as the address type. ➢ For DHCP, save the setting and the GXV3380 should be able to get IP address from the DHCP server in the network. -
Page 123: Figure 143: Gxv3380 Connect To Wi-Fi
6. The phone will start connecting to the Wi-Fi. The status bar will show Wi-Fi signal strength. 7. Once it's added and the password is remembered, the GXV3380 will connect to it again when the SSID is within the range. -
Page 124: Wi-Fi Settings Shortcut
Figure 145: Wi-Fi - Add network Wi-Fi Settings Shortcut Users can enter the Wi-Fi settings by sliding the Status Bar, then long Press on the Wi-Fi icon. Figure 146: Wi-Fi Settings Shortcut P a g e | 123 GXV3380 User Guide Version 1.0.1.5... -
Page 125: Bluetooth
Bluetooth hands-free profile, and listen to media (music or other audio output) from the GXV3380 To connect to a Bluetooth device, turn on GXV3380’s Bluetooth radio first. The first time when using a new Bluetooth device with the GXV3380, "pair" the device with GXV3380 so that both devices know how to connect securely to each other. -
Page 126: Change Bluetooth Device Name
Bluetooth devices. 4. The GXV3380 scans and displays the IDs of all available Bluetooth devices in range. If the device you would like to pair with does not show up in the list (available devices), ensure that the other device is turned on and set to be discoverable. -
Page 127: Unpair A Bluetooth Device
Figure 148: GXV3380 Bluetooth - Paired Device Unpair a Bluetooth Device 1. In the Bluetooth settings, tap on button corresponding to the Bluetooth device. 2. Select Unpair. Bluetooth Settings Shortcut User can enter the Bluetooth settings by sliding the Status Bar, then long Press on the Bluetooth icon. -
Page 128: Ehs Headset
1. Go to the GXV3380 Home screen → Settings → System → Peripherals: enable option “Plug RJ9/EHS headset” 2. Connect EHS Headset to the GXV3380. Insert headset connector into the RJ9 headset port on the back of GXV3380. P a g e... -
Page 129: Usb Headset
Figure 151: EHS headset USB Headset The GXV3380 supports USB Headset, once the headset plugged, it will be detected automatically, and the following icon will be shown on the top right of the status bar, this means a USB headset is connected. -
Page 130: Usb
1. Insert an USB storage device into USB port at the back of the GXV3380. 2. It will take a few seconds for the GXV3380 to prepare the connection. Then the USB storage icon will show on the status bar. -
Page 131: Microsd Card
MicroSD Card is inserted with right direction on the GXV3380 as indicated on the MicroSD card slot. 2. It will take a few seconds for the GXV3380 to prepare the connection. Then the MicroSD Card icon will show on the status bar. -
Page 132: Emergency Call
Figure 157: Emergency Dial Screen Note: The GXV3380 is not pre-configured to support or carry emergency calls to any type of hospital, law enforcement agency, medical care unit (“Emergency Service(s)”) or any other kind of Emergency Service. -
Page 133: Experiencing The Gxv3380 Application Phone
EXPERIENCING THE GXV3380 APPLICATION PHONE Please visit our website: http://www.grandstream.com to receive the most up- to-date updates on firmware releases, additional features, FAQs, documentation and news on new products. We encourage you to browse our product related documentation, FAQs User and Developer Forum for answers to your general questions.
Need help?
Do you have a question about the GXV3380 and is the answer not in the manual?
Questions and answers