Table of Contents
Advertisement
Quick Links
Advertisement
Table of Contents

Related Manuals for Promax PROLITE-57


Summary of Contents for Promax PROLITE-57
- Page 1 User's Guide to the PROLITE-57 PON Power Meter v2.0 0 MI2029 (13/12/2018)
- Page 2 PROLITE-57 1. Introduction 1.1 Summary PROLITE- is a portable, high quality PON optical power meter. It is specifically designed to meet the rapid growth of FTTx market with PON (Passive Optical Network) technologies. It is capable to measure all three signals (1310nm, 1490nm and 1550nm) that carry voice, data and video, so-called t r i p l e - p l a y a p p l i c a t i o n s a l o n g a s i n g l e f i b e r.
-
Page 3: Main Function And Specifications
PROLITE-57 1.2 Main Function and Specifications Cost efficient palm size designed for field and lab testing. Support P/F measurement and normal measurement. Easy-to-use interface with large color TFT display for easy visibility and LED indicators. Simply connect-and-display the results of all three wavelengths (1310/1490/1550 nm) of PON signals with two optical ports. -
Page 4: Specification
PROLITE-57 1.3 Specification: Connector Type SC/APC, ST/APC Detector type InGaAs Measurement Range 1310 nm 1490 nm 1550 nm (Continuous Datastream) -40 dBm~+10 dBm -40 dBm~+10 dBm -40 dBm~+20 dBm Burst measurement range -30 dBm~+10 dBm (1310 nm bursted signal) 1310 nm... -
Page 5: Safety Information
PROLITE-57 3 Safety Information SAFETY RULES The safety could not be assured if the instructions for use are not closely followed. The external DC charger is a Class II equipment, for safety reasons plug it to a supply line with the corresponding ground terminal. - Page 6 PROLITE-57 Symbols related with safety: Discharged batteries 1.- When the battery power is almost out, there will be a DIRECT CURRENT warning of indicator keeps blinking, then please replace ALTERNATING CURRENT the batteries or plug in AC adapter to charge batteries.
-
Page 7: Preparing For Operation
PROLITE-57 4. Preparing for Operation Unpacking the instrument Packing material We suggest that you keep the original packing material. Using the original packing material is your guarantee of protecting the instrument during transit. Checking the package contents The standard accessories of PROLITE-... -
Page 8: Operation
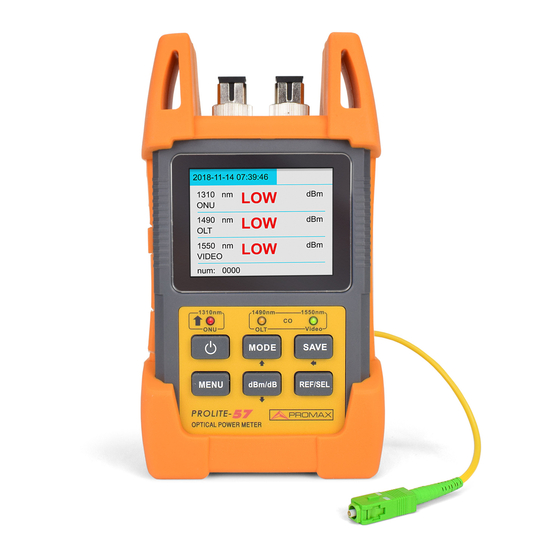
PROLITE-57 5. Operation 5.1 Layout Video/OLT The front panel is divided in two parts: Part I – LCD Display Part 1 Part II- Keypad The tester shows test result on LCD screen, and in the meanwhile indicates different status in part 2 by LED. -
Page 9: Key's Functions
ROLITE 5.2 Key’s Functions Power Switch – Hold (> 2 s): Switch unit on and off. Press: Control Auto-off. MODE key – It enables / disables F/P mode. MODE G o up in the Menu mode. SAVE key – Hold: Save current data. SAVE Press: Go left in the Menu mode. - Page 10 ROLITE 5.3 Definitions LEDs Not only the instrument will display measured optical power value on LCD screen, but also under P/F test mode its three LED indicators will function with following meanings: The three LED indicators represent upstream 1310 nm (ONU), downstream 1490 nm (OLT) and 1550 nm (Video) respectively.
-
Page 11: Quick Operation
ROLITE 5.4 Quick Operation 1. Connect the instrument to the optical link under test. 2. Press Power On key to turn on the instrument. 3. In the menu mode, choose the second option "Threshold". Press "REF/SEL" to select one group of threshold from the preset list. - Page 12 ROLITE 5.5 Detail Operation 5.5.1 Powering On the Instrument Press the Power key to turn on the instrument. It will automatically go to test menu. In test menu, press Power key and release quickly (less than 2 seconds) to activate or deactivate Auto shut down function.
-
Page 13: Test Mode Switch
ROLITE 5.5.2 Test mode switch: In the test menu, press Mode to switch between normal test mode and P/F test mode. 1. Normal test mode Normal test mode means do not setup threshold value but display optical power directly. In this mode, the LED indicators will not light. The results are displayed in two units: dB and dBm using dB/dBm key to switch. -
Page 14: Threshold Setup
ROLITE 5.5.3 Threshold Setup The user can setup the value. The steps are as follows: In the Menu mode, choose the second option "Threshold" and enter the threshold setup menu. In this menu, top line shows system information (date & time) and bottom line shows information of threshold including threshold number and name. -
Page 15: Time Setup
ROLITE 5.5.4 Time Setup In the Menu mode, choose the fourth option "Time " to enter Time Setup menu (see figure 4). Time Setup 08-10-25 15:02:03 Fig.4 Time Setup Menu In the Time setup menu, the Save key becomes arrow key - using it to move cursor. ▼... - Page 16 ROLITE 5.5.5 Unit Switch When the instrument is in normal test mode, pressing dBm/dB can switch unit between dBm and dB. Here, the unit dBm is the actual power and unit dB is a power value relative to reference value. Refer to next section about “Reference value setup”.
-
Page 17: Reference Value Setup
ROLITE 5.5.6 Reference Value Setup In the test menu, press REF/SEL key for more than 2 seconds, then the LCD will display REF in red (see Fig. 5). This means the instrument choose the current light power as reference value. The test results afterward are the values after comparing to this reference value. -
Page 18: Backlit Setup
ROLITE 5.5.7 Backlit Setup In the Menu mode, choose the third option "Backlight" to enter Backlit setup menu (s ee Fig. 7). Fig.7 Backlit Setup Menu In this menu, press ▲ (Mode) key to brighten the backlit and ▼ (dBm/dB) key to weaken the backlit. Press Menu key two times to exit and back to main mode. -
Page 19: Description Of Memory Record Function
ROLITE 5.5.8 Description of Memory Record Function Description of Interface: At the main interface, it shows the current recording number on the left bottom of the page: Displaying: num : xxxx(xxxx means the current recording number, the num:0024 Auto off maximum number up to 1000 pieces ). - Page 20 ROLITE At the "History" interface(refer to picture 10), the characters on top of horizon line are "total number of recording" and "wavelength"(from left to right). 1310 1490 1550 The characters under horizon line are "the number of recording" and the optical power value in accordance to the corresponding wavelengths.
- Page 21 ROLITE Description of every individual menu: : Page up to the last 10 recording. : Page down to the next 10 recording. : Page up to the last 100 recording. : Page down to the next 100 recording. ESC: Exit the "record view" interface ( same as press " "). Select one or more than one recording to delete.
- Page 22 PROLITE-57 6. Remarks 1. When battery power is not enough, the battery indicator will flash. Please immediately use the attached AC/DC adapter or charge the instrument/battery. 2. While charging, the instrument does not allow the user to power off. If pressing Power Off key, the charger head will flash.
- Page 23 PROLITE-57 7. Advice: 1) Please use the dust-proof cap to secure the connector to be scratched or contaminated everytime when the product is not in operation. Please always stay the optical connectors away from oil, dirt and other contamination to ensure the proper operation.
- Page 24 PROMAX ELECTRONICA, S. L. Francesc Moragas, 71 - 75 08907 L’HOSPITALET DE LLOBREGAT (Barcelona) SPAIN Tel. : 93 184 77 00 * Tel. Intl. : (+34) 93 184 77 02 Fax : 93 338 11 26 * Fax Intl. : (+34) 93 338 11 26 http://www.promaxelectronics.com...
Need help?
Do you have a question about the PROLITE-57 and is the answer not in the manual?
Questions and answers