
Related Manuals for Leister TAPEMAT


Summary of Contents for Leister TAPEMAT
- Page 1 ® TAPEMAT Leister Process Technologies Galileo-Strasse 10 CH-6056 Kaegiswil/Switzerland Tel. +41 41 662 74 74 +41 41 662 74 16 www.leister.com sales@leister.com...
- Page 2 Hot-Air welding machine Application TAPEMAT: Manually guided automatic hot-air welding machine for welding PVC straps from 45 mm to max. 50 mm wide – as the reinforcement for tarpaulins – on horizontal and level surfaces. TAPEMAT Spriegel: : Manually guided automatic hot-air welding machine for welding PVC straps (reinforcement strips) 100 mm and 125 mm wide –...
-
Page 3: Technical Data
Conformity Leister Process Technologies, Galileo-Strasse 10, CH-6056 Kaegiswil/Switzerland confirms that this product, in the version as brought into circulation through us, fulfils the requirements of the following EC directives. Directives: 98/37, 2004/108, 2006/95 Harmonised standards: EN 12100-1, EN 12100-2, EN 60204-1, EN 55014-1, EN 55014-2,... -
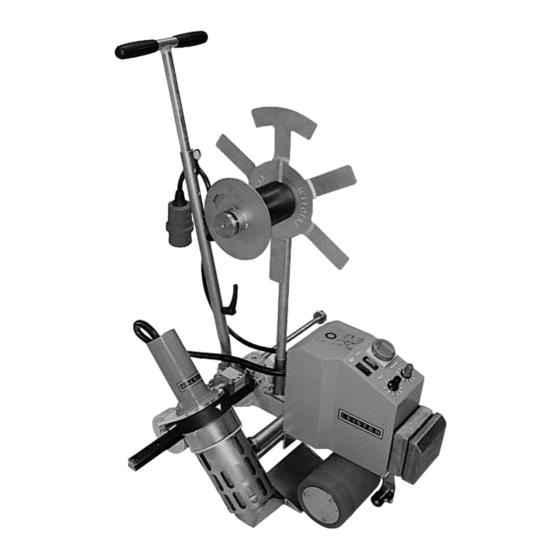
Page 4: Tool Description
Tool description 13 15 1. Mains connection cable 18. Clamping lever, guiding handle joint 2. Cabinet 19. Clamping lever, height adjustment 3. Main switch 20. Retainer (for mains connection cable) 4. Release switch 21. Guide roller 5. Motor On/Off 22. Additional weight 6. -
Page 5: Readiness For Operation
– the guide roller (21) must be aligned centrally to the Drive roller / Pressure roller (12). Adjusting the TAPEMAT welding nozzle • Check the default setting of the welding nozzle (8). – The welding nozzle (8) must be aligned and set parallel and centrically to the drive roller/pressure roller (12). -
Page 6: Transport Position
• Carry out the precise adjustment of the welding nozzle (8) as follows: – Remove strap unrolling device (32) and additional weight (22). – Tilt the TAPEMAT Tarpaulin Bow (figure A). – Loosen adjustment screws (15) and push the welding nozzle (8) upwards parallel to the pressure roller (12), then tighten the adjustment screws (15) again (figure B). - Page 7 Roller (12) and then insert into the strap retaining rollers (27) (Figure 5). The strap retaining rollers (27) are adjustable. Figure 3 Figure 4 Figure 5 – Lift the unit, remove the additional weight (22) and hang back on the TAPEMAT.
-
Page 8: Performing A Test Weld
Before the welding Connect the equipment to the mains. The mains voltage must agree with the equip- ment voltage. • Swing the guide roller (21) downwards. • Set the welding parameters (see page 9). welding temperature must be reached (heating time approx. 5 minutes). During the welding procedure, the operator must always be on the guiding handle side and guide the welding machine. -
Page 9: Setting The Welding Parameters
After the welding • Drive out the hot air blower (9) with guide trolley (31), pivot up and lock in position with the stop ring (24) at retaining pin (23). • Set the temperature variation knob (7) to zero; this allows the welding nozzle (8) to cool off (approx. 10 minutes). •... - Page 10 Fault – Cause – Action • Fault – The drive motor does not start automatically when inserting the nozzle. • Cause – Sensor (28) set incorrectly. • Action Allow the welding nozzle (8) to cool off (approx. 10 minutes). – Set the main switch (3) to 0. –...
-
Page 11: Maintenance
• Regular service of the TAPEMAT increases its service life! • Repairs should only be carried out by authorised Leister Service Centres. They guarantee a correct and reliable repair service within 24 hours, using original spare parts in accordance with the circuit diagrams and spare parts lists. - Page 12 ® © Copyright by Leister Your authorised Service Centre is: Leister Process Technologies Galileo-Strasse 10 CH-6056 Kaegiswil/Switzerland Tel. +41 41 662 74 74 +41 41 662 74 16 www.leister.com leister@leister.com...
Need help?
Do you have a question about the TAPEMAT and is the answer not in the manual?
Questions and answers