Table of Contents
Advertisement
Advertisement
Table of Contents

Related Manuals for Bticino 343100


Summary of Contents for Bticino 343100
- Page 1 343100 Monobloc Audio Digital Entrance Panel Installer manual 05/16-01 PC...
-
Page 3: Table Of Contents
Monobloc Audio Digital Entrance Panel Contents 1 Introduction Warnings and recommendations 2 Description Main functions 2.1.1 Using the pushbutton panel Front view Back view Installation 3 Configuration Access to programming Master code setup 3.2.1 Setting up a master code 3.2.2 Deleting a master code 3.2.3 Deleting all master codes 3.2.4 General device reset SCS and logic addresses setup... -
Page 4: Introduction
1 Introduction Warnings and recommendations Before proceeding with the installation we recommend that you read the content of this manual very carefully. The warranty will automatically become void in case of negligence, improper use, and tampering by unauthorised personnel. -
Page 5: Description
2 Description Main functions The BTicino door entry system entrance panel can manage up to 4000 handset addresses (from 0 to 3999) and the direct call to the switchboard Through the recognition of previously saved numerical (SCS addresses) or alphanumerical codes (logic addresses), it can be used to call handsets, and to give residents the possibility of opening the door lock using a dedicated numerical code. -
Page 6: Front View
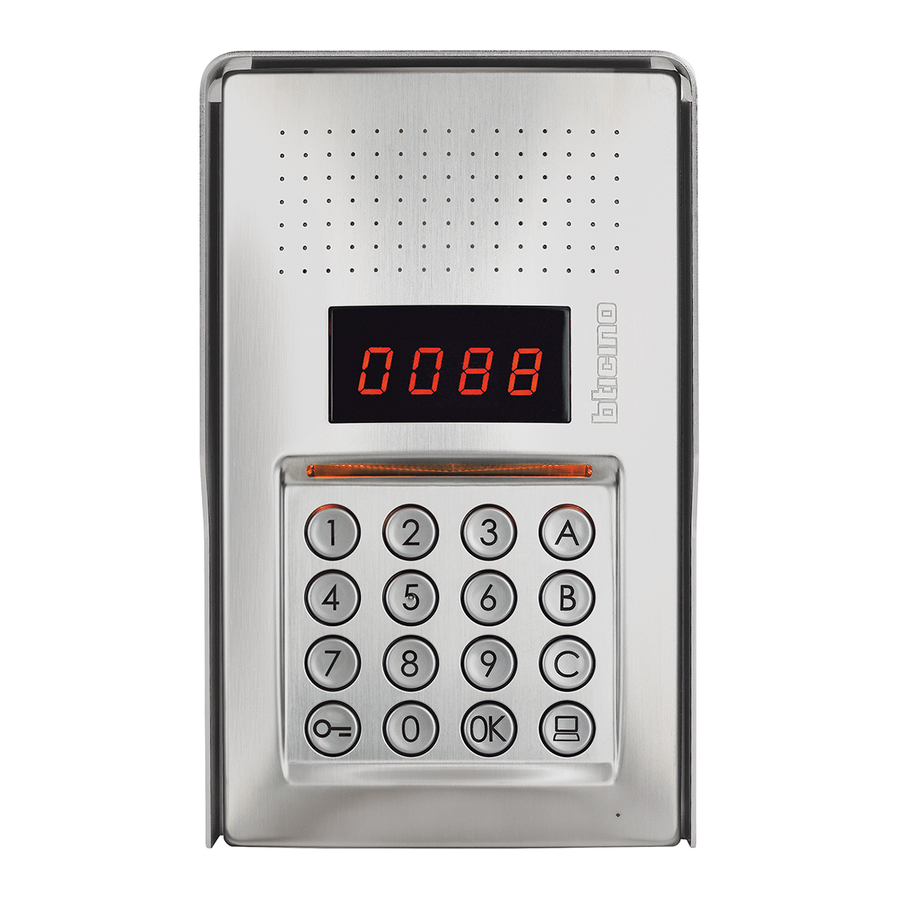
2 Description Front view 1 - Alphanumeric keypad; ” “Key - code confirmation; “ “ key – door lock release. 2 - Keypad lighting LED. 3 - Loudspeaker. 4 - Display. 5 - Switchboard call key. 6 - Microphone. 7 - Rainshield. -
Page 7: Back View
4 - J2: remove to disable the sounds. 5 - J1: remove to enable the additional power supply. 6 - Connection to the BTicino 2 wire digital system BUS. 7 - Additional power supply connector. 8 - Door lock additional pushbutton connector. -
Page 8: Installation
2 Description Installation... - Page 9 Monobloc Audio Digital Entrance Panel To complete the installation insert and fully tighten the fixing screw supplied.
-
Page 10: Configuration
3 Configuration Access to programming To access the entrance panel programming function, a master code must be set (default 0000), consisting of 4 digits. Below is an example. 0000 Enter the master code. If the code is valid the display It is now possible to access will show: “... - Page 11 Monobloc Audio Digital Entrance Panel The programming menu consists of two digits corresponding to two different levels. To make things easier, below is a table with all the available configuration levels and their functions. LEVEL 0 MASTER CODE SETUP Set up a new master code. Delete a master code.
- Page 12 3 Configuration LEVEL 3 PASSEPARTOUT SETUP Enable the passepartout function: YES = 1; NO = 0 (default). Associate a passepartout code to the internal contact (default -0), or to an external actuator with P address the same as that of the entrance panel (1). Set up a new passepartout code.
-
Page 13: Master Code Setup
Monobloc Audio Digital Entrance Panel Master code setup For safety reasons, the system gives the installer the possibility of programming a “MASTER” code. This can be used to access the programming of the other codes (passepartout and door lock code). The master code (default 0000) must be a numerical code consisting of 4 digits; up to 20 master codes may be saved. -
Page 14: Deleting All Master Codes
3 Configuration 3.2.3 Deleting all master codes The display flashes until the operation is completed. An audible signal confirms the deletion. - The operation cannot be cancelled. - Once all master codes have been deleted the default master code will be reinstated automatically (0000). -
Page 15: Scs And Logic Addresses Setup
Monobloc Audio Digital Entrance Panel SCS and logic addresses setup The entrance panel manages SCS and logic addresses. It is possible to save up to 3999 addresses. As a rule, the correspondence between the logic call addresses and the SCS addresses of the hand- sets is saved in the device. -
Page 16: New Logic Address From The Scs Address
3 Configuration 3.3.2 New logic address from the SCS address The menu can only be accessed if the type of call selected is a logic address call (P r 1.0); otherwise the display will show the message E r 0 8. The logic address can be numeric (from 0 to 9) or alphanumeric. -
Page 17: Changing A Logic Address
Monobloc Audio Digital Entrance Panel 3.3.3 Changing a logic address The menu can only be accessed if the type of call selected is a logic address call (P r 1.0); otherwise the display will show the message E r 0 8. Enter the logic address to Press OK to confirm. -
Page 18: Deleting A Logic Address
3 Configuration 3.3.4 Deleting a logic address The menu can only be accessed if the type of call selected is a logic address call (P r 1.0); otherwise the display will show the message E r 0 8. Enter the logic address to Press OK;... -
Page 19: Deleting A Logic Address From An Scs Address
Monobloc Audio Digital Entrance Panel 3.3.5 Deleting a logic address from an SCS address The menu can only be accessed if the type of call selected is a logic address call (P r 1.0); otherwise the display will show the message E r 0 8. It is possible to delete a logic address if the SCS address is known. -
Page 20: Deleting All Logic Addresses
3 Configuration 3.3.6 Deleting all logic addresses The menu can only be accessed if the type of call selected is a logic address call (P r 1.0); otherwise the display will show the message E r 0 8. The display flashes until the operation is completed. -
Page 21: Setup Codice Serratura
Monobloc Audio Digital Entrance Panel Setup codice serratura The door lock code can be used to open the door lock connected to the entrance panel. The entrance panel saves up the 3999 codes, one for each apartment. The code must be univocal and must consist of 4 digits. It is possible to change it following the pro- cedure shown in the following example: Press OK. -
Page 22: Enabling The Door Lock Code Function
3 Configuration 3.4.1 Enabling the door lock code function Press “0” to disable (default) the function and confirm. An audible signal confirms the new setting. Press “1” to enable the function and confirm. An audible signal confirms the new setting. If the value entered is different from 0 or 1, an error message will be displayed (see the dedi- cated section). -
Page 23: Associating The Door Lock Code To The Internal Contact Or To An External P Actuator
Monobloc Audio Digital Entrance Panel 3.4.2 Associating the door lock code to the internal contact or to an external P actuator Press “0” to associate the door lock code to the N-NC-NO contact. An audible signal confirms the new setting. Press “1”... -
Page 24: Setting Up A New Door Lock Code
3 Configuration 3.4.3 Setting up a new door lock code The menu can only be accessed if the door lock code function is enabled (P r 2.0); otherwise the display will show the message E r 0 9. Enter the SCS address the Press OK to confirm. -
Page 25: Deleting A Door Lock Code
Monobloc Audio Digital Entrance Panel 3.4.4 Deleting a door lock code The menu can only be accessed if the door lock code function is enabled (P r 2.0); otherwise the display will show the message E r 0 9. It is possible to delete a door lock code if the corresponding SCS address is known. Enter the SCS address Press OK;... -
Page 26: Deleting All Door Lock Codes
3 Configuration 3.4.5 Deleting all door lock codes The menu can only be accessed if the door lock code function is enabled (P r 2.0); otherwise the display will show the message E r 0 9. The display flashes until the operation is completed. -
Page 27: Passepartout Scs Setup
Monobloc Audio Digital Entrance Panel Passepartout SCS setup The passepartout code gives the possibility of opening the door lock the entrance panel is associ- ated to. This code is not linked to any apartments. The code (default 1234) must be a numerical code consisting of 4 digits; up to 20 codes may be saved. -
Page 28: Associating The Door Lock Code To The Internal Contact Or To An External P Actuator
3 Configuration 3.5.2 Associating the door lock code to the internal contact or to an external P actuator Press “0” to associate the passepartout code to the N-NC- NO contact. An audible signal confirms the new setting. Press “1” to associate the passepartout code to an actuator configured with the same P address of the entrance panel. -
Page 29: Setting Up A New Passepartout
Monobloc Audio Digital Entrance Panel 3.5.3 Setting up a new passepartout The menu can only be accessed if the passepartout function is enabled (P r 3.0); otherwise the display will show the message E r 0 9. Press OK; a beep confirms Press OK. -
Page 30: Deleting All Passepartout Codes
3 Configuration 3.5.5 Deleting all passepartout codes The menu can only be accessed if the type of call selected is a logic address call (P r 3.0); otherwise the display will show the message E r 0 8. The display flashes until the operation is completed. -
Page 31: Switchboard Setup
Monobloc Audio Digital Entrance Panel Switchboard setup If enabled, the direct call to the switchboard function is performed by pressing the dedicated . The addresses dedicated to the switchboard are those from “0” to “15”. 3.6.1 Enabling the switchboard call Press “0”... -
Page 32: Changing The Switchboard Scs Address
3 Configuration 3.6.2 Changing the switchboard SCS address The menu can only be accessed if the function has been enabled (P r 4.0). Enter the address (from “0” Press OK; Return to the start menu. to “15”) to associate to the an audible signal confirms switchboard. -
Page 33: Error Messages
Monobloc Audio Digital Entrance Panel Error messages Below is a summary table of the error messages that may appear on the display. MESSAGE MEANING Code not found Code change sequence wrong Code already exists Memory full Parameter not found Sequence wrong Menu not found Logic addresses not enabled Door lock code and passepartout code not enabled... -
Page 34: Appendix
4 Appendix Display view Display in Stand-by. When a call is made, the display shows the handset called. The 4 dots start flashing quickly. During the connection with the handset the dots flash faster. If a door lock code or a passepartout code is entered, a key will appear for a few seconds on the display. -
Page 35: Reset Of Master Codes Without Using The Main Master Code
Monobloc Audio Digital Entrance Panel Reset of master codes without using the main master code If the programming access code has been forgotten, the master codes can be “physically” reset to the factory configuration code. P P N N T S Disconnect the power Connect the OFF Power the device. -
Page 36: Technical Data
2 A; 12 – 24 Vac/dc Operating temperature (-25) – (+70) °C Technical After-Sales Service BTicino only accepts responsibility for perfect device operation if it is installed to the state of the art respecting the indications of the product installation manual. www.bticino.com... - Page 37 Monobloc Audio Digital Entrance Panel...
- Page 38 BTicino SpA Viale Luigi Borri 231 21100 Varese - Italy www.bticino.com BTicino SpA reserves at any time the right to modify the contents of this booklet and to communicate in any form and modality, the changes brought to the same.
Need help?
Do you have a question about the 343100 and is the answer not in the manual?
Questions and answers