
Related Manuals for SMART-AVI HDX-XT


Summary of Contents for SMART-AVI HDX-XT
- Page 1 HDX-XT User Manual 4K Video and USB 2.0 KVM Extender www.smartavi.com | Tel: (800) AVI-213 | (702) 800-0005 | 2455 W Cheyenne Ave, Suite 112 | North Las Vegas, NV 89032...
-
Page 2: Table Of Contents
NOTICE: The information contained in this document is subject to change without notice. Smart-AVI makes no warranty of any kind with regard to this material, including but not limited to, implied warranties of merchantability and fitness for any particular purpose. Smart-AVI will not be liable for errors contained herein or for incidental or consequential damages in connection with the furnishing, performance or use of this material. -
Page 3: Introduction
328ft./100meters to a compatible display. It is designed to convert HDMI signal to standard, ex- tended signal which can be transmitted by CAT5e/CAT6/CAT7 cable. It also supports Transfer Bidirec- tional Infrared control signal and RS232 control signal. The HDX-XT also supports the connection of a USB host and 2 USB device ports. -
Page 4: Hardware Installation
Press the Ctrl key twice, press the e key, then press the Enter key. This will cause the USB light on the front of the HDX-XT Transmitter Unit to blink rapidly for 1 second, indicating the EDID settings have been re-learned. -
Page 5: Front Panel Control (Transmitter)
tRANSMITTER FRONT PANEL CONTROL Plug in the desired output and inputs, then power on the unit. Press SELECT to alternate between inputs that will be displayed via the output. Press SELECT once more to switch the output. 1. Indicator LED: Power LED: Illuminates when power has been supplied to the unit. -
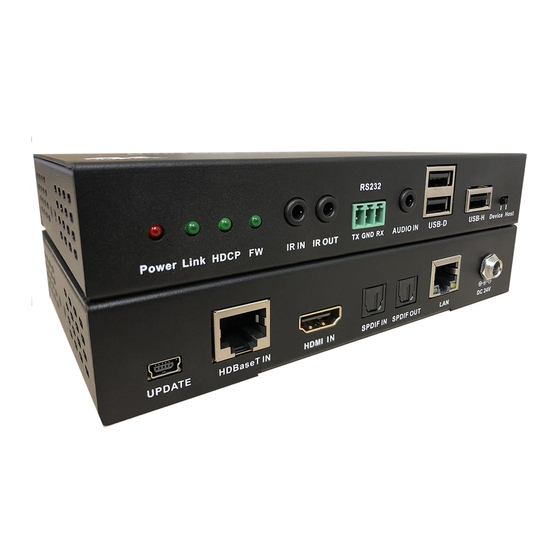
Page 6: Rear Panel Control (Transmitter)
13. SPDIF OUT (Optical out): Connect to speaker with coaxial input for audio signal output from Receiver’s SPDIF IN (Optical in). 14. LAN: This slot provide Internet signal from receiver or to receiver. 15. DC IN: Plug the 24V DC power supply into the unit. HDX-XT (TX) Front HDX-XT (TX) Rear... -
Page 7: Front Panel Control (Receiver)
Receiver FRONT PANEL CONTROL Plug in the desired output and inputs, then power on the unit. Press SELECT to alternate between inputs that will be displayed via the output. Press SELECT once more to switch the output. 1. Indicator LED: Power LED: illuminates when power has been supplied to the unit. -
Page 8: Rear Panel Control (Receiver)
13. SPDIF OUT (Optical out): Connect to speaker with coaxial input for audio signal output from Transmitter’s SPDIF IN (Optical in). 14. LAN: This slot provide Internet signal from receiver or to receiver. 15. DC IN: Plug the 24V DC power supply into the unit. HDX-XT (RX) Front HDX-XT (RX) Rear... -
Page 9: Technical Specifications
technical specifications: VIDEO Format HDMI Input Interface (RX) (1) IR In, (1) Optical (Spdif In), (1) Extender In, (1) USB-H Output Interface (RX) (1) HDMI, (1) LAN, (2) USB, (1) IR Out, (1) Audio Out, (1) RS-232, (1) Optical (Spdif out) Input Interface (TX) (1) HDMI, (1) LAN, (1) USB-H, (1) IR-IN, (1) RS-232, (1) Optical (Spdif in), (1) Audio In Output Interface (TX) -
Page 10: Limited Warranty Statement
Smart-AVI. Any replacement product could be new or like new, provided that it has functional- ity at least equal to that of the product being replaced. Smart-AVI limited warranty is valid in any country where the covered product is distributed by Smart-AVI.
Need help?
Do you have a question about the HDX-XT and is the answer not in the manual?
Questions and answers