Welch Allyn Connex Startup Manual
Integrated wall system
Hide thumbs
Also See for Connex:
- Service manual (221 pages) ,
- Directions for use manual (96 pages) ,
- Quick reference manual (2 pages)
Table of Contents
Advertisement
Quick Links
Download this manual
See also:
Service Manual
STARTUP
GUIDE
FOR SAFETY AND EASE OF ASSEMBLY, FOLLOW THESE
Do not remove packing material from the wall system until the
instructions tell you to do so.
Install the security screw as instructed.
GUÍA DE
INICIO
POR RAZONES DE SEGURIDAD Y PARA FACILITAR EL MONTAJE
DEBE SEGUIR ESTAS INSTRUCCIONES PASO A PASO.
No retire el material de embalaje del sistema de pared hasta que las
instrucciones no se lo indiquen.
Instale el tornillo de seguridad tal y como se indica.
GUIDE DE
DÉMARRAGE
POUR VOTRE SÉCURITÉ ET POUR FACILITER L'ASSEMBLAGE,
VEUILLEZ SUIVRE CES INSTRUCTION ÉTAPE PAR ÉTAPE.
Ne retirez pas le matériel d'emballage du système mural avant que les
instructions ne le stipulent.
Installez les vis de fixation tel qu'indiqué.
INSTRUCTIONS STEP BY STEP.
Advertisement
Table of Contents

Related Manuals for Welch Allyn Connex


Summary of Contents for Welch Allyn Connex
- Page 1 STARTUP GUIDE FOR SAFETY AND EASE OF ASSEMBLY, FOLLOW THESE INSTRUCTIONS STEP BY STEP. Do not remove packing material from the wall system until the instructions tell you to do so. Install the security screw as instructed. GUÍA DE INICIO POR RAZONES DE SEGURIDAD Y PARA FACILITAR EL MONTAJE DEBE SEGUIR ESTAS INSTRUCCIONES PASO A PASO.
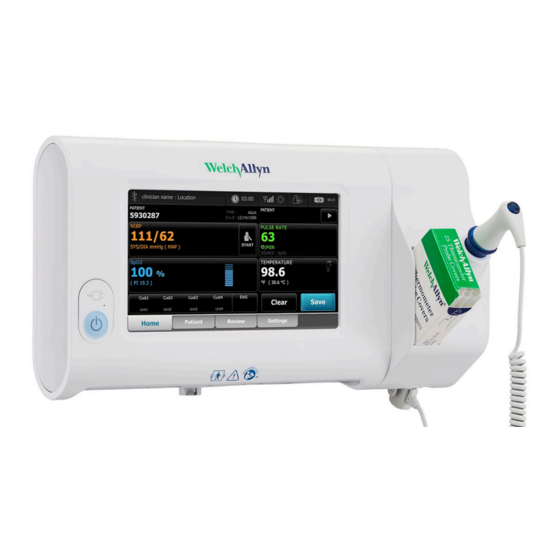
- Page 3 Welch Allyn Connex ® Integrated Wall System Startup guide...
- Page 4 Welch Allyn Connex® Integrated Wall System © 2011 Welch Allyn. All rights are reserved. To support the intended use of the product described in this publication, the purchaser of the product is permitted to copy this publication, for internal distribution only, from the media provided by Welch Allyn. No other use, reproduction, or distribution of this publication, or any part of it, is permitted without written permission from Welch Allyn.
-
Page 5: Unpack The Wall System
Setup Caution Welch Allyn is not responsible for the integrity of any wall mounting interface. Welch Allyn recommends that you contact your Biomedical Engineering Department or maintenance service to ensure professional installation, safety, and reliability of any mounting accessory. Note Some product features described in this publication might not be available in your country. - Page 6 Setup Welch Allyn Connex® Integrated Wall System 2. With the wall system still in its packing material, place it onto a table or flat work surface and remove it from the plastic bag. 3. Turn the wall system over so that the back of the wall system faces up.
-
Page 7: Insert The Battery
Startup guide Setup Insert the battery This procedure applies to first-time setup of the wall system. Therefore, the wall system is assumed to be shut down. WARNING Risk of fire, explosion, and burns. Do not short-circuit, crush, incinerate, or disassemble the battery pack. 1. -
Page 8: Prepare For Mounting
Setup Welch Allyn Connex® Integrated Wall System Prepare for mounting Slide the mounting rail bracket out of the packing material and put it aside. Do not discard. Then flip the wall system onto its back. 2. Remove the cardboard end caps as shown and put aside for recycling. -
Page 9: Mounting Location
• Blood pressure tubing is 8 ft. (2.44 m) long. • Position the wall system so that all instruments are accessible and in a location that allows for ergonomic examinations. Sample room layout Connex Integrated Wall System 2. Examination table... -
Page 10: Mount The Wall System
Setup Welch Allyn Connex® Integrated Wall System Mount the wall system On the selected wall, find and mark the studs, and choose the system height and corresponding height for the mounting rail bracket. Recommendation: Place the mounting rail bracket 63 inches (1.6 m) from the floor, which places screen center height at approximately 63 inches (1.6 m) from the floor. - Page 11 Startup guide Setup 2. Affix the mounting rail bracket to three studs at the selected height using the available screws (anchors are provided for additional support). Caution Ensure that the upper "lip" of the bracket sticks out from the wall and that the bracket is level.
- Page 12 Setup Welch Allyn Connex® Integrated Wall System 4. Before mounting the wall system, remove the cover by loosening the captive retention screws. 5. Hang the wall system on the mounting rail bracket. WARNING Ensure that the “ribs” on the back of the wall system fully engage...
- Page 13 Startup guide Setup 6. Select one of the three available slots at the bottom of the unit that overlaps a stud, and secure the unit to the stud with the remaining screw. WARNING Failure to install this security screw may result in personal injury and equipment damage.
- Page 14 Setup Welch Allyn Connex® Integrated Wall System 8. Re-attach the cover. a. Thread the SpO2 cable through the cutouts on the top right and bottom left of the cover. b. Tighten the two retention screws. 9. Attach the system power cord to the wall unit. Do not plug the cord into an outlet at...
-
Page 15: Mount The Accessory Bin
Startup guide Setup Mount the accessory bin Mount the accessory bin on the accessory bin bracket, then loosely wrap the excess power cord around the accessory bin bracket. 2. If your wall system is configured for SpO2, attach the SpO2 spool to the accessory bin by sliding the spool onto the retention clip. -
Page 16: Connect The Blood Pressure (Nibp) Hose
Setup Welch Allyn Connex® Integrated Wall System 4. Wrap the excess SpO2 patient cable around the spool, and place the SpO2 finger clip in the SpO2 holder. Connect the blood pressure (NIBP) hose Align the hose connector with the hose connector port on the bottom of the monitor. -
Page 17: Set Up The Physical Assessment Instrument Handles And Specula Dispenser
2. Remove the cardboard securing the instrument handles. 3. Attach Welch Allyn 3.5V instrument heads of your choice to the handles. See the directions for use for each instrument head. -
Page 18: Set Up The Suretemp® Plus Thermometer
Setup Welch Allyn Connex® Integrated Wall System Set up the SureTemp® Plus thermometer If your wall system is configured for a SureTemp Plus thermometer, follow these setup instructions. Align the probe well with the tabs facing up and down and insert the probe well into the temperature module. - Page 19 Startup guide Setup Set up the Braun ThermoScan® PRO 4000 thermometer If your system is configured for the Braun ThermoScan thermometer, follow these setup instructions. Remove the thermometer from the package and discard the protective casing. Then open a box of probe covers and place it in the dock. 2.
-
Page 20: Connect Ac Power
Setup Welch Allyn Connex® Integrated Wall System Connect AC power The wall system uses both battery and AC power. After completing all other setup activities, you can apply power to the wall system. Insert the power plug into an outlet to power the monitor and to charge the battery. -
Page 21: Select A Language
Startup Power up the wall system Press to power up the wall system. Select a language When you power up the wall system for the first time, the language selection screen appears. Select your language. 2. Touch Exit. The Home tab appears. -
Page 22: Set The Date And Time
Startup Welch Allyn Connex® Integrated Wall System Set the date and time Touch the Settings tab. 2. Touch the Device tab. 3. To change the date and time values, touch the up and down arrow keys or touch and enter a value.
Need help?
Do you have a question about the Connex and is the answer not in the manual?
Questions and answers