Advertisement
Table of Contents
- 1 Table of Contents
- 2 Device Overview & Intended Use
- 3 CVSM Exterior
- 4 Power on
- 5 Power off
- 6 Spot Profile
- 7 Monitor Profile
- 8 Changing Profiles
- 9 Taking a Non-Invasive Blood Pressure
- 10 Taking Interval Blood Pressures
- 11 And Pulse Rate
- 12 Alarm Management
- 13 Entering Manual Parameters
- 14 Entering Modifiers
- 15 Cleaning
- 16 Advanced Settings
- Download this manual
Advertisement
Table of Contents

Related Manuals for Welch Allyn Connex Vital Signs Monitor


Summary of Contents for Welch Allyn Connex Vital Signs Monitor
- Page 1 Connex® Vital Signs Monitor 1.7 Software Version Clinical Inservice Presentation...
-
Page 2: Table Of Contents
Table of Contents • Device Overview & Intended Use • Taking Temperatures using SureTemp® Plus • Roll Stand Features • Taking Temperatures using Braun • CVSM Exterior 4000 • Power ON • Obtaining an SpO and Pulse Rate • Power OFF •... -
Page 3: Device Overview & Intended Use
Device Overview & Intended Use Use to obtain vital signs and other parameters • Adults (>12 yrs) • Pediatric (29 days-12 yrs) • Neonate (<28 days) MC12691... - Page 4 Roll Stand & Accessory Cable Management System Features • Ergonomic design: roll handle, night light, easy to roll • Cable management system with SpO holster – please use! • Infection control features: – Holder for wipes – Lack of corners for ease of wiping –...
- Page 5 Roll Stand & Accessory Cable Management System Features • Ergonomic design: roll handle, night light, easy to roll • Cable management system with SpO holster – please use! • Cross-contamination reduction features: – Holder for wipes – Lack of corners for ease of wiping –...
-
Page 6: Cvsm Exterior
CVSM Exterior • Power button • Ports: – Ethernet – USB – Stereo/nurse call – EarlySense® Port (if applicable) MC12691... - Page 7 CVSM Exterior • Patient cable/sensor ports – SpO /Pulse Rate – NIBP (non-invasive BP) MC12691...
-
Page 8: Power On
Power ON Power ON Press Power Button on the side MC12691... -
Page 9: Power Off
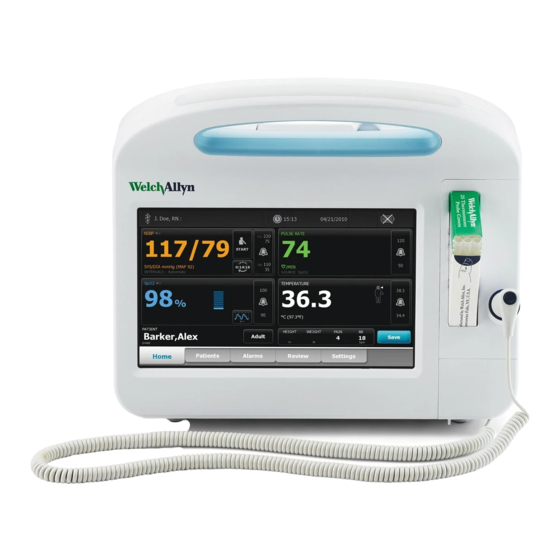
Power OFF Power OFF* 1. Touch battery icon on top right corner of Home Screen 2. Choose Power Down *It is important to power down this way in order to prevent a hard re- boot of the device, which could result in lost information and configuration setting changes. - Page 10 The Home Screen The home screen is divided into three areas: • Device Status Area • Content Area • Navigation Area Let’s look at each area. MC12691...
- Page 11 Device Status Area Provides device status information, including: • Clinician ID • Device location (i.e. nursing unit) • Time • Date • Connection status (i.e. Wireless) • Alarms and Messages MC12691...
- Page 12 Content Area Displays: • Vital sign measurements • Patient information • Manual parameters • Shortcuts to alarm controls • Save button MC12691...
- Page 13 Navigation Area Provides tabs for: • Home • Patient List* • Alarms* • Review* • Settings *Depending upon profile selected MC12691...
-
Page 14: Spot Profile
Spot Profile Features: • No alarms • No BP intervals • Take SpO sensor OFF prior to touching SAVE MC12691... -
Page 15: Monitor Profile
Monitor Profile Features: • Automatic, Program, and Stat interval settings • Parameter alarms • sensor should stay ON while you touch SAVE MC12691... -
Page 16: Changing Profiles
Changing Profiles To change Profiles Touch Settings tab Touch Profiles tab Select the desired Profile (Spot or Monitor) Touch Home tab Note: You cannot change profiles while there is any data on the screen OR if intervals are running. MC12691... -
Page 17: Taking A Non-Invasive Blood Pressure
Taking a Non-Invasive Blood Pressure (NIBP) • Proper technique is very important for accurate readings • Uses SureBP® technology to capture BP on cuff inflation • Will revert to Step deflation method – in times of extreme movement – artifact –... - Page 18 Proper Blood Pressure Technique • No more than two fingers between cuff and • Patient sitting quietly; not moving • Back supported; legs uncrossed • Arm at heart level • Align Artery Index Marker with brachial artery • Proper sized cuff •...
- Page 19 Proper Blood Pressure Technique For more information on Blood Pressure technique, go to: https://www.youtube.com/watch?v=ScbFRb1dKc4&index=21&list=PLkXnwo kwhxrU8d-LnfwYy2Lsjzqa2z7kX MC12691...
- Page 20 Simple Steps for Initiating BP Intervals 1. Touch within the BP frame on the Home Screen 2. Choose “Automatic” or “Program” 3. Adjust intervals in minutes (Automatic) or choose appropriate program (Program) 4. Touch “Start Intervals” MC12691...
-
Page 21: Taking Interval Blood Pressures
Taking Interval Blood Pressures • Access the Interval options by touching the clock icon within the NIBP frame • Choose Automatic, Program, or Stat • Note: “Stat” takes multiple BPs in a 5-minute period MC12691... - Page 22 Automatic Taking Interval Blood Pressures: • Adjust Automatic Interval setting in minutes – Touch arrow keys – Touch small keyboard icon in bottom right of “minutes” window • Touch Start Intervals MC12691...
- Page 23 Program Taking Interval Blood Pressures: • Choose a preset Program – These are set up in Advanced Settings – Interval = How often – Duration = How long • Touch Start Intervals MC12691...
- Page 24 Stopping Interval Blood Pressures • To stop intervals entirely – Press within the BP frame on the Home Screen – Touch Stop Intervals • To stop one single interval reading – Press within the BP frame on the Home Screen –...
-
Page 25: And Pulse Rate
Taking an SpO and Pulse Rate • Uses Nellcor® or Masimo® technology • Clean sensor (alcohol pad) • No nail polish/artificial nails • Warm/perfused extremity • Place on opposite limb of blood pressure cuff if possible • Pulse Rate comes from SpO unless only a BP is taken, in which case the PR comes from the NIBP reading... - Page 26 3 min rectal/oral or 5 min axillary. There will not be an indicator when measurement is complete. User must record reading. Probe Covers Use only Welch Allyn Probe covers. Covers are designed specifically for Sure Temp Plus and are single use. Probe Well Well can be removed for cleaning.
- Page 27 • Thermometer will beep when reading is complete (12-15 secs) • Press top of probe to release cover, then return probe to well Proper probe placement is vital to obtaining an accurate reading *Use ONLY Welch Allyn Probe Covers MC12691...
- Page 28 • Lubrication is optional (if used, account for heating lubrication if at room temperature and use minimal amount) • Thermometer will beep when reading is complete (4-6 secs) • Press top of probe to release cover, then return probe to well *Use ONLY Welch Allyn Probe Covers MC12691...
- Page 29 Taking a Temperature using Braun® Thermoscan 4000: Tympanic Proper Probe Placement Guide MC12691...
- Page 30 Changing Alarms in Monitor Profile • From the Home screen, touch the alarm limits control in the selected parameter frame (i.e. NIBP or Pulse Rate) • Enter the desired upper and lower alarm limits using the up/down arrows or keypad •...
- Page 31 Changing Alarms in Monitor Profile • From the Home screen, touch the alarm limits control in the selected parameter frame • Enter the desired upper and lower alarm limits using the up/down arrows or keypad • To turn alarm limits on or off, use the ON/OFF toggle button •...
-
Page 32: Alarm Management
Alarm Management: Monitor Profile • Alarms occur when vital sign measurements fall outside of set alarm limits • The light bar on the handle of the monitor illuminates as follows: – Flashing red for high priority alarms – Flashing amber for medium priority alarms –... -
Page 33: Entering Manual Parameters
Entering Manual Parameters* • From the Home screen touch the Manual parameters area (height, weight, pain, respirations) pictured below • Touch up/down arrows or keypad to enter desired information • Touch OK to confirm and return to the Home screen •... -
Page 34: Entering Modifiers
Entering Patient Modifiers* • From Home screen touch Manual parameters area • Touch the Modifiers tab • Enter desired information (BP site, cuff size, etc.) • Touch OK to accept or Clear to delete all entries • Entries will not be saved unless you touch OK MC12691 *If applicable to your facility... - Page 35 Saving and Reviewing Vitals 1. When vitals are complete, touch the Save button – Data is then saved to Review tab and the screen is cleared – In Monitor Profile, vitals are automatically saved to the Review tab 2. Touch the Review tab –...
-
Page 36: Cleaning
Cleaning • See DFU for cleaning instructions for each accessory • For CVSM and Accessory Cable Management stand: – Clean on a routine basis according to your facility’s protocols and standards. – The following agents are compatible with the monitor: •... -
Page 37: Advanced Settings
– Allows users to clone devices via USB drive • See Directions for Use for further information regarding Advanced Settings • Separate instruction available for appropriate personnel. Contact your local Welch Allyn Sales Rep or Clinical Consultant. MC12691... - Page 38 Resources Thank you for choosing Customer Care: 1-800-535-6663 Website: www.welchallyn.com MC12691...
Need help?
Do you have a question about the Connex Vital Signs Monitor and is the answer not in the manual?
Questions and answers