Table of Contents
Advertisement
Advertisement
Table of Contents

Related Manuals for Monoprice Maker Ultimate 2


Summary of Contents for Monoprice Maker Ultimate 2
- Page 1 Maker Ultimate 2 3D Printer P/N 36045 User's Guide...
-
Page 2: Table Of Contents
CONTENTS SAFETY WARNINGS AND GUIDELINES ............................4 INTRODUCTION ........................................ 5 FEATURES ..........................................6 CUSTOMER SERVICE ....................................6 PACKAGE CONTENTS ....................................7 PRODUCT OVERVIEW ....................................8 Right Side View ....................................... 9 MENU SYSTEM ....................................... 10 Menu Map ........................................10 Menu Operation ...................................... 10 Main Menu ........................................ - Page 3 Retraction Tab ......................................26 Material Tab ....................................... 26 Travel Tab ........................................27 Machine Tab ......................................28 Line Width Tab ......................................28 Dual Extrusion Tab ....................................29 Warping Precaution Tab ................................. 30 Seam Tab ........................................30 Others Tab ........................................31 GETTING STARTED ...................................... 33 CARE AND MAINTENANCE .................................
-
Page 4: Safety Warnings And Guidelines
SAFETY WARNINGS AND GUIDELINES Please read this entire manual before using this device, paying extra attention to these safety warnings and guidelines. Please keep this manual in a safe place for future reference. Do not reach inside the printer during operation. ... -
Page 5: Introduction
INTRODUCTION Thank you for purchasing this Maker Ultimate 2 3D Printer! This printer uses the FFF (Fused Filament Fabrication) method of printing. It features a metal frame, fully enclosed structure, and heated build platform. It can print 1.75mm ABS, PLA, metal fill, wood fill, and other filament types with melting points below 250°C. -
Page 6: Features
If you have any problem with your order, please give us an opportunity to make it right. You can contact a Monoprice Customer Service representative through the Live Chat link on our website www.monoprice.com or via email at support@monoprice.com. -
Page 7: Package Contents
PACKAGE CONTENTS Please take an inventory of the package contents to ensure you have all the items listed below. If anything is missing or damaged, please contact Monoprice Customer Service for a replacement. 1x 3D printer 1x 500g spool of PLA filament 1x Filament holder 1x 8GB microSD™... -
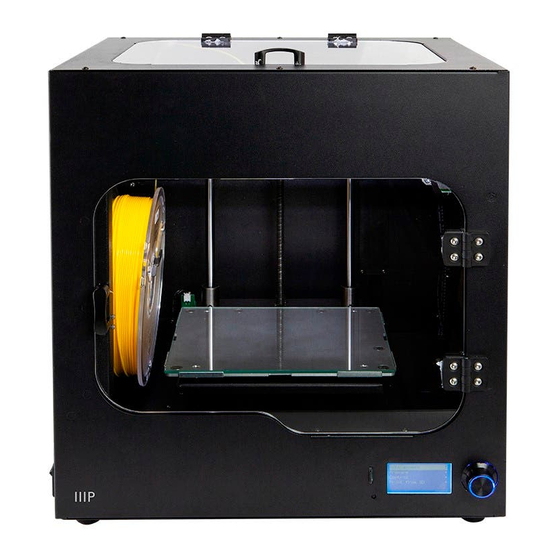
Page 8: Product Overview
PRODUCT OVERVIEW Front View 1. Top Cover 2. Front Door 3. AC Power Socket and Power Switch 4. LCD Display 5. Control Knob 6. Heated Build Platform 7. Nozzle... -
Page 9: Right Side View
Right Side View 1. Filament Holder 2. microSD™ Card Slot 3. USB Port... -
Page 10: Menu System
MENU SYSTEM Menu Map Menu Operation The Control Knob to the right of the LCD Display is used to manipulate the menu. If on a menu or submenu, turn the Control Knob counterclockwise to move the menu highlight up or to the left. ... -
Page 11: Main Menu
If editing a value, turn the Control Knob clockwise to increase the value. If editing a value, push the Control Knob to save the displayed value and return to the previous menu or submenu. Main Menu Info Screen: Displays the printer information screen. ... -
Page 12: Info Screen
Info Screen Press the Control Knob to exit the Info Screen. Prepare Menu Main: Select the Main option to return to the Main Menu. Filament In: Loads filament. Retract: Unloads filament. Auto home: Moves the extruder and build platform to their home positions. ... -
Page 13: Move Axis Menu
Move Axis Menu Prepare: Returns to the Prepare Menu. Move 10mm: Selecting the Move 10mm option displays the movement screen, as shown on the left above, allowing you to move the X and Y axes only. Move 1mm: Selecting the Move 1mm option displays the movement screen, as shown on the right above, allowing you to move the X, Y, and Z axes, as well as the extruder. -
Page 14: Control Menu
Move Z: Select the Move Z option to open the Move Z Edit Screen. Rotate the Control Knob to move the build platform up or down, then press it to save the value and return to the Move Axis Menu. This option will only be visible when choosing 1mm or 0.1mm. -
Page 15: Temperature Menu
Temperature Menu Control: Select the Control option to return to the Control Menu. Nozzle: Select the Nozzle option to open the Nozzle Temperature Edit Screen. Rotate the Control Knob to set the temperature, then press it to save the value and return to the Temperature Menu. -
Page 16: Wiibuilder Slicing Software
WIIBUILDER SLICING SOFTWARE The printer includes the WiiBuilder slicing software on the included microSD™ card. Use the included card reader to display the contents of the microSD card on your PC to install the program. Installation Perform the following steps to install the WiiBuilder slicing software. 1. - Page 17 3. Click the Install button to continue. 4. Once the installation is complete, click the Next button to continue. 5. Click the Finish button to complete the installation and launch the program.
-
Page 18: Wiibuilder Setup
WiiBuilder Setup 1. Once the program launches, the Initial Setup Wizard will launch. It will inform you of several program basics, including how to load model files, the locations of the slice buttons, etc. Read each page, clicking the next button to proceed from page to page. - Page 19 4. Click one of the Slice buttons to display the Basic Configure dialog. 5. Click the Advanced Configure button to display the following dialog. The following sections detail the options on each tab.
-
Page 20: Speed Tab
Speed Tab The Speed Tab features the following options: Top/Bottom Speed (mm/s): Sets the printing speed of the top and bottom surfaces of the model. Outer shell speed (mm/s): Sets the printing speed of the external shell surfaces. ... -
Page 21: Infill Tab
Infill Tab Infill Pattern: Use the drop-down menu to select one of seven different infill patterns, including Lines, Grid, Triangles, Zig Zag, Concentric, Cross, and Octet. The individual patterns are illustrated in the table below. Infill Before Wall: Check this box to print the model after filling and printing the outline. - Page 22 Triangle Zig Zag Concentric Cross Octet...
-
Page 23: Support Tab
Support Tab Support Pattern: Use the drop-down menu to select one of five support patterns, including Lines, Grid, Triangles, Zig Zag, and Concentric. The pattern designs are the same as those of the infill patterns of the same name. o Lines support is easier to remove and is used on models that require more support. -
Page 24: Build Plate Adhesion Tab
Distance X/Y (mm): The distance between the support and the model surface in the horizontal plane. The effects of this parameter are the same as the effects of the Support Top Gap (mm) parameter. Enable Support: Check this box to use supports. ... - Page 25 Initial Layer Z Overlap: Determines the amount of overlap between the first and second layers of the model. Brim line amount: Sets the number of ring gaskets that are added to the edge of the model in contact with the build platform. ...
-
Page 26: Retraction Tab
Retraction Tab Horizontal Travel Retraction: Check this box to enable filament retraction when the nozzle is not printing and is moving in a horizontal direction. Retract at Layer Change: Check this box to retract the filament when switching from layer to layer. -
Page 27: Travel Tab
Filament Diameter (mm): Sets the diameter of the filament being used. This printer only supports 1.75mm diameter filament. Auto Change Temperature: When printing, the nozzle will automatically change the printing temperature according to the type of filament being used. General consumable are set by default, so there is no need to select this option. -
Page 28: Machine Tab
Machine Tab Right Nozzle Diameter (mm): Sets the diameter of the nozzle on the right extruder. This printer only has a single extruder, which is designated the right extruder. The nozzle diameter of this printer is 0.4mm. Left Nozzle Diameter (mm): Sets the diameter of the nozzle on the left extruder. This printer only has a single extruder, which is designated the right extruder. -
Page 29: Dual Extrusion Tab
Raft Top Line Width (mm): This is the width of the lines in the top surface of the raft. These lines can be thin so that the top of the raft is smooth. Raft Middle Line Width (mm): This is the width of the lines in the middle raft layers. Making the second layer extrude more causes the lines to stick to the build plate. -
Page 30: Warping Precaution Tab
Warping Precaution Tab Z Offset (mm): When the Z axis bias is set to negative, the nozzle will print closer to the build platform, which helps reduce warping on large models. Extra Skin Wall Count: This value sets the number of contours on the outer surface of the model. -
Page 31: Others Tab
o User Specified: This option allows you to specify the X and Y start/stop location, which determines where the Z Seam will appear. o Random: With this option, the printer will randomly choose the start/stop location, which prevents building a column. o Sharpest Corner: The start/stop location and the Z Seam will appear in the sharpest corner of the model. - Page 32 Skin Alternate Rotation: Typically, a 3D printer will print solid layers for the top and bottom layers. When doing this, it changes direction 90 degrees from layer to layer. This setting changes that behavior to add an additional 45 degrees of rotation every two layers.
-
Page 33: Getting Started
GETTING STARTED 1. Open the box and remove the printer from the protective foam. Set it on a flat, stable surface, then remove the plastic film. 2. Use a pair of scissors or side cutters to remove the zip ties and silicon rubber sheets on the Z-axis. - Page 34 5. Remove the filament holder from the accessory box and install it inside the printer. Remove the spool of filament and hang it on the filament holder, then insert the end of the filament into the sensor until it comes out of the tube. 6.
-
Page 35: Care And Maintenance
CARE AND MAINTENANCE All 3D printers require periodic maintenance, including several maintenance tasks that should be performed daily. Cleaning the Nozzle Extruded filament and filament particles can accumulate around the nozzle. Use tweezers and a cleaning cloth to remove extraneous filament. Clearing a Blocked Nozzle The nozzle can become blocked from time to time. - Page 36 3. Grasp the heated nozzle with a pair of pliers, then use a 1.5mm Allen wrench to clear the blockage. 4. Reinstall the nozzle, then secure it in place with the screw.
-
Page 37: Replacing The Tape On The Build Platform
Replacing the Tape on the Build Platform Check the surface of the tape on the build platform for wear and unevenness. If it becomes worn, it should be replaced to ensure that the model can adhere properly to the platform. Perform the following steps to replace the tape. - Page 38 2. Unplug the cable connecting the nozzle motor. 3. Using a 2.5mm Allen wrench, loosen the screw shown in the image below and to the left, then unplug the nozzle. 4. Completely unscrew the two hex head screws on the right side, then remove the motor and cooling fan.
-
Page 39: Specifications
SPECIFICATIONS Model 36045 Maximum Printing Area 7.9" x 5.9" x 5.9" (200 x 150 x 150 mm) Filament Diameter 1.75mm Nozzle Diameter 0.4mm Printing Speed 20 ~ 150 mm/sec XY Axis: 0.011mm Positioning Accuracy Z Axis: 0.0025mm ABS, PLA, PLA Pro, TPU, TPE, PET, Metal fill, Supported Filament Types Wood fill, etc. -
Page 40: Technical Support
TECHNICAL SUPPORT Monoprice is pleased to provide free, live, online technical support to assist you with any questions you may have about installation, setup, troubleshooting, or product recommendations. If you ever need assistance with your new product, please come online to talk to one of our friendly and knowledgeable Tech Support Associates. -
Page 41: Notice For Industry Canada
Cet appareil numérique de la classe B est conforme à la norme NMB-003 du Canada. EU Declaraton of Conformity Monoprice, Inc. declares the product described within this user guide or manaul is in compliance with below applicable directives. The full text of the EU Declaration of... - Page 42 Electric and Electronic Equipment (WEEE) This document contains important information for users with regards to the proper disposal and recycling of Monoprice products. Consumers are required to comply with this notice for all electronic products bearing the following symbol: For Consumers in the European Union: This EU Directive requires that the product bearing this symbol and or its packaging must not be disposed of with unsorted municipal waste.
- Page 43 Safety Notice WARNING: Do not use this product near water, for example, in a wet basement or near swimming pool or in an area where accidental contact with water or liquid might occurs WARNING: Avoid using this product during an electrical storm. There may be a remote risk of electric shock from the surge caused by lightning WARNING: The external power adapter or AC power cord is the equipment's disconnection device.
Need help?
Do you have a question about the Maker Ultimate 2 and is the answer not in the manual?
Questions and answers