Table of Contents
Advertisement
Advertisement
Table of Contents

Related Manuals for Monoprice 15710


Summary of Contents for Monoprice 15710
- Page 1 MONOPRICE Maker Select Pro Ultimate 3D Printer P/N 15710 User's Manual...
-
Page 2: Table Of Contents
CONTENTS SAFETY WARNINGS AND GUIDELINES ............................3 INTRODUCTION ........................................ 4 FEATURES ..........................................4 CUSTOMER SERVICE ....................................4 PACKAGE CONTENTS ....................................5 PRODUCT OVERVIEW ....................................6 UNPACKING AND SETUP ..................................7 MENU OPERATION ....................................... 11 LEVELING THE BUILD PLATE ................................12 INSERTING FILAMENT .................................... -
Page 3: Safety Warnings And Guidelines
SAFETY WARNINGS AND GUIDELINES The printer is very sensitive to static electricity. Always contact a grounded object before working with this device. It is recommended to wear an anti-static wrist strap when working with this device. Power off and unplug the printer from the power source prior to making repairs or alterations. -
Page 4: Introduction
If you have any problem with your order, please give us an opportunity to make it right. You can contact a Monoprice Customer Service representative through the Live Chat link on our website www.monoprice.com during normal business hours (Mon-Fri: 5am-7pm PT, Sat-Sun: 9am-... -
Page 5: Package Contents
PACKAGE CONTENTS Please take an inventory of the package contents to ensure you have all the items listed below. If anything is missing or damaged, please contact Monoprice Customer Service for a replacement. 1x 3D printer 1x Spool holder 2x Print bed mats... -
Page 6: Product Overview
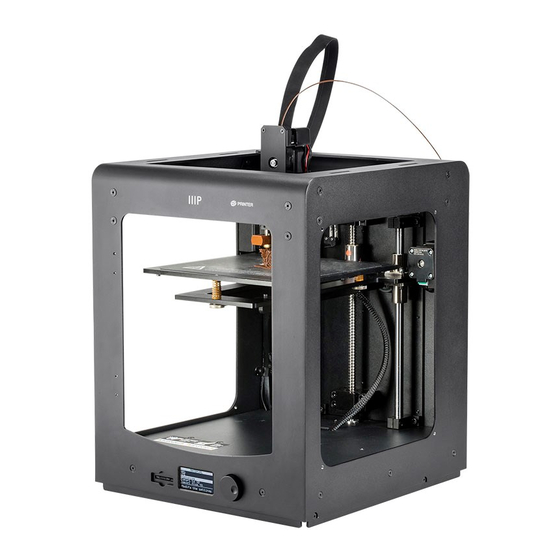
PRODUCT OVERVIEW 1. Mk11 extruder 8. Cable quick coupler 2. Double locking Z-axis screw 9. Cable lock 3. Printing mat 10. Extruder cable 4. Guide rod 11. USB port 5. SD card slot 12. Power switch 6. LCD display 13. AC power socket 7. -
Page 7: Unpacking And Setup
UNPACKING AND SETUP Take care when unpacking the printer. Do not use excessive force at any stage of the unpacking process. 1. Place the box on a flat stable surface. 2. Open the box and remove the User's Manual. 3. Remove the black foam protector. 4. - Page 8 5. Place the printer on a sturdy table. 6. Remove the plastic bag from the top of the printer. 7. Cut the two black bindings from the side of the printer. 8. Carefully remove the print mats. 9. Gently remove the accessories box from under the print bed.
- Page 9 10. Fold the protecting foam and carefully pull it out from under the print bed. 11. Carefully cut the bindings that hold the X-axis and Y- axis rails in place. 12. Carefully lift the printer out of the foam cradle and set the foam aside.
- Page 10 15. Turn the control post by hand until the flat side is facing up. 16. Position the control knob with the locking screw facing up, then slide it onto the control post. 17. Using the 1.5mm hex wrench, tighten the locking screw to secure the control knob in place.
-
Page 11: Menu Operation
20. With one hand hold the nut in place. With the other hand insert the spool holder into the large hole on the back, then turn clockwise and thread it into the nut. Tighten, but do not over tighten. 21. Ensure that the printer is powered off (O side of the power switch is depressed). -
Page 12: Leveling The Build Plate
LEVELING THE BUILD PLATE Although the build plate was leveled at the factory, it may have shifted somewhat during shipping. Before you begin using the printer, you will need to check the build plate level and adjust it as necessary. Build plate leveling is crucial to getting a good print. - Page 13 4. For step 1/7, use the control knob to raise the build plate, as directed. Press the control knob to select the CONTINUE option when complete. 5. For step 2/7, adjust the screw under the left-rear corner of the build plate until the plate is 1mm from the nozzle.
- Page 14 8. The extruder will move to the center front of the build plate. Adjust the screw under the center-front until you can move the paper with a slight bit of resistance. Select the CONTINUE option to proceed. 9. The extruder will move to the left-rear of the build plate. Adjust the screw under the left-rear corner until you can move the paper with a slight bit of resistance.
-
Page 15: Inserting Filament
INSERTING FILAMENT Before you can print any objects, you will need to insert filament. Perform the following steps to insert filament. Note that these instructions will assume the use of PLA filament. 1. Ensure that the printer is powered on. 2. - Page 16 4. Select the Move material option. Wait for the nozzle temperature to reach the target value (200°C). 5. With one hand, depress the lever on the feed mechanism and with the other insert the filament into the hole on top, as shown. Keep pushing in the filament until there is significant resistance.
-
Page 17: Installing Cura
To download the software, use your browser to go to www.monoprice.com, type 15710 into the search bar, then scroll down to the Support Files section and click the Cura download link. - Page 18 5. Print Profiles: Use the radio buttons to select one of the print profiles, which determine the print quality. 6. Print With Support Structure: When printing models with overhanging elements, it might be a good idea to add support structures. 7.
- Page 19 Left and Right Mouse Buttons: Click and hold both buttons, then move the mouse to zoom the camera in or out. Scroll Wheel: Use the scroll wheel to zoom the camera in or out. Right Mouse Button + Shift Key: Hold down one of the shift keys, then click and hold the right mouse button and move the mouse to pan the 3D view.
-
Page 20: Manual Cura Setup
MANUAL CURA SETUP If you have a different version of Cura installed or if you want to set the printer information manually for Cura or another software package, use the settings contained in the following images to configure your software to work with the Maker Select printer. -
Page 21: Creating A Gcode File
CREATING A GCODE FILE Before making a print, you need a gcode file, which contains all the model information as well as machine specific information about your printer. You can create the proper file using a basic model file in STL format. YouMagine.com is an online community website dedicated to allowing users to share and download various basic model files, which can be used to create the gcode file. - Page 22 5. Once Cura has finished loading the file, it will automatically begin preparing the model for printing on your selected printer model (Maker Select). A progress bar will appear under the Save Toolpath icon. While Cura is working, you can set the print type (quality) and can instruct it to print support structures.
- Page 23 9. Ensure that the printer is powered off, then insert the SD card with your saved file into the SD card slot to the left of the display on the front of the printer. Power the printer on. 10. Use the control knob to highlight and select the PRINT option.
-
Page 24: Maintenance
TECHNICAL SUPPORT Monoprice is pleased to provide free, live, online technical support to assist you with any questions you may have about installation, setup, troubleshooting, or product recommendations. If you ever need assistance with your new product, please come online to talk to one of our friendly and knowledgeable Tech Support Associates. -
Page 25: Troubleshooting
TROUBLESHOOTING Q1: The print will not stick to the build plate. LEVELING A1: This is caused by an improperly leveled build plate. Perform the steps in the THE BUILD PLATE section. Q2: The material feed mechanism ticks while loading new material. A2: As long as material is being extruded at a normal rate, this is normal. -
Page 26: Specifications
SPECIFICATIONS Print Technology Fused filament fabrication (FFF) Build Volume 200 x 200 x 175 mm Ultra high: 20 micron High: 60 micron Layer Resolution Medium: 100 micron Low: 200 micron X: 12.5 micron Position Precision Y: 12.5 micron Z: 5 micron Filament Diameter 1.75mm Nozzle Diameter... -
Page 27: Regulatory Compliance
Modifying the equipment without Monoprice's authorization may result in the equipment no longer complying with FCC requirements for Class B digital devices. In that event, your right to use the equipment may be limited by FCC regulations, and you may be required to correct any interference to radio or television communications at your own expense. -
Page 28: Notice For Industry Canada
particular installation. If this equipment does cause harmful interference to radio or television reception, which can be determined by turning the equipment off and on, the user is encouraged to try to correct the interference by one or more of the following measures: ...
Need help?
Do you have a question about the 15710 and is the answer not in the manual?
Questions and answers