
Subscribe to Our Youtube Channel
Related Manuals for Ferno EZ-Glide 59T


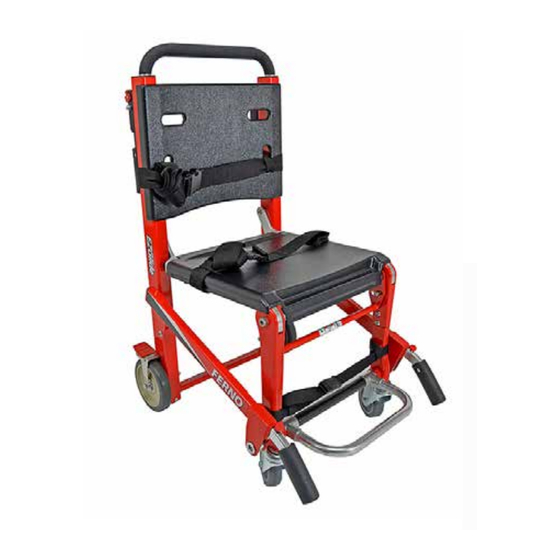
Summary of Contents for Ferno EZ-Glide 59T
- Page 1 EZ-Glide ® Evacuation Chair Models 59, 59T, 59T-LWH Users’ Manual July 2018 Pub. No. 234-3298-07 Read this Manual and Retain for Future Reference...
-
Page 2: Ferno Customer Relations
Limited Warranty Statement The products sold by Ferno are covered by a limited warranty, which 1.937.382.1451 is printed on all Ferno invoices. The complete terms and conditions of the limited warranty, and the limitations of liability and disclaimers, are also available upon request by calling Ferno at 1.800.733.3766 or... -
Page 3: Table Of Contents
Training Record__________________________________________ 37 Footrest _________________________________________ 17 Wheel Locks _____________________________________ 17 Maintenance Record _____________________________________ 38 Notes __________________________________________________ 39 Rear Lift Handles Model 59T-LWH Only ________________ 18 Rear Lift Handles Models 59, 59T (Optional) ____________ 19 © Ferno-Washington, Inc. / 234-3298-07 / July 2018... -
Page 4: Safety Information
Use only Ferno-approved items on the chair. Improper parts and service can cause injury. Use only Ferno parts and Ferno-approved service on the chair. Modifying the chair can cause injury and damage. Use the chair only as designed by Ferno. -
Page 5: Symbol Glossary
1.5 Symbol Glossary The symbols defined on this page are used on the chair and/or in this users’ manual. Ferno uses symbols recognized by the International Standards Organization (ISO), American National Standards Institute (ANSI) and the emergency medical services industry. -
Page 6: Safety And Instruction Labels: Model 59
Safe Use Guidelines Instruction: Folding/Unfolding the Chair Ferno Products are Protected by Patents Worldwide Instruction: Adjusting Lift Bar Instruction: Risk of Injury: Do Not Closing Tracks Lubricate Tracks Safety Instruction: Attaching Restraints © Ferno-Washington, Inc. / 234-3298-07 / July 2018... -
Page 7: Operator Focus
INTERACTIVE CONTENT: For training videos and proper use of the ● chair, scan a QR code in this manual, click a link in an electronic version of this manual or visit our website at www.ferno.com. LOAD: The load is the overall weight of the patient plus equipment ●... -
Page 8: Using Additional Help
Using the Chair 2.3 Using Additional Help WARNING Operating the chair requires a minimum of two trained operators. Ferno Helpers can cause injury. Maintain control of the chair, recommends: operate the controls, and direct all helpers. Position a trained operator at each end of the chair;... -
Page 9: About The Chair
A third person to serve as a spotter may be required by local protocols. Additional help may be required when working with heavy patients. Specification Imperial Metric The Ferno® Model 59 EZ-Glide® Evacuation Chair is an emergency Load Capacity 500 lb 227 kg patient-handling device designed to transport a seated patient up and Load Capacity (UK) 35.7 st... -
Page 10: Components: Model 59
Restraint Slots Removable Wheel Lock (2) ABS Seat Panel with Restraint Slots Patient Restraints Chair Lock Telescoping Lift Handle (2) 6" Wheel Ankle Restraint with Lock (2) 4" Swivel Wheel (2) Folding Footrest © Ferno-Washington, Inc. / 234-3298-07 / July 2018... -
Page 11: Components: Model 59T, Model 59T-Lwh
6" Wheel with Lock (2) IV Pole (Optional) Extending Lift Bar Lift Bar Release Tabs Locking Rear Handle (Pair, Optional) Track Release Bar Restraint Options (See “Accessories” on page 34) Track Closing Handle Wheel Lock (2) © Ferno-Washington, Inc. / 234-3298-07 / July 2018... -
Page 12: Setup
Repeat with the second restraint, attaching its straps to opposite sides of the chair. Lap Belt Lap Belt Attach the lap restraint through the seat-panel slots. © Ferno-Washington, Inc. / 234-3298-07 / July 2018... -
Page 13: Ankle Restraint
(Figure 3). Attach the remaining strap to the opposite front leg. Buckle the restraint and adjust the length (Figure 4). © Ferno-Washington, Inc. / 234-3298-07 / July 2018... -
Page 14: Features
To verify the lock has engaged, hold the lift bar while pulling up on the chair frame at the front of the seat. The chair will not fold if the lock is engaged. © Ferno-Washington, Inc. / 234-3298-07 / July 2018... -
Page 15: Track System (Models 59T, 59T-Lwh Only)
Never lubricate the tracks or belts. Using the chair on stairs requires a minimum of two trained ● operators. Ferno recommends using a third person as a “spotter”. See “Transporting a Patient Down Stairs (Models 59T, 59T-LWH)” on page 23. -
Page 16: Extending Lift Bar
Lock both handles at the same position. Verify that both handles are locked by trying to push or pull them without pressing the release buttons. When the locks are engaged, the handles will not move. © Ferno-Washington, Inc. / 234-3298-07 / July 2018... -
Page 17: Footrest
To engage a wheel lock, press down the rear end of the lock pedal (Figure 16). To disengage a wheel lock, press down the forward end of the lock pedal. © Ferno-Washington, Inc. / 234-3298-07 / July 2018... -
Page 18: Rear Lift Handles Model 59T-Lwh Only
Use the handles to lift and carry the chair up stairs or over obstacles. To tilt and roll the chair, use the lift bar. Do not press down on the locked handles in order to tilt or turn the chair. © Ferno-Washington, Inc. / 234-3298-07 / July 2018... -
Page 19: Rear Lift Handles Models 59, 59T (Optional)
Use the handles to lift and carry the chair up stairs or over obstacles. To tilt and roll the chair, use the lift bar. Do not press down on the locked handles in order to tilt or turn the chair. © Ferno-Washington, Inc. / 234-3298-07 / July 2018... -
Page 20: Using The Chair
Operators communicate with one another and use coordinated ● movements to operate the chair. Ferno recommends that a third trained person serve as a “spotter” ● while using the chair on stairs. Lift only the weight you can safely handle. Use additional help ●... -
Page 21: Transferring The Patient
(Figure 18), or tilt the chair back and roll it on its rear wheels. Foot-End Operator: Assist the head-end operator as needed and attend the patient. © Ferno-Washington, Inc. / 234-3298-07 / July 2018... -
Page 22: Transporting A Patient Down Stairs (Model 59)
● operators. Use additional help as needed. See “Using Additional Help” on page 8. Ferno recommends that the two operators face each other when ● transporting a patient down stairs and that a third person “spot” for the foot-end operator (Figure 24). However, the foot-end operator may face forward (with back to patient) if desired. -
Page 23: Transporting A Patient Down Stairs (Models 59T, 59T-Lwh)
Use additional help as needed to control the chair. See “Using Additional Help” on page 8. Ferno recommends that the two operators face each other when ● transporting a patient on stairs and that a third trained person “spot”... - Page 24 12. To continue the descent, adjust the lift handles and lift bar as needed to maneuver the chair to the next stairway. Note: In a narrow stairway, you may need to retract the handles between each flight of stairs. © Ferno-Washington, Inc. / 234-3298-07 / July 2018...
-
Page 25: Transporting A Patient Up Stairs (All Models)
● Use additional help as needed. See “Using Additional Help” on page 8. Ferno recommends that the two operators face each other when ● transporting a patient up stairs and that a third person “spot” for the head-end operator. Follow your local protocols for carrying chairs. -
Page 26: Pausing On The Stairs
Both operators set the chair down on its rear wheels on a step. Both operators hold the chair in place (Figure 30). To resume, lift and carry the chair as instructed in this manual. See “Transporting a Patient Up Stairs (All Models)” on page 25. © Ferno-Washington, Inc. / 234-3298-07 / July 2018... -
Page 27: Maintenance
Chest and Lap Restraints: Disinfect and clean restraints as directed in WARNING the restraint users’ manual provided. Additional, free users’ manuals can be obtained from Ferno. See “Ferno Customer Relations” on page 2. Improper maintenance can cause injury. Maintain the chair only as described in this manual. -
Page 28: Inspecting The Chair
Do the belts operate properly through the full range of ● motion, without becoming loose or off-track? Are the inner cords of the belts visible (indicating the ● need for replacement)? Are the belt-tensioning bolts and nuts tight? ● © Ferno-Washington, Inc. / 234-3298-07 / July 2018... -
Page 29: Lubricating The Chair
If track or belts pick up oil or grease during use or while the chair is being serviced, clean the track and belts with SD-20 All-Purpose Cleaner before using the chair again. See “Cleaning Tracks and Belts” on page 27. © Ferno-Washington, Inc. / 234-3298-07 / July 2018... -
Page 30: Reconditioning The Track Belts
If the belts do not perform properly, you may need to re-sand them, or they may need to be replaced. See “Parts and Service” on page 35. © Ferno-Washington, Inc. / 234-3298-07 / July 2018... -
Page 31: Adjusting Track-Belt Tension
7/16-inch wrenches to tighten the bolt and nut only enough to hold the tension (Figure 37). © Ferno-Washington, Inc. / 234-3298-07 / July 2018... - Page 32 3/4 in. to 1 in. (19 mm to 25 mm) as shown (Figure 39). the exposed surface of the track to the inner surface of the belt is 1-1/4 in. to 1-1/2 in. (31.75 mm to 38 mm), as shown (Figure 38). © Ferno-Washington, Inc. / 234-3298-07 / July 2018...
-
Page 33: Removing And Attaching The Abs Panels
(Figure 42) then lift the panel off the chair. To attach the seat panel: Align the panel with the chair frame and press down to snap the panel onto the frame. Panel Keeper (2) © Ferno-Washington, Inc. / 234-3298-07 / July 2018... -
Page 34: Accessories
Accessories 8 - ACCESSORIES POWERTRAXX™ CONVERSION KITS Ferno offers a full line of emergency medical service accessories. Selected items approved for use with the chair are listed here. PowerTraxx™ conversion kits provide a powered track system for the Always follow the instructions packed with accessories. Keep the Model 59T series chair. -
Page 35: Parts And Service
+1.937.383.1051 Internet www.EMSAR.com 9.2 Worldwide To order Ferno parts, and for professional repair, contact your Ferno distributor. Your distributor is the only agent authorized by Ferno to manage, service, and repair Ferno products. 9.3 Parts List Telescoping Handle Assemblies (complete) Ref. -
Page 36: Parts Diagrams
Parts and Service 9.4 Parts Diagrams Refer to Chart On Page 35 Not Shown © Ferno-Washington, Inc. / 234-3298-07 / July 2018... -
Page 37: Training Record
Training Record TRAINING RECORD Training Method Trainer Date Printed Name Signature Read Video/ Initials Hands-On Manual Online © Ferno-Washington, Inc. / 234-3298-07 / July 2018... -
Page 38: Maintenance Record
Maintenance Record MAINTENANCE RECORD Date Maintenance Performed © Ferno-Washington, Inc. / 234-3298-07 / July 2018... -
Page 39: Notes
NOTES © Ferno-Washington, Inc. / 234-3298-07 / July 2018... - Page 40 © Ferno-Washington, Inc. / 234-3298-07 / July2018...
Need help?
Do you have a question about the EZ-Glide 59T and is the answer not in the manual?
Questions and answers