Table of Contents
Advertisement
Quick Links
Download this manual
See also:
User Manual
Advertisement
Table of Contents

Related Manuals for Harman Kardon HKTS 60BQ/230


Summary of Contents for Harman Kardon HKTS 60BQ/230
- Page 1 HKTS 60BQ/230 Home Theater Speaker System Owner’s Manual...
-
Page 2: Important Safety Instructions
HKTS 60BQ/230 Important Safety Instructions Important Safety Instructions Read these instructions. Keep these instructions. Heed all warnings. Follow all instructions. Do not use this apparatus near water. Clean only with a dry cloth. Do not block any ventilation openings. Install in accordance with the manufacturer’s instructions. -
Page 3: Table Of Contents
HKTS 60BQ/230 Table of Contents IMPORTAnT SAFeTy InSTRUCTIOnS InTRODUCTIOn DeSCRIPTIOn AnD FeATUReS InClUDeD ITeMS HKTS 210SUB ReAR-PAnel COnneCTIOnS COlOR-CODIng SySTeM SPeAKeR PlACeMenT PlACIng THe FROnT SPeAKeRS PlACIng THe CenTeR SPeAKeR PlACIng THe SUBWOOFeR PlACIng THe SURROUnD SPeAKeRS MOUnTIng OPTIOnS FOR SATellITe AnD CenTRe SPeAKeRS... -
Page 4: Introduction
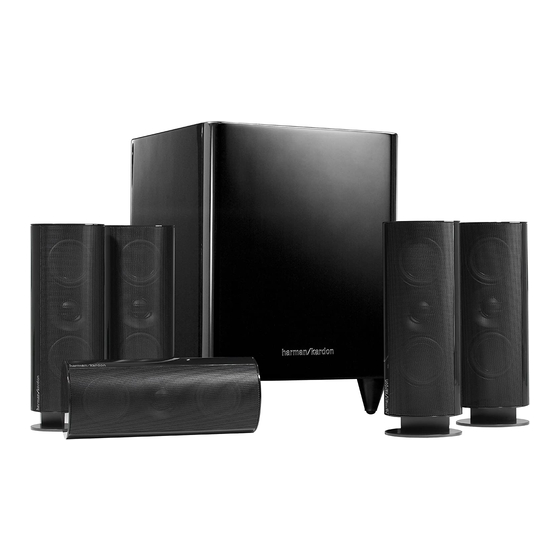
Introduction, Description and Features, Included Items Introduction Included Items Thank you for purchasing the harman kardon HKTS 60BQ speaker system, with which Four satellite speakers for front left/ you’re about to begin many years of listening enjoyment. The HKTS 60BQ has been... -
Page 5: Hkts 210Sub Rear-Panel Connections
HKTS 60BQ/230 HKTS 210SUB Rear-Panel Connections, Color-Coding System HKTS 210SUB Rear-Panel Connections Phase switch : The Phase switch 0 determines whether the HKTS 210SUB’s Line-Level LFE In connector : The signal from this connector bypasses the piston-like action moves in and out in phase with the satellite speakers. If the subwoofer’s internal low-pass crossover. -
Page 6: Speaker Placement
HKTS 60BQ/230 Speaker Placement, Mounting Options Speaker Placement Mounting Options for Satellite and Centre Speakers Placing the Front Speakers 0 – 2ft Shelf Placement Apply Pressure evenly lift Base Straight The front speakers should be placed the same to Both Sides of Base... - Page 7 HKTS 60BQ/230 Mounting Options nOTe: If you’re running the speaker wire through the wall, you can bring it out directly Insert the conductor with the coloured band into the speaker’s red ( + ) terminal, and behind the bracket location and insert it through the bottom opening in the wall portion of insert the other conductor into the speaker’s black ( –...
-
Page 8: Wall-Mounting: Centre Speaker
Most electronics makers, including harman kardon engineers, use red to denote the ( + ) terminal and black for the ( – ) terminal. newer harman kardon receivers conform to Use These Holes the CeA standard and therefore use a colour other than red to denote the ( + ) terminal for to Attach Bracket some speaker positions. -
Page 9: Connecting The Subwoofer To A Receiver Or Preamp/Processor With A Dedicated Subwoofer Output
HKTS 60BQ/230 Speaker Connections Left Front Centre Right Front Front left Speaker Cable Center Speaker Cable Front Right Speaker (White Bands) (green Bands) Cable (Red Bands) – – – Set Input Mode Switch to “lFe” FRONT SURROUND CENTRE + –... -
Page 10: Connecting The Subwoofer To A Receiver Or Preamp/Processor With Line Outputs
HKTS 60BQ/230 Speaker Connections Left Front Centre Right Front Front left Speaker Cable Center Speaker Cable Front Right Speaker (White Bands) (green Bands) Cable (Red Bands) – – – Set Input Mode Switch to “normal” FRONT SURROUND CENTRE + –... -
Page 11: Connecting To A Trigger-Voltage Source
HKTS 60BQ/230 Speaker Connections FRONT SURROUND CENTRE + – + – RIGHT LFE SUB LEFT TRIGGER OUTPUT + – + – OUTPUT Receiver Subwoofer Trigger Cable (Black ends) Connecting to a Trigger-Voltage Source nOTe: Please do not connect the subwoofer On/OFF trigger cable to the Remote Control If your preamp/processor or another audio/video component has a trigger-voltage Output (IR Out) of your home cinema system or surround receiver. -
Page 12: Operation
HKTS 60BQ/230 Operation Operation Turning the Subwoofer On and Off Set the HKTS 210SUB’s Power Switch 8 to the ON position. • If the Power On Mode Switch 2 is set to AUTO, the HKTS 210SUB will automatically turn itself on when it receives an audio signal, and it will go into the standby mode after it has received no audio signal for 15 minutes. -
Page 13: Troubleshooting
This unit is designed for trouble-free operation. Most problems that users encounter are due to operating errors. So if you have a problem, first check this list for a possible solution. If the problem persists, consult your authorized harman kardon service centre. -
Page 14: Specifications
HKTS 60BQ/230 Specifications Specifications HKTS 60BQ/230 System Frequency Response 45Hz – 20kHz (-6dB) SAT-TS60 Satellites Recommended Power 20 ~ 150 watts Impedance 8 ohms nominal Sensitivity 83dB @ 2.83v/1 meter Tweeter One 1" (25mm) CMMD lite dome, video-shielded Midrange Dual 3" (75mm) flat-diaphragm drivers, video-shielded Dimensions –... - Page 15 HKTS 60BQ/230...
- Page 16 Made in P.R.C. © 2010 HARMAn International Industries, Incorporated. All rights reserved. harman kardon and CMMD are trademarks of HARMAn International Industries, Incorporated, registered in the United States and/or other countries. CeA is a registered trademark of the Consumer electronics Association.
Need help?
Do you have a question about the HKTS 60BQ/230 and is the answer not in the manual?
Questions and answers