Table of Contents
Advertisement
Quick Links
Advertisement
Table of Contents

Subscribe to Our Youtube Channel
Related Manuals for DX Engineering OMNI-TILT DXE-OMNITILT-1


Summary of Contents for DX Engineering OMNI-TILT DXE-OMNITILT-1
- Page 1 ™ OMNI-TILT Vertical Antenna Tilt Base DXE-OMNITILT-1 DXE-OMNITILT-INS Revision 0e © DX Engineering 2017 1200 Southeast Ave. - Tallmadge, OH 44278 USA Phone: (800) 777-0703 - Tech Support and International: (330) 572-3200 Fax: (330) 572-3279 - E-mail: DXEngineering@DXEngineering.com...
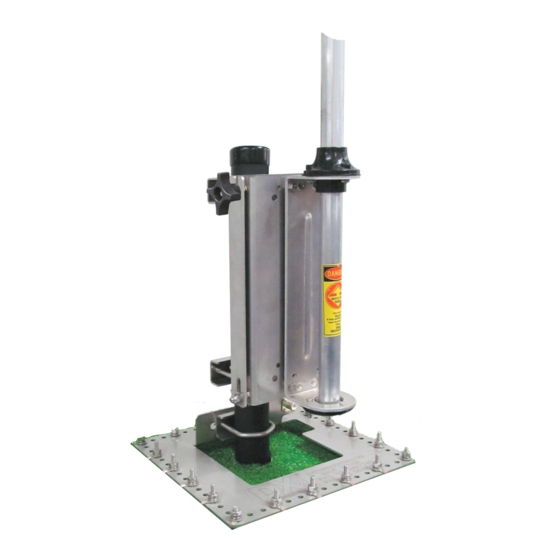
- Page 2 Introduction The DX Engineering OMNI-TILT™ Vertical Antenna Tilt Base is a new design incorporating features that make this Tilt Base a ‘must have’ for all types of vertical antennas. The OMNI-TILT™ base is patterned on the same proven safe ™...
-
Page 3: Basic Assembly
™ There are three OMNI-TILT kits and one clamp kit available: Part Number Description DXE-OMNITILT-1 OMNI-TILT™ Base with hardware DXE-OMNITILT-1P OMNI-TILT™ Base with hardware for Trap Vertical - includes one DXE-TVA-HWK DXE-OMNITILT-2P OMNI-TILT™ Base with hardware for Mast Mounted Vertical includes 2 DXE-OTMC-250P Clamp Kits DXE-OTMC-250P Double V-Clamp fits 1.25 to 2.5"... - Page 4 Position the rear plate and the front plate together as shown below. Rear Plate Front Plate (Has DX logo) Install a flat washer and hex nut onto one of the set screws as show. Note: position these parts on the opposite end of the set screw that has the hex wrench opening.
- Page 5 Install a flat washer, split washer and hex nut as shown. Tighten these parts using a 1/2” open end wrench and the supplied 5/32” Allen Wrench. Note that the parts are tightened together on the front plate as shown. Hardware in place Allen Wrench and 1/2”...
- Page 6 Using the supplied Allen Wrench and a customer supplied 1/2” open end wrench, tighten the Nyloc hex nuts. Note that when tightening the Nyloc Nuts in place, you DO NOT want them completely tightened. The Allen wrench used in combination with the open end wrench as shown will not loosen the previously installed hardware.
- Page 7 10. Once the hardware is properly installed, you can tilt the front and rear plates of the OMNI- TILT™ base together. Note the bottom has an elongated hole so you lift the front plate in place over the rear plate and drop it into position. The following pictures show the completed basic assembly.
- Page 8 Installing the OMNI-TILT™ Tilt Base Ground Mounting Pipe The following is a suggested 2” OD mounting pipe installation. You may want a heavier and/or longer ground mounted pipe depending on your soil conditions and the type of antenna mast being used with the OMNI-TILT™ base. Refer to your antenna’s manual for possible ™...
- Page 9 This will allow easy access to install the radial wire hardware. The DXE-RADP-3 Radial Plate comes with 20 sets of stainless steel hardware for mounting the radial wires. Additional hardware kits are available from DX Engineering: DXE- RADP-1HWK contains 20 sets of Radial Plate Hardware.
- Page 10 Mounting the OMNI-TILT™ to the Ground Mounted Pipe Two DXE-OTMC-250P Mounting Clamp Kits are used to mount the OMNI-TILT™ Tilt Base to the ground mounted mounting pipe. DXE-OTMC-250P (Qty 2 are required) Mounting Clamps 2 - DXE-OTMC-250P Mounting Clamps with Hardware Kits For mounting to a 1-1/4”...
- Page 11 Mounting a Hustler BTV Series Vertical Antenna to the OMNI-TILT™ Tilt Base DXE-OMNITILT-1P Mounting the Hustler BTV Series antenna to the OMNI-TILT™ Tilt Base requires installation of four hex head bolts, Flat, Split Lock washers and Hex Nuts. DXE-TVA-HWK Parts List DXE-TVA-HWK Mounting Hardware Kit For Trap Verticals (Hustler BTV series, Hy-Gain AVQ series) 1/4”-20 x 1”...
- Page 12 - 11 -...
- Page 13 Mounting Other Vertical Antennas to the OMNI-TILT™ Tilt Base DXE-OMNITILT-1P Hy-Gain: DX88, AV-18VS, 12AVQ, 14AVQ, 18AVQ vertical antenna to the OMNI-TILT™ Tilt Base When mounting one of the above listed Hy-Gain vertical antennas, the procedure is exactly the same as the Hustler BTV series. The only difference is the Hy-Gain base mounting holes are spaced differently than the Hustler BTV series on the OMNI-TILT™...
- Page 14 Mounting methods for other vertical antennas to the OMNI-TILT™ Tilt Base Cushcraft R-8 will require a customer supplied 1-1/2” water pipe (1.90” OD) approximately 8 feet long. The water pipe is installed on the OMNI-TILT™ base using two DXE-OTMC- 250P clamp kits. Hy-Gain AV-620 or AV-640 will require a customer supplied 2”...
- Page 15 - 14 -...
-
Page 16: Manual Updates
Every effort is made to supply the latest manual revision with each product. Occasionally a manual will be updated between the time your DX Engineering product is shipped and when you receive it. The OMNI-TILT™ tilt base is capable of mounting a wide variety of vertical antennas and masts. - Page 17 Tilt Action The OMNI-TILT™ is easy and safe to operate. 1. To tilt downward loosen the top Nyloc Nuts to allow the Flanged Nuts to be loosened approximately 1/2 to 1 turn. 2. Grasp the antenna base (or mounting pipe) that is bolted to the OMNI-TILT™ base and lift until the upper bolts on the front plate are out of the grooved area on the tilt base rear plate.
- Page 18 Optional Tilt Base Wing Nut Knobs DX Engineering has optional Tilt Base Wing Nut Knobs - DXE-AOK-OT1194 - allow for the tool- less, quick release of the DX Engineering DXE-OMNI-TILT™ base. They are perfect for lowering the antenna for tuning or daily stealth operation.
-
Page 19: Guying A Vertical Antenna System
Guying a Vertical Antenna System Guying of any vertical antenna is always recommended for stability. If your area encounters severe wind velocities or icing conditions, simple guying will reduce the possibility of failure. Using the DXE-GUY kits, you can install one, two or three level guy ropes. The drawing below shows an example of dual level guying. -
Page 20: Technical Support
All products manufactured by DX Engineering are warranted to be free from defects in material and workmanship for a period of one (1) year from date of shipment. DX Engineering’s sole obligation under these warranties shall be to issue credit, repair or replace any item or part thereof which is proved to be other than as warranted; no allowance shall be made for any labor charges of Buyer for replacement of parts, adjustment or repairs, or any other work, unless such charges are authorized in advance by DX Engineering.
Need help?
Do you have a question about the OMNI-TILT DXE-OMNITILT-1 and is the answer not in the manual?
Questions and answers