Table of Contents
Advertisement
Advertisement
Table of Contents

Related Manuals for Fermax WAY KIT


Summary of Contents for Fermax WAY KIT
- Page 1 WAY KIT ENGLISH USER & INSTALLER’S MANUAL...
-
Page 2: Indoor Monitor
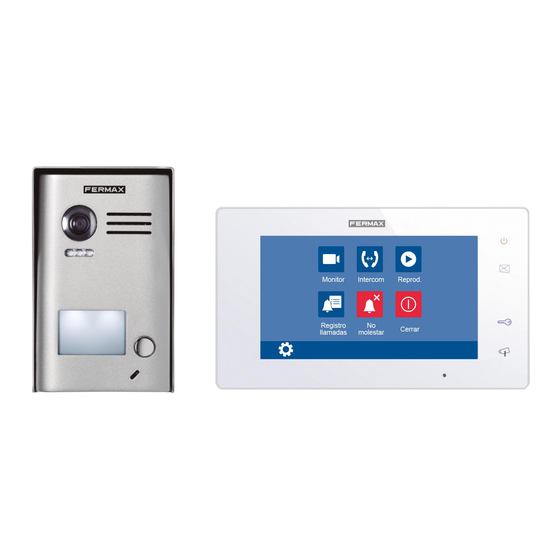
THIS KIT IS NOT COMPATIBLE WITH VERSION V1.0 1. Indoor Monitor Parts and Functions SD card Digital TFT LCD Screen ON/OFF Button Message Indicator UNLOCK Button TALK/MON Button Microphone Mounting Hook Speaker Connection Port Door bell Mounting Hook Key functions LCD screen Display the visitors' image ON/OFF Button... -
Page 3: Outdoor Station
2. Outdoor Station Parts and Functions Camera Lens Speaker Night Light Nameplate Call Button Microphone Rainy Cover 90 mm 23 mm Terminal Descriptions JP/LK 1 2 3 P L S + B U S Main Connect Port • JP/LK: Lock control jumper, to select the lock type (see 13.2.1 , 13.2.2). •... -
Page 4: Monitor Mounting
3. Mounting 3.1 Monitor Mounting 1. Use the screws to fi x the Mounting Bracket on the wall, (fi tting accesories includes a Bracket. Two pieces of 4X25 screws are needed for fastening the Mounting Bracket). 2. Connect the system correctly (see the later connection chapter) then hang the Monitor into the Mounting Bracket. -
Page 5: Placing Name Label
4. Placing Name Label Remove the plastic cover to open the transparent name label cover, insert a name label, then put the plastic cover back to the panel. STEP 1 STEP 2 Unscrew the screws. Replace name label. -
Page 6: Basic Door Release Operation
Operation Instructions 5.1 Main Menu 06:32 PM Touch the screen anywhere on monitor Monitor Intercom Playback Wed. 02/11/2015 in standby mode, the main menu page will be shown as follows: Call Record Do not Close Disturb 5.2 Basic Door Release Operation 1. -
Page 7: Intercom Function
6. Intercom Function Touch Intercom icon on main menu to get into the intercom mode, you have 3 items to select: Inner Broadcast, Inner Call and Name List Call (External Call). Inner Inner Name List 06:32 PM Monitor Intercom Playback Broadcast Call Call... - Page 8 Video/Picture Playback Touch Playback icon on main menu, the recorded videos/pictures will be played on screen, please note that touch icon to Start/Pause the videos recorded. 06:32 PM Monitor Intercom Playback Wed. 02/11/2015 Call Record Do not Close Disturb Image: 008/008 2015/02/11 19:23:28 Note: When the system without SD card: 1.
-
Page 9: Do Not Disturb Function
9. Do Not Disturb Function Touch Do Not Disturb icon on main menu to get into the don't disturb mode, you have 4 item to select: Normal, for 1 Hour, for 8 Hours and Always. You can select the appropriate item according to your needs. Do not Disturb Normal 06:32 PM... -
Page 10: Date And Time Settings
10.2 Date & Time Settings Touch icon on main menu page, then select "Date & Time" item to enter the date & time settings page.You can set the date & time on this page, (touch icon to exit the setting and return main menu page). 06:32 PM Monitor Intercom Playback... -
Page 11: Screen And Volume Adjustment
10.4 Monitor (Rename the outdoor panel & the Monitor Time Settings) Touch icon on main menu page, then select "Monitor" item to enter the rename & monitor time settings page.You can set door station rename and "Auto-on" duration (time) on this page, (touch icon to exit the setting and return main menu page). - Page 12 11. Restore to Default (About) The restore to default function allows the user to recover the settings to factory setting. Note that the restore to default operation will not change any setting. Enter main menu page and touch icon, then select "About" item to enter the about settings page, touch icon, the default settings will be loaded.
-
Page 13: Monitor Parameter Setting
12. Monitor Parameter Setting 12.1 How to enter the installation setting page About Local Address 00.00 Monitor Intercom Playback AUTO Video Standard 00.02.09 System Version Display Driver Call Record Do not Close Disturb Font 2. Touch UNLOCK button 1. Touch icon on main menu page, then select "About"... -
Page 14: System Wiring And Connections
13. System Wiring and Connections 13.1.1 One Way Connection BUS(IM) BUS(DS) Lock L1 L2 PL S+ S- BUS (M) BUS (DS) Doorbell Button Monitor Panel Switch 13.1.2 Two Ways Connection Doorbell Button Switch Doorbell Button Switch BUS(IM) BUS(DS) Lock L1 L2 PL S+ S- BUS (M) BUS (DS) Monitor... -
Page 15: Electric Lock Connection
13.2 Electric Lock Connection 13.2.1 Door Lock Controlled with Internal Power Note: 1 2 3 1 2 3 connect Electronic lock, the jumper position in 2-3. 1-2. 1. Electronic lock fail secure type should be used. 2. The door lock is limited to 12Vdc, and holding current must be less than 250mA. -
Page 16: Unlock Time Setting
14. Setup Note: For 1 way doorstation, open front cover to fi nd button B. 14.1 Unlock Time Setting Power up within 5 seconds, Within 5 seconds, press and hold the press and hold the "B" "A" button for 3 seconds, this will button for 3 seconds, this enter the lock time settings. - Page 17 14.2 Call confi rmation Power up and within 5 Within 5 seconds, press and hold the seconds, press and hold the "B" button for 3 seconds, this will "B" button for 3 seconds, enter the ringtone settings. this will enter the setting menu.
-
Page 18: Cables Requirements
15. Cables Requirements The maximum distance of the wiring is limited. Using different cables will affect the maximum distance which the system can reach. monitor monitor BUS(IM) BUS(DS) Cable Usage Twisted cable 2x0.75 mm Twisted cable 2x1 mm -17-... -
Page 19: Specification
16. Specifi cation ● Power supply: 26Vdc +/- 2 ● Power consumption: Standby 12mA; Working 350mA (for monitor); ● Standby 33mA; Working status 110mA (for door station). ● Monitor screen: 7 Inch digital color LCD ● Display Resolutions: 800*3(R, G, B) x 480 pixels ●... - Page 20 Technical document published for information purposes by FERMAX ELECTRÓNICA. FERMAX, in a policy of ongoing improvement, reserves the right to modify the contents of this document and the feature of the products referred to herein at any time and with no prior notice.
- Page 22 SD card Digital TFT LCD Screen ON/OFF Button Message Indicator UNLOCK Button TALK/MON Button Microphone Mounting Hook Speaker Connection Port ﺏﺍﺏﻝﺍ ﺱﺭﺝ Mounting Hook .ﺗ ُ ﻅﻬﺭ ﺻﻭﺭﺓ ﺍﻟﻔﻳﺩﻳﻭ ﺍﻟ ﻣ ُﻠﺗﻘﻁﺔ ﻣﻥ ﻁﺭﻑ ﻛﺎﻣﻳﺭﺍ ﺍﻟﻠﻭﺣﺔ LCD ﺷﺎﺷﺔ .(ﻋﻧﺩ ﺍﻟﺿﻐﻁ ﻋﻠﻳﻪ، ﻳﺗﻡ ﺗﺷﻐﻳﻝ/ﺇﻁﻔﺎء ﺍﻟﺷﺎﺷﺔ )ﻗﺎﺋﻣﺔ ﺍﻟﺧﻳﺎﺭﺍﺕ (...
- Page 23 ۲. ﺍﻟﻠﻭﺣﺔ ﻛﺎﻣﻳﺭﺍ Camera Lens ﻣﻛﺑﺭ ﺍﻟﺻﻭﺕ Speaker ﺻﻣﺎﻣﺎﺕ ﺛﻧﺎﺋﻳﺔ Night Light ﺇﺿﺎءﺓ ﻟﻳﻠ ﻳ ّﺔ ﺣﺎﻣﻝ ﺍﻟﺑﻁﺎﻗﺔ Nameplate ﻣﻛﺎﻟﻣﺔ Call Button ﻣﻳﻛﺭﻭﻓﻭﻥ Microphone Rainy Cover ﺣﺎﺟﺏ ()ﺣﻣﺎﻳﺔ ﺿﺩ ﺍﻟﻣﻁﺭ 90 mm 23 mm JP/LK JP/LK P L S + ﺭﺑﻁ...
- Page 24 ۳. ﺍﻟﺗﺭﻛﻳﺏ The base unit is installed .ﺿﻊ ﺍﻟﻼﺻﻘﺔ ﻓﻲ ﺣﺎﻣﻝ ﺍﻟﺑﻁﺎﻗﺔ .ﻗﻡ ﺑﺭﺑﻁ ﺍﻟﺳﻠﻙ ﺑﺷﻛﻝ ﺳﻠﻳﻡ .ﺭﻛﺏ ﺍﻟﻭﺣﺩﺓ ﺍﻷﺳﺎﺱ ﻋﻠﻰ ﺍﻟﺟﺩﺍﺭ Connect the cable correctly. Placing name label. on the wall. The front cover is installed .ﺍﺳﺗﻌﻣﻝ ﺍﻟﺑﺭﻏﻲ ﻟﺗﺛﺑﻳﺕ ﺍﻟﻐﻁﺎء ﺍﻷﻣﺎﻣﻲ .ﻧﻬﺎﻳﺔ...
- Page 25 ٤. ﺿﻊ ﺍﻟﻼﺻﻘﺔ ﻓﻲ ﺣﺎﻣﻝ ﺍﻟﺑﻁﺎﻗﺔ STEP 1 STEP 2 Unscrew the screws. Replace name label. -٤-...
- Page 26 .٥ ﺇﺭﺷﺎﺩﺍﺕ ﺍﻟﺗﺷﻐﻳﻝ ٥-۱ ﺍﻟﻘﺎﺋﻣﺔ ﺍﻟﺭﺋﻳﺳﻳﺔ ۲۳:٦۰ ﻣﺳﺎء ،ﻋﻧﺩ ﻭﺟﻭﺩ ﺟﻬﺎﺯ ﺍﻟﻌﺭﺽ ﻓﻲ ﻭﺿﻊ ﺍﻻﻧﺗﻅﺎﺭ ﺟﻬﺎﺯ ﺍﻟﻌﺭﺽ ﺟﻬﺎﺯ ﺍﻻﺗﺻﺎﻝ ﺍﻟﺩﺍﺧﻠﻲ ﺗﺷﻐﻳﻝ ﺍﻷﺭﺑﻌﺎء ۲۰۱٥/۱۱/۰۲ ﺍﺿﻐﻁ ﻋﻠﻰ ﺃﻱ ﻣﻛﺎﻥ ﻣﻥ ﺷﺎﺷﺔ ﺍﻟﺟﻬﺎﺯ ﻭﺳﺗﻅﻬﺭ .ﺍﻟﻘﺎﺋﻣﺔ ﺍﻟﺭﺋﻳﺳﻳﺔ ﻛﻣﺎ ﻫﻭ ﻣ ُﺑ ﻳ ّﻥ ﻋﻠﻰ ﺍﻟﺻﻭﺭﺓ ﻋﺩﻡ...
- Page 27 ٦. ﻭﻅﻳﻔﺔ ﺇﻧﺗﺭﻛﻡ :ﺍﻟﻣﻭﺟﻭﺩﺓ ﻋﻠﻰ ﺍﻟﻘﺎﺋﻣﺔ ﺍﻟﺭﺋﻳﺳﻳﺔ ﻟﻠﻭﺻﻭﻝ ﺇﻟﻰ ﻭﻅﻳﻔﺔ ﺇﻧﺗﺭﻛﻡ. ﻭﻟﻬﺫﻩ ﺍﻟﻭﻅﻳﻔﺔ 3 ﺧﻳﺎﺭﺍﺕ ﺍﺿﻐﻁ ﻋﻠﻰ ﺃﻳﻘﻭﻧﺔ ﺇﻧﺗﺭﻛﻡ .ﺍﻹﺫﺍﻋﺔ ﺩﺍﺧﻠﻳﺎ، ﻣﻛﺎﻟﻣﺔ ﺩﺍﺧﻠﻳﺔ ﻭ ﻣﻛﺎﻟﻣﺔ ﺧﺎﺭﺟﻳﺔ ﺇﺫﺍﻋﺔ ﺩﺍﺧﻠﻳﺔ ﻣﻛﺎﻟﻣﺔ ﺩﺍﺧﻠﻳﺔ ﻣﻛﺎﻟﻣﺔ ﺧﺎﺭﺟﻳﺔ ۲۳:٦۰ ﻣﺳﺎء ﺟﻬﺎﺯ ﺍﻟﻌﺭﺽ ﺟﻬﺎﺯ ﺍﻻﺗﺻﺎﻝ ﺍﻟﺩﺍﺧﻠﻲ ﺗﺷﻐﻳﻝ ﺍﻷﺭﺑﻌﺎء...
- Page 28 ﺗﺷﻐﻳﻝ ﺍﻟﻔﻳﺩﻳﻭ/ﺍﻟﺻﻭﺭ .ﺍﻟﻣﻭﺟﻭﺩﺓ ﻓﻲ ﺍﻟﻘﺎﺋﻣﺔ ﺍﻟﺭﺋﻳﺳﻳﺔ ﻟﻌﺭﺽ ﺍﻟﻔﻳﺩﻳﻭ/ﺍﻟﺻﻭﺭ، ﻭﺗﺗﻡ ﺭﺅﻳﺗﻬﺎ ﻋﻠﻰ ﺷﺎﺷﺔ ﺍﻟﺟﻬﺎﺯ ﺍﻧﻘﺭ ﺃﻳﻘﻭﻧﺔ ﺗﺷﻐﻳﻝ .ﻳﺗﻡ ﻋﺭﺽ ﺍﻟﻔﻳﺩﻳﻭ ﻭﺗﺣﺗﻭﻱ ﺍﻟﺷﺎﺷﺔ ﻋﻠﻰ ﺃﻳﻘﻭﻧﺎﺕ ﻋﺩﻳﺩﺓ ﻟﻠﺗﺣﻛﻡ ﻓﻳﻬﺎ. ﻋﻧﺩ ﺍﻟﻧﻘﺭ ﻋﻠﻰ ﺍﻷﻳﻘﻭﻧﺔ ﺑﺩء/ﺗﻭﻗﻑ ۲۳:٦۰ ﻣﺳﺎء ﺟﻬﺎﺯ ﺍﻻﺗﺻﺎﻝ ﺍﻟﺩﺍﺧﻠﻲ ﺟﻬﺎﺯ ﺍﻟﻌﺭﺽ ﺗﺷﻐﻳﻝ ﺍﻷﺭﺑﻌﺎء ۲۰۱٥/۱۱/۰۲...
- Page 29 ۹. ﻭﻅﻳﻔﺔ ﻋﺩﻡ ﺍﻹﺯﻋﺎﺝ ﺍﻟﻣﻭﺟﻭﺩﺓ ﻋﻠﻰ ﺍﻟﻘﺎﺋﻣﺔ ﺍﻟﺭﺋﻳﺳﻳﺔ ﻟﻠﻭﺻﻭﻝ ﺇﻟﻰ ﻭﻅﻳﻔﺔ ﻋﺩﻡ ﺍﻹﺯﻋﺎﺝ. ﻭﻟﻬﺫﻩ ﺍﻟﻭﻅﻳﻔﺔ ﺍﻧﻘﺭ ﻋﻠﻰ ﺃﻳﻘﻭﻧﺔ ﻋﺩﻡ ﺍﻹﺯﻋﺎﺝ .٤ ﺧﻳﺎﺭﺍﺕ: ﻋﺎﺩﻱ، ﺧﻼﻝ ﺳﺎﻋﺔ ۱، ﺧﻼﻝ ۸ ﺳﺎﻋﺎﺕ ﻭ ﺩﺍﺋﻣﺎ. ﻋ ﻳ ّﻥ ﺍﻟﺧﻳﺎﺭ ﺍﻟﻣﻼﺋﻡ ﻭﻓﻘﺎ ﻟﺣﺎﺟﻳﺎﺗﻙ ﻋﺩﻡ ﺍﻹﺯﻋﺎﺝ ﻋﺎﺩﻱ...
- Page 30 ۰۱-۲ ﺇﻋﺩﺍﺩﺍﺕ ﺍﻟﺗﺎﺭﻳﺦ ﻭﺍﻟﺳﺎﻋﺔ "ﻣﻥ ﺍﻟﻘﺎﺋﻣﺔ ﺍﻟﺭﺋﻳﺳﻳﺔ، ﻳﺗﻡ ﺍﻟﻭﺻﻭﻝ ﺇﻟﻰ ﻗﺎﺋﻣﺔ ﺍﻟﺗﻛﻭﻳﻥ. ﻋ ﻳ ّﻥ ﺍﻟﺧﻳﺎﺭ "ﺍﻟﺗﺎﺭﻳﺦ ﻭﺍﻟﺳﺎﻋﺔ ﻋﻧﺩ ﺍﻟﻧﻘﺭ ﻋﻠﻰ ﺍﻷﻳﻘﻭﻧﺔ ﻟﻠﺧﺭﻭﺝ ﻣﻥ ﻟﻠﻭﺻﻭﻝ ﺇﻟﻰ ﺇﻋﺩﺍﺩﺍﺕ ﺍﻟﺳﺎﻋﺔ. ﻓﻲ ﻫﺫﺍ ﺍﻟﺧﻳﺎﺭ، ﻳﻣﻛﻥ ﺿﺑﻁ ﺍﻟﺗﺎﺭﻳﺦ ﻭﺍﻟﺳﺎﻋﺔ )ﺍﺿﻐﻁ ﻋﻠﻰ ﺃﻳﻘﻭﻧﺔ .(ﻫﺫﻩ ﺍﻟﺷﺎﺷﺔ ﻭﺍﻟﻌﻭﺩﺓ ﺇﻟﻰ ﺷﺎﺷﺔ ﺍﻟﻘﺎﺋﻣﺔ ﺍﻟﺭﺋﻳﺳﻳﺔ 23:60 ﻣﺳﺎء...
- Page 31 ۰۱-٤ ﺍﻟﺟﻬﺎﺯ ()ﺇﻋﺎﺩﺓ ﺗﺳﻣﻳﺔ ﺍﻟﻠﻭﺣﺔ ﻭﺇﻋﺩﺍﺩﺍﺕ ﺍﻟﻭﻗﺕ ﺍﻟﺗﺎﺑﻊ ﻟﺟﻬﺎﺯ ﺍﻟﻌﺭﺽ ﻣﻥ ﺍﻟﻘﺎﺋﻣﺔ ﺍﻟﺭﺋﻳﺳﻳﺔ، ﻳﺗﻡ ﺍﻟﻭﺻﻭﻝ ﺇﻟﻰ ﻗﺎﺋﻣﺔ ﺍﻟﺗﻛﻭﻳﻥ. ﻋ ﻳ ّﻥ ﺧﻳﺎﺭ "ﺟﻬﺎﺯ ﺍﻟﻌﺭﺽ". ﻓﻲ ﻋﻧﺩ ﺍﻟﻧﻘﺭ ﻋﻠﻰ ﺍﻷﻳﻘﻭﻧﺔ ﻟﻠﺧﺭﻭﺝ ﻫﺫﺍ ﺍﻟﺧﻳﺎﺭ، ﻳﻣﻛﻥ ﺇﻋﺎﺩﺓ ﺗﺳﻣﻳﺔ ﺍﻟﻠﻭﺣﺔ ﻭﺿﺑﻁ ﻣﺩﺓ ﺍﻟﺗﺷﻐﻳﻝ ﺍﻟﺫﺍﺗﻲ ﻟﺟﻬﺎﺯ ﺍﻟﻌﺭﺽ )ﺍﺿﻐﻁ ﻋﻠﻰ ﺃﻳﻘﻭﻧﺔ .(ﻣﻥ...
- Page 32 (۱۱. ﺇﻋﺎﺩﺓ ﺗﻌﻳﻳﻥ ﺍﻟﻘﻳﻡ ﺍﻹﻓﺗﺭﺍﺿﻳﺔ )ﺣﻭﻝ ﺗﺗﻭﻓﺭ ﺇﻣﻛﺎﻧﻳﺔ ﺇﻋﺎﺩﺓ ﺗﻌﻳﻳﻥ ﻣﻌﺎﻟﻡ ﺟﻬﺎﺯ ﺍﻟﻌﺭﺽ ﺇﻟﻰ ﻗﻳﻡ ﺍﻟﻣﺻﻧﻊ ﺍﻹﻓﺗﺭﺍﺿﻳﺔ، ﻣﻥ ﺧﻼﻝ ﺗﻌﻳﻳﻥ ﺧﻳﺎﺭ "ﺣﻭﻝ". ﻋﻣﻠﻳﺔ .ﺍﻟﻌﻭﺩﺓ ﺇﻟﻰ ﺍﻟﻣﻌﺎﻟﻡ ﺍﻹﻓﺗﺭﺍﺿﻳﺔ ﻟﻥ ﺗ ُ ﻐﻳﺭ ﺍﻟﺗﻌﺩﻳﻼﺕ ﻭﺍﻟﺑﻳﺎﻧﺎﺕ ﻣﻥ ﺍﻟﻘﺎﺋﻣﺔ ﺍﻟﺭﺋﻳﺳﻳﺔ، ﻳﺗﻡ ﺍﻟﻭﺻﻭﻝ ﺇﻟﻰ ﻗﺎﺋﻣﺔ ﺍﻟﺗﻛﻭﻳﻥ. ﻋ ﻳ ّﻥ ﺧﻳﺎﺭ "ﺣﻭﻝ" ﻟﻠﻭﺻﻭﻝ ﺇﻟﻰ ﻋﻧﺩ...
- Page 33 ۲۱. ﺇﻋﺩﺍﺩﺍﺕ ﻣﻌﺎﻟﻡ ﺟﻬﺎﺯ ﺍﻟﻌﺭﺽ ۲۱-۱ ﻛﻳﻔﻳﺔ ﺍﻟﺩﺧﻭﻝ ﺇﻟﻰ ﺻﻔﺣﺔ ﺗﻛﻭﻳﻥ ﺍﻟﺗﺭﻛﻳﺏ ﺣﻭﻝ ﺍﻟﻌﻧﻭﺍﻥ ﺍﻟﻣﺣﻠﻲ ۰۰٫۰۰ ﺫﺍﺗﻲ ﻓﻳﺩﻳﻭ ﻗﻳﺎﺳﻲ ۰۰٫۰۲٫۰۹ ﻧﺳﺧﺔ ﺍﻟﻧﻅﺎﻡ ۱٫۳ ﻣﺷﻐﻝ ﺍﻟﺷﺎﺷﺔ ۱٫۰ ﺍﻟﻣﺻﺩﺭ ﻭﺍﺟﻬﺔ ﺍﻟﻣﺳﺗﺧﺩﻡ ۱٫۰ ﺍﻟﻣﻭﺟﻭﺩﺓ ﻋﻠﻰ ﺍﻟﻘﺎﺋﻣﺔ ۱. ﺍﻧﻘﺭ ﻋﻠﻰ ﺃﻳﻘﻭﻧﺔ ۲. ﺍﺿﻐﻁ ﻋﻠﻰ ﺯﺭ ﻓﺗﺢ ﺍﻷﺑﻭﺍﺏ ."ﺍﻟﺭﺋﻳﺳﻳﺔ...
- Page 34 ۳۱. ﻣﺧﻁﻁﺎﺕ ﺍﻟﺗﺭﻛﻳﺏ ۱ ۳۱-۱-۱ ﻁﻘﻡ ﺧﻁ BUS(IM) BUS(DS) ﺟﺭﺱ L1 L2 PL S+ S- (M) ﻧﺎﻗﻝ (DS ﻧﺎﻗﻝ )ﺑﻁﺎﻗﺔ ﺍﻟﺑﺎﺏ ﺟﻬﺎﺯ ﺍﻟﻌﺭﺽ ﺍﻟﻠﻭﺣﺔ Doorbell Button Switch ۲ ﻁﻘﻡ ﺧﻁﻳﻥ ۲-۱-۱۳ ﺟﺭﺱ ﺍﻟﺑﺎﺏ Doorbell Button Switch ﺟﺭﺱ ﺍﻟﺑﺎﺏ Doorbell Button Switch BUS(IM) BUS(DS) L1 L2 PL S+ S-...
- Page 35 ۳۱-۲ ﺭﺑﻁ ﻓﺎﺗﺢ ﺍﻷﺑﻭﺍﺏ ۳۱-۲-۱ ﺭﺑﻁ ﻓﺎﺗﺢ ﺍﻷﺑﻭﺍﺏ ﺑﺎﻟﻣﺻﺩﺭ ﺍﻟﻣﺩﻣﺞ ﻓﻲ ﺍﻟﻁﻘﻡ :ﻣﻼﺣﻅﺔ .ﻳﺟﺏ ﺭﺑﻁ ﻓﺎﺗﺢ ﺃﺑﻭﺍﺏ ﺫﻱ ﺗﺷﻐﻳﻝ ﻋﺎﺩﻱ ۱ . 1 2 3 ﺭﺑﻁ ﻓﺎﺗﺢ ﺍﻷﺑﻭﺍﺏ. ﻳﺟﺏ ﻋﻠﻰ ﻭﺿﻊ ﺍﻟﻭﺻﻠﺔ ﻋﻠﻰ ﻳﺟﺏ ﻋﻠﻰ ﻓﺎﺗﺢ ﺍﻷﺑﻭﺍﺏ ﺍﻟﺗﺷﻐﻳﻝ ﺑـ ۲۱ ﻓﻭﻟﺕ ﺗﻳﺎﺭ ۲...
- Page 36 ٤۱. ﺍﻟﺗﺷﻐﻳﻝ ﻣﻼﺣﻅﺔ: ﻣﻊ ﺍﻟﻠﻭﺣﺔ ﺫﺍﺕ ﺯﺭ ۱، ﺍﻓﺗﺢ ﺍﻟﻐﻁﺎء ﺍﻷﻣﺎﻣﻲ .B ﻟﻠﺑﺣﺙ ﻋﻥ ﺍﻟﺯﺭ ٤۱-۱ ﺿﺑﻁ ﻭﻗﺕ ﻓﺎﺗﺢ ﺍﻷﺑﻭﺍﺏ " ﻟﻣﺩﺓA" ﻓﻲ ﻭﺿﻊ ﺍﻟﺑﺭﻣﺟﺔ، ﺍﺿﻐﻁ ﻋﻠﻰ ﺍﻟﺯﺭ ،ﻗﻡ ﺑﺗﺷﻐﻳﻠﻪ ﻭﻗﺑﻝ ﻣﺭﻭﺭ ٥ ﺛﻭﺍﻧﻲ ۳ ﺛﻭﺍﻧﻲ. ﻳﺗﻡ ﺍﻟﻭﺻﻭﻝ ﻋﻧﺩﻫﺎ ﺇﻟﻰ ﻭﺿﻊ ﺿﺑﻁ ۳...
- Page 37 ٤۱-۲ ﺿﺑﻁ ﺗﺄﻛﻳﺩ ﻧﻐﻣﺔ ﺍﻟﻣﻛﺎﻟﻣﺔ ﻋﻠﻰ ﻣﺳﺗﻭﻯ ﺍﻟﻠﻭﺣﺔ " ﻟﻣﺩﺓB" ﻓﻲ ﻭﺿﻊ ﺍﻟﺑﺭﻣﺟﺔ، ﺍﺿﻐﻁ ﻋﻠﻰ ﺍﻟﺯﺭ ،ﻗﻡ ﺑﺗﺷﻐﻳﻠﻪ ﻭﻗﺑﻝ ﻣﺭﻭﺭ ٥ ﺛﻭﺍﻧﻲ ۳ ﺛﻭﺍﻧﻲ. ﻳﺗﻡ ﺍﻟﻭﺻﻭﻝ ﻋﻧﺩﻫﺎ ﺇﻟﻰ ﻭﺿﻊ ﺗﺄﻛﻳﺩ ۳ " ﻟﻣﺩﺓB" ﺍﺿﻐﻁ ﻋﻠﻰ ﺍﻟﺯﺭ .ﻧﻐﻣﺔ ﺍﻟﻣﻛﺎﻟﻣﺔ ﺛﻭﺍﻧﻲ. ﻳﺗﻡ ﺍﻟﻭﺻﻭﻝ ﻋﻧﺩﻫﺎ ﺇﻟﻰ .ﻭﺿﻊ...
- Page 38 ٥۱. ﺷﺭﻭﻁ ﺍﻷﺳﻼﻙ .(ﺇﻥ ﺍﻟﻣﺳﺎﻓﺔ ﺍﻟﻘﺻﻭﻯ ﻣﺣﺩﺩﺓ ﻓﻲ ﺍﻟﻧﻅﺎﻡ )ﺍﻧﻅﺭ ﺟﺩﻭﻝ ﺍﻟﻣﻘﺎﻁﻊ - ﺍﻟﻣﺳﺎﻓﺎﺕ ﻭﺍﻟﺭﺳﻡ ﺍﻟﺑﻳﺎﻧﻲ ﻟﻠﺧﻁ ﺍﻟﻛﻬﺭﺑﺎﺋﻲ ﺍﻟﻣﻔﺭﺩ ﺍﻟﺭﺳﻡ ﺍﻟﺑﻳﺎﻧﻲ ﻟﻠﺧﻁ ﺍﻟﻛﻬﺭﺑﺎﺋﻲ ﺍﻟﻣﻔﺭﺩ monitor monitor BUS(IM) BUS(DS) ﺟﺩﻭﻝ ﺍﻟﻣﻘﺎﻁﻊ/ ﺍﻟﻣﺳﺎﻓﺎﺕ ﺍﻟﻣﻘﺎﻁﻊ/ ﺍﻟﻣﺳﺎﻓﺎﺕ ٦۰ ٦۰ ٥۷٫۰ ﻣﻡx ۲ ﺳﻠﻙ ﻣﺿﻔﻭﺭ ۲...
- Page 39 ٦۱. ﺍﻟﻣﻭﺍﺻﻔﺎﺕ ﺍﻟﻔﻧﻳﺔ ● ۲ -/+ ٦۲ ﻓﻭﻟﺕ ﺗﻳﺎﺭ ﻣﺑﺎﺷﺭ :ﺍﻟﻁﺎﻗﺔ ● 053 )ﺟﻬﺎﺯ ﺍﻟﻌﺭﺽ(؛mA 21؛ ﺗﻔﻌﻳﻝmA ﻭﺿﻊ ﺍﻻﻧﺗﻅﺎﺭ :ﺍﻻﺳﺗﻬﻼﻙ ● .( 011 )ﺍﻟﻠﻭﺣﺔmA 33؛ ﺗﻔﻌﻳﻝmA ﻭﺿﻊ ﺍﻻﻧﺗﻅﺎﺭ ﺭﻗﻣﻳﺔ ﺃﻟﻭﺍﻥLCD ۷ ﺑﻭﺻﺎﺕ :ﺷﺎﺷﺔ ﺟﻬﺎﺯ ﺍﻟﻌﺭﺽ ● ●...
- Page 40 .ﻧﻘﻁﺔ ﺍﻟﺗﺟﻣﻳﻊ ﺍﻻﻧﺗﻘﺎﺋﻲ ﺍﻟﺗﺎﺑﻊ ﻟﻙ .FERMAX ELECTRÓNICA ﻧﺷﺭﻳﺔ ﻓﻧﻳﺔ ﺫﺍﺕ ﻫﺩﻑ ﺇﻋﻼﻣﻲ ﺗﺻﺩﺭﻫﺎ ﺷﺭﻛﺔ ﺑﺣﻘﻬﺎ ﻓﻲ ﺗﻌﺩﻳﻝ ﻣﺣﺗﻭﻯ ﻫﺫﻩ ﺍﻟﻭﺛﻳﻘﺔFERMAX ﻓﻲ ﺇﻁﺎﺭ ﺳﻳﺎﺳﺔ ﺍﻟﺗﺣﺳﻳﻥ ﺍﻟﻣﺗﻭﺍﺻﻝ ﺍﻟﺗﺎﺑﻌﺔ ﻟﻬﺎ، ﺗﺣﺗﻔﻅ ﺷﺭﻛﺔ .ﻭﻛﺫﻟﻙ ﺧﺎﺻﻳﺎﺕ ﺍﻟﻣﻧﺗﺟﺎﺕ ﺍﻟﻣﺫﻛﻭﺭﺓ ﻓﻳﻬﺎ ﻓﻲ ﺃﻱ ﻭﻗﺕ ﻭﺩﻭﻥ ﺳﺎﺑﻕ ﺍﻹﻋﻼﻡ...
Need help?
Do you have a question about the WAY KIT and is the answer not in the manual?
Questions and answers