Table of Contents
Advertisement
Quick Links
Download this manual
See also:
Manual
Advertisement
Table of Contents

Subscribe to Our Youtube Channel
Related Manuals for Bender ATICS-2-63A-ISO


Summary of Contents for Bender ATICS-2-63A-ISO
- Page 1 Manual ATICS-2-63A-ISO ATICS-2-80A-ISO Automatic transfer switching devices with monitoring functions for unearthed safety power supplies Software version: D333 V1.2x/D334 V1.2x D335 V1.0x/D308 V1.2x ATICS-2-ISO_D00046_02_M_XXEN/04.2015...
- Page 2 Bender GmbH & Co. KG © Bender GmbH & Co. KG All rights reserved. P.O. Box 1161 • 35301 Gruenberg • Germany Londorfer Straße 65 • 35305 Gruenberg • Germany Reprinting only with permission Tel.: +49 6401 807-0 • Fax: +49 6401 807-259 of the publisher.
-
Page 3: Table Of Contents
Table of Contents 1. How to get the most out of this manual ............. 7 How to use this manual ......................7 Explanation of symbols and notes ..................8 2. Safety instructions ....................9 Intended use ..........................9 Skilled persons .......................... 9 Device-specific safety instructions ................. - Page 4 Table of Contents 4. Installation and connection ................23 Installation ..........................23 4.1.1 Dimension diagram ......................23 4.1.2 Removing the terminal covers ..................24 4.1.3 Mounting on DIN rail ......................24 4.1.4 Screw mounting on plate ....................25 Connection ..........................26 4.2.1 Short-circuit protection .......................
- Page 5 Table of Contents 6.2.2 Display in fault condition ....................47 6.2.3 Test function ........................... 48 6.2.3.1 Test menu 1: IT system ....................49 6.2.3.2 Test menu 2: Autom. changeover ................50 6.2.3.3 Test menu 3: Manual changeover ................50 6.2.3.4 Test menu 4: Last switch ....................
- Page 6 Table of Contents 8. Troubleshooting ....................77 Fault and alarm messages ....................77 8.1.1 Plain text fault messages ....................77 8.1.2 Messages with error code or service code ..............78 Frequently asked questions ....................80 9. Periodic verification and service ............... 83 Periodic verification ......................
-
Page 7: How To Get The Most Out Of This Manual
Although great care has been taken in the drafting of this operating manual, it may nevertheless contain errors and mistakes. The Bender Group cannot accept any liability for injury to persons or damage to property resulting from errors or mistakes in this manual. -
Page 8: Explanation Of Symbols And Notes
How to get the most out of this manual 1.2 Explanation of symbols and notes The following terms and symbols are used to denote hazards and instructions in Bender documen- tation: The signal word indicates that there is a high risk danger that will result in elec- trocution or serious injury if not avoided. -
Page 9: Safety Instructions
2.2 Skilled persons Only appropriately qualified personnel may work on Bender devices. Persons who are familiar with the assembly, commissioning and operation of the equipment and have undergone appropriate training are considered skilled persons. Such persons must have read this manual and understood all instructions relating to safety. -
Page 10: Device-Specific Safety Instructions
2.4 General safety instructions Bender devices are designed and built in accordance with the state of the art and accepted rules in respect of technical safety. However, the use of such devices may introduce risks to the life and limb of the user or third parties and/or result in damage to Bender devices or other property. -
Page 11: System Description
3. System description 3.1 Properties 3.1.1 Product description The ATICS® transfer switching devices provide all functions for changeover between two independ- ent power supplies and for monitoring unearthed power supplies. The integration of both the elec- tronic system and the switching elements in one flat, compact device reduces space requirements in the switchgear cabinet, minimises the amount of wiring, and reduces the fault probability. -
Page 12: Functional Safety
Responsibility during the life cycle: Production Commissioning Maintenance Decommissioning Recycling Bender plant operator Bender For detailed information refer to chapter "5. Commissioning, settings and testing" on page 39 chapter "9. Periodic verification and service" on page 83 ... -
Page 13: Example Applications
System description 3.3 Example applications 3.3.1 Example application operating theatre ATICS-2-63A-ISO: Changeover between the preferred and redundant line while monitoring the medical IT system with transformer load and temperature monitoring IR426-D47: Monitoring the operating theatre light IT system (optional) ... -
Page 14: Example Intensive Care Unit
System description 3.3.2 Example intensive care unit ATICS-2-63A-ISO: Changeover between the preferred and redundant line while monitoring the medical IT system with transformer load and temperature monitoring EDS151: Insulation fault locator for fast insulation fault location (recommended) ATICS-BP: Bypass switch for uninterrupted test/maintenance (recommended) ... -
Page 15: Atics® Tasks
System description 3.4 ATICS® tasks The ATICS® transfer switching device has the following capabilities: Two-pole changeover of the power supply Voltage monitoring for the preferred supply (Line 1) Voltage monitoring for the second supply (Line 2) Voltage monitoring at the transfer switching device output (Line 3) ... - Page 16 If the ATICS® detects a supply failure or a fault, an alarm appears on the LCD, the "ALARM" LED lights up, the alarm relay trips (if set) and this alarm is forwarded to other Bender devices (such as an alarm indicator and test combination) via the BMS bus.
-
Page 17: Time Chart: Changeover Between The Preferred And Redundant Line
System description 3.5.1.1 Time chart: Changeover between the preferred and redundant line Example: Line 1 is set as the preferred line. ATICS-2-ISO_D00046_02_M_XXEN/04.2015... -
Page 18: Time Chart: Staggered Switching After Complete Power Failure
System description 3.5.1.2 Time chart: Staggered switching after complete power failure After a complete power failure (i.e. no voltage on either of the power supplies) it is often necessary to switch to the supply at staggered intervals. This prevents all loads being switched on simultane- ously. -
Page 19: Time Chart: Changeover To Generator Mode
System description 3.5.1.3 Time chart: Changeover to generator mode ATICS-2-ISO_D00046_02_M_XXEN/04.2015... -
Page 20: It System Monitoring
If any of the measured values does not fall within the limits, an alarm is triggered. A message appears on the LCD, the "ALARM" LED lights up, the alarm relay trips (if set) and this alarm is forwarded to oth- er Bender devices (such as an alarm indicator and test combination) via the BMS bus. Locating current injector When an insulation fault is detected on an IT system, the integrated locating current injector gener- ates a defined locating current signal to locate the insulation fault. -
Page 21: Power Supply
System description On systems with generator: total power failure possible If the preferred line fails, the ATICS® starts the generator which is connected to the redundant line. If the generator does not start, the line downstream of the WARNING transfer switching device will be dead. When the generator is switched off, the ATICS®... -
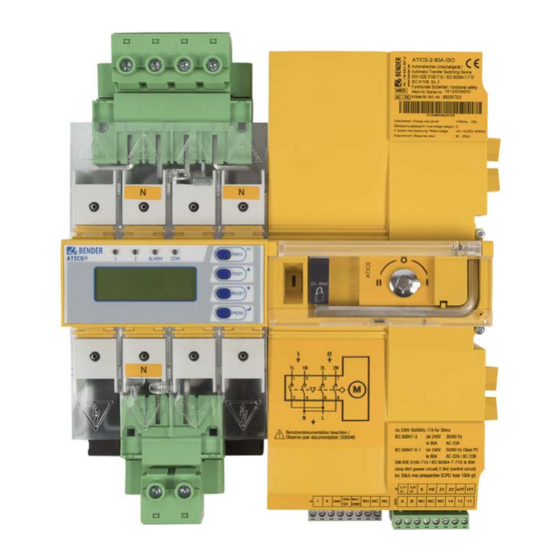
Page 22: The Atics-2-Iso Front View
System description 3.6 The ATICS-2-ISO front view Green plug device for Line 1 and Line 2 Control buttons Inspection window for switch position Selector switch for manual mode selection. Also shows the switch position. Allen key for manual mode Transparent cover for changeover switch (manual mode), sealable Wiring diagram for Lines 1, 2 and 3 Three coded connector plugs Locking device for switch position 0... -
Page 23: Installation And Connection
4. Installation and connection Risk of fatal injury from electric shock Touching live parts of the system carries the risk of electric shock. Before fitting the enclosure and working on the device connections, make sure DANGER that the power supply has been disconnected and the system is dead. In manual mode, the ATICS®... -
Page 24: Removing The Terminal Covers
Installation and connection 4.1.2 Removing the terminal covers 1. Push back the locking hook (B) in the middle of the top and bottom terminal (A) cover by using a screwdriver. 2. Remove the terminal cover. 4.1.3 Mounting on DIN rail 1. -
Page 25: Screw Mounting On Plate
Installation and connection 5. Always tighten the mounting screws (D) (PZ1, 8.8 lb-in, 1 Nm). If the screws are not tighte- ned, ATICS may be dama- ged due to the vibrations CAUTION that occur during swit- ching. 4.1.4 Screw mounting on plate Provide for sufficient distance to adjacent live conductors by using mounting screws with flat screw heads and flat washers. -
Page 26: Connection
Installation and connection 4.2 Connection 4.2.1 Short-circuit protection When choosing the short-circuit protective devices in the supply cables and output cables of the transfer switching devices, follow the requirements of DIN VDE 0100-710 (VDE 0100 Part 710). Transformers for the IT system: ... - Page 27 Installation and connection Selecting a short-circuit protective device for several loads ATiCS Circuit breaker This circuit branches into several load groups. This means that each short-circuit protective device of each load group is moved downstream of the transfer switching device. However, the maximum possible back-up fuse is calculated in the same way as described above.
-
Page 28: Connecting The Atics® Safely
Installation and connection 4.2.2 Connecting the ATICS® safely Risk of fatal injury from electric shock If any of the supplies are switched on, some of the parts of the system which are not yet fully installed may be live. DANGER Open the transparent cover of the de- vice for manual mode selection and wait until the display shows "Manual... - Page 29 Connection measuring current transformer T3 (STW3) for monitoring the load current l, k downstream the transfer switching device (short-circuit monitoring) GND, En/Ex Terminals must not be used. Intended for Bender-internal purposes only (12 V). IN1/GND, Digital input, configurable (see "Settings menu 6: Digital Input" on page 70) not used Connection to the IT system.
-
Page 30: Connection Example: Atics® Basic Configuration
Installation and connection 4.2.3 Connection example: ATICS® basic configuration Risk of destruction if connected incorrectly The terminals marked "*" are intended for Bender-internal purposes only. If this is ignored, the ATICS® may be damaged. CAUTION ATICS-2-ISO_D00046_02_M_XXEN/04.2015... -
Page 31: Connection Example: Atics® With Bypass Switch
Installation and connection 4.2.4 Connection example: ATICS® with bypass switch Risk of destruction if connected incorrectly The terminals marked "*" are intended for Bender-internal purposes only. If this is ignored, the ATICS® may be damaged. CAUTION ATICS-2-ISO_D00046_02_M_XXEN/04.2015... -
Page 32: Connection Example: Atics® With Bypass Switch And Eds151
Installation and connection 4.2.5 Connection example: ATICS® with bypass switch and EDS151 Risk of destruction if connected incorrectly The terminals marked "*" are intended for Bender-internal purposes only. If this is ignored, the ATICS® may be damaged. CAUTION ATICS-2-ISO_D00046_02_M_XXEN/04.2015... -
Page 33: Connection Example: Atics® For 400 Volt Systems
Connection example: ATICS® for 400 volt systems Risk of damage caused by wrong connection The terminals marked with the symbol "*" are intended for Bender internal use only. In the event of non-compliance, the ATICS® device may be damaged. CAUTION Risk of ineffective voltage monitoring The ATICS®... -
Page 34: Instructions For Connection
DIN VDE 0100-710 (VDE 0100 Part 710) for transformers for medical systems. 4.2.7.2 Temperature sensors Bender IT system transformers are equipped with the temperature sensors required according to their insulation class. These temperature sensors (maximum of 6 sensors connected in series) are connected to terminals Z1 and Z2. -
Page 35: Fastening, Inserting And Securing Connections
Installation and connection 4.2.8 Fastening, inserting and securing connections Connect the terminals according to the wiring diagram to the plug connectors (A, B) and the three connector plugs (C). Connect the Lines 1, 2 and 3 to the plug connectors (A,B). Consider a stripping length of 20 mm ... -
Page 36: Other Functions
Installation and connection 4.3 Other functions 4.3.1 Sealing the transparent cover of the changeover switch The transparent cover can only be sealed when it is closed (automatic mode). 4.3.2 Manual mode Risk of injury from rotating Allen key When the transparent cover is closed, the ATICS® is in automatic mode. The ATICS®... -
Page 37: Locking The Changeover Switch With The Padlock
Installation and connection 4.3.3 Locking the changeover switch with the padlock It is only possible to lock the selector switch in manual mode (transparent cover open). The locking device can only be locked in switch position "0". Padlock shackle diameter: 4 mm … 8 mm (3/16” … 5/16”) To lock the changeover function: 1. - Page 38 Installation and connection ATICS-2-ISO_D00046_02_M_XXEN/04.2015...
-
Page 39: Commissioning, Settings And Testing
5. Commissioning, settings and testing 5.1 Design and Installation Risk of erroneous measurements The ATICS® contains an insulation monitoring device. If another insulation mon- itoring device is connected, the devices will affect one another. This will lead to CAUTION false measurements. Therefore, only one insulation monitoring device should be connected on each interconnected IT system! Risk of missing or false messages on the display on MK..., TM... -
Page 40: Configure Mk
Commissioning, settings and testing 5.1.1 Configure MK… resp. TM… Configure MK… or TM… in a meaningful way In addition to the alarm, also configure a brief message of what to do or who to notify. Examples: - IT system overload. Switch off unnecessary loads. - IT system insulation fault. -
Page 41: Tests, Decommissioning
Commissioning, settings and testing Messages for alarm on the digital input The following operational status and alarm messages may appear depending on the settings on the "Settings menu 6: Digital Input": Menu Function of digital input Alarm on BMS bus BMS channel setting Digital input switched off... -
Page 42: Setting And Testing According To The Checklist
Commissioning, settings and testing 5.2 Setting and testing according to the checklist The settings made at the factory take into account a total changeover period t ≤ 0.5 s and switching back to the preferred supply within 10 seconds on voltage recovery. The response delay t(on), the dead time t(0), the delay on release t(off) and the return transfer delay time t(2->1) of the ATICS®... -
Page 43: Addressing Examples
Commissioning, settings and testing 5.3 Addressing examples Insert terminating resistors correctly Communication via the BMS bus is only guaranteed when there is a terminating resistor at the beginning and the end of the BMS bus. Other terminating resistors cause malfunction and must not be used. Please also note the information in the "BMS bus"... - Page 44 Commissioning, settings and testing Two transfer switching devices One with an insulation fault locator With two alarm indicator and test combinations in each case And one central monitoring Device Parameters Address settings Bus address ATICS® for Area A Address First MK…...
-
Page 45: Operation
6. Operation This chapter can also be used as a quick reference guide by technical operating personnel. 6.1 Operator control and display elements ALARM COM LED and LCD Illuminated graphic LCD LED "1" lights up when Line 1 is ready LED "2"... -
Page 46: Quick Reference Guide
Operation 6.2 Quick reference guide 6.2.1 Display during fault-free operation There is no alarm message. The LCD shows the standard information. Example: 228V 231V 50.0Hz 50.0Hz 160kΩ 14:11 12.10.2010 Line 1: Measured values of mains voltage and frequency Switch position of the changeover switch Line 2: Measured values of mains voltage and frequency Display of the load in the IT system in %. -
Page 47: Display In Fault Condition
Operation 6.2.2 Display in fault condition There is an alarm message. The yellow LED "Alarm" lights up. A detailed message appears on the LC display. Example: Line 2 has no voltage 228V 0.00V 50.0Hz 0.00Hz 160kΩ 14:11 Undervoltage Press the button "↵"... -
Page 48: Test Function
Operation 6.2.3 Test function A test is used to test the functioning of the device. There are several ways to call up a test menu: Select standard display and then press the "TEST" button on the front panel of the device for at ... -
Page 49: Test Menu 1: It System
Operation If manual mode is selected for changeover (transparent cover open or digital in- put set to "manual changeover") then no changeover can take place under the test menu "Autom. changeover" or "Manual changeover". ATICS® then displays the following fault alarm: Info TEST Cancel... -
Page 50: Test Menu 2: Autom. Changeover
Operation 6.2.3.2 Test menu 2: Autom. changeover Autom. changeover Autom. changeover Cancel Autom. changeover Test of the changeover function. The device changes to the redundant line. The changeover period t(1->2) is displayed. After the set time t(Test) has elapsed, the device changes back to the preferred line. Cancel Back to test menu TEST... -
Page 51: Test Menu 4: Last Switch
Operation Manual mode aborts manual test When the transparent cover is opened after changing over to the redundant line, the ATICS® switches to manual mode. The test will be aborted. After closing the transparent cover, the ATICS® switches back to the preferred line. -
Page 52: Test Menu 5: Generator
Operation 6.2.3.5 Test menu 5: Generator Executing this function makes sense only when a generator is connected to the redundant line and the associated settings have been carried out (see "Settings menu 1: Changeover" on page 64. To avoid voltage interruptions, in the test menu "Generator", the ATICS®... -
Page 53: Reset Function
Operation Example: "Channel 5: MANUAL MODE" is selected. Channel disabled Manual mode :-- Exit Exit Channel:-- Channel:5 MANUAL MODE The ATICS® stays in this menu until it is exited by pressing the "ESC" button. During this time, all the alarms on the BMS bus have the word "TEST". 6.2.4 Reset function A reset is used to reset the alarm and fault messages for the device and for releasing the switching-... -
Page 54: Reset Menu 1: Alarm
Operation 6.2.4.1 Reset menu 1: Alarm Delete Delete Cancel Delete Resets alarm and fault messages on the device. The progress of the test is shown on the display. The reset is required if one or more alarm-triggering parameters are not con- stantly monitored so that the end of the alarm condition was not detected. -
Page 55: Reset Menu 3: Changeover
Operation 6.2.4.3 Reset menu 3: Changeover ATICS® monitors the parameters important for its service life. On reaching the set limits, the unit dis- plays an alarm message. Replacement of the device must be initiated. During the period until it is re- placed the annoying alarm can be "deleted"... - Page 56 Operation ATICS-2-ISO_D00046_02_M_XXEN/04.2015...
-
Page 57: Menu Mode: Operation And Setting
7. Menu mode: Operation and setting 7.1 Switching on and calling up the main menu When the device is connected to the power supply, the following information appears on the display for approx. 3 seconds. If the device has been without power for several days, the time and date must be reset. -
Page 58: Menu Overview Diagram
Menu mode: Operation and setting 7.2 Menu overview diagram The following diagram will help you to familiarise yourself with the menus: Exit Exit 1.History 1.Alarm/meas.values 2.Data logger 3.Config. logger 2.Changeover 4.Test data logger 3.History/Logger 5.Service logger Exit 1.Changeover 2.Voltage 3.Current 4.IT system 5.Relay 6.Digital Input... -
Page 59: Main Menu Functions
Menu mode: Operation and setting 7.3 Main menu functions Menu item Function Page Exit Exit menu mode 1. Alarm/meas. values Displays saved status messages, alarm messages and measured values 2. Changeover Displays information on the changeover function (number, test) 3. History/Logger Displays the history memory, data logger, logger configuration, test logger and service logger 4. -
Page 60: The Main Menu
Menu mode: Operation and setting 7.4 The main menu 7.4.1 Menu 1: Alarm/meas. values Displays current status messages, alarm messages and measured values. The device shows the alarm status for each menu item: no alarm, alarm. Menu Meaning Exit Exit "Alarm/meas. values" menu; go up one menu level Line 1: Measured value mains voltage Line 1: 228V Line 2: Measured value mains voltage... -
Page 61: Menu 3: History/Logger
Menu mode: Operation and setting Menu Meaning Number of changeovers performed Changeover: xxx Operating hours counter (h=hours, d=days, mo=months) Operat. time: xxh Number of changeovers performed which were carried out with overcurrent Changeover I>: xx of short-circuit current. These changeovers reduce the service life of the ATICS®... -
Page 62: Operating Example: History
"off" to "0". The last line contains an identification code for the type of modification (in this case: [4/1]). Channel 1 means that the first digital input has been changed. Please contact the Bender Service and provide the identification number, when the modifica- tion led to an undesirable behaviour of the device. -
Page 63: Menu 4: Settings
The device has two separate passwords for the "Settings" menu and the "TEST" menu. Adjustable in each case: Change password, enable/disable password 12. Service Reserved for settings to be made by authorised Bender Service personnel. Call up information about the device status and make settings for specific operating conditions. ATICS-2-ISO_D00046_02_M_XXEN/04.2015... -
Page 64: Settings Menu 1: Changeover
Menu mode: Operation and setting 7.4.4.1 Settings menu 1: Changeover The times set on this menu determine the timing of a changeover. Also note the time charts on page 17ff. The following settings for the changeover are available: Menu Meaning Exit Exit settings menu "Changeover";... - Page 65 Menu mode: Operation and setting Menu Meaning 6. SwitchBackLock Switching back interlocking function is switched on Switching back interlocking function is switched off Also see: "Time chart: Changeover between the preferred and redundant line" on page 17 7. Prefer.supply Line 1 Line 2 In generator mode, Line 1 is always the preferred line.
-
Page 66: Settings Menu 2: Voltage
Menu mode: Operation and setting 7.4.4.2 Settings menu 2: Voltage On this menu, you can adjust settings for monitoring the voltage on Line 1 and Line 2 individually or together. Example: Line 1 is set to "Undervolt.: 184 V". If the voltage on Line 1 falls below 184 V, the device displays an alarm message. -
Page 67: Settings Menu 3: Current
Exit settings menu "Current"; go up one menu level 1. Mode Current monitoring is switched on No current monitoring 2. CT STW3 Bender measuring current transformer STW3 STW4 Bender measuring current transformer STW4 3. CT monitor Transformer monitoring is switched on Transformer monitoring switched off Note: External interference from loads can cause false trippings. -
Page 68: Settings Menu 5: Relay
Menu mode: Operation and setting Menu Meaning 9. Fault locat. Insulation fault location switched off auto Insulation fault location switched on 10. IT system Nominal voltage of the IT system being monitored: 230 V Nominal voltage of the IT system being monitored: 115 V 7.4.4.5 Settings menu 5: Relay On this menu, you adjust settings for the mode of operation and function of the relay output (alarm... - Page 69 Menu mode: Operation and setting Meaning Menu 6. Device error Internal device error 1.x, 3.x (except 3.50), 6.x, 7.x, 8.x, 9.x or BMS bus has no master, short-circuit distribution board, failure distribution board. 7. Test interval relay switches when a test is due (interval elapsed). 8.
-
Page 70: Settings Menu 6: Digital Input
Menu mode: Operation and setting 7.4.4.6 Settings menu 6: Digital Input On this menu, you can adjust settings for the mode of operation and function of the digital input. The digital input is electrically isolated. It is designed for an input of AC/DC 24 V. ATICS-2-ISO has a digital input and a relay output with a changeover contact. -
Page 71: Settings Menu 7: Datalogger
Menu mode: Operation and setting 7.4.4.7 Settings menu 7: Datalogger The settings for six data loggers of the device are adjusted on this menu. These data loggers display the history memory of measured values (see "Menu 3: History/Logger" on page 61): Voltage Line 1 Voltage Line 2 Switch position of the changeover switch... -
Page 72: Settings Menu 8: Language
Menu mode: Operation and setting Menu Meaning 2. Overwrite Once the maximum number of measured values which can be saved is reached, the current measured value overwrites the oldest entry. Once the maximum number of measured values which can be saved is reached, no further measured values are saved. -
Page 73: Settings Menu 10: Clock
Menu mode: Operation and setting Menu Meaning 4. Failure monitoring Alarm, if no communication with BMS master is detected. The presence of a BMS master is not monitored. This setting is required when the ATICS® is used as a "Stand-alone" device without BMS master. -
Page 74: Settings Menu 11: Password
Menu mode: Operation and setting 7.4.4.11 Settings menu 11: Password The device has two separate passwords for the "Settings" menu and the "TEST" menu. Menu Meaning Exit Exit settings menu "Password"; go up one menu level 1. Settings Change the password for the "Settings" menu, switch the password "on/off". Factory setting: Password: Status:... -
Page 75: Settings Menu 12: Service
Password protection is switched off. 7.4.4.12 Settings menu 12: Service The Service menu is reserved for settings made by authorised Bender Service personnel. It is only accessible to Bender service. In the Service menu, information about the device status can be called up and settings for specific operating conditions can be made. -
Page 76: Menu 5: Control
Date, time Line 3: Address set on the BMS bus Line 4: Serial number of the device Line 5…8: Software versions of the four controllers of the device Line 9…11: Bender address, homepage Line 11: Exit. Exit standard information. ATICS-2-ISO_D00046_02_M_XXEN/04.2015... -
Page 77: Troubleshooting
8. Troubleshooting 8.1 Fault and alarm messages If a fault occurs, the message of the ATICS® transfer switching device will enable you to narrow down the possible causes. Some messages may point to several causes. The following possible faults are indicated by messages on the ATICS®... -
Page 78: Messages With Error Code Or Service Code
RS-485 interface Service: __ (date) Reminder for next service - Agree date with Bender Service Test: Reminder for next test - Plan date for test __ (date) - Carry out test Manual mode Message "Manual mode"... - Page 79 2. Make a note of what happened prior to the fault: operator inputs, device error messages, ambi- ent conditions, etc. 3. Keep the device article number and device serial number to hand. 4. Speak to Bender Service, describe the type of fault and quote the three-digit error code. ATICS-2-ISO_D00046_02_M_XXEN/04.2015...
-
Page 80: Frequently Asked Questions
Troubleshooting 8.2 Frequently asked questions A series of clicks is always heard at around noon. What does that mean? ATICS® carries out a coil trigger test once a day. The time is calculated as follows: 12:00:00 o'clock + (own BMS bus address * 10 s) If configured to "Generator"... - Page 81 Why transferring a report from device to device may lead to error messages ATICS® - like many Bender devices - can be monitored and adjusted by means of a Bender gateway CP700, COM46x ... etc. Gateway operation takes place via a user interface, which is available through an Internet browser.
- Page 82 Troubleshooting ATICS-2-ISO_D00046_02_M_XXEN/04.2015...
-
Page 83: Periodic Verification And Service
According to DIN VDE 0100-710 (VDE 0100-710):2002-11 an interval of six months is recommended. Thereby the minimum requirements are satisfied. Bender recommends a monthly test to ensure that the operating personnel is familiar with the testing procedure in the event of a fault. -
Page 84: Service
Periodic verification and service 9.2 Service We can also offer you on-site service for commissioning and periodic verification. Please contact our Service Department or your next Bender agency for more information: Service hotline: 0700-BenderHelp (Telephone and Fax) Carl-Benz-Straße 8 • 35305 Grünberg • Germany Tel: +49 6401 807-760 •... -
Page 85: Replace The Atics
Periodic verification and service Conditions for operation with the bypass switch Wiring must be carried out according to "Connection example: ATICS® with bypass switch" on page 31. The following settings are to be set in the "Settings menu 6: Digital Input": ... -
Page 86: Removing The Existing Atics
Periodic verification and service 9.6.1 Removing the existing ATICS® 1. Record settings on the existing ATICS®. The settings should match the entries on the checklist (see checklist in the appendix of this manual or, if necessary, update checklist). 2. Make device dead or switch on bypass switch. Switch existing ATICS® to manual mode and switch to switch position "0"... - Page 87 Periodic verification and service Remove the lower and upper terminal covers (E, F) by using a screwdriver to push back the locking hook located approximately in the middle of the cover in each case. Use a screwdriver to pull the lower yellow slide lock (G) downwards and raise the ATICS®...
- Page 88 Periodic verification and service Remove the lower and upper terminal covers (D, E) by using a screwdriver to push back the locking hook located approximately in the middle of the cover in each case. Undo the Allen screws of the terminals (F). Remove the green connectors (G) top and bottom.
-
Page 89: Installing A New Atics
Periodic verification and service 9.6.2 Installing a new ATICS® 1. Install the ATICS®: "Mounting on DIN rail" see page 24 "Screw mounting on plate" see page 25 2. Connect the ATICS® Insert bottom green plug connector (B) and secure with mounting screws. -
Page 90: Disposal
Old electrical and electronic equipment from users other than private households which was introduced to the market after 13th August 2005 must be taken back by the manufacturer and disposed of properly. For more information on the disposal of Bender devices, see our homepage. ATICS-2-ISO_D00046_02_M_XXEN/04.2015... -
Page 91: Data
10. Data 10.1 TÜV test report ATICS-2-ISO_D00046_02_M_XXEN/04.2015... -
Page 92: Standards
Data 10.2 Standards The transfer switching device conforms to the following standards: DIN VDE 0100-710 (VDE 0100 Part 710):2012-10* DIN VDE 0100-718 (VDE 0100-718):2005-10 ÖVE/ÖNORM E 8007:2007-12* IEC 60364-7-710:2002-11 DIN EN 61557-8 (VDE 0413 Part 8):2007-12 ... -
Page 93: Technical Data
Data 10.3 Technical data Insulation coordination acc. to IEC 60664-1/IEC 60664-3 Overvoltage category ................................ III Pollution degree outside, inside ............................2 Rated insulation voltage..............................250 V Protective separation between ................Line 1 – Line 2; Line 1, 2, 3 – RS-485 ....................Line 1, 2, 3 – digital inputs; Line 1, 2, 3 – relay outputs Voltage test according to IEC 61010-1 (basic insulation/protective separation) ........2.21 kV / 3.54 kV Supply voltage Rated operational voltage... - Page 94 Data Measuring voltage .............................DC 12 V Measuring current Im (at = 0 Ω) ........................≤ 53 μA Internal resistance .............................≥ 240 kΩ Impedance Z ................................≥ 220 kΩ Internal resistance/impedance during test ......................≥ 100 kΩ Permissible extraneous DC voltage ......................≤ DC 370 V Permissible system leakage capacitance ......................
- Page 95 Data Output Switching element ....................1 potential-free changeover contact Mode of operation, adjustable......................N/O / N/C operation Adjustable function ..................see "Settings menu 5: Relay" on page 68 Electrical endurance under rated operating conditions, number of cycles .............10.000 Contact data according to IEC 61810 Rated operational current AC (resistive load, cos φ=1)................
- Page 96 Weight................................approx. 3400 g Utilisation category according to DIN EN 60947 Type Ie AC-23A Ie AC-23B Ie AC-32A Ie AC-32B Ie AC-33B Fuse ATICS-2-63A-ISO 63 A 63 A 63 A 63 A 80 A gG 30 kA ATICS-2-80A-ISO 80 A 80 A...
-
Page 97: Ordering Information
10.4 Ordering information Rated operational Type Definition Art. No. current ATiCS-2-63A-ISO Two-pole transfer switching device AC 63 A B 9205 7202 : AC 230 V, U : AC 230 V) with integrated IT system insulation, load and temperature monitoring, 1 digital... -
Page 98: Additional Documents
STW2, STW3, STW4 Measuring current transformer BMS-Bus Bender Measuring Device Interface COM460IP BMS Ethernet Gateway for the connection of the Bender measuring interface to the TCP/IP network EDS150 Insulation fault locator EDS151 Insulation fault locator ... -
Page 99: Index
Addressing examples 43 Opening the main menu 57 Operating hours counter 55 Operating theatre lights 16 Operation 45 Bender Service personnel 75 - condition 47 BMS bus (channel use) 40 - fault-free 46 Ordering information 97 Overcurrent or short-circuit current 55... - Page 100 Bender GmbH & Co. KG P.O. Box 1161 • 35301 Gruenberg • Germany Londorfer Straße 65 • 35305 Gruenberg • Germany Tel.: +49 6401 807-0 • Fax: +49 6401 807-259 E-mail: info@bender.de • www.bender.de Fotos: Bender Archiv und bendersystembau Archiv.
Need help?
Do you have a question about the ATICS-2-63A-ISO and is the answer not in the manual?
Questions and answers