Advertisement
Available languages
Available languages
INSTRUCTION MANUAL FOR MODELS:
#91519- Advanced VX Mount
#32054- Advanced VX 6" Newtonian Telescope
#32062- Advanced VX 8" Newtonian Telescope
#22020- Advanced VX 6" Refractor Telescope
#12025- Advanced VX 5" Schmidt-Cassegrain Telescope
#12079- Advanced VX 6" Schmidt-Cassegrain Telescope
#12026- Advanced VX 8" Schmidt-Cassegrain Telescope
#12046- Advanced VX 9.25" Schmidt-Cassegrain Telescope
#12067- Advanced VX 11" Schmidt-Cassegrain Telescope
#12031- Advanced VX 8" EdgeHD Telescope
S E R I E S
Advertisement
Chapters

Related Manuals for Celestron advanced VX Series


Summary of Contents for Celestron advanced VX Series
- Page 1 S E R I E S INSTRUCTION MANUAL FOR MODELS: #91519- Advanced VX Mount #12079- Advanced VX 6” Schmidt-Cassegrain Telescope #32054- Advanced VX 6” Newtonian Telescope #12026- Advanced VX 8” Schmidt-Cassegrain Telescope #32062- Advanced VX 8” Newtonian Telescope #12046- Advanced VX 9.25” Schmidt-Cassegrain Telescope #22020- Advanced VX 6”...
-
Page 2: Table Of Contents
Optical Tube Assemblies Setting up the Refractor Setting up the Newtonian Reflector Setting up the EdgeHD & Schmidt-Cassegrain Optical Tubes Aligning the Finderscope Polar Aligning the Mount Appendix A - Advanced VX Mount Technical Specifications Celestron Two Year Limited Warranty ENGLISH... -
Page 3: Introduction
Your telescope is designed to give you years of fun and rewarding observations However, there are a few things to Congratulations on your purchase of the Celestron Advanced consider before using your telescope that will ensure your VX telescope mount The Advanced VX German equatorial... -
Page 4: Advanced Vx Mount
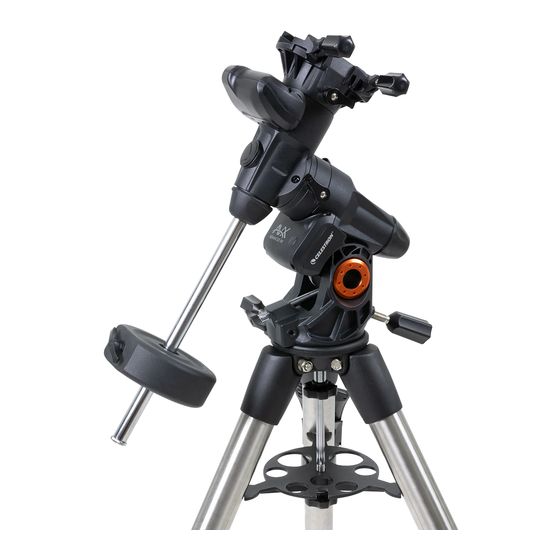
Advanced VX Mount (Advanced VX with 5” Schmidt-Cassegrain Optical Tube Shown) Optical Tube CONTROL PANEL Control Panel Power Port Advanced VX Equatorial Mount DEC Motor Port Latitude Adjustment Scale Power Switch Tripod Center Leg Brace/Accessory Tray Auxiliary Ports Tripod Hand Control Port Dec Motor Housing Auto Guider Port Counterweight... -
Page 5: Assembly
A large floor space is ideal When setting up your Celestron mount, you must start with 4 Place the equatorial mount on the tripod head so that... - Page 6 Your Advanced VX tripod comes with the alignment peg installed so the polar axis and counterweight bar extends between two tripod legs If you wish, you can reposition the alignment peg so the counterweight bar extends directly over a tripod leg This is a matter of personal preference and Mounting Knob does not affect the stability of the mount Observers at lower Central...
- Page 7 2 Remove the counterweight safety screw on the bottom that the mount does not move suddenly while attaching the end of the counterweight bar by turning it counterclock- telescope To mount the telescope tube: wise This screw prevents the counterweight from falling 1 Loosen the two mounting screws on the side of the off the mount in the case the counterweight locking screw telescope mounting platform This allows you to slide...
- Page 8 telescope (i e , the telescope remains stationary when the R A clutch knobs are loose) 6 Tighten the screw on the counterweight to hold it in place To keep the empty threads clean, always replace the Allen-key screws into the set of holes you are not using Moving the Telescope Manually In order to properly balance your telescope, you will need to Tip: While the above instructions describe a perfect balance...
- Page 9 Powering the Telescope The Advanced VX mount can be powered by the supplied car battery adapter or optional 12V AC adapter Use only adapters supplied by Celestron Using any other adapter may damage the electronics and will void your manufacturer’s warranty...
-
Page 10: Computerized Hand Control
Update hand control firmware over USB without external power or without connecting to the mount To update the firmware, simply plug a mini USB cable (not included) from your PC to the port on the bottom of the hand control, and run Celestron Firmware Manager (CFM), available for free from the support section on Celestron com ENGLISH... - Page 11 • Quick-Align will ask you to input all the same information 7 Option (Celestron Logo): Can be used in combination as you would for the Two Star Align procedure However,...
- Page 12 • Press ENTER to accept the current parameters Note: If incorrect information is entered into the hand control, the BACK button acts like a backspace button, • Press BACK to enter current date, time and location allowing the user to re-enter the correct data information into the hand control Select one of the alignment methods described below 3 The following information will be displayed:...
- Page 13 Note: East/West Filtering – In order to ensure the best 3 Use the UP and Down keys to select Sun Menu and possible full-sky pointing accuracy, your computerized press ENTER mount automatically filters and chooses its initial 4 Press ENTER again to allow the Sun to appear on the alignment stars so that the first two alignment stars hand control display are located on one side of the Meridian and any...
-
Page 14: Object Catalog
6 Press ALIGN to make the change you want to view Press ENTER to command the telescope to slew to the object or hold the OPTION button (the Celestron logo) and press OBJECT Object Catalog INFO to see information about the object you... - Page 15 • To slew to the object displayed, press ENTER choose a speed rate To use this feature, simply press the arrow button that corresponds to the direction that you want • To see the next tour object, press the DOWN key to move the telescope While holding that button down, press the opposite directional button This will increase the Identify Button...
- Page 16 Option displays objects that are higher in altitude than 20° button (the Celestron logo) for 10 seconds while Tip: If you want to explore the entire object database, set powering up the telescope the maximum altitude limit to 90°...
- Page 17 GoTo Approach – Lets the user define the direction that respond when it is slewing to objects that are accessible the telescope will approach when slewing to an object This from both sides of the meridian The meridian feature allows allows the user the ability to minimize the effects of backlash the telescope tube to remain on a desired side of the mount when slewing from object to object Just like with Direction...
- Page 18 tracking in the same direction past the meridian without the Calibrate Mount – In order to optimize the performance need to “flip” the telescope around to the opposite side of and pointing accuracy of the telescope, the mount has built-in the mount (see Meridian feature above) Using the first example calibration routines allowing it to compensate for mechanical above, the user could slew the telescope in R A (azimuth)
- Page 19 Hibernate – Hibernate allows the telescope to be completely Turn On/Off RTC – Allows you to turn off the telescope’s powered down and still retain its alignment when turned internal real time clock When aligning, the telescope still back on This not only saves power, but is ideal for those receives time information from the RTC If you want to use that have their telescope permanently mounted or leave their the hand control database to find the coordinates of a...
- Page 20 telescope, they are only valid for that exact location To To use Precise GoTo: save land objects, once again center the desired object in 1 Press the MENU button and use the Up/Down keys the eyepiece Scroll down to the “Save Land Obj” command to select Precise GoTo and press ENTER The display will ask you to enter a number between 1 and 200 to identify the object Press...
-
Page 21: Advanced Vx Main Menu Tree
Advanced VX Main Menu Tree Menu Tracking Mode EQ North EQ South Rate Sidereal Solar Lunar View Time-Site Saved Site Hand Control Light Control Keypad Level Display Level Scrolling Menu Toggle Bold Font Set Contrast Set Language Scope Setup See Diagram - Next Page Utilities See Diagram - Next Page User Objects... - Page 22 Advanced VX Main Menu Tree Scope Setup Setup Time-Site Custom Site Utilities Calibrate Mount City Database Home Position GoTo Anti-Backlash RA Positive RA Negative Factory Setting Dec Positive Version Dec Negative Get Axis Position Filter Limits GoTo Axis Position Direction Button RA Button Hibernate Dec Button...
-
Page 23: Optical Tube Assemblies
Optical Tube Assemblies Depending on the telescope kit you purchased, you may have received one of the following optical tubes This section of the manual will walk you through the setup of the basic types Kit # 22020 32054 32062 12031 Optical Design Refractor... -
Page 24: Setting Up The Refractor
Setting Up the Refractor (#21020) 3 Tighten the set screw to hold the eyepiece in place Installing the Finderscope Focuser Tension Screw To install the finderscope onto the telescope, you must first 1 25 Eyepiece Adapter mount the finderscope through the finder bracket and then attach it to the telescope Toward the rear of the telescope tube, near the focusing assembly, there is a small bracket with a set screw in it This is where the finderscope bracket... -
Page 25: Setting Up The Edgehd & Schmidt-Cassegrain Optical Tubes
Setting up the EdgeHD and Schmidt- 4 Locate the mounting bracket near the front (open) end of the telescope Cassegrain Optical Tubes (#12031, #12079, 5 Loosen the set screw on the mounting bracket on the #12025, #12026, #12046 and #12067) telescope Installing the Star Diagonal 6 Slide the finder bracket (attached to the finderscope) - Page 26 larger the number), the lower the eyepiece magnification Installing the 9x50 Finderscope The shorter the focal length (i e , the smaller the number), The 8” EdgeHD and the 11” Schmidt-Cassegrain telescopes the higher the magnification Generally, you will use low- come with 9x50 finderscopes used to help you locate and to-moderate power when viewing For more information on center objects in the main field of your telescope To...
-
Page 27: Aligning The Finderscope
Polar Aligning the Mount Latitude Scales The easiest way to polar align a telescope is with a latitude scale Unlike other methods that require you to find the celestial pole by identifying certain stars near it, this method works off of a known constant to determine how high the polar axis should be pointed The Advanced VX mount can be adjusted from 7 to 77 degrees The constant, mentioned above, is a relationship between... - Page 28 This method can be done in daylight, thus eliminating the • Press the Align button and use the Up/Down buttons need to attempt in the dark Although this method does on the hand controller to select Undo Sync from the list, NOT put you directly on the pole, it will limit the number of and press Enter The message Complete will display on corrections you will make when tracking an object It will also...
- Page 29 This device allows you to photograph and guide through the 1 Find a bright star relatively close to the object you want telescope simultaneously In addition, you will need a T-Ring to image to attach your camera to the off-axis guider 2 Insert the autoguider into the eyepiece holder of your telescope Orient the guider so that one axis of the Other equipment needs include an autoguider, which is a...
-
Page 30: Appendix A - Advanced Vx Mount Technical Specifications
Appendix A – Advanced VX Mount Technical Specifications Payload Capacity (excluding counterweight) 30 lb Optical Tube Mounting System Dual Saddle Plate NexStar+ hand control with LCD display, 19 fiber-optic Computerized Hand Control backlit LED buttons 40,000+ objects, 100 user-defined programmable objects Database Enhanced information on over 200 objects Slew Speeds... -
Page 31: Celestron Two Year Limited Warranty
Celestron, is found to be defective in materials or workmanship As dealer in the U S A or Canada Warranty outside the U S A a condition to the obligation of Celestron to repair or replace such and Canada is valid only to customers who purchased from a product, the product must be returned to Celestron together with Celestron’s International Distributor or Authorized Celestron Dealer... - Page 33 G A M M E MODE D’EMPLOI POUR LES MODÈLES : #91519- Advanced VX Monture #12079- Advanced VX 6” Télescope de Schmidt-Cassegrain #32054- Advanced VX 6” Télescope Newtonien #12026- Advanced VX 8” Télescope de Schmidt-Cassegrain #32062- Advanced VX 8” Télescope Newtonien #12046- Advanced VX 9.25”...
- Page 34 Installation du réfracteur Installation du réflecteur Newtonien Installation des tubes optiques EdgeHD & Schmidt-Cassegrain Alignement du chercheur Alignement polaire de la monture Annexe A - Caractéristiques techniques de la monture Advanced VX Garantie Limitée de 2 ans de Celestron FRANÇAIS...
-
Page 35: Introduction
Introduction instructions intégrées pour vous guider à travers toutes Félicitations pour votre achat du télescope Celestron les procédures d’alignement nécessaires pour que le Advanced VX La monture équatoriale allemande Advanced télescope soit opérationnel en quelques minutes Utilisez VX a été conçue avec des matériaux de haute qualité afin de ce manuel en conjonction avec les instructions à... -
Page 36: Monture Advanced Vx
Monture Advanced VX (Advanced VX avec tube optique 5” Schmidt-Cassegrain représenté) Tube optique PANNEAU DE CONTRÔLE Panneau de contrôle Port d’alimentation Monture équatoriale Advanced VX Alimentation du moteur dec Échelle de réglage de latitude Interrupteur marche/arrêt Attache centrale des pieds du trépied / Ports auxiliaires Support à... -
Page 37: Assemblage
Pour installer votre monture 4 Déposez la monture équatoriale sur la tête du trépied de Celestron, commencez par le trépied puis continuez ensuite manière à ce que les deux soient encastrés Ces instructions sont données dans l’ordre où elles doivent 5 Poussez la molette située sur la barre centrale elle-... - Page 38 Votre trépied Advanced VX est livré avec la cheville d’alignement installée de manière à ce que l’axe polaire et la barre de contrepoids s’étendent entre les jambes du trépied Si désiré, vous pouvez repositionner la cheville du trépied de manière à ce que la barre de contrepoids se Molette de trouve directement au dessus d’une jambe du trépied Cela montage...
- Page 39 2 Retirez la vis de sécurité du contrepoids situé à l’extrémité l’installation du télescope Pour fixer le tube de télescope: de la barre de contrepoids en la faisant tourner dans le 1 Desserrez les deux vis de fixation situées de chaque côté sens inverse des aiguilles d’une montre La vis est présen- de la plateforme de montage du télescope Cela vous te pour empêcher le contrepoids de tomber de la monture...
- Page 40 4 Desserrez la vis située sur le côté du contrepoids, de manière à ce que celui-ci puisse être déplacé sur la barre 5 Déplacez le contrepoids jusqu’à ce qu’il équilibre le téle- scope (donc lorsque le télescope ne bouge plus lorsque les molettes de verrouillage R A sont desserrées) 6 Serrez la vis de verrouillage sur le côté...
- Page 41 Molettes pour batterie de voiture ou adaptateur optionnel CA 12 de réglage d’azimut V N’utiliser que les adaptateurs fournis par Celestron L’utilisation d’adaptateurs d’autres marques pourrait endom- mager les composants électroniques et annuler la garantie du fabricant 1 Pour alimenter le télescope avec une batterie de voiture (ou adaptateur optionnel CA 12V), branchez simplement Il est préférable d’effectuer les derniers réglages en altitude...
-
Page 42: Bloc De Commande Électronique
Pour mettre le logiciel à jour, branchez simplement un câble mini USB (non inclus) entre le port d’un ordinateur et celui présent sur le bas de la raquette de commande Lancez ensuite le logiciel Celestron Firmware Manager (CFM) disponible gratuitement dans la section Assistance du site Celestron com FRANÇAIS... - Page 43 Celestron Ces procédures sont regroupées en trois caté- 2 Alignement : Pour lancer le processus d’alignement de gories: Alignement, Paramétrage et Utilitaires La section votre télescope...
- Page 44 • Appuyez sur ENTRÉE pour accepter les valeurs heure Continuez à appuyer sur RETOUR pour modifier l’état, le pays ou saisir les coordon- • Appuyez sur RETOUR pour saisir la date, l’heure et nées de longitude et de latitude l’emplacement actuel dans le contrôle manuel Remarque : Si cous faites une erreur de saisie, le bou- 3 Les informations suivantes seront affichées : ton RETOUR fait également office de barre...
- Page 45 posé de ce côté du ciel (méridien) comparé aux étoiles prêt » apparaisse d’alignement originales Cela est essentiel pour le proces- 2 Appuyer sur le bouton MENU et utiliser les flèches Haut sus de calibration précis de la monture et Bas pour sélectionner le Menu Utilitaires Appuyer sur ENTRÉE Enfin, vous pouvez choisir d’ajouter plus d’étoiles de calibra- 3 Utiliser les touches de défilement Haut/Bas pour sélec-...
-
Page 46: Catalogue Des Objets
ENTRÉE pour faire orienter le télescope Catalogue des objets vers l’objet, ou maintenir enfoncé le bouton OPTION (logo Celestron) et appuyer sur Sélectionner un objet INFO OBJET pour consulter l’information Dès que le télescope est aligné correctement, vous pouvez sur l’objet sélectionné... - Page 47 éviter l’enroulage du câble d’alimentation durant la visite numéro 1 est la vitesse la plus lente (2x sidéral) et peut être utilisé pour un centrage précis des objets dans l’oculaire 4 Le contrôle manuel affichera les meilleurs objets à ob- Pour modifier la vitesse des moteurs: server qui sont présentement dans le ciel •...
- Page 48 +20° Cela fera en affichée en maintenant le bouton Option (le sorte que la commande manuelle n’affichera que les objets qui logo Celestron) pendant 10 secondes pendant sont supérieurs en altitude à 20° l’allumage du télescope Astuce : Si vous souhaitez explorer la totalité...
- Page 49 des photos astronomiques Pour compenser, la direction L’option de tandem doit être définie avant de commencer toute des clés de contrôle du moteur peut être modifiée Pour étape de l’alignement sur les étoiles Pour ce faire, rendez-vous renverser la logique du contrôle manuel, appuyer sur MENU dans les Options du télescope, sélectionnez l’option Tandem et sélectionner Direction Buttons du menu Utilitaires Utilisez puis appuyez sur ENTRÉE Choisissez ensuite parmi l’une des...
- Page 50 • R.A. (Ascension Droite) Index – Ceci est la valeur de rebond dans les engrenages, il pourrait être nécessaire d’erreur d’index R A définie lorsque les opérations Utili- de faire en sorte que le télescope s’oriente plus loin que les taires/Calibration de monture/R A sont effectuées limites d’orientation saisie pour approcher l’étoile depuis la direction correcte Cela pourrait limiter votre capacité...
- Page 51 réinitialisées Cependant, les paramètres stockés tels que ture, effectuez un pivot vers une étoile brillante de la liste les objets définis par l’utilisateur resteront intacts même si des étoiles nommées, et sélectionnez Définir la Position de Réglage d’Usine est sélectionné Le contrôle manuel vous monture Le contrôle manuel se synchronisera sur l’étoile demandera d’appuyer sur la clé...
- Page 52 Conserver objet la Nébuleuse de l’Anneau (M57) se trouve à 6° de votre position présente En cherchant dans le catalogue Étoiles • de base de données : Cette fonction vous permet de Binaires, vous remarquerez qu’Epsilon Lyrae se trouve à 1° créer votre propre visite guidée d’objets de base de don- de Véga Pour utiliser la fonction Identification : nées en vous permettant d’enregistrer la position courante...
-
Page 53: Arbre Du Menu Principal Advanced Vx
Arbre du menu principal Advanced VX Menu Suivi Mode EQ Nord EQ Sud Désactivé Taux Sidéral Solaire Lunaire Afficher heure-site Site enregistré Contrôle du ré- Contrôle manuel Éclairage du clavier troéclairage Éclairage de l’affichage Menu de Défilement Activer les caractères gras Contraste Langue d’interface Réglage du Télescope... - Page 54 Arbre du menu principal Advanced VX Réglage du Télescope Saisie Heure-Site Site personnalisé Utilitaires Calibrer la monture Base de données de Position d’Origine Aller à villes Anti-rebond R.A. positive Définir R.A. négative Réglage d’usine DEC. positive Version DEC. négative Obtenir position d’axe Limites de filtre Aller à...
-
Page 55: Assemblage Du Tube Optique
Assemblage de tube optique Selon le kit de télescope acheté, l’un des tubes optiques est peut-être livré Cette section du manuel vous expliquera comment installer les types les plus courants Kit N°. 22020 32054 32062 12031 Conception optique Lunette Newtonien Newtonien Edge HD Diamètre... -
Page 56: Installation Du Réfracteur
Installation du réfracteur (#21020) Vis de tension du renvoi coudé Adaptateur Installation du chercheur d’oculaire 1,25 Pour installer le chercheur sur le télescope, celui-ci doit être au préalable fixé au support de chercheur puis attaché au télescope Vers l’arrière du tube du télescope, près de l’assemblage de renvoi coudé, se trouve un petit support avec une vis C’est là... -
Page 57: Installation Des Tubes Optiques Edgehd & Schmidt-Cassegrain
que le joint soit pressé fermement entre le chercheur et devrez au préalable désinstaller l’adaptateur 3,1 cm et ainsi l’intérieur du support pouvoir installer l’oculaire de 5 cm Pour ce faire, desserrez simplement les deux vis à main chromées qui se trouvent 3 Serrez les vis de réglage jusqu’à... - Page 58 Pour retirer l’oculaire, desserrez la vis de la diagonale en 6 Serrez légèrement les trois vis de nylon à main sur étoile et retirez l’oculaire Vous pouvez alors l’échanger avec l’anneau avant du support de chercheur un autre oculaire (vendu séparément) 7 Une fois cela fait, repoussez le joint en anneau jusqu’à...
-
Page 59: Alignement Du Chercheur
méthode utiliser un point constant connu pour déterminer à quelle altitude l’axe polaire doit être pointé La monture Advanced VX peut être réglée de 7 à 77 degrés La constante, mentionnée ci-dessus est la relation entre votre latitude et la distance angulaire du pôle céleste avec l’horizon nord (ou sud) ;... - Page 60 également assez précis pour permettre la mise au point • Appuyez sur le bouton d’alignement et utilisez les touches initiale pour la photographie planétaire (quelques haut/bas du contrôle manuel pour sélectionner Annuler secondes) et l’astrophotographie à exposition courte synchro dans la liste Le message Terminé s’affichera sur (quelques minutes) l’écran Pour réaligner votre télescope :...
- Page 61 guider le télescope simultanément De plus, un anneau-T 2 Insérez l’autoguideur dans le support d’oculaire de votre sera requis pour attacher votre appareil photo à un guidage télescope Orientez le guideur de manière à ce que l’axe hors axe optionnel du capteur soit parallèle à...
-
Page 62: Annexe A - Caractéristiques Techniques De La Monture Advanced Vx
Annexe A – Caractéristiques techniques de la monture Advanced VX Capacité de charge (contrepoids non inclus) 30 lb (13 5 Kg) Système de monture de tube optique Double chevalet Controle manuel NexStar+ avec écran LCD et 19 touches Bloc de commande électronique rétroéclairés par DEL et fibres optiques Plus de 40 000 objets et 100 objets personnalisés, Base de données... -
Page 63: Garantie Limitée De 2 Ans De Celestron
Cette garantie vous donne des droits légaux spécifiques, et vous pouvez également avoir d’autres droits qui varient d’un état ou d’une province à l’autre Celestron se réserve le droit de A Celestron garanti que votre produit est libre de défauts de matériaux et de fabrication pour une période de deux ans... - Page 65 S E R I E BEDIENUNGSANLEITUNG FÜR DIE MODELLE: #91519- Advanced VX-Montierung #12079- Advanced VX 6” Schmidt-Cassegrain Teleskop #32054- Advanced VX 6” Newton-Teleskop #12026- Advanced VX 8” Schmidt-Cassegrain Teleskop #32062- Advanced VX 8” Newton-Teleskop #12046- Advanced VX 9.25” Schmidt-Cassegrain Teleskop #22020- Advanced VX 6”...
- Page 66 Schwenken zu einem Objekt Hauptmenübaum des Advanced VX Aufsetzen der Teleskoptuben Aufsetzen des Refraktors Aufsetzen des Newtonschen Reflektors Die EdgeHD- und Schmidt-Cassegrain-Teleskoptuben aufsetzen Justieren des Suchfernrohrs Polausrichtung der Montierung Anhang A – technische Daten der Advanced VX-Montierung Zweijährige eingeschränkte garantie von Celestron DEUTSCH...
-
Page 67: Einleitung
Einleitung Herzlichen Glückwunsch zum Kauf der Advanced VX-Teles- Ihr Teleskop wurde so entworfen, dass es Ihnen jahrelang kopmontierung von Celestron Die parallaktische Montierung Freude bei interessanten Beobachtungen macht Sie müssen des Advanced VX besteht aus hochwertigen Materialien, um jedoch vor der Verwendung Ihres Teleskops einige Gesichts- Stabilität und Langlebigkeit zu gewährleisten Das Ergebnis:... -
Page 68: Montierungen Des Advanced Vx
Advanced VX-Montierung (Advanced VX mit 5-Zoll-Schmidt-Cassegrain-Teleskoptubus) Teleskoptubus BEDIENFELD Bedienfeld Stromanschluss Parallaktische Montierungen des Advanced VX DEK-Motoranschluss Breitengrad-Einstellskala Netzschalter Stativ-Mittelsäule/Zubehörablage Hilfsanschlüsse Stativ Handsteuerungsanschluss DEK-Motorgehäuse Autoguider-Anschluss Gegengewicht RA-Motorgehäuse Gegengewichtsstange Handsteuerung DEUTSCH... -
Page 69: Aufbau
Aufbau Dieser Abschnitt enthält die Anleitung zum Zusammenbau Bevor die Montierung an das Stativ montiert wird: der Advanced VX-Montierung von Celestron Im Lieferum- 1 Nehmen Sie die Azimut-Einstellknöpfe aus der Packung fang Ihrer Montierung sollte Folgendes enthalten sein: mit der parallaktischen Achse des Advanced VX •... - Page 70 Bei Ihrem Advanced VX ist der Justierstift bereits installiert, sodass Polachse und Gegengewichtsstange zwischen den beiden Stativbeinen herausragen Der Justierstift kann auf Wunsch neu positioniert werden, damit die Gegenge- wichtsstange direkt über einem Stativbein herausragt Dies Montagedrehknopf ist eine Frage der persönlichen Vorliebe und hat keinen Einfluss auf die Stabilität der Montierung Für Beobach- Mittelsäule tungen auf niedrigen Breiten mag der Justierstift vorzugs-...
- Page 71 Gegengewichtes lösen sollte 1 Lösen Sie die beiden Montageschrauben seitlich an der Teleskop-Montageplatte Dadurch wird es Ihnen möglich, 3 Lösen Sie die Sicherungsschraube seitlich am die Schwalbenschwanzführung auf die Montierung zu Gegengewicht schieben 4 Schieben Sie das Gegengewicht auf die Gegengewichts 2 Wenn Ihr Teleskop damit ausgestattet ist, entfernen Sie stange, bis es sich auf halber Höhe befindet nun die Sicherungsschrauben unterhalb der Schwalben-...
- Page 72 5 Bewegen Sie die Gegengewichte an einen Punkt, an dem das Teleskop ausbalanciert wird (d h es bleibt stehen, wenn die RA-Kupplungsdrehknöpfe gelöst sind) 6 Ziehen Sie die Schraube am Gegengewicht zur sicheren Befestigung an Um die leeren Gewindelöcher sauber zu halten, setzen Sie stets die Innensechskantschrauben in die nicht verwendeten Gewindelöcher ein Das Teleskop manuell bewegen...
- Page 73 Die Advanced VX-Montierung kann über den mitgelieferten knöpfe Autobatterieadapter oder optional über einen 12-V-Wechsel- stromadapter angetrieben werden Verwenden Sie nur von Celestron bereitgestellte Adapter Die Verwendung eines anderen Adapters könnte die Elektronik beschädigen und macht Ihre Herstellergarantie ungültig Es empfiehlt sich, endgültige Höheneinstellungen vorzu- 1 Das Teleskop wird über den Autobatterieadapter (oder...
-
Page 74: Computergesteuerte Handsteuerung
Schließen Sie für ein Firmware-Update einfach ein Mini-USB-Kabel (nicht enthalten) an den PC und den Steckplatz an der Unterseite der Handsteuerung an und führen Sie den Celestron Firmware Manager (CFM) aus, der kostenfrei auf Celestron com unter Support erhältlich ist... - Page 75 • Die Sonnensystem-Ausrichtung zeigt eine Liste sicht- und Vieles mehr barer Tagesobjekte an (Planeten sowie den Mond), die für 7 Option (Celestron-Logo): kann in Kombination mit an- die Ausrichtung des Teleskops zur Verfügung stehen deren Tasten verwendet werden, um auf fortgeschrittene •...
- Page 76 • Übernehmen Sie die Werte durch Drücken auf ENTER Hinweis: Wenn falsche Informationen in die Handsteuerung • Auf ZURÜCK drücken, um aktuelle Daten über Datum, eingegeben werden, fungiert die ZURÜCK-Taste Uhrzeit und Standort in die Handsteuerung einzugeben als Rücksetztaste, die es dem Benutzer ermöglicht, 3 Folgende Angaben werden angezeigt: die korrekten Daten einzugeben •...
- Page 77 Kalibrierung der Montierung entscheidend der Aufwärts- und Abwärts-Tasten das „Utility-Menü” aus Drücken Sie auf ENTER Schließlich können Sie weitere Kalibrierungssterne 3 Wählen Sie mithilfe der Aufwärts- und Abwärts-Tasten hinzufügen oder auf ZURÜCK drücken, um die Ausrichtung das Sonnenmenü aus und drücken Sie auf ENTER abzuschließen 4 Drücken Sie erneut auf ENTER, damit die Sonne in der Hinweis: Ost-/West-Filter –...
-
Page 78: Objektkatalog
Durch Drücken der ENTER-Taste schwenkt AUSRICHTEN das Teleskop auf das Objekt, und durch Gedrückt- Objektkatalog halten der OPTIONS-Taste (das Celestron Logo) und Drücken der OBJEKTINFO-Taste werden Informa- Auswahl eines Objekts tionen über das ausgewählte Objekt angezeigt Nun da das Teleskop richtig ausgerichtet ist, können Sie ein... - Page 79 während der Tour verwickelt verwendet Die Zahl 1 auf der Handsteuerung entspricht der langsamsten Geschwindigkeit (halb-siderisch) und kann 4 Die Handsteuerung zeigt die besten Beobachtungsob- zur präzisen Zentrierung von Objekten im Okular verwendet jekte an, die zurzeit am Himmel stehen werden Änderung der Motorendrehzahl: •...
- Page 80 +20° einstellen Dadurch wird sichergestellt, dass die jeder Zeit aufrufen, indem Sie die Options-Taste Handsteuerung lediglich Objekte anzeigt, die sich in einer (das Celestron-Logo) für 10 Sekunden drücken, Höhe über 20° befinden während das Teleskop eingeschaltet wird Tipp: Wenn Sie die gesamte Objektdatenbank durchsuchen Teleskopsetupmenü...
- Page 81 geändert wird Um die Tastenlogik der Richtungstasten angebracht wurden (Ost oder West), wenn mit der Ausrichtung umzukehren, drücken Sie die MENÜ-Taste und wählen die begonnen wird Die Doppeloption muss vor der anfänglichen Richtungstasten aus dem Utility-Menü Benutzen Sie die Sternausrichtung eingestellt werden Gehen Sie zum Einstellen Aufwärts-/Abwärts-Tasten (10), um entweder die Azimut- dieser Option ins Teleskopsetupmenü, wählen Sie die Doppelfunktion aus und drücken Sie auf ENTER Wählen Sie...
- Page 82 kalibrierung/DEK-Schalter - Konus ausgeführt wird Warnung: Damit das Teleskop von einer Richtung auf einen Stern zuschwenken kann, die das Ausmaß des Getriebe- • DEK-Index – Hierbei handelt es sich um den Deklinations- spiels minimiert, könnte es nötig sein, dass das Teleskop index-Fehlerwert, der gespeichert wird, wenn Kalibrier- über den spezifizierten Grenzwert in der Schwenkbewegung ungssterne nach der anfänglichen Sternenausrichtung...
- Page 83 bei der Auswahl der Werkseinstellungen gespeichert Die dem Stern können Sie die Montierung in beiden Achsen Handsteuerung fordert Sie zum Drücken der „0“-Taste auf, manuell bewegen, um die Balance wiederherzustellen Wenn Sie das Teleskop auf Ihr nächstes Objekt schwenken bevor die Werkseinstellungen aktivierbar werden möchten, bedenken Sie bitte, dass Sie den Tubus manuell Version –...
- Page 84 Objekts gespeichert wird Auf diese Objekte kann nun Katalog, in dem gesucht werden soll, auszuwählen über die GoTo-Himmelsobjekt-Auswahl zugegriffen • Drücken Sie auf ENTER, um mit der Suche zu beginnen werden Hinweis: Manche Datenbanken umfassen Tausende von • RA – DEK eingeben: Sie können auch spezifische Koor- Objekten, und daher kann es einige Minuten dinaten für ein Objekt speichern, indem Sie einfach die RA dauern, bis das nächstliegende Objekt...
-
Page 85: Hauptmenübaum Des Advanced Vx
Hauptmenübaum des Advanced VX Menü Nachführung Modus EQ-Norden EQ-Süden Rate Siderisch Solar Lunar Uhrzeit-/Standort- Gespeicherter Anzeige Standort Handsteuerung Lichtsteuerung Tastaturebene Anzeigeebene Scrollmenü Fettdruck ändern Kontrast einstellen Sprache einstellen Teleskop-Setup Siehe Diagramm – Nächste Seite Utility Siehe Diagramm – Nächste Seite Benutzerdefinierte GoTo-Himmelsobjekte Objekte... - Page 86 Hauptmenübaum des Advanced VX Uhrzeit-/Standort- Teleskop-Setup Benutzerdefinierter Standort Utility Montierung kalibrieren Setup Städte-Datenbank Startposition GoTo Anti-Getriebespiel RA Positiv Einstellen RA Negativ Werkseinstellungen DEK Positiv Version DEK Negativ Achsenposition aufrufen GoTo-Achsenposition Filter-Grenzwerte Richtungstasten RA-Taste Ruheposition DEK-Taste Sonnenmenü GoTo-Automatik RA-Annährung Montierungsposition einstellen DEK-Annährung GPS an-/ausschalten Autoguide-Raten...
-
Page 87: Aufsetzen Der Teleskoptuben
Aufsetzen der Teleskoptuben Je nach erworbenem Teleskopset haben Sie eine der folgenden optischen Tuben erhalten Dieser Abschnitt erklärt Ihnen schrittweise das Einrichten der Grundtypen Set-Nr. 22020 32054 32062 12031 Optisches Design Refraktor Newton Newton Edge HD Durchmesser 6” (150mm) 6” (150mm) 8”... -
Page 88: Aufsetzen Des Refraktors
Aufsetzen des Refraktors (Nr. 21020) Fokus-Spannschraube Installieren des Suchfernrohrs 1,25-Okularadapter Um das Suchfernrohr am Teleskop zu installieren, muss das Suchfernrohr zuerst an der Sucherhalterung und anschließend am Teleskop abgebracht werden Im hinteren Bereich des Teleskoptubus, in der Nähe der Fokusbaugrup- pe, befindet sich eine kleine Halterung mit Rändelschraube Dort wird die Suchfernrohr-Halterung montiert Installation T-Adaptergewinde... -
Page 89: Die Edgehd- Und Schmidt-Cassegrain-Teleskoptuben Aufsetzen
2 Schieben Sie das Okularende des Suchfernrohrs durch Wenn Sie den newtonschen 8-Zoll-Teleskoptubus (Nr 32062) haben, kann Ihr Teleskop Okulare mit 1,25-Zoll- und die Halterung, bis der O-Ring fest zwischen Sucher und 2-Zoll-Steckhülsendurchmesser verwenden Um eine 2-Zoll- Halterungsinnenseite festgepresst ist Okularsteckhülse zu verwenden, muss der 1,25-Zoll-Okular- 3 Ziehen Sie die Rändelschrauben fest, bis diese mit dem adapter zuvor entfernt und durch den mitgelieferten 2-Zoll-... - Page 90 Um das Okular zu entfernen, drehen Sie die Rändelschraube 6 Ziehen Sie die drei Nylon-Klemmschrauben am vorderen Halterungsring leicht an, damit der Sucher an Ort und am Zenitspiegel los und schieben das Okular heraus Sie können Stelle bleibt es durch ein anderes Okular (separat erworben) ersetzen 7 Schieben Sie die Sucherrückseite nun weiter, bis der O-Ring Okulare werden in der Regel durch Angabe von Brennweite fest im hinteren Ring der Sucherhalterung sitzt...
-
Page 91: Justieren Des Suchfernrohrs
Verfahren, die ein Auffinden des Himmelspols erfordern, indem bestimmte Sterne in der Nähe identifiziert werden, arbeitet diese Methode mit einer bekannten Konstante, um zu ermitteln, wie hoch die Polachse anvisiert werden müsste Das Advanced VX kann zwischen 7 und 77 Grad ausgerich- tet werden Die oben erwähnte Konstante ergibt sich aus dem Verhältnis zwischen Ihrem Breitengrad und dem Winkelabstand des... - Page 92 ist auch exakt genug für kurze Belichtungszeiten bei der die Aufwärts-/Abwärts-Tasten auf der Handsteuerung, um Primärfokus-Planetenfotografie (ein paar Sekunden) und die Funktion Synchronisation aufheben aus der Liste aus- für kurze Belichtungszeiten bei der Huckepack-Astrofoto- zuwählen und drücken Sie auf Enter Auf dem LCD wird grafie (ein paar Minuten) die Meldung „Abgeschlossen“...
- Page 93 Ihnen stehen mehrere Techniken für diese Form der Foto- Die periodische Fehlerkorrektur nutzen grafie zur Verfügung und die jeweils gewählte entscheidet Sobald das Teleskop ordnungsgemäß am Pol ausgerichtet über das benötigte Standardzubehör Das optimale Ver- ist, wählen Sie aus dem Utility-Menü PEC sowie die Option fahren für die Deep-Sky-Astrofotografie mit langen Belich- Aufzeichnen aus So nutzen Sie die PEC-Funktion: tungszeiten ist der Off-Axis-Guider Dieses Instrument...
-
Page 94: Anhang A - Technische Daten Der Advanced Vx-Montierung
Anhang A – technische Daten der Advanced VX-Montierung Nutzlast (Gegengewicht ausgenommen) 30 lb (13 5 Kg) Optisches Rohrmontagesystem Doppel-Sattelplatte NexStar—Handsteuerung mit LCD-Bildschirm, Computergesteuerte Handsteuerung 19 faseroptische Hintergrund-LED-Tasten 40 000 Objekte und mehr, 100 vom Benutzer programmierbare Datenbank Objekte Zusatzinformationen für über 200 Objekte Schwenkrate Neun Schwenkgeschwindigkeiten, maximal 4 Grad/Sek Nachführmodi... -
Page 95: Zweijährige Eingeschränkte Garantie Von Celestron
Celestron den Kunden entsprechen in Kenntnis setzen verursacht, was durch ein vorübergehendes Ausschalten Celestron behält sich das Recht vor, ein Produkt, das aus der des Geräts festgestellt werden kann, wird der Benutzer Produktlinie ausgeschieden ist, durch ein neues oder in Wert und dazu angehalten, die Störung durch eine oder mehrere der... - Page 97 S E R I E MANUAL DE INSTRUCCIONES PARA LOS MODELOS: #91519- Advanced VX Montaje de Soporte #12079- Advanced VX 6” Telescopio Schmidt-Cassegrain #32054- Advanced VX 6” Telescopio Newtoniano #12026- Advanced VX 8” Telescopio Schmidt-Cassegrain #32062- Advanced VX 8” Telescopio Newtoniano #12046- Advanced VX 9.25”...
- Page 98 Montaje del tubo óptico Instalar el refractor Instalar el refractor Newtoniano Instalar los tubos ópticos EdgeHD y Schmidt-Cassegrain Alinear el localizador Alineación polar del soporte Apéndice A – Especificaciones técnicas del soporte Advanced VX Garantía limitada por dos años de Celestron ESPAÑOL...
-
Page 99: Introducción
Introducción Su telescopio está diseñado para ofrecerle años de diver- Felicidades por adquirir el soporte de telescopio Celestron Advanced VX El soporte ecuatorial alemán Advanced VX se sión y observaciones provechosas Sin embargo, debe tener ha diseñado con materiales de la mejor calidad para garantizar algunos aspectos en cuenta antes de usar su telescopio, su estabilidad y resistencia Esta construcción ha creado un... -
Page 100: Soporte Advanced Vx
Soporte Advanced VX (Se muestra Advanced VX con tubo óptico Schmidt-Cassegrain de 5” ) Tubo óptico PANEL DE CONTROL Panel de control Puerto de alimentación Soporte ecuatorial Advanced VX Puerto del motor DEC Escala de ajuste de altitud Interruptor de alimentación Fijación de pata central del trípode/ Puertos auxiliares Bandeja de accesorios... -
Page 101: Montaje
Antes de fijar el soporte al trípode: Esta sección trata las instrucciones de montaje de su soporte Advanced VX de Celestron El soporte debe incluir 1 Localice los mandos de ajuste de azimut en la caja que los siguientes elementos:... - Page 102 Su trípode Advanced VX incluye la punta de alineación in- stalada, de forma que el eje polar y la barra de contrapeso se extienden entre dos patas del trípode Si lo desea puede recolocar la punta de alineación de forma que la barra del Mando de contrapeso se extienda directamente sobre una pata del montaje...
- Page 103 Instalar el contrapeso tubo del telescopio Antes de fijar el tubo óptico, asegúrese de que los mandos de declinación y derecho de ascensión Para instalar el(los) contrapeso(s) incluido(s) con el soporte estén apretados y el(los) contrapeso(s) esté(n) instalados o el kit de telescopio: con seguridad Así...
- Page 104 5 Mueva el contrapeso hasta un punto en el que equilibre el telescopio (es decir, el telescopio permanece estacionar- io cuando los mandos de enganche R A estén aflojados) 6 Apriete el tornillo del contrapeso para aguantarlo en su lugar Para mantener las estriaciones vacías limpias, vuelva a colo- car los tornillos Allen en los agujeros que no use Mover manualmente el telescopio...
- Page 105 12V CA Use exclusivamente adaptadores proporcionados por Celestron Usar otro adaptador puede dañar la electróni- ca y anulará la garantía del fabricante 1 Para alimentar el telescopio con el adaptador de batería...
-
Page 106: Mando Manual Informatizado
Actualice el firmware del control manual por USB sin alimentación externa ni conectar al soporte Para actualizar el firmware, conecte un cable mini USB (no incluido) del PC al puerto de la parte inferior del mando manual, y ejecute el Celestron Firmware Manager (DFM) disponible gratuitamente en la sección de soporte de Celestron com... - Page 107 • La Alineación de sistema solar mostrará una lista de objetos diurnos visibles (planetas y la Luna) disponibles 7 Opción (Logo Celestron): Puede usarse junto con para alinear el telescopio otras teclas para acceder a características y funciones más avanzadas...
- Page 108 • Pulse ENTER para aceptar los parámetros actuales Nota: Si introduce información incorrecta en el mando manual, el botón ANTERIOR sirve como retroceso, • Pulse ANTERIOR para introducir la información de permitiendo al usuario volver a introducir los datos fecha, hora y ubicación actual en el mando manual correctos 3 Se mostrará...
- Page 109 del firmamento (meridiano) de las estrellas de alineación 2 Pulse el botón MENÚ y use las teclas arriba y abajo para originales Esto es esencial para calibrar con precisión el seleccionar el menú Utilidades Pulse ENTER soporte 3 Use las teclas arriba y abajo para seleccionar el menú solar y pulse ENTER Para terminar, puede elegir continuar añadiendo estrellas de calibración adicionales o pulsar ANTERIOR para finalizar la...
-
Page 110: Catálogo De Objetos
Catálogo de objetos que se desplace al objeto, o mantenga pulsado el Selección de un objeto botón OPCIÓN (el logo Celestron) y pulse INFOR- MACIÓN DE OBJETO para ver información sobre Una vez el telescopio esté correctamente alineado, puede el objeto que ha seleccionado elegir un objeto se cualquiera de los catálogos de la base de... - Page 111 durante el recorrido un centrado preciso de objetos en el ocular Para cambiar la velocidad de los motores: 4 El mando manual mostrará los mejores objetos que se puedan observar en ese momento en el firmamento • Pulse la tecla VELOCIDAD DE MOTOR del mando •...
- Page 112 También puede iniciarlo en cualquier momento man- establecer el límite de altitud mínimo para que lea +20º Esto teniendo pulsado el botón Opción (el logo Celestron) garantizará que el mando manual solamente muestre objetos durante 10 segundos mientras el telescopio esté...
- Page 113 esté tomando fotografías Para compensarlo, la dirección alineaciones estelares Para establecer esta opción, acceda de las teclas de control del motor puede cambiarse Para al menú de configuración del telescopio, seleccione la opción invertir la lógica del botón del mando manual, pulse el botón Tándem y pulse ENTER Seleccione entre una de las opciones MENÚ...
- Page 114 • Índice R.A. – Es el valor de error del índice R A estab- a una estrella desde la dirección que minimice la cantidad lecido cuando se realiza Utilidades/Calibrar soporte/Con- de retroceso en los engranajes, puede ser necesario que el mutador R A telescopio se desplace más allá...
- Page 115 tud/latitud, junto con los límites de desplazamiento y filtro, la lista de estrellas con nombre y seleccione Establecer se reiniciarán Sin embargo, los parámetros guardados posición de soporte El mando manual sincronizará en la como objetos definidos por el usuario seguirán guardados estrella solicitando que centre la estrella en el ocular y aunque se seleccione Configuración de fábrica El mando pulse el botón Alinear Cuando haya sincronizado en la...
- Page 116 Guardar base de datos (Bd) de estrellas binarias le mostrará que Epsilon Lyrae solamente está a 1º de Vega Para usar la función • Objeto: Esta función le permite crear su propio recorrido Identificar: personalizado de objetos de la base de datos permitién- dole registrar la posición actual del telescopio y guardar el •...
-
Page 117: Árbol Del Menú Principal Del Advanced Vx
Árbol del menú principal del Advanced VX Menú Seguimiento Modo EQ Norte EQ Sur Apagado Velocidad Sideral Solar Lunar Ver hora-lugar Sitio guardado Mando manual Control de luz Nivel de teclado Nivel de indicación Menú de desplazamiento Activar negrita Establecer contraste Establecer idioma Configuración del Ver diagrama –... - Page 118 Árbol del menú principal del Advanced VX Configuración del Localización per- Configurar hora-lugar Utilidades Calibrar soporte telescopio sonalizada Base de datos de ciudad Posición de inicio Compensación de RA positivo Establecer retroceso RA negativo Configuración de fábrica Dec positivo Versión Dec negativo Obtener posición de eje Límites de filtro...
-
Page 119: Montaje Del Tubo Óptico
Montaje del tubo óptico Según el kit de telescopio adquirido, puede haber recibido uno de los siguientes tubos ópticos Esta sección del manual le llevará por la instalación de los tipos básicos Kit # 22020 32054 32062 12031 Diseño óptico Refractor Newtoniano Newtoniano... -
Page 120: Instalar El Refractor
Instalar el refractor (#21020) Tornillo de tensión del enfoque Adaptador de Instalar el localizador ocular 1,25r Para instalar el localizador en el telescopio, debe montar primero el localizador por el soporte del localizador y luego fijarlo al telescopio Hacia la zona posterior del tubo del Espacio para telescopio, cerca de la estructura de enfoque, existe un adaptador... -
Page 121: Instalar Los Tubos Ópticos Edgehd Y Schmidt-Cassegrain
3 Apriete los tornillos de ajuste hasta que entren en sacado, puede introducir un adaptador de ocular de 2” contacto con el chasis del localizador directamente en el cañón de enfoque y asegurarse con los dos tornillos 4 Localice el soporte de montaje cerca del extremo anterior (abierto) del telescopio Instalar los tubos ópticos EdgeHD y 5 Afloje el tornillo de fijación del soporte de montaje del... - Page 122 Los oculares se indican habitualmente por la longitud focal 7 Cuando esté colocado, empuje el localizador atrás hasta que la arandela esté ajustada dentro de la arandela poste- y el diámetro del cañón La longitud focal de cada ocular rior del soporte del localizador está...
-
Page 123: Alinear El Localizador
Alineación polar del soporte Escalas de latitud La forma más sencilla de alineación polar de un telescopio es con una escala de latitud A diferencia de otros métodos que requieren que encuentre el polo celeste identificando ciertas estrellas cercanas a él, este método funciona como una constante conocida para determinar la altura a la que se debería apuntar el eje polar El soporte Advanced VX puede ajustarse entre 7 y 77 grados... - Page 124 correcciones que realizará al realizar el seguimiento de eación polar precisa de “sincronice” el telescopio con una un objeto También será lo suficientemente preciso para estrella brillante antes de comenzar, será necesario desmon- fotografías planetarias de enfoque primario de corta ex- tar la sincronización antes de volver a alinear Para anular la posición (un par de segundos) y fotografía astronómica de sincronización:...
- Page 125 de su telescopio El brillo de estos objetos, sin embargo, realizadas durante la fase de registro Tenga en cuenta que precisa de tiempos de exposición largos y, como resultado, esta función sirve para fotografía astronómica avanzada y son bastante difíciles precisa de un guiado cuidadoso, ya que todos los motores del telescopio tienen cierto error periódico Existen diversas técnicas para este tipo de fotografía, y la...
-
Page 126: Apéndice A - Especificaciones Técnicas Del Soporte Advanced Vx
Apéndice A – Especificaciones técnicas del soporte Advanced VX Capacidad de carga (excluyendo el contrapeso) 30 lb (13 5 kg) Sistema de montaje de tubo óptico Plancha de silla doble Mando manual NexStar+ con pantalla LCD, 19 botones Mando manual informatizado LED iluminados de fibra óptica 40000+ objetos, 100 objetos programables definidos por Base de datos... -
Page 127: Garantía Limitada Por Dos Años De Celestron
Celestron, muestre defectos de materiales https://www celestron com/pages/technical-support o mano de obra Como condición de la obligación de Celestron de reparar o sustituir dicho producto, el producto debe ser NOTA: Esta garantía tiene validez para clientes de EE UU y devuelto a Celestron junto con una prueba de compra que Canadá... - Page 129 S E R I E MANUALE D’ISTRUZIONI PER I MODELLI: #91519- Montatura Advanced VX #12079- Advanced VX 6” Telescopio Schmidt-Cassegrain #32054- Advanced VX 6” Telescopio Newtoniano #12026- Advanced VX 8” Telescopio Schmidt-Cassegrain #32062- Advanced VX 8” Telescopio Newtoniano #12046- Advanced VX 9.25” Telescopio Schmidt-Cassegrain #22020- Advanced VX 6”...
- Page 130 Gruppi del tubo ottico Configurazione del rifrattore Configurazione del rifrattore Newtoniano Configurazione dei tubi ottici EdgeHD e Schmidt-Cassegrain Allineamento del cercatore di stelle Allineamento dell’asse polare della montatura Appendice A: Specifiche tecniche della montatura Advanced VX Garanzia limitata di due anni Celestron ITALIANO...
-
Page 131: Introduzione
Congratulazioni per aver acquistato la montatura per tele- oni a schermo fornite dal controllo manuale Il manuale scopio Celestron Advanced VX La montatura equatoriale fornisce informazioni dettagliate in merito a ciascuna fase alla tedesca Advanced VX è stata progettata con i materiali nonché... -
Page 132: Montatura Advanced Vx
Montatura Advanced VX (Raffigurazione di Advanced VX con tubo ottico Schmidt-Cassegrain da 5”) Tubo ottico PANNELLO DI CONTROLLO Pannello di controllo Porta di alimentazione Montatura equatoriale Advanced VX Porta del motore DEC Scala di regolazione della latitudine Interruttore di alimentazione Supporto della gamba centrale del treppiede/ Porte ausiliarie Vassoio porta-accessoriy... -
Page 133: Assemblaggio
è l’ideale Al momento della configura- 4 Posizionare la montatura equatoriale sulla testa del trep- zione della montatura Celestron, è necessario iniziare con il piede in modo che si trovino a filo treppiede e proseguire da lì Queste istruzioni sono fornite 5 Spingere la manopola situata sull’asta centrale sotto... - Page 134 Il treppiede Advanced VX è fornito con il perno di allinea- mento installato in modo che l’asse polare e la barra di con- trappeso si estendano tra le due gambe del treppiede Se lo si desidera, è possibile riposizionare il perno di allinea- mento in modo che la barra di contrappeso si estenda diret- Manopola della tamente su una gamba del treppiede Ciò...
- Page 135 2 Rimuovere la vite di sicurezza del contrappeso siano installato/i in modo sicuro Ciò garantirà che la monta- sull’estremità inferiore della barra del contrappeso tura non si muova improvvisamente durante il collegamento ruotandola in senso antiorario Questa vite impedisce al del telescopio Per montare il tubo del telescopio: contrappeso di cadere dalla montatura in caso la vite di 1 Allentare le due viti di montaggio sul lato della piatta-...
- Page 136 sia possibile muoverlo per la lunghezza della barra di contrappeso 5 Spostare il contrappeso in un punto in cui bilanci il tele- scopio (ovvero, il telescopio rimane stazionario mentre le manopole di frizione R A sono allentate) 6 Serrare la vite sul contrappeso per mantenerlo in posizione Per tenere pulite le filettature vuote, sistemare sempre nuova- mente le viti rimosse con la chiave a brugola nei fori quando...
- Page 137 CA da 12V opzionale Utilizzare esclusivamente adattatori forniti da Celestron L’uso di qualsiasi altro adat- tatore può danneggiare i componenti elettronici e annullerà la garanzia del produttore 1 Per accendere il telescopio con l’adattatore di batte- ria per auto (o con l’adattatore CA da 12V), collegare...
-
Page 138: Controllo Manuale Computerizzato
Aggiornamento del firmware del telecomando attraverso porta USB con alimentazione esterna e senza collegamento alla montatura Per aggiornare il firmware è sufficiente collegare il cavo mini USB (non in dotazione) dal PC alla porta sul fondo del telecomando ed eseguire il Celestron Firmware Manager (CFM), disponibile gratuitamente alla sezione Assistenza su Celestron com... - Page 139 • L’Allineamento con il Sistema Solare visualizzerà un 7 Option (Opzione) (Logo Celestron): Può essere elenco degli oggetti diurni visibili (pianeti e la Luna) dis- utilizzato in combinazione con gli altri tasti per accedere ponibili per allineare il telescopio a caratteristiche e funzionalità...
- Page 140 • Premere ENTER per accettare i parametri correnti Nota: In caso si inseriscano informazioni sbagliate nel con- trollo manuale, il tasto BACK funzione come un tasto • Premere BACK per inserire le informazioni correnti di ritorno spazio consentendo all’utente di inserire relative alla data, all’ora e alla posizione nel controllo nuovamente il dato corretto manuale...
- Page 141 Da ultimo, è possibile scegliere di continuare ad aggiungere Sole appaia sullo schermo del controllo manuale stelle di calibrazione aggiuntive, oppure premere BACK per Il Sole può essere rimosso dalla visualizzazione utilizzando la completare l’allineamento stessa procedura di cui sopra Nota: Filtraggio Est/Ovest: al fine di garantire la pre- Suggerimento: Per migliorare la precisione di puntamento del telescopio, è...
-
Page 142: Catalogo Degli Oggetti
Premere ENTER per comandare al telescopio di ruotare verso l’oggetto, oppure tenere premuto il Selezionare un oggetto tasto OPTION (logo Celestron) e premere il tasto OBJECT INFO per vedere le informazioni relative Una volta allineato correttamente il telescopio, è possibile all’oggetto selezionato... - Page 143 • Per ruotare verso l’oggetto visualizzato, premere ENTER ità dei motori senza dover scegliere una velocità specifica Per utilizzare questa funzionalità, premere semplicemente • Per vedere l’oggetto successivo del tour, premere il il tasto a freccia che corrisponde alla direzione verso cui si tasto GIÙ...
- Page 144 +20° Ciò garantirà che il con- È anche possibile avviarla in qualsiasi momento te- trollo manuale visualizzi esclusivamente gli oggetti che hanno nendo premuto il tasto Option (con il logo Celestron) un’altitudine maggiore di 20° per 10 secondi durante l’accensione del telescopio...
- Page 145 verso ovest) Impostare i tasti di altitudine verso positivo • Normale: se la barra doppia non è più in uso, selezionare sposterà il telescopio in senso antiorario lungo l’asse di “normale” per spegnere questa funzionalità DECLINAZIONE Approccio VaiA: consente all’utente di Meridiano: questa funzionalità...
- Page 146 immagini CCD che dispone di cavi non sufficientemente Menu Utilità lunghi da spostarsi con il telescopio man mano che ruota Scorrendo lungo le opzioni del MENU (9) si accederà anche nel cielo, è possibile regolare i limiti di rotazione sul lato della a varie funzioni di utilità...
- Page 147 l’azimut per la posizione corrente del telescopio l’accessorio GPS SkySync opzionale, sarà necessario ac- cendere il GPS la prima volta che si usa l’accessorio Se si VaiA posizione asse: consente all’utente di inserire una desidera utilizzare il database del telescopio per trovare le posizione specifica relativa all’altitudine e all’azimut e di far coordinate di un oggetto celeste per date passate o future, ruotare il telescopio verso essa...
- Page 148 • Salva oggetto terrestre: Il telescopio può altresì essere centrare gli oggetti più vicino al centro del campo visivo per utilizzato come cannocchiale per oggetti terrestri Oggetti l’acquisizione di immagini astrali Il VaiA di precisione cerca terrestri fissi possono essere salvati salvando l’altitudine automaticamente la stella luminosa più...
-
Page 149: Struttura Del Menu Principale Di Advanced Vx
Struttura del menu principale di Advanced VX Menu Tracciatura Modalità Nord EQ Sud EQ Velocità Siderale Solare Lunare Visualizza ora- Posizione salvata posizione Controllo manuale Controllo luci Livello tastierino Livello schermo Menu di scorrimento Attiva/disattiva grassetto Imposta contrasto Imposta lingua Configurazione Vedi diagramma - pagina successiva telescopio... - Page 150 Struttura del menu principale di Advanced VX Posizione person- Configurazione Configurazione ora- alizzata Utilità Calibra montatura telescopio posizione Database città Posizione iniziale VaiA Anti-contraccolpo R.A. positivo Imposta Impostazioni di R.A. negativo fabbrica Dec positivo Versione Dec negativo Ottieni posizione asse Limiti di filtro VaiA posizione asse Tasti direzionali...
-
Page 151: Gruppi Del Tubo Ottico
Gruppi del tubo ottico A seconda del kit per telescopio acquistato, è possibile aver ricevuto uno dei seguenti tubi ottici La presente sezione del manuale guiderà l’utente attraverso la configurazione delle tipologie di base Kit n. 22020 32054 32062 12031 Design ottico Rifrattore Newtoniano... -
Page 152: Configurazione Del Rifrattore
Configurazione del rifrattore (n. 21020) Vite di tensione del focheggiatore Installazione del cercatore di stelle Adattatore per oculare da 1,25 Per installare il cercatore di stelle sul telescopio, è neces- sario montare prima il cercatore di stelle nella staffa del cercatore e quindi collegarlo al telescopio Verso il retro del tubo del telescopio, vicino al gruppo di messa a fuoco, è... -
Page 153: Configurazione Dei Tubi Ottici Edgehd E Schmidt-Cassegrain
Configurazione dei tubi ottici EdgeHD e 4 Posizionare la staffa di montaggio in prossimità dell’estremità anteriore (aperta) del telescopio Schmidt-Cassegrain (n 12031, 12079, 12025, 5 Allentare le viti sulla staffa di montaggio del telescopio 12026, 12046 e 12067) 6 Far scorrere la staffa del cercatore (collegata al cercatore di stelle) nella staffa di montaggio sul telescopio Installare la diagonale stellare 7 La staffa del cercatore di stelle scorrerà... - Page 154 mero), minore sarà l’ingrandimento dell’oculare Minore è la 8 Serrare a mano le tre viti di nylon fino a quando saranno lunghezza focale (ovvero, più piccolo è il numero), maggiore aderenti sarà l’ingrandimento Normalmente, durante l’osservazione Installazione del cercatore di stelle 9 x 50 si utilizzerà...
-
Page 155: Allineamento Del Cercatore Di Stelle
Allineamento dell’asse polare della montatura Scale di latitudine Il modo più semplice per l’allineamento polare di un telesco- pio è utilizzando una scala di latitudine A differenza di altri metodi che richiedono di trovare il polo celeste identificando determinate stelle nelle sue vicinanze, questo metodo impie- ga una costante nota per determinare l’altezza di puntamento dell’asse polare La montatura Advanced VX può... - Page 156 Questo metodo deve essere eseguito nelle ore diurne, polare richiede all’utente di “sincronizzare” il telescopio su eliminando pertanto la necessità di fare tentativi di notte una stella luminosa prima di cominciare, sarà necessario an- Sebbene questo metodo NON indirizzi direttamente al nullare la sincronizzazione prima di eseguire il riallineamento polo, limiterà...
- Page 157 Esistono varie tecniche per questo tipo di fotografia, e Utilizzo della correzione dell’errore periodico quella scelta determinerà gli accessori standard necessari Una volta allineato correttamente il telescopio al polo, Il metodo migliore per la fotografia astrale del profondo selezionare PEC dal menu Utilità e selezionare l’opzione cielo a esposizione lunga è...
-
Page 158: Appendice A: Specifiche Tecniche Della Montatura Advanced Vx
Appendice A: Specifiche tecniche della montatura Advanced VX Carico utile (esclusi i contrappesi) 30 lb (13 5 kg) Sistema di montaggio del tubo ottico Piastra doppia Controllo manuale NexStar+ con schermo LCD, 19 tasti a Controllo manuale computerizzato LED retroilluminati in fibra ottica Più... -
Page 159: Garanzia Limitata Di Due Anni Celestron
Garanzia limitata di due anni Celestron La presente garanzia dà all’utente specifici diritti legali, oltre ad altri diritti che possono variare da Stato a Stato Celestron si riserva il diritto di modificare o sospendere la produzione, senza previa notifica, A Celestron garantisce che il prodotto sia privo di difetti nei di qualsivoglia modello o stile del prodotto Nel caso in cui sorgano materiali e nella fabbricazione per due anni Celestron riparerà...
Need help?
Do you have a question about the advanced VX Series and is the answer not in the manual?
Questions and answers