Table of Contents
Advertisement
A
s
t
r
o
M
a
s
A
s
t
r
o
M
a
s
●
●
A
A
s
s
t
t
r
r
o
o
M
M
●
A
s
t
r
o
M
a
s
t
●
A
s
t
r
o
M
a
s
t
t
e
r
S
e
r
i
e
t
e
r
S
e
r
i
e
I
N
S
T
R
U
C
T
I
O
I
N
S
T
R
U
C
T
I
O
a
a
s
s
t
t
e
e
r
r
9
9
0
0
E
E
Q
Q
#
#
2
2
1
1
0
0
6
6
4
4
e
r
9
0
E
Q
-
M
D
#
2
1
0
6
9
e
r
9
0
E
Q
-
M
D
#
2
1
0
6
9
s
T
e
l
e
s
c
o
s
T
e
l
e
s
c
o
N
M
A
N
U
A
L
N
M
A
N
U
A
L
●
●
A
A
s
s
t
t
r
r
o
o
M
M
a
a
s
s
t
t
e
e
r
r
1
1
3
3
0
0
E
E
Q
Q
●
A
s
t
r
o
M
a
s
t
e
r
1
3
0
E
Q
-
●
A
s
t
r
o
M
a
s
t
e
r
1
3
0
E
Q
-
p
e
s
p
e
s
#
#
3
3
1
1
0
0
4
4
5
5
M
D
#
3
1
0
5
1
M
D
#
3
1
0
5
1
Advertisement
Table of Contents

Related Manuals for Celestron AstroMaster 130 EQ


Summary of Contents for Celestron AstroMaster 130 EQ
- Page 1 ● ● ● ● ● ● ● ●...
-
Page 2: Table Of Contents
Observing Deep-Sky Objects .........................25 Seeing Conditions...........................25 ASTROPHOTOGRAPHY..........................26 Short Exposure Prime Focus Photography .....................26 Piggyback Photography..........................26 Planetary & Lunar Photography with Special Imagers ................26 CCD Imaging for Deep Sky Objects ......................26 Terrestrial Photography ..........................26 TELESCOPE MAINTENANCE ........................27 Care and Cleaning of the Optics......................27 Collimation of a Newtonian ........................27... -
Page 3: Introduction
90mm refractor and 130mm Newtonian and then both of these sizes with a motor drive. The AstroMaster Series is made of the highest quality materials to ensure stability and durability. All this adds up to a telescope that gives you a lifetime of pleasure with a minimal amount of maintenance. - Page 4 Figure 1-1 AstroMaster 90 EQ Refractor Telescope Optical Tube Latitude Adjustment Screw Dovetail Mounting Bracket Accessory Tray RA. Setting Circle Tripod Star Pointer Finderscope Counterweight Bar Eyepiece Counterweights Diagonal Equatorial Mount Focus Knob Dec. Slow Motion Cable R.A. Slow Motion Cable...
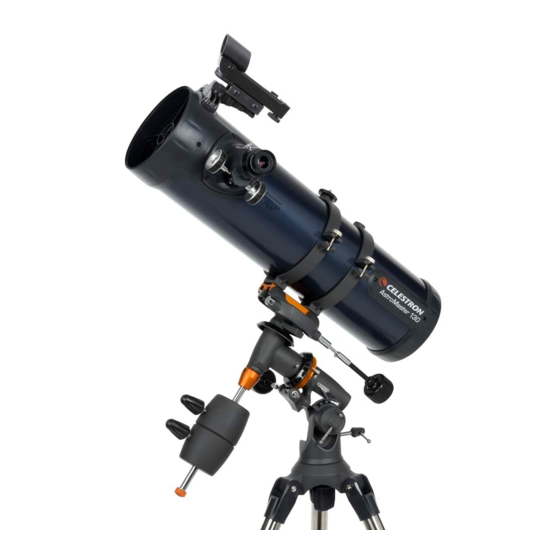
- Page 5 Figure 1-2 AstroMaster 130 EQ Newtonian Eyepiece Accessory Tray Tube Ring Tripod Telescope Optical Tube Counterweights Primary Mirror Dec. Setting Circle Dec. Slow Motion Cable Star Pointer Finderscope R.A. Slow Motion Cable R.A. Setting Circle Latitude Adjustment Screw Focus Knob...
-
Page 6: Assembly
Figure 2-3 Figure 2-4 5. Rotate the tray until the ears are under the leg brace support of each leg and push slightly and they will lock in place (Figure 2-5). The tripod is now completely assembled (Figure 2-6). 6. You can extend the tripod legs to the height you desire. At the lowest level the height is 24” (61cm) and extends to 41”... -
Page 7: Attaching The Equatorial Mount
The equatorial mount allows you to tilt the telescopes axis of rotation so that you can track the stars as they move across the sky. The AstroMaster mount is a German equatorial mount (CG-3) that attaches to the tripod head. To attach the mount: 1. -
Page 8: Attaching The Slow Motion Cables
2. Slide the cable onto the R.A. shaft as far as it will go. There are two R.A. shafts, one on either side of the mount. It makes no difference which shaft you use since both work the same. Use whichever one you find more convenient. -
Page 9: Installing The Diagonal & Eyepieces (Refractor)
& & The diagonal is a prism that diverts the light at a right angle to the light path of the refractor. This allows you to observe in a position that is more comfortable than if you looked straight through. This diagonal is an erect image model that corrects the image to be right side up and oriented correctly left-to-right which is much easier to use for terrestrial observing. -
Page 10: Moving The Telescope Manually
(Fig 2-21) is released. To balance the telescope in Dec.: 1. Release the R.A. locking knob and rotate the telescope so that it is on one side of the mount (i.e., as described in the previous section on balancing the telescope in R.A.). -
Page 11: Adjusting The Equatorial Mount
To do this you should loosen both latitude adjustment screws and manually push the front of the mount down as far as it will go. Then tighten the rear adjustment screw to raise the mount to the desired latitude. -
Page 12: Telescope Basics
A Newtonian reflector uses a single concave mirror as its primary. Light enters the tube traveling to the mirror at the back end. There light is bent forward in the tube to a single point, its focal point. Since putting your head in front of the telescope to look at the image with an eyepiece would keep the reflector from working, a flat mirror called a diagonal intercepts the light and points it out the side of the tube at right angles to the tube. -
Page 13: Image Orientation
If you have astigmatism, corrective lenses must be worn at all times. The Star Pointer is the quickest and easiest way to point your telescope exactly at a desired object in the sky. It's like having a laser pointer that you can shine directly onto the night sky. -
Page 14: Calculating Magnification
3. With both eyes open, look through the glass window at the alignment star. If the Star Pointer is perfectly aligned, you will see the red LED dot overlap the alignment star. If the Star Pointer is not aligned, take notice of where the red dot is relative to the bright star. -
Page 15: Determining Field Of View
Determining the field of view is important if you want to get an idea of the angular size of the object you are observing. To calculate the actual field of view, divide the apparent field of the eyepiece (supplied by the eyepiece manufacturer) by the magnification. -
Page 16: Astronomy Basics
You will never see the stars complete one circle because the sunlight during the day washes out the starlight. However, part of this circular motion of stars in this region of the sky can be seen by setting up a camera on a tripod and opening the shutter for a couple hours. -
Page 17: Polar Alignment With Latitude Scale
This means the pole is now 89° above the northern horizon. If you move one degree further south, the same thing happens again. You would have to travel 70 miles north or south to change your latitude by one degree. As you can see from this example, the distance from the northern horizon to the celestial pole is always equal to your latitude. -
Page 18: Pointing At Polaris
This star, Polaris, is the end star in the handle of the Little Dipper. Since the Little Dipper (technically called Ursa Minor) is not one of the brightest constellations in the sky, it may be difficult to locate from urban areas. If this is the case, use the two end stars in the bowl of the Big Dipper (the pointer stars). -
Page 19: Polar Alignment In The Southern Hemisphere
Aligning the equatorial mount to the polar axis of the Earth Polar alignment to the South Celestial Pole (SCP) is a little more challenging due to the fact that there is no very bright star close to it like Polaris is in the NCP. There are various ways to polar align your telescope and for casual observing the methods below are adequate and will get you reasonably close to the SCP. -
Page 20: Finding The South Celestial Pole (Scp)
In each hemisphere, there is a point in the sky around which all the other stars appear to rotate. These points are called the celestial poles and are named for the hemisphere in which they reside. For example, in the southern hemisphere all stars move around the south celestial pole. -
Page 21: Declination Drift Method Of Polar Alignment
Both stars should be near the celestial equator (i.e., 0° declination). You will monitor the drift of each star one at a time and in declination only. While monitoring a star on the meridian, any misalignment in the east-west direction is revealed. -
Page 22: Aligning The Setting Circles
9. Look through the finderscope to see if you have located the object and center the object in the finderscope. 10. Look in the main optics and the object should be there. For some of the fainter objects, you may not be able to see them in the finderscope. -
Page 23: Motor Drive
To determine the proper rate of speed, the telescope should be roughly polar aligned. Find a star on the celestial equator (approx. 0° declination) and center it in a low power eyepiece. Turn the drive on and let the telescope track for 1 or 2 minutes. -
Page 24: Celestial Observing
For safe solar viewing, use a solar filter that reduces the intensity of the Sun's light, making it safe to view. With a filter you can see sunspots as they move across the solar disk and faculae, which are bright patches seen near the Sun's edge. -
Page 25: Observing Deep-Sky Objects
Milky Way. Most deep-sky objects have a large angular size. Therefore, low-to-moderate power is all you need to see them. Visually, they are too faint to reveal any of the color seen in long exposure photographs. Instead, they appear black and white. And, because of their low surface brightness, they should be observed from a dark-sky location. -
Page 26: Astrophotography
There are several forms of photography possible with your telescope for celestial as well as terrestrial pursuits. Below is just a very brief discussion of some of the methods of photography available and suggest you search out various books for detailed information on the subject matter. -
Page 27: Telescope Maintenance
Special care should be taken when cleaning any instrument so as not to damage the optics. If dust has built up on the optics, remove it with a brush (made of camel’s hair) or a can of pressurized air. Spray at an angle to the glass surface for approximately two to four seconds. -
Page 28: Aligning The Primary Mirror
To star collimate in the Northern Hemisphere, point at a stationary star like the North Star (Polaris). It can be found in the north sky, at a distance above the horizon equal to your latitude. It’s also the end star in the handle of the Little Dipper. - Page 29 Barlow lens. When a star is in focus it should look like a sharp pinpoint of light. If, when focusing on the star, it is irregular in shape or appears to have a flare of light at its edge, this means your mirrors aren’t in alignment.
-
Page 30: Optional Accessories
Omni Barlow Lens (# 93326) – Used with any eyepiece, it doubles the magnification of that eyepiece. A Barlow lens is a negative lens that increases the focal length of a telescope. The 2x Omni is a 1.25” barrel, is under 3” (76mm) long, and weights only 4oz. (113gr.). -
Page 31: Astromaster Specifications
Light Gathering Power 165x 345x Optical Tube Length 36" (91cm) 24" (61cm) Telescope Weight 27 lbs. (12.2kg) 28 lbs. (12.7kg) Note: Specifications are subject to change without notice or obligation Note: # 21069 & # 31051 include a Motor Drive... - Page 32 Celestron 2835 Columbia Street Torrance, CA 90503 U.S.A. Tel. (310) 328-9560 Fax. (310) 212-5835 Website www.celestron.com Copyright 2008 Celestron All rights reserved. (Products or instructions may change without notice or obligation.) Item # 21064-INST Printed in China $10.00 01-08...
Need help?
Do you have a question about the AstroMaster 130 EQ and is the answer not in the manual?
Questions and answers