Table of Contents
Advertisement
Available languages
Available languages
Advertisement
Table of Contents

Related Manuals for Celestron OMNI AZ 102


Summary of Contents for Celestron OMNI AZ 102
- Page 1 OMNI AZ 102 INSTRUCTION MANUAL Model #22157 -DS ENGLISH...
-
Page 2: What's In The Box
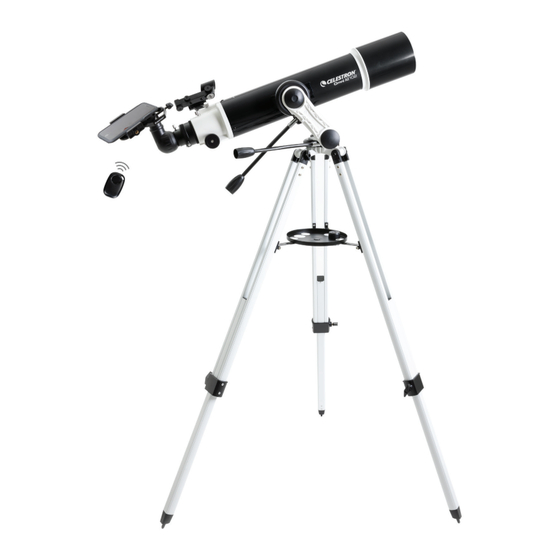
WHAT’S IN THE BOX We recommend saving your telescope box so it can be used to store the telescope when it is not in use. Unpack the box carefully as some parts are small. Use the parts list below to verify that all parts and accessories are present. PARTS LIST Telescope Tube StarPointer Finderscope... -
Page 3: Assembling Your Telescope
ASSEMBLING YOUR TELESCOPE THE MOUNT The Omni AZ mount and tripod come fully assembled, so setting it up is easy. 1. Remove the tripod and mount from the box. 2. Loosen the hand knobs at the bottom of each leg and extend the inner section of the leg to the desired length. -
Page 4: The Star Diagonal
THE SLOW MOTION KNOBS To attach the slow motion knobs to your mount: 1. Locate the supplied hex key hidden inside the slot in the Locate the supplied hex key hidden inside the slot in the front of your mount. 2. -
Page 5: The Starpointer Finderscope
THE EYEPIECE Your telescope comes with a 10mm and 20mm Kellner eyepieces. Additional eyepieces can be purchased to increase or decrease the magnifi cation to your desired level. 1. Loosen the set screws on the open end of the star diagonal. -
Page 6: Your First Astronomical Observing Session
ALIGNING THE STARPOINTER FINDERSCOPE The StarPointer fi nderscope helps you aim your telescope by looking through its round glass window and covering your target with the red recticle projected in the window. The fi rst time you assemble your telescope, you’ll need to align the fi nderscope with the main optics of the telescope. Although this step can be done at night, it is signifi cantly easier during the day. - Page 7 INSTALLING THE SMARTPHONE ADAPTER 1. Open the eyepiece clamp and place it around the body of the eyepiece. Tighten the clamp unit it is secure. 2. Use the phone clamp knob to open the phone holder until your phone fi ts inside. Tighten it to secure your phone in place.
-
Page 8: Celestron Two Year Limited Warranty
NOTE: This warranty is valid to U.S.A. and Canadian customers who have purchased this product from an authorized Celestron dealer in the U.S.A. or Canada. Warranty outside the U.S.A. and Canada is valid only to customers who purchased from a Celestron’s International Distributor or Authorized Celestron Dealer in the specifi c country. Please contact them for any warranty service. - Page 9 OMNI AZ 102 MODE D’EMPLOI Modèle #22157 -DS FRANÇAIS...
-
Page 10: Contenu De La Boîte
CONTENU DE LA BOÎTE Nous vous recommandons de conserver la boîte du télescope pour le ranger lorsque vous ne vous en servez pas. Déballez la boîte avec précautions car certaines pièces sont petites. Reportez-vous à la liste des pièces ci-dessous pour vous assurer que toutes les pièces et les accessoires sont présents. - Page 11 ASSEMBLER VOTRE TÉLESCOPE LA MONTURE La monture Omni AZ et son trépied sont livrés assemblés, alors leur installation est facile. 1. Sortez le trépied et la monture de la boîte. 2. Desserrez les molettes situées au bas de chaque pied et étendez la section intérieure du pied selon la longueur désirée.
- Page 12 MOLETTES DE MOUVEMENT RALENTI Pour attacher les molettes de mouvement ralenti à votre Pour attacher les molettes de mouvement ralenti à votre monture: 1. Munissez-vous de la clef Allen insérée dans le logement Munissez-vous de la clef Allen insérée dans le logement du devant de votre monture.
-
Page 13: Le Chercheur Starpointer
L’OCULAIRE Votre télescope est livré avec des oculaires Kellner de 10mm et de 20mm. Des oculaires supplémentaires peuvent être achetés pour augmenter ou réduire le grossissement comme désiré. 1. Desserrez les vis de fi xation du côté ouvert du renvoi coudé. 2. - Page 14 ALIGNER LE CHERCHEUR STARPOINTER Le chercheur StarPointer vous aide à orienter votre télescope en regardant dans la fenêtre de verre ronde et en alignant le viseur rouge projeté dans la fenêtre sur votre cible. La première fois que vous assemblez votre télescope, vous devez aligner le chercheur avec le système optique principal du télescope.
- Page 15 INSTALLER L’ADAPTATEUR POUR TÉLÉPHONE INTELLIGENT 1. Ouvrez la pince d’oculaire et placez insérez-y l’oculaire. Serrez la pince jusqu’à qu’il soit fermement attaché. 2. Avec la molette de la pince de téléphone, ouvrez cette dernière jusqu’à ce que votre téléphone puisse y entrer. Serrez la molette pour fi xer votre téléphone.
-
Page 16: Garantie Limitée De Deux Ans Celestron
REMARQUE: Cette garantie est valable pour les clients américains et canadiens qui ont acheté ce produit auprès d’un revendeur autorisé Celestron aux États-Unis ou au Canada. La garantie en dehors des É.-U. et du Canada n’est valable que pour les clients ayant acheté le produit d’un distributeur international de Celestron ou d’un distributeur agréé dans le pays en question. Veuillez communiquer avec eux pour toute réparation sous garantie. - Page 17 OMNI AZ 102 BRUKSANVISNING Modell # 22157-DS SVENSKA...
-
Page 18: Vad Finns I Lådan
VAD FINNS I LÅDAN Vi rekommenderar att du sparar din teleskoplåda så att den kan användas för att lagra teleskopet när det inte används. Packa upp lådan försiktigt eftersom vissa delar är små. Använd reservdelslistan nedan för att kontrollera att alla delar och tillbehör fi nns. PARTS LIST Teleskoprör StarPointer Finderscope... - Page 19 MONTERA DITT TELESKOP FÄSTET Omni AZ-fästet och stativet är helt monterade, så det är enkelt att ställa in det. 1. Ta bort stativet och montera från lådan. 2. Lossa handknapparna längst ner på varje ben och förläng den inre delen av benet till önskad längd. Dra åt knopparna för att säkra benen, var försiktig så...
- Page 20 SLOW MOTION RATTAR För att fästa slow motion-rattarna på ditt fäste: 1. Leta reda på den medföljande sexkantnyckeln gömd inuti Leta reda på den medföljande sexkantnyckeln gömd inuti spåret på framsidan av fästet. 2. Placera slow motion-ratten över den D-formade Placera slow motion-ratten över den D-formade växelaxeln och tryck inåt för att se till att den sitter fast växelaxeln och tryck inåt för att se till att den sitter fast...
- Page 21 OKULAR Ditt teleskop levereras med en 10mm och 20mm Kellner okular. Ytterligare okular kan köpas för att öka eller minska förstoringen till önskad nivå. 1. Lossa ställskruvarna på öppna änden stjärndiagonalen. 2. Sätt in den silverfärgade cylindern på det 20 mm okularet i stjärndiagonalen.
- Page 22 ANPASSA STARPOINTER FINDERSCOPE StarPointer-sökarkikaren hjälper dig att rikta ditt teleskop genom att titta genom dess runda glasfönster och täcka ditt mål med den röda rektiken som projiceras i fönstret. Första gången du monterar ditt teleskop måste du justera fi nderscope med teleskopets huvudoptik. Även om detta steg kan göras på...
- Page 23 INSTALLERA SMARTPHONE-ADAPTERN 1. Öppna okularklämman och placera den runt okularets kropp. Dra åt klämenheten den är säker. 2. Använd telefonens klämvred för att öppna telefonhållaren tills telefonen passar inuti. Dra åt den för att säkra telefonen på plats. 3. Slå på telefonen och öppna din kameraapp. Se till att blixten är avstängd.
- Page 24 OBSERVERA: Denna garanti gäller för kunder i USA och Kanada som har köpt denna produkt från en auktoriserad Celestron-återförsäljare i USA eller Kanada. Garanti utanför USA och Kanada gäller ENDAST kunder som köpt från en Celestrons internationella distributör eller auktoriserad Celestron-återförsäljare i det specifika landet. Vänligen kontakta dem för någon garantiservice.
Need help?
Do you have a question about the OMNI AZ 102 and is the answer not in the manual?
Questions and answers