Table of Contents
Advertisement
Available languages
Available languages
Quick Links
Bedienungsanleitung
User Manual
PCE-VDL 16I + PCE-VDL 24I Vibration Analyzer
Artikelnr. + Keyword deutsch / englisch
User manuals in various languages (français,
italiano, español, português, nederlands, türk, polski,
русский, 中文) can be found by using our
product search on: www.pce-instruments.com
Letzte Änderung / last change: 10 December 2018
V1.1
© PCE Instruments
Advertisement
Table of Contents

Related Manuals for PCE Instruments PCE-VDL 16l


Summary of Contents for PCE Instruments PCE-VDL 16l
- Page 1 Artikelnr. + Keyword deutsch / englisch User manuals in various languages (français, italiano, español, português, nederlands, türk, polski, русский, 中文) can be found by using our product search on: www.pce-instruments.com Letzte Änderung / last change: 10 December 2018 V1.1 © PCE Instruments...
-
Page 2: Table Of Contents
Verbindung zum "PCE-VDL X" herstellen ................11 Verbindung zum " PCE-VDL X" trennen ................11 Ausschalten des Datenloggers ..................11 Informationen zu einem verbundenen Datenlogger abrufen ..........12 Testen der Sensoren .......................13 2 Punkt Kalibrierung der Sensoren Temperatur und Feuchte ..........14 © PCE Instruments... - Page 3 6.10 Löschen von Messreihen....................18 6.11 Die Auswertung von Messreihen ..................19 6.11.1 Tabellarische Ansicht ....................20 6.11.2 Statistiken ......................21 6.11.3 Grafische Ansicht ....................22 6.11.4 Gemischte Ansicht (grafisch plus tabellarisch)............25 Mögliche Fehlermeldungen ............... 26 Garantie ....................27 Entsorgung ..................27 © PCE Instruments...
- Page 4 Connect to the "PCE-VDL X" ...................39 Disconnect from the " PCE-VDL X" .................39 Switch off the data logger ....................39 Retrieve information on connected data logger ..............40 Test the sensors ......................41 2-point calibration of the temperature and humidity sensors ..........42 © PCE Instruments...
- Page 5 6.10 Delete series of measurements ..................46 6.11 Evaluate series of measurements ...................47 6.11.1 Tabular view ......................48 6.11.2 Statistics .......................49 6.11.3 Graphical view.......................50 6.11.4 Mixed view (graphical plus tabular)................53 Possible error messages ..............54 Warranty ....................54 Disposal ....................54 © PCE Instruments...
-
Page 6: Sicherheitsinformationen
Micro USB Betriebsbedingungen Temperatur: -20 ... +65 °C Lagerbedingungen Temperatur: 5 ... 45 °C (ideal für Akku) Luftfeuchtigkeit: 10 ... 95 % r. H. nicht kondensierend Gewicht ca. 60 g Abmessungen 86,8 x 44,1 x 22,2 mm © PCE Instruments... -
Page 7: Spezifikationen Der Verschiedenen Integrierten Sensoren
0,045 … 188.000 Lux Messbereich Auflösung 0,045 Lux Max. Abtastrate 1 Hz 3 Achsen Beschleunigung Messbereich ±16 g ±16 g Genauigkeit ±0,24 g ±0,24 g Auflösung 0,00390625 g 0,00390625 g Max. Abtastrate 800 Hz 1600 Hz *nicht während des Ladevorgangs © PCE Instruments... -
Page 8: Spezifikation Der Akku Laufzeit
Die angegebenen Laufzeiten und Abtastraten gelten nur in Verbindung mit der im Lieferumfang enthaltenen microSD-Karte vom Typ: TS32GUSD300S-A. Lieferumfang 1x Datenlogger PCE-VDL 16l oder PCE-VDL 24I 1x Datenkabel USB A – Micro USB 1x 32 GB microSD Karte 1x Schiebeelement für SD-Karte 1x USB Stick mit PC Software und Bedienungsanleitung Zubehör... -
Page 9: Systembeschreibung
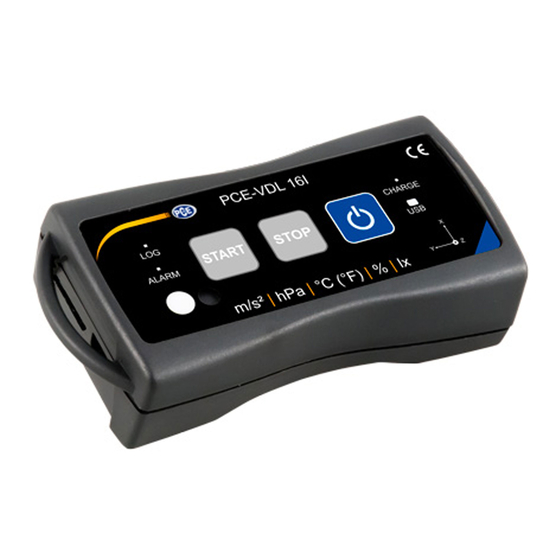
Ein- und Ausschalter Speicherkarteneinschub STOP: Beendung der Messung START: Beginn einer Messung LED Anzeigen Sensorpositionen: nur PCE-VDL 16I LOG: Statusanzeige / Log-Intervall Feuchtesensor ALARM: rot bei Grenzwertüberschreitung Lichtsensor CHARGE: grün im Lademodus USB: grün bei PC Verbindung © PCE Instruments... -
Page 10: Microsd-Karte Im Datenlogger
Speicherkartenaufnahme ein. Die Speicherkarte löst sich aus ihrer Halterung und schiebt sich so aus dem Gehäuse, dass sie anschließend herausgenommen werden kann. Zum Auslesen der Daten stecken Sie die microSD-Speicherkarte zusammen mit dem SD Karten Adapter in einen PC. © PCE Instruments... -
Page 11: Vorbereitung
Verwendung formatiert werden (FAT32 Dateisystem). Für hohe Abtastraten des Beschleunigungssensors (800 Hz beim PCE-VDL 16I und 1600 Hz beim PCE-VDL 24I) ist mindestens eine Class 10 (U1) microSD-Karte notwendig. Die Spezifikation der Akku Laufzeit gilt nur mit der im Lieferumfang enthalten microSD-Karte. © PCE Instruments... -
Page 12: Betrieb
• Einen Datenlogger ("PCE-VDL 16I" oder "PCE-VDL 24I") Empfohlen: Betriebssystem (64 Bit) ab Windows 7 aufwärts Mindestens 8 GB RAM Arbeitsspeicher Softwareinstallation Bitte führen Sie die "Setup PCE-VDL X.exe" aus und folgen Sie den Anweisungen des Setups. © PCE Instruments... -
Page 13: Beschreibung Der Softwarebenutzeroberfläche
Datenlogger handelt ("PCE-VDL 16I" oder "PCE-VDL 24I"). Bedeutung der Symbole in der Symbolleiste der PC-Software Gruppe "Verbindung" Verbindung mit dem "PCE-VDL X" herstellen Verbindung mit dem " PCE-VDL X" trennen Gruppe "Datenlogger" Eine Messung starten Eine Messung beenden © PCE Instruments... - Page 14 Gruppe „Messreihen“ Eine Messreihe vom Datenlogger oder aus dem Cache laden Messreihe aus dem Programmspeicher entfernen Messreihe endgültig löschen Gruppe „Sensoren“ Temperatursensor Feuchtigkeitssensor Lichtsensor Drucksensor Beschleunigungssensor Gruppe „Ansichten“ Tabellarische Ansicht Grafische Ansicht Grafische und tabellarische Ansicht Statistiken © PCE Instruments...
-
Page 15: Bedienung
COM-Port in der Software eingestellt werden. Dieser kann mit Hilfe des "Einstellungs-Dialogs" festgelegt werden. Zusätzlich zu den Verbindungsdaten können hier noch weitere Einstellungen zur Darstellung von Ansichten zu Messreihen sowie zum Datums- und Zeitformat vorgenommen werden. © PCE Instruments... -
Page 16: Verbindung Zum "Pce-Vdl X" Herstellen
Ausschalten des Datenloggers Ist der Datenlogger eingeschaltet, blinkt die LOG LED. Wenn Sie die Taste im eingeschaltetem Zustand drücken, so schaltet sich das Blinken der LOG LED und der Datenlogger aus. Im Anzeigefeld der Statusleiste steht in grün: © PCE Instruments... -
Page 17: Informationen Zu Einem Verbundenen Datenlogger Abrufen
Informationen dargestellt: - Der Volume-Name, der Status und die Kapazität der verbauten SD-Karte. - Der Status, ob eine aktive Messung vorliegt - Die aktuelle Akku-Spannung - Datum und Zeit (optional) - Serien- und Artikelnummer des VDL X © PCE Instruments... -
Page 18: Testen Der Sensoren
Wenn eine aktive Verbindung zum "PCE-VDL X" besteht, so kann mit einem Klick auf das Symbol in der Gruppe "Datenlogger" ein Fenster mit den aktuellen Werten aller verfügbaren Sensoren angezeigt werden. Hinweis: Die dort angezeigten Werte werden kontinuierlich abgefragt, so dass hier also tatsächlich Live-Daten vorliegen. © PCE Instruments... -
Page 19: Punkt Kalibrierung Der Sensoren Temperatur Und Feuchte
Kalibrier-Dialog per Klick auf die "Übernehmen"-Schaltfläche schließen und die Kalibrier-Daten an den Datenlogger übertragen. Für die Soll- und Ist-Werte müssen bestimmte Wertebereiche eingehalten werden. Näheres hierzu in der Tabelle "Kalibrier-Daten": Sensor Mindestabstand Referenzpunkte Höchstabstand Soll/Ist Temperatur 20 °C 1 °C Feuchte 20 %RH 5 %RH © PCE Instruments... -
Page 20: Starten Einer Messung
Für jeden Sensor kann zudem eine Messrate konfiguriert werden. Bei den Sensoren für Temperatur, Feuchtigkeit, Druck und Licht ist dies im Bereich von 1 Sekunde bis 1800 Sekunden (30 Minuten) möglich. Hier gilt: je kleiner der Wert, desto häufiger wird gemessen. © PCE Instruments... - Page 21 Ein Mausklick auf die Schaltfläche "Zeit" setzt die dort im Fenster angezeigte Zeit auf die aktuelle Uhrzeit des PCs. Selbstverständlich kann eine laufende Messung auch jederzeit manuell über die Software beendet werden: hierzu genügt ein Mausklick auf das Symbol in der Gruppe "Datenlogger". © PCE Instruments...
-
Page 22: Übertragen Und Laden Von Messreihen
Dateien (einzeln oder auch zu mehreren) per "drag & drop" in das Fenster der Software importiert werden. Nach diesem Vorgang stehen alle Messreihen im schnellen Zwischenspeicher ("Cache") des PCs zur Verfügung. Wenn eine Messreihe geöffnet wird, kann auch ein eigener Name hierfür vergeben werden. Auflistung der Messreihen © PCE Instruments... -
Page 23: Löschen Von Messreihen
Je nachdem, wo sich die zu löschenden Messreihen befinden, werden sie entweder nur aus dem Schnellzugriff des PCs, oder auch von der SD-Karte des Datenloggers gelöscht. Anmerkung: Bitte bedenken Sie, dass diese Art des Löschens endgültig ist! © PCE Instruments... -
Page 24: Die Auswertung Von Messreihen
Die andere Option erlaubt die Anzeige aller Ansichten von allen geöffneten Messreihen. Diese Einstellung macht dann Sinn, wenn man nur sehr wenige Messreihen gleichzeitig geöffnet hat, diese dann aber miteinander vergleichen möchte. © PCE Instruments... -
Page 25: Tabellarische Ansicht
"Strg + V" aus der Zwischenablage entnommen und eingefügt werden. Datenexport Über die Schaltfläche "Datenexport" kann entweder eine zuvor getroffene Auswahl von Zeilen oder auch der komplette Inhalt der Tabelle im CSV-Format exportiert werden. Auswahl: Nur selektierte oder alle Datensätze? © PCE Instruments... -
Page 26: Statistiken
Zeilen in die Zwischenablage übernommen und von dort aus per Tastenkombination "CTRL + V" wieder entnommen werden. Datenexport Über die Schaltfläche "Datenexport" kann entweder eine zuvor getroffene Auswahl von Zeilen oder auch der komplette Inhalt der Tabelle im CSV-Format exportiert werden. Auswahl: Nur selektierte oder alle Datensätze? © PCE Instruments... -
Page 27: Grafische Ansicht
("Zoomen") bzw. Bewegen der vergrößerten Grafik") eine "Lupe" darstellen. Dann kann bei gedrückt gehaltener Maustaste ein Rechteck über einen Bereich der Grafik gezogen werden. Sobald die Maustaste losgelassen wird, erscheint der ausgewählte Bereich als neue Grafik. "Zoomen" der Grafik © PCE Instruments... - Page 28 "Lupe"-Symbol. Verschieben der "gezoomten" Grafik Wiederherstellung der originalen Grafik Wiederhergestellte (originale) Grafik Die originale Grafik kann jederzeit wiederhergestellt werden, indem auf das entsprechende Symbol ("Wiederherstellung der originalen Grafik") neben der Lupe bzw. Hand geklickt wird. © PCE Instruments...
- Page 29 Solange auch die einzelnen Punkte dargestellt werden, sorgt ein Führen des Mauszeigers auf einen Punkt der dargestellten Linie nach kurzer Zeit für das Anzeigen eines kleinen Informationsfensters mit den Daten (Zeit und Einheit) des aktuell ausgewählten Messwerts. Informationen zu einem ausgewählten Punkt © PCE Instruments...
-
Page 30: Gemischte Ansicht (Grafisch Plus Tabellarisch)
Diese Ansicht besteht aus der grafischen, zusammen mit der tabellarischen Ansicht. Der Vorteil bei dieser Ansicht ist der Zusammenhang zwischen beiden Ansichten: Ein Doppelklick auf einen der Punkte in der grafischen Ansicht selektiert automatisch den passenden Eintrag in der tabellarischen Ansicht. © PCE Instruments... -
Page 31: Mögliche Fehlermeldungen
Schreib- oder Lesefehler SD-Karte Datei kann nicht geöffnet werden SD-Karte Das Verzeichnis auf der SD-Karte ist unlesbar SD-Karte Eine Datei konnte nicht gelöscht werden SD-Karte Es wurde keine SD-Karte gefunden Beispiel: " Es wurde keine SD-Karte gefunden" © PCE Instruments... -
Page 32: Garantie
Zur Umsetzung der ElektroG (Rücknahme und Entsorgung von Elektro- und Elektronikaltgeräten) nehmen wir unsere Geräte zurück. Sie werden entweder bei uns wiederverwertet oder über ein Recyclingunternehmen nach gesetzlicher Vorgabe entsorgt. Alternativ können Sie Ihre Altgeräte auch an dafür vorgesehenen Sammelstellen abgeben. WEEE-Reg.-Nr.DE69278128 © PCE Instruments... -
Page 33: Safety Notes
We expressly point to our general guarantee terms which can be found in our general terms of business. If you have any questions please contact PCE Instruments. The contact details can be found at the end of this manual. Specifications... -
Page 34: Specifications Of The Different Integrated Sensors
100 Hz 1d 23h 03min 1d 11h 32min 200 Hz 1d 17h 05min 1d 08h 32min 400 Hz 1d 08h 39min 1d 03h 48min 800 Hz 1d 00h 39min 0d 22h 09min 1600 Hz 0d 15h 46min © PCE Instruments... - Page 35 The specification of the battery life is based on the assumption that the battery is new and fully charged and that the included microSD card, type TS32GUSD300S-A, is used. © PCE Instruments...
-
Page 36: Specification Of The Measuring Time (2,500,000 Readings)
The specified measuring times and sampling rates only apply in combination with the microSD card, type TS32GUSD300S-A, which comes with the meter. Delivery contents 1x data logger PCE-VDL 16l or PCE-VDL 24I 1x data cable USB A – USB Micro 1x 32 GB microSD memory card... -
Page 37: System Description
START: start the measurement LED indicators Sensor positions: PCE-VDL 16I only LOG: status indicator / log interval Humidity sensor ALARM: red when limit value is exceeded Light sensor CHARGE: green when charging USB: green when connected to PC © PCE Instruments... -
Page 38: Microsd Card In The Data Logger
The memory card is then released from ist retainer and snaps out of the case so that it can be taken out. To read out the data, insert the microSD card into a PC, together with its adaptor. © PCE Instruments... -
Page 39: Getting Started
(FAT32 file system). For high sampling rates of the acceleration sensor (800 Hz for PCE-VDL 16I and 1600 Hz for PCE-VDL 24I), you will need at least a Class 10 (U1) microSD card. The specification of the battery life only applies if the included microSD card is used. © PCE Instruments... -
Page 40: Operation
A data logger ("PCE-VDL 16I" or "PCE-VDL 24I") Recommended: Operating system (64 Bit) Windows 7 or higher At least 8 GB main memory (the more, the better) Software installation Please run the " Setup PCE-VDL X.exe " and follow the instructions of the setup. © PCE Instruments... -
Page 41: Description Of The User Interface In The Software
("PCE-VDL 16I" or "PCE-VDL 24I"). Meaning of the individual icons in the toolbar of the PC software Group "Connection" Connect to the "PCE-VDL X" Disconnect from the "PCE-VDL X" Group "Data Logger" Start a measurement Stop a measurement Test sensors © PCE Instruments... - Page 42 Load a series of measurements from cache Remove series of measurements from program memory Delete series of measurements permanently Group „Sensors“ Temperature sensor Humidity sensor Light sensor Pressure sensor Acceleration sensor Group „Views“ Tabular view Graphical view Graphical and tabular view Statistics © PCE Instruments...
-
Page 43: Operation
It can be set via the “Settings” dialog In addition to the connection data, further settings for the different views of series of measurements as well as for the date and time format can be made here. © PCE Instruments... -
Page 44: Connect To The "Pce-Vdl X
In the display field of the status bar, you will see the following in green: button in the group “Data If the data logger is turned off manually, a new configuration via the Logger” is required, see chapter “Start a measurement”. © PCE Instruments... -
Page 45: Retrieve Information On Connected Data Logger
- the volume name, the status and the capacity of the SD card - the status if there is an active measurement - the current battery voltage - date and time (optional) - serial and part number of the VDL X © PCE Instruments... -
Page 46: Test The Sensors
When a connection to the "PCE-VDL X" is active, a window with the current values of all available sensors can be displayed by clicking on the icon in the group "Data Logger". Note: The values displayed in that window are continuously queried. This means that the data are live data. © PCE Instruments... -
Page 47: 2-Point Calibration Of The Temperature And Humidity Sensors
For the set points and actual values, a certain range of values is available. More information can be found in the chart "Calibration data": Sensor Minimum difference between Maximum difference reference points between set point and actual value Temperature 20 °C 1° C Humidity 20 % RH 5 % RH © PCE Instruments... -
Page 48: Start A Measurement
For the acceleration sensor, you can select a value between 1 and 800 / 1600 (depending on your requirements). The higher the value entered, the more measurements are made. You can also set alarm values for the temperature, humidity, pressure and light sensors. © PCE Instruments... - Page 49 By clicking on the „By time“ button, you can take over the current time of your PC as the time shown in that window. Of course, an ongoing measurement can always be terminated manually via the software, by in the group “Data Logger”. clicking on the icon © PCE Instruments...
-
Page 50: Transfer And Load Series Of Measurements
After doing this, all series of measurements are available from the fast cache of the PC. When you open a series of measurements, you can assign an individual name to it. List of measurement series © PCE Instruments... -
Page 51: Delete Series Of Measurements
Depending on the location of the measurement series to be deleted, they are either deleted from the PC’s quick access only or from the SD card of the data logger. Note: Please bear in mind that this type of deletion is permanent! © PCE Instruments... -
Page 52: Evaluate Series Of Measurements
The other option is to show all views of all opened series of measurements. This setting makes sense if you only have very few series of measurements opened at the same time and want to compare them. © PCE Instruments... -
Page 53: Tabular View
"CTRL + C" and remove it from the clipboard and insert it with the shortcut "CTRL + V". Data export Via the button "Data Export", either a previously made selection of lines or the complete content of the chart can be exported in CSV format. Selection: Only selected or all records? © PCE Instruments... -
Page 54: Statistics
"CTRL + C" and remove it with the shortcut "CTRL + V". Data export Via the button "Data Export", either a previously made selection of lines or the complete content of the chart can be exported in CSV format. Selection: Only selected or all records? © PCE Instruments... -
Page 55: Graphical View
Then, a rectangle can be drawn over a part of the graphics by holding the mouse button down. When the mouse is released, the selected area appears as a new graphic. "Zooming" the graphic © PCE Instruments... - Page 56 Shifting the "zoomed" graphic Restore original graphic Restored (original) graphic The original graphic can be restored at any time by clicking on the corresponding icon (“Restore original graphic”) next to the magnifying glass or hand. © PCE Instruments...
- Page 57 As long as the individual dots are shown, placing the mouse cursor on a dot within the displayed line will open a small information window with the data (time and unit) of the currently selected reading. Information on a selected dot © PCE Instruments...
-
Page 58: Mixed View (Graphical Plus Tabular)
This view consists of the graphical view together with the tabular view. The correlation between the two views is the advantage of the mixed view. When you double-click on one of the dots in the graphical view, the same entry will automatically be selected in the tabular view. © PCE Instruments... -
Page 59: Possible Error Messages
For countries outside the EU, batteries and devices should be disposed of in accordance with your local waste regulations. If you have any questions, please contact PCE Instruments. © PCE Instruments... - Page 60 PCE Instruments contact information Germany France Spain PCE Deutschland GmbH PCE Instruments France EURL PCE Ibérica S.L. Im Langel 4 23, rue de Strasbourg Calle Mayor, 53 D-59872 Meschede 67250 Soultz-Sous-Forets 02500 Tobarra (Albacete) Deutschland France España Tel.: +49 (0) 2903 976 99 0 Téléphone: +33 (0) 972 3537 17...
- Page 61 User manuals in various languages (français, italiano, español, português, nederlands, türk, polski, русский, 中文) can be found by using our product search on: www.pce-instruments.com Specifications are subject to change without notice. © PCE Instruments...
Need help?
Do you have a question about the PCE-VDL 16l and is the answer not in the manual?
Questions and answers