Advertisement
05/11/2012
Ins-30202 Net2 Entry - Monitor
Technical Support
01273 811011
Technical help is available:
Documentation on all Paxton products can be found on our website - http://www.paxton.co.uk/
Description of product
The Net2 Entry monitor is an audio/video monitor used to remotely communicate with visitors. It is powered using
power over Ethernet (PoE) and communicates with the other elements of the system using IPv6, providing 'plug
and play' installation. The only configuration required is the allocation of a monitor ID which the system uses to
identify the correct monitor.
If used in conjunction with Net2 access control software, this must be version 4.25 or later.
6
support@paxton.co.uk
Monday - Friday from 07:00 - 19:00 (GMT)
Saturday from 09:00 - 13:00 (GMT)
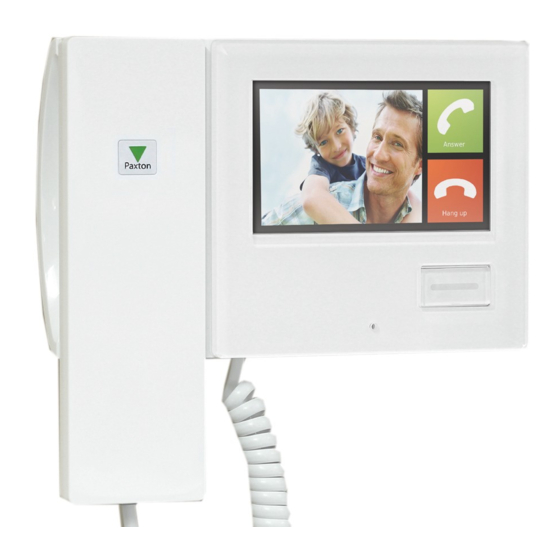
5
1. Colour 3.5' Touch screen
2. Volume control
3. Speaker
4. Open door button
5. Microphone
6. Handset
Paxton
1
2
3
4
Page 1
Advertisement
Table of Contents

Related Manuals for Paxton NET2 ENTRY-MONITOR


Summary of Contents for Paxton NET2 ENTRY-MONITOR
-
Page 1: Technical Support
Monday - Friday from 07:00 - 19:00 (GMT) Saturday from 09:00 - 13:00 (GMT) Documentation on all Paxton products can be found on our website - http://www.paxton.co.uk/ Description of product The Net2 Entry monitor is an audio/video monitor used to remotely communicate with visitors. It is powered using power over Ethernet (PoE) and communicates with the other elements of the system using IPv6, providing 'plug and play' installation. -
Page 2: Installation
A white network cable is supplied with the stand. Feed this through the mount and push it into the socket at the rear of the monitor. Clip the mount to the monitor. also: AN1127 - Net2 Entry - Planning and installation < http://paxton.info/1896 > Page 2... - Page 3 Paxton recommend that the network cable is run to each location and terminated in a network box. A patch cable should then be used to link the unit to the network. This makes unit replacement or removal for building maintenance much easier.
- Page 4 Configuration Setting the Monitor ID When the monitor is first connected to the network it will not have a Monitor ID number. The monitor ID is the number that a visitor will call to request entry (unless they are using a text only list) so it should relate to the location of the monitor where possible e.g.
-
Page 5: Incoming Call
Operation - Answering a call 1. Default state The monitor will normally have no display. The button is not illuminated. 2. Incoming call When a visitor calls a monitor, it will sound its ring tone until it is answered or it times out. The 'open door' button will illuminate green and the video image will be displayed. -
Page 6: Default Menu
Operation - Viewing a camera 1. Select 'View video' mode Where this function is permitted, the 'View video' option will display. This allows the camera to be used for an external view at any time. Touch the screen to display the default menu. Touch the 'View video' option. -
Page 7: Monitor Settings
Monitor settings Touch 'Monitor settings' to Sound settings display the menu. QDisplays the Sound settings. Display settings QDisplays the Language, Alarm and 'Easy read' settings. About QDisplays the Software version in use on this monitor. Installer settings QDisplays the Installer settings for this monitor. Name QAllows the user to edit the name of this monitor. -
Page 8: Alarm Display
Operation - Do not disturb mode Visitors can be stopped from calling the monitor by putting it into 'Do not disturb' mode. If the screen is blank, touch the screen to display the menu. Touch the 'Do not disturb' option. The button will illuminate red.
Need help?
Do you have a question about the NET2 ENTRY-MONITOR and is the answer not in the manual?
Questions and answers