Table of Contents
Advertisement
Advertisement
Table of Contents

Related Manuals for 3nStar SC455


Summary of Contents for 3nStar SC455
-
Page 2: Table Of Contents
Model No.:SC455 Contents ABOUT THIS MANUAL......ERROR! BOOKMARK NOT DEFINED. CHAPTER 1 GETTING START..ERROR! BOOKMARK NOT DEFINED. 1.1R ......................5 ECEIVER 1.2 C ..................5 ONNECT RECEIVER ....................5 INSTALL CABLE ..................... 6 SCANNER PAIRING CHAPTER 2 SCANNING..... ERROR! BOOKMARK NOT DEFINED. - Page 3 4.2.6 Interleaved 2 of 5 ..................18 4.2.7 Straight 2 of 5 Industrial................19 4.2.8 Matrix 2 of 5................... 20 4.2.9 UPC-A....................20 4.2.10 UPC-E ....................23 4.2.11 EAN-8 ....................25 4.2.12 EAN-13 ....................27 4.2.13 MSI....................... 29 4.3 2DBARCODE ....................31 4.3.1 PDF417....................
-
Page 4: About This Manual
About this manual This manual is designed to provide you the common setting, operation and maintenance instructions of SC455 handheld 1D scanner, to help you to use this product easily. SC455... -
Page 5: Chapter 1 Getting Start
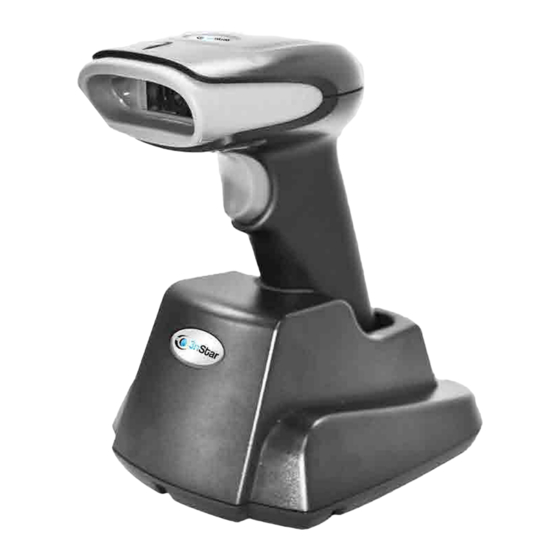
Chapter 1 Getting Start 1.1 Receiver Picture 1.1 Receiver 1.2 Connect receiver Picture 1.2 Connect receiver 1.3 Install cable 1.1. Insert the crestal end of the cable to the interface of the scanner 2. Gently pull on the cable to ensure that cable connections are secure... -
Page 6: Scanner Pairing
3. Connect the other end of the cable to PC. Notice:Wireless scanner cable can be used for charging or transmission data Picture1.3 Insert cable Picture 1.4 Connect the PC(For charging) 1.3 Scanner pairing 1. Conncetion cradle to terminal 2. Scanning the “ ”... -
Page 7: Chapter 2 Scanning
Start pairing(@SET) 3.If connect successfully, there will have three warning sound and scanner flashing light turn red to green. 4.Finish pairing Chapter 2 scanning 2.1 Introduction This chapter has covered the introduction of scanner appearance, the scanning method and scope, as well as two different operation ways. -
Page 8: Handheld Scan Mode
2.2 Handheld scan mode Picture 2.1 Scan method 1.Make sure all connection is correct 2.Aim at the barcode, press the button 3.Barcode should be in range of LED light decoding area 2.3AIM The red LED light bar is the window center of scanning area, please make sure... -
Page 9: Depth Of Filed
the barcode is in this area. The below picture show the decode region and the blind region Picture2.2 Scan region 2.4 Dept of field 1.Dept of field Picture 2.3 Dept of field Barcode Resolution Nearest Fastest Code39 60mm 130mm 5.0 mil 13.0mil 30mm 300mm... -
Page 10: Chapter 3 Common Funstion Setting
0.127mm Code 39 0.08mm Code 39 Chapter 3 Common function setting Restore default setting After scanned Restore default setting, scanner will return to be 扫 parameter factory stat. Notice: After Restore default setting, need to scan barcode “9600” , or or it will come across Data disorder phenomenon Restore default setting,... -
Page 11: Image Revere
Mobile phone mode 1 Mobile phone mode 2: Choose this mode when the mobile phone background light is strong and the reflection is strong. Mobile phone mode 2 3.2 Image revere *Open revere *Close revere 3.3 Illumination *Open Illumination *Close Illumination 3.4 Barcode scanning delay Under that function,scanner will delay to scan next barcode after successfully scanned previous barcode. -
Page 12: Chapter 4 Barcode Type Definition
No delay Delay 500 Milliseconds Delay 2000 Milliseconds Chapter 4 Barcode Type Definition 4.1 Comman setting Turn on all barcode Turn off all barcode 4.2 1D barcode 4.2.1 Codabar Restore Codabar default setting *Turn on Codabar... - Page 13 Turn off Codabar Transmission Start/End symbol If Codabar barcode includes start and end symbol, scan below barcode, so that the start and end character will be transfer when the data transmission. Transmission start/end symbol *Not transfer start/end symbol Codabar Detection symbol To add the Detection symbol in Codabar is able to detect the legitimacy of the barcode by verifying.
- Page 14 Codabar barcode length is able to set Max, and Min, the data is valid to between Max and Min, and the data which over the Max or less then the Min is invalid. Use the Programming Command to finsh the setting. For example: The valid barcode length of Codabar is Min10 and Max 25.
-
Page 15: Code 39
*No detective symbol Verify but not transfer detect symbol Verify and transfer detect symbol Code 39 additional data It can add additional data behind Code 39 after turn it on. Turn on addition Turn off addition Code 39 Full ASCII *Turn on Code 39 Full ASCII *Turn off Code 39 Full ASCII Effective length configuration... -
Page 16: Code 128
Code 39 barcode length is able to set to Max, and Min, the data is valid between Max andMin, and the data which over the Max or less then the Min is invalid. Use the Programming Command to finsh the setting. For example: The valid barcode length of Code39 is Min10 and Max 25. -
Page 17: Code 11
*Turn Code 11 Turn off Code 11 Detective character *1detective character 2 detective characters Effective length configuration Code 11 barcode length is able to set to Max, and Min, the data is valid between Max andMin, and the data which over the Max or less then the Min is invalid. Use the Programming Command to finsh the setting. -
Page 18: Code 93
*Turn on Code 93 Turn off Code 93 Effective length configuration Code 93barcode length is able to set to Max, and Min, the data is valid between Max andMin, and the data which over the Max or less then the Min is invalid. Use the Programming Command to finsh the setting. -
Page 19: Straight 2 Of 5 Industrial
*No detect symbol Verify but not transfer detect symbol Verify and transfer detect symbol Effective length configuration Interleaved 2 of 5 barcode length is able to set to Max, and Min, the data is valid between Max andMin, and the data which over the Max or less then the Min is invalid. Use the Programming Command to finsh the setting. -
Page 20: Matrix 2 Of 5
Straight 2 of 5 Industrial barcode length is able to set to Max,and Min,the data is valid between Max andMin, and the data which over the Max or less then the Min is invalid. Use the Programming Command to finsh the setting. For example: The valid barcode length of Interleaved 2 of 5 is Min10 and Max 25. -
Page 21: Upc-A
4.2.9 UPC-A Restore UPC-A default setting *Turn on UPC-A Turn off UPC-A Parity bit *With Parity bit Without parity bit Digital system Turn on digital system *Turn off digital system Addtional code... - Page 22 Turn on 2 bits additional *Turn off 2 bits additional Turn on 5 bits additional *Turn off 5 bits additional UPC-A Required Turn on the function of UPC-A Required, the scanner can only read the barcode with suffix. Turn on UPC-A Required *Turn off UPC-A Required UPC-A Addenda Separator Turn on...
-
Page 23: Upc-E
Turn off 4.2.10 UPC-E Default setting Turn on UPC-E0 Turn off UPC-E0 Turn on UPC- E1 Turn off UPC- E1 UPC-E0Extension UPC-E0 can be extended to be 12 bytes UPC-A Turn on UPC-E0 extension... - Page 24 Turn off UPC-E0 extension UPC-E0 parity bit Turn on UPC-E0 parity bit Turn off UPC-E0 parity bit UPC-E0 Addenda Required Turn on UPC-E0 Addenda Required Turn off UPC-E0 Addenda Required UPC-E0 Addenda Separator Turn on UPC-E0 Addenda Separator Turn off UPC-E0 Addenda Separator UPC-E0 digital system...
-
Page 25: Ean-8
Turn on Turn off UPC-E0 Additional code Turn on 2 bits additional Turn off 2 bits additional Turn on 5 bits additional Turn off 2 bits additional 4.2.11 EAN-8 Restore EAN-8 default setting *Turn on EAN-8... - Page 26 Turn off EAN-8 Transfer the parity bit The length of EAN-8 is 8 bits, the last bit is parity bit, it is to verify the accuracy of the data. *Turn on transmission Turn off transmission Add additional code Each EAN-8 code is able to add 2 bits or 5 bits additional code, in the sample of below, the part in blue dotted line is EAN-8 code, and which in red dotted line is additional code.
-
Page 27: Ean-13
Turn on 5 bits additional code *Turn off 5 bits additional code Need to add additional code or not Need to add EAN-8 additional code *Not need to add EAN-8 additional code EAN/JAN-8 additional space Turn on this function, there will be a space between the data and the additional data, if disable this function, there will be no space. - Page 28 *Turn on EAN-13 Turn off EAN-13 Transfer parity bit *Transfer EAN-13 detect bit Not transfer EAN-13 detect bit Additional code Turn on 2 bits additional code *Turn off 2 bits additional code Turn on 5 bits additional code...
-
Page 29: Msi
*Turn off 2 bits additional code Need to add additional code or not Need to add EAN-13 additional code *Not need to add EAN-13 additional code 4.2.13 MSI Default setting *Turn on MSI Turn off MSI Effective length configuration MSI barcode length is able to set to Max, and Min,the data is valid between Max andMin, and the data which over the Max or less then the Min is invalid. - Page 30 Max:020E0410 Min:020E035 MSI parity code ValidateType10Transmit ValidateType10ThenType11CharTransmit ValidateType10ThenType11CharNoTransmit ValidateType10NoTransmit Validate2Type10NoTransmit Validate2Type10CharTransmit Validate2Type10CharNoTransmit DisableMSICheck...
-
Page 31: 2Dbarcode
4.3 2Dbarcode 4.3.1 PDF417 Default setting *Turn on PDF417 Turn off PDF417 PDF417 barcode length is able to set to Max, and Min, the data is valid between Max andMin, and the data which over the Max or less then the Min is invalid. Use the Programming Command to finsh the setting. -
Page 32: Qr Code
Micro PDF417 barcode length is able to set to Max, and Min, the data is valid between Max andMin, and the data which over the Max or less then the Min is invalid. Use the Programming Command to finsh the setting. For example: The valid barcode length of Micro PDF417 is Min5 and Max 10. -
Page 33: Maxicode
*Turn on Data Matrix Turn off Data Matrix Effective length configuration Data Matrix barcode length is able to set to Max,and Min,the data is valid between Max andMin, and the data which over the Max or less then the Min is invalid. Use the Programming Command to finsh the setting. -
Page 34: Aztec
Maxicode barcode length is able to set to Max,and Min,the data is valid between Max andMin, and the data which over the Max or less then the Min is invalid. Use the Programming Command to finsh the setting. For example: The valid barcode length of Maxicode is Min5 and Max 10. Programming Command as below: Max:02360310 Min:0236025... -
Page 35: Appendix :Digital Barcode
Turn on Chinese sensible code Turn off Chinese sensible code Effective length configuration Chinese sensible barcode length is able to set to Max,and Min,the data is valid between Max andMin, and the data which over the Max or less then the Min is invalid. Use the Programming Command to finsh the setting. -
Page 36: Appendix Estore Default Setting
Appendix 3:Default setting Parameter Default Code system Reverse image Turn off Code 128 Code 128 Turn on Max length Min length EAN-8 EAN-8 Turn on Parity bit Transmit 2 bits additional code Turn off 5 bits additional code Turn off Additional code Not needed Expand to EAN-13 code... - Page 37 Parameter Default UPC-A UPC-A Turn on Parity bit Transmit 2 bits additional code Turn off 5 bits additional code Turn off Additional code Not needed Leading symbol”0” Not transmit Interleaved 2 of 5 Interleaved 2 of 5 Turn on Parity bit Not transmit Max length Min length...
- Page 38 Parameter Default Codabar Codabar Turn on Start/End symbol Not transmit Max length Min length Code 93 Code 93 Turn on Max length Min length Code 11 Code 11 Turn on Parity bit Not transmit Max length Min length PDF 417 PDF 417 Turn on Max length...
-
Page 39: Chapter 5 Wireless Configuration
Parameter Default Turn on Max length Min length Chapter 5 Wireless configuration 5.1 Transmitting terminal 5.1.1 Enter setting & Save&exit Enter setting @SET Save&Exit @END Notice: 1. Except quick setting instruction, other settings need to scan Enter Setting code first, then scan function code, and scan Save&Exit code. -
Page 40: Interface Setting
5.1.3 Setting interface Enter setting @SET *USB output Virtual Port output Save&Exit @END Notice: When need to change USB and Virtual COM Port, please scan the setting barcode, and do not plug the receiver 5.1.4 Wired output setting Enter setting @SET *Turn on USB wired output... -
Page 41: Check Parameter
Czech Spanish(Latin America) Save&Exit @END Notice: That setting barcode is valid to Tx and Rx.If set multiple languages under the condition of wireless connection is broken, it will come the Rx language successfully set, but the Tx fails. 5.1.5 Check parameter Enter setting @SET Check system... -
Page 42: Inventory Mode Operation Setting
The above three barcodes are quick commands, it will enter and save setting after scanning. The storage is 10,000 pcs 13Byte barcodes in inventory mode, 30,000 pcs 13Byte barcodes in cache mode. 5.1.11 Inventory mode operation setting Upload data Data amount Clear data Notice: The above three barcodes are quick commands, it will enter and save setting after scanning. -
Page 43: Set Prefix
Save&Exit @END Notice: Restore wireless defaul setting: Restore default interface, lanaguage, operation mode, switch sleep time, wired output 5.2.1 Set prefix Enter setting @SET *Disable prefix User-defined prefix barcode Save&Exit @END Example: Sets the prefix of the barcode “1234567” to “#Ab9”, namely the output barcode is “#Ab91234567”. -
Page 44: Notify Sound System
barcode is “1234567%B”. 1. Scan “Enter setting” barcode 2. Scan “User-defined suffix + barcode” barcode 3. Scan “%”, “B” barcode one by one. 4. Scan “Save&Exit” 5.System factory default End symbol: 0x0D(Enter) 6.Common End symbol 0x0D(Enter),0x0A(换行),0x09(Tab) Notice: 0x0D(Enter) 0x0A(Line feed) 0x09(Tab) 5.2.3 N otify sound system... - Page 45 detection Green Four short beeps(H igh, Normal boot light Normally on middle,low frequency Pairing status instruction Turn on One short beeps(H LED light flashes once wireless pairing frequency wireless pairing None LED light flashes status Wireless None light Normally on, green pairing failure light off...
-
Page 46: Appendix
Data upload One short beep(High Green light flashes once success frequency) Data upload Three short beeps(Middle Red light flashes failure frequency)) thrice Battery status nstruction Charging None Blue light turn on status Charging Blue light turn off, green None completed light on Sleep/power off One long beep(low frequency) - Page 47 ^D(EOT) ^E(ENQ) ^F(ACK) ^G(BEL) ^H(BS) ^I(HTab) ^J(LF) ^K(VTab) ^L(FF) ^M(CR) ^N(SO) ^O(SI) ^P(DLE) ^Q(DC1) ^R(DC2) ^S(DC3) ^T(DC4) ^U(NAK) ^V(SYN) ^W(ETB)...
- Page 48 ^X(CAN) ^Y(EM) ^Z(SUB) ^[(ESC) ^\(FS) ^](GS) ^^(RS) ^_(US) Character " &...
- Page 49 <...
- Page 50 >...
- Page 53 Keyboard keys...
- Page 54 Backspace Return(ENTER) Enter(Numeric Keypad) Arrow Down Arrow up Arrow right Arrow left Insert Home Page up Page down Left Shift Left Ctrl Left Alt Left GUI Right Shift Right Ctrl...
-
Page 55: Appendix 2:Ascii Barcode List
Right Alt Right GUI Caps Lock Appendix 2:ASCII barcode list Decimal Octal Hexadecima Character Description start of header start of text end of text end of transmission enquiry acknowledge bell backspace horizontal tab line feed vertical tab form feed carriage return shift out shift in data link escape... - Page 56 Decimal Octal Hexadecima Character Description group separator record separator unit separator space " & < >...
- Page 57 Decimal Octal Hexadecima Character Description...
- Page 58 Decimal Octal Hexadecima Character Description delete Backspace Return...
- Page 59 Decimal Octal Hexadecima Character Description Enter Arrow Down Arrow up Arrow right Arrow left Insert Home Page up Page down Left Shift Left Ctrl Left Alt Left GUI Right Shift Right Ctrl Right Alt Right GUI Caps Lock...
- Page 60 Appendix 3: Example codes EAN13 UPC-A EAN8 UPC-E Default data: 1234565 Codabar Code 93 Encoded data: c01235d Code 39(Regular) Code 39(Full ASCII) Encoded data: *Code 39* GS1 Databar Encoded data: 65473728281919...
Need help?
Do you have a question about the SC455 and is the answer not in the manual?
Questions and answers