Table of Contents

Related Manuals for Melitta BARISTA TS


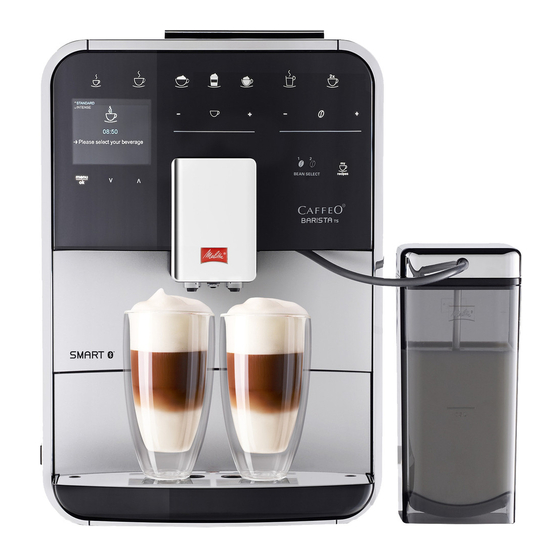
Summary of Contents for Melitta BARISTA TS
- Page 1 Bedienungsanleitung / Operating Instructions Mode d‘emploi / Gebruiksaanwijzing / Istruzioni per l‘uso Bruksanvisning / Bruksanvisning Brugsanvisning / Käyttöohje ONLY ONCE A YEAR TO DESCALE WITH PRO AQUA FILTER TECHNOLOGY* RECIPES...
-
Page 3: Table Of Contents
Checking the delivery contents ................41 Installing the appliance..................41 Connecting the appliance...................41 Switching on the appliance for the first time ..........41 Installing the Melitta-Connect-App ..............42 Basic operation ........................42 Switching the appliance on and off ..............42 Using the control panel ..................42 Navigating in the menu ..................43 Establishing the Bluetooth connection ............44... - Page 4 Table of contents Permanently changing beverage settings .............50 Selecting recipes ....................50 Changing default settings...................51 Personal settings – "My Coffee" ..................51 Editing personal user profiles ................51 Selecting/changing personal settings ............52 Preparing beverages with personal settings ..........52 Changing basic settings ....................53 Setting the language ....................53 Setting the time ......................53 Activating/deactivating Auto Bean Select (BARISTA TS model only) ..53 Setting energy save mode ..................53...
-
Page 5: Overview Of The Appliance
1.1 The appliance at a glance 1 Water tank 2 2-chamber bean container 3 "BEAN SELECT" slider (BARISTA T model only) For "BEAN SELECT" in BARISTA TS, see item number 30. 4 Ground coffee chute 5 Cup tray with stainless steel plate (depending on the model) 6 Control panel 7 Height-adjustable outlet with 2 coffee... -
Page 6: The Control Panel At A Glance
Setting the beverage quantity slider 28 Coffee strength Setting the coffee strength slider 29 My Coffee/Recipes Selecting personal settings for beverages or preparing (in BARISTA TS) beverages with recipes. My Coffee Selecting personal settings for beverages. (in BARISTA T) 30 BEAN SELECT Selecting the bean type (BARISTA TS model only). -
Page 7: For Your Safety
Melitta accepts no liability for damage caused by failure to observe the operating Observe the following safety instructions. instructions to avoid danger from... -
Page 8: Risk Of Burns And Scalds
First steps 2.3 Risk of burns and scalds younger than 8 years of age. Children over 8 years of age Escaping fluids and steam may must be supervised during be very hot. Parts of the appli- cleaning and maintenance. ance can also become very hot. ū... -
Page 9: Checking The Delivery Contents
First steps 3.2 Checking the delivery 3.5 Switching on the appliance contents for the first time Check the completeness of delivery using During initial start-up, the language, the the following list. If parts are missing, time and the water hardness can be set. contact your retailer. -
Page 10: Installing The Melitta-Connect-App
Bluetooth » The ready symbol appears on the or with android devices that support Blue- display. tooth. You need the Melitta-Connect-App for this. Detailed information at www. Switching off the appliance melitta.de. 1. Place a vessel beneath the outlet. -
Page 11: Navigating In The Menu
Basic operation Use the following actions to operate the Use the following options to navigate in control panel: the menu: Calling up the menu and confirming the Brief press selection Briefly press a button to select a function. Press the "menu/ok" button for longer than 2 seconds to call up Long press the menu. -
Page 12: Establishing The Bluetooth Connection
Requirements: ū The appliance has already been con- ū The appliance is switched on. nected to the Smartphone. ū The Melitta-Connect-App is installed ū No other user is currently connected to and open on the Smartphone (see sec- the appliance. - Page 13 Basic operation Auto Bean Select, BARISTA TS model Manual Bean Select, BARISTA T Fig. 8: BARISTA TS 2-chamber bean Fig. 9: BARISTA T 2-chamber bean con- container tainer Auto Bean Select ensures that the best Using the "BEAN SELECT" slider (3), you coffee beans are automatically selected for can switch between the bean chambers various coffee specialities.
-
Page 14: Using Ground Coffee
Basic operation 4.6 Using ground coffee Information The quality of the water largely determines Ground coffee may also be used to pre- the flavour of the coffee. Therefore, use a pare coffee beverages. water filter (see section 9.8, page 60 and section 9.9, page 60). ATTENTION The use of unsuitable types of coffee can lead to clogging of the brewing unit. -
Page 15: Using Milk
Basic operation 4.9 Using milk Connecting the milk hose (depending on the model) Use cooled milk for optimum coffee enjoyment. Depending on the model, the enclosed milk container or the milk hose and con- ventional milk packs can be used. Connecting the milk container (depend- ing on the model) Only fill as much milk into the milk con-... -
Page 16: Preparing Beverages
There are three options for preparing beverages: Requirement: Milk is connected. ū Standard dispensing with direct keys and recipes (BARISTA TS model), 1. Place a vessel beneath the outlet. ū Preparation with modified beverage 2. Press the "Cappuccino" or "Latte Mac- settings (see chapter 6, page 50) -
Page 17: Preparing Hot Water
Preparing beverages 5.6 Changing beverage set- » The display shows: Easy Cleaning? (OK for start). tings before and during 3. Remove the vessel. preparation 4. Run the Easy Cleaning programme or prepare another beverage and then Beverage settings can be changed before carry it out, see section 9.4, page 57. -
Page 18: Stopping Beverage Preparation
Permanently changing beverage settings ū If a beverage is not prepared within 1 1. Place two vessels beneath the out- minute, the appliance switches to the let (7). 2. Press the "2 cups" button (26). default settings. 3. Continue as described for the relevant beverage preparation. -
Page 19: Changing Default Settings
The "My Coffee" function lets you to save it is changed again. personal beverage settings and assign ū In the Barista TS, recipes can also be them to a user. selected directly with the "My Cof- fee/Recipes" button (see section 5.5, 7.1 Editing personal user... -
Page 20: Selecting/Changing Personal Settings
Recipes, coffee amount, amount of froth, (OK for start). milk amount, hot water amount, temper- 5. You can execute the Easy Cleaning pro- ature, beans (BARISTA TS model only), gramme or prepare further beverages. coffee strength and coffee flavour. a) Execute the Easy Cleaning pro- The assignment of personal settings to a gramme. -
Page 21: Changing Basic Settings
Changing basic settings Information Information ū To exit the "My Coffee" function, press To prevent the time being shown on the the "My Coffee" button until the ready display, set the time to 00:00. symbol appears. ū If a beverage is not prepared within 3 8.3 Activating/deactivat- minutes, the appliance automatically switches to the ready symbol. -
Page 22: Setting Auto Off
Changing basic settings 3. Use the arrow buttons to select a Information period of time and confirm with To switch the appliance via the Melit- "menu/ok". ta-Connect-App from the Energy save 4. Exit the menu with the Exit command. mode, deactivate the Auto Off function. »... -
Page 23: Resetting The Appliance To The Factory Settings
Changing basic settings 8.9 Setting the grinding 2. Navigate to the Settings> Switch-off rinsing menu. fineness 3. Use the arrow buttons to select Enabled The grinding fineness of the coffee beans or Disabled and confirm with "menu/ influences the flavour of the coffee. The ok". -
Page 24: Care And Maintenance
Care and maintenance 9.1 General cleaning Clean the appliance regularly. Immediately remove external soiling caused by milk and coffee. ATTENTION The use of unsuitable cleaning agents can lead to scratched surfaces. Do not use any abrasive cloths, sponges ƒ or cleaning agents. Fig. -
Page 25: Cleaning The Brewing Unit
Care and maintenance 9.3 Cleaning the brewing unit 1. Open the cover (11). To do this, reach into the recess on the right of the appli- To avoid damage to the appliance, we ance and pull the cover off upwards. recommend cleaning the brewing unit 2. -
Page 26: Cleaning Milk System" Programme
ATTENTION The use of unsuitable milk system clean- ing agents can damage the appliance. Fig. 23: Removing the milk unit, 1 Only use Melitta® PERFECT CLEAN ƒ Espresso Machines milk system clean- ing agent. Requirement: The ready symbol appears on the display. -
Page 27: Cleaning Coffee System" Programme
Before starting the cleaning programme, by the appliance. clean the brewing unit and the interior (see section 9.3, page 57). With consistent use of a Melitta water filter, carry out the descaling program at The cleaning programme takes approx- least once a year. -
Page 28: Setting The Water Hardness
Care and maintenance » The menu appears on the display. ATTENTION 2. Navigate to the Settings > Water hard- A water filter may be damaged if it is ness menu. screwed in during the descaling pro- 3. Use the arrow buttons to select the gramme. -
Page 29: Transport, Storage And Disposal
Transport, storage and disposal 1. Press the "menu/ok" button for 2 sec- 3. Use the arrow buttons to select Start onds. and confirm with "menu/ok". » The menu appears on the display. 4. Follow the further instructions on the 2. Navigate to the Care > Filter > Insert display. -
Page 30: Disposing Of The Appliance
Depth 465 mm Capacity Bean container 2 × 135 g Water tank 1.8 l Weight (empty) 10.5 kg (Barista TS) 10.1 kg (Barista T) Ambient conditions Temperature 10 °C to 32 °C Relative humidity 30 % to 80 % (non-condensing) -
Page 31: Trouble Shooting
Trouble shooting 12 Trouble shooting If the actions listed below fail to rectify the problems or other problems not listed here occur, contact our hotline (local rate). The service number can be found on the lid of the water tank or in the Service area of our website.
Need help?
Do you have a question about the BARISTA TS and is the answer not in the manual?
Questions and answers