Table of Contents
Advertisement
Quick Links
■ Dimensions
■ Connection diagram
■ Safety warnings
■ Technical specifications
■ Display and keyboard
■ Installation
■ Programming menu
- Time and date modification
- Programs modification
- Temperatures T1, T2, T3 modification
- Timing setting
- Advanced functions menu
- Radiofrequency menu
■ Manual operation
■ Off operation
■ Minimum and maximum value
■ Summer time change
■ Regulation type
■ Timings: what they are
■ Instrument reset
■ Battery replacement
■ Reference standards
■ Default values
■ Winter preset programs
■ Summer preset programs
CHRONOS RF Radiofrequency digital chronothermostat User Manual
Index
- 1 -
Page
3
Page
3
Page
4
Page
5
Page
6
Page
7
Page
11
Page
11
Page
11
Page
13
Page
15
Page
16
Pagina 19
Page
20
Page
21
Page
22
Page
22
Page
24
Page
26
Page
28
Page
28
Page
29
Page
30
Page
31
Page
32
Advertisement
Table of Contents

Subscribe to Our Youtube Channel
Related Manuals for Vemer Chronos RF Bianco


Summary of Contents for Vemer Chronos RF Bianco
- Page 1 Index ■ Dimensions Page ■ Connection diagram Page ■ Safety warnings Page ■ Technical specifications Page ■ Display and keyboard Page ■ Installation Page ■ Programming menu Page - Time and date modification Page - Programs modification Page - Temperatures T1, T2, T3 modification Page - Timing setting Page...
- Page 2 Radiofrequency digital chronothermostat CHRONOS RF • Summer and winter operating mode • Models available in white and black colours • 7 programs available for the heating mode 7 programs available for cooling mode • Integrated radiofrequency module • Touch screen display of capacitive type (sensible to the fi...
-
Page 3: Connection Diagram
DIMENSIONS Chronos RF CONNECTION DIAGRAM Load activation occurs through the remote actuator controlled by the chronothermostat by means of a radiofrequency signal. Chronos RF Remote actuator Load 1 or more channels For more detailed information about the instruments configuration see chapter “Installation”... -
Page 4: Safety Warnings
6) The instrument can be used in environments with category of measurement III and pollution degree 2. Code Model Description VE484200 Chronos RF Bianco Radiofrequency touch screen chronothermostat white VE485900 Chronos RF Nero Radiofrequency touch screen chronothermostat black - 4 - CHRONOS RF Radiofrequency digital chronothermostat User Manual... -
Page 5: Technical Specifications
TECHNICAL SPECIFICATIONS • Power supply: – 2 alkaline batteries 1.5 V (AAA type) – battery life: 1 year – battery charge level indication – charge reserve (for battery replacement): 1 minute • Wall mounting or to coverage three-module in built box •... -
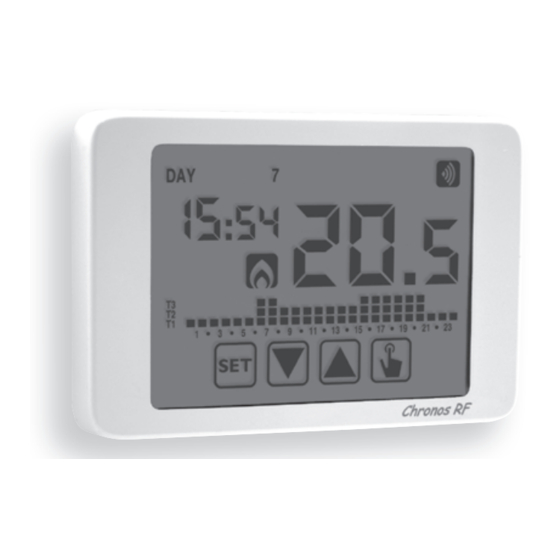
Page 6: Display And Keyboard
DISPLAY AND KEYBOARD ① Day of the week (DAY 1 = Monday) ② Programming menu: : date/time and summer time setting : programs change mode (for automatic operating) : temperatures setting T1, T2. T3 : timing menu : advanced programming menu : not used : radiofrequency transmission menu ③... -
Page 7: Installation
Keyboard ■ The keys carry out different functions on the basis of the instrument status and they will be described step by step in this user manual. Multipurpose keys are not built into the instrument, that is to say contemporary pressures of 2 or more keys. - Page 8 3. Upon receipt of the configuration string, the remote actuator is configured and resumes the normal operation while the Chronos RF requires date and time insertion ( the programming keys will be active only after you have hooked the thermostat at the base) Note: to associate a second remote actuator, activate the configuration of the actuator channel and, while this last is in configuration mode, remove the thermostat from the base and re-put it (the cronothermostat starts the...
- Page 9 • Clock setting Once the instrument is mains powered, set the clock (time and date insertion). The parameters to enter are the following: seconds (only synchronisation at value 00), minutes, hours, year, month, day. Use the keys to increase and decrease the values and the key confirm and to move to the next parameter.
- Page 10 HOUR TEMPERATURE At this point the chronothermostat will begin to operate with the set default parameters (see page 33) displaying the day of the week, the time, the environment temperature and the graphic of the program on. When Chronos RF sends an on PROGRAM or off command to the remote GRAPHIC...
-
Page 11: Programming Menu
PROGRAMMING MENU With this menu it’s possible to modify the following operating parameters: - Date and time - Automatic operation programs - Automatic operation temperatures - Timings - Advanced functions. - Radiofrequency menu Time and date modification To modify the hour and the date set: 1. - Page 12 to Friday and P2 on Saturday and on Sunday (the programs profile is described at the end of this manual on page 34-35). If this programming doesn’t satisfy the user needs it’ s possible to change it. To modify the programming: 1.
- Page 13 Use the keys to change the temperature level and the key to move to the next hour. Set like this the desired level temperature for each hour of the day. 3.2.1.1. For each hour it’ s possible to delay the start of th regulation of 15’, 30’...
- Page 14 3. The value of the flashing T1 temperature is displayed. Modify the value with the keys and press the key to move to the modification of T2. 4. The value of the flashing T2 temperature is displayed. Modify the value with the keys and press the key to move to the modification ofi T3.
-
Page 15: Timing Setting
Timing setting This menu allows the setting of a timing on the current operating mode, expressed in hours and days. For further information about timings, see the chapter “Timings: what they For further information about timings, see the chapter “Timings: what they are”... -
Page 16: Advanced Functions Menu
5. Once all parameters are set, to exit and to go back to the programming menu, press for a short time the key To exit and to go back to the normal operation (automatic, manual) press for a long time the key or wait for the time-out expiration (30 seconds about). -
Page 17: Operating Mode
Operating mode This parameter allows to specify the operating mode of the chronothermostat, between winter-heating ( ) and summer-cooling ( For further information about the operating mode see the chapter “Regulation types” on page 24. Regulation type (only for heating mode) For heating mode it’s possible to choose between on/off regulation (Reg 0) or proportional (rEg P) or proportional programming (reg tP) to use if the remote actuator is a valve for ThermoPro RF radiators). -
Page 18: Regulation Parameters
Regulation parameters In case of on/ off regulation the only parameter to set is the hysteresis (dIF), which can have values between 0.1°C e 1°C. In case of proportional regulation the parameters to set are the regulation band (bnd) e il periodo di regolazione (PEr). - Page 19 If the key lock is active and one key is pressed, the display shows for a few seconds the writing bLoc with flashing dashes: enter the password to unlock the keyboard, which will be locked for 30 seconds from the last pressure. System operation hours This page shows the total number of hours of the system operation (relais ON) for the current mode...
-
Page 20: Manual Operation
MANUAL OPERATION During manual operation the instrument performs as a normal thermostat, adjusting on the basis of the Tm temperature (manual setpoint), independently from the day and the time where it is. The manual operation is signalled with the switch on of the symbol on field (5). -
Page 21: Off Operation
OFF OPERATION In off mode the instrument doesn’t perform any regulation (*) but it continues to display the day, the time and the measured temperature. (*) When in heating / winter mode the instrument maintains a minimum temperature - Toff antifreeze temperature - to avoid the freezing of the systems where the instrument is installed. -
Page 22: Minimum And Maximum Value
MINIMUM AND MAXIMUM VALUE It’s possible to display the measured values of minimum and maximum temperature. To display these values press the key (maximum value Hi) or (minimum value L0). During the display it’s possible the resetting of these values pressing the key until 3 dashes appear in place of the temperature. - Page 23 long time the key until the display shows the writing Aut0 appears on field (3). 3. Choose with the key automatic time change activation (Aut0 0n) or its deactivation (Aut0 0FF) and confirm with the key 4. If 0FF we go back to the date/time change; if 0n the current setting for the passage to summer time is displayed (indicated with the symbol...
-
Page 24: Regulation Type
REGULATION TYPE The Chronos has got two types of regulation: • ON/OFF regulation During ON/OFF regulation the chronothermostat measures once a minute the environment temperature and it carries out the regulation on the basis of the following logic: heating mode cooling mode relay ON relay ON... - Page 25 to the setpoint value – band, the more the activation time will be predominant in comparison with the deactivation time; on the contrary, the more the measured temperature is next to the setpoint value + band, the more the deactivation time will be predominant in comparison with the activation time).
-
Page 26: Timed Manual
• Emergency regulation (for heating mode only) The instrument performs a regulation of emergency if an error occurs during the reading of the probe or in case of time loss. In case of probe error, if the antifreeze function is not deactivated, the instrument activates the load for 10 minutes every 4 hours. - Page 27 Timed off If in off status you set a timing, such off status will be maintained until the end of the timing; operation will then switched to the one active before the deactivation (automatic or manual). If you set a timing, the display shows the symbol Attention: the timing is calculated in minutes and for this reason if for example you set a timing of 3 days at 12:15 on Tuesday it will expire at 12:15 on Friday.
-
Page 28: Instrument Reset
INSTRUMENT RESET If you want to erase all performed settings and to recharge the default values, proceed as follows: 1. to switch off and to switch on the power of the chronothermostat (230 V versions) or to disconnect the time thermostat from the wall-mounted base and reconnect it (battery versions). -
Page 29: Reference Standards
REFERENCE STANDARDS Compliance with Community Directives: 2014/53/EU (RED). 2014/30/EU (EMCD) is declared with reference to the following harmonized standards: • ETSI EN 300 220-1 • ETSI EN 300 220-2 • ETSI EN 301 489-1 • ETSI EN 301 489-3 - 29 - CHRONOS RF Radiofrequency digital chronothermostat User Manual... -
Page 30: Default Values
DEFAULT VALUES Parameter step default winter manual 2.0°C 35.0°C 0.1°C 21°C setpoint summer manual 2.0°C 35.0°C 0.1°C 25°C setpoint T1 winter 2.0°C 0.1°C 15.0°C T2 winter 0.1°C 18.0°C T3 winter 35.0°C 0.1°C 21.0°C T2 summer 10.0°C 0.1°C 23.0°C T3 summer 35.0°C 0.1°C 25.0°C... -
Page 31: Winter Preset Programs
WINTER PRESET PROGRAMS ■ ■ ■ ■ ■ ■ ■ T2 ■ ■ ■ ■ ■ ■ ■ ■ ■ ■ ■ ■ ■ ■ ■ ■ ■ ■ ■ ■ ■ ■ ■ ■ T1 ■ ■ ■ ■ ■ ■ ■ ■ ■ ■ ■ ■ ■ ■ ■ ■ ■ ■ ■ ■ ■ ■ ■ ■ 0 1 2 3 4 5 6 7 8 9 10 11 12 13 14 15 16 17 18 19 20 21 22 23 ■... -
Page 32: Summer Preset Programs
SUMMER PRESET PROGRAMS T3 ■ ■ ■ ■ ■ ■ ■ ■ ■ ■ ■ ■ ■ ■ ■ ■ ■ T2 ■ ■ ■ ■ ■ ■ ■ ■ ■ ■ ■ ■ ■ ■ ■ ■ ■ ■ ■ ■ ■ ■ ■ ■ T1 ■... - Page 34 Vemer S.p.A. I - 32032 Feltre (BL) Via Camp Lonc, 16 Tel +39 0439 80638 Fax +39 0439 80619 07-2016 e-mail: info@vemer.it - web site: www.vemer.it...
Need help?
Do you have a question about the Chronos RF Bianco and is the answer not in the manual?
Questions and answers