Table of Contents
Advertisement
Advertisement
Table of Contents

Related Manuals for Vemer Iride


Summary of Contents for Vemer Iride
- Page 1 Chronothermostat IRIDE User Manual...
- Page 3 Page ■ Timings: what they are Page ■ Device reset Page ■ Battery replacement Page ■ Reference standards Page ■ Default values Page ■ Winter preset programs Page ■ Summer preset programs Page - 1 - Iride Chronothermostat User Manual...
- Page 4 • Touch screen display of capacitive type (sensible to the fingers’ touch) • Flush-mounting on 3 modules box (503 type) • Weekly programming with 3 different settable temperatures levels - 2 - Iride Chronothermostat User Manual...
-
Page 5: Content Of The Package
CONTENT OF THE PACKAGE mount A frames mount B plastic plastic elements VI elements BM mount AIR Chronothermostat frames and plastic elements available in white and anthracite grey colors CONNECTION DIAGRAM Iride 230 230V~ Iride X.code - 3 - Iride Chronothermostat User Manual... - Page 6 BATTERY IRIDE MOUNTING Bticino Living series, Light, Light Tech, Livinglight, Axolute Vimar Eikon series, Eikon Evo, Plana Ave S44 series – ABB Mylos series - 4 - Iride Chronothermostat User Manual...
- Page 7 IRIDE 230 MOUNTING Bticino Living series, Light, Light Tech, Livinglight, Axolute Vimar Eikon series, Eikon Evo, Plana Ave S44 series – ABB Mylos series - 5 - Iride Chronothermostat User Manual...
-
Page 8: Mounting
BATTERY IRIDE MOUNTING ABB Chiara series Vimar Arké series - 6 - Iride Chronothermostat User Manual... - Page 9 IRIDE 230 MOUNTING ABB Chiara series Vimar Arké series - 7 - Iride Chronothermostat User Manual...
- Page 10 BATTERY IRIDE MOUNTING Remove the cogs Gewiss Chorus series - 8 - Iride Chronothermostat User Manual...
- Page 11 IRIDE 230 MOUNTING Remove the cogs Gewiss Chorus series - 9 - Iride Chronothermostat User Manual...
- Page 12 BATTERY IRIDE MOUNTING Remove the cogs Bticino Matix series - 10 - Iride Chronothermostat User Manual...
- Page 13 IRIDE 230 MOUNTING Remove the cogs Bticino Matix series - 11 - Iride Chronothermostat User Manual...
- Page 14 BATTERY IRIDE MOUNTING Vimar Idea series - 12 - Iride Chronothermostat User Manual...
- Page 15 IRIDE 230 MOUNTING Vimar Idea series - 13 - Iride Chronothermostat User Manual...
- Page 16 BATTERY IRIDE MOUNTING Note: if the box extension is not present (adapter which increases the depth of the flush-mounting box) we recommend you using the frame for Livinglight AIR installation Bticino Livinglight AIR series - 14 - Iride Chronothermostat User Manual...
- Page 17 IRIDE 230 MOUNTING Note: if the box extension is not present (adapter which increases the depth of the flush-mounting box) we recommend you using the frame for Livinglight AIR installation Bticino Livinglight AIR series - 15 - Iride Chronothermostat User Manual...
- Page 18 BATTERY IRIDE MOUNTING AXO AIR Mount AXO AIR is not included in the package. Bticino Livinglight AIR series - 16 - Iride Chronothermostat User Manual...
- Page 19 IRIDE 230 MOUNTING AXO AIR Mount AXO AIR is not included in the package. Bticino Livinglight AIR series - 17 - Iride Chronothermostat User Manual...
-
Page 20: Safety Warnings
(503 type) suitable for the temperature control in household. Two versions are available: ■ Iride, battery powered, with backlit monocolour display (blue) and input for external contact with whom to switch on/to switch off the chronothermostat remotely (by telephone) ■... -
Page 21: Technical Specifications
– battery life: 1 year – battery charge level indication – charge reserve (for battery replacement): 1 minute • Power supply Iride 230: – 230Vac (-15% ÷ +10%) 50/60Hz – maximum consumption: 6 VA / 230Vac – charge reserve (for blackout): 2 days about •... -
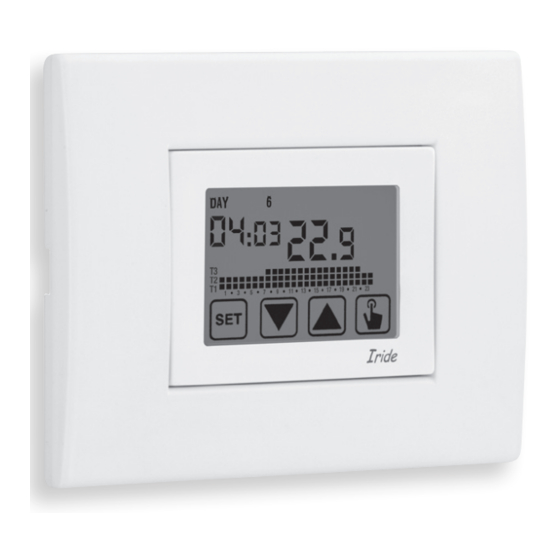
Page 22: Display And Keyboard
⑧ Program on graphic for the current date (in automatic operation) ⑨ Off operation ⑩ Depleted battery indication (only batteries model) ⑪ Keyboard (active only if the device is inserted in the flush-mounting box) - 20 - Iride Chronothermostat User Manual... -
Page 23: Installation
To clean the display use a soft, lint-free cloth, without using excess force. INSTALLATION • The chronothermostats of Iride series are designed for flush-mountig on 3 modules box (503 type). • The chronothermostats must be installed at a height at about 1.5 m above the floor, away from direct sunlight, away from doors, windows, heat sources, locations with excess or total lack of ventilation. -
Page 24: Clock Setting
Once the device is mains powered, synchronise the clock (time and date insertion). The parameters to enter are the following: seconds (only synchronisation at value 00), minutes, hours, year, month, day. Seconds synchronisation Minutes setting Time setting Year setting Month setting Day setting - 22 - Iride Chronothermostat User Manual... - Page 25 (6°C). In this condition, the pressure of any key reactivates the menu of date/time insertion for other 30 seconds about. - 23 - Iride Chronothermostat User Manual...
-
Page 26: Programming Menu
(30 seconds about). Inside this menu it’ s possible to modify the parameters for winter/summer time change. The procedure is described in a detailed way in the chapter “Summer time change” on page 34. - 24 - Iride Chronothermostat User Manual... -
Page 27: Programs Modification
On field (3) 00:00 appears while on field (7) flashes the temperature level (T1, T2 o T3) set for that specific time (00:00). - 25 - Iride Chronothermostat User Manual... -
Page 28: Temperatures T1,T2,T3 Modification
1. From the normal operation display, press for a long time the key until the starts flashing on field (2) symbol 2. Press briefly the key until the symbol flashes. Press the key to access the parameters modification. - 26 - Iride Chronothermostat User Manual... - Page 29 (30 seconds about). Attention: the values of set temperatures must respect the condition: T1≤T2≤T3. In cooling mode T1 is not settable and equals off system. - 27 - Iride Chronothermostat User Manual...
-
Page 30: Timing Setting
(hours and days). 4. The measurement unit starts flashing (h0ur or day). Press the keys to choose a timing in hours (h0ur) or days (day). - 28 - Iride Chronothermostat User Manual... -
Page 31: Advanced Functions Menu
3. At this point the first parameter of the menu starts flashing: press the keys to modify the parameter and the key to confirm and to move to the next parameter. To exit the parameters modification press the - 29 - Iride Chronothermostat User Manual... - Page 32 Regulation type (only for heating mode) For heating mode it’s possible to choose between on/off regulation (Reg 0) or proportional (rEg P ). For further information about regulation type see the chapter “Regulation type” on page 36. - 30 - Iride Chronothermostat User Manual...
- Page 33 To set a password, enter on field PAs a value between 001 and 999. To deactivate the password until “__. _” appears. press the key When the keyboard is locked, the chronothermostat performs all its functions using the set regulation parameters. - 31 - Iride Chronothermostat User Manual...
-
Page 34: Manual Operation
If you want to change the setpoint (Tm) press the key and repeat the points 2 and 3. To go back to the automatic operation press for a long time the key (for about 3 seconds). - 32 - Iride Chronothermostat User Manual... -
Page 35: Off Operation
The set default Toff is 6°C but it’s possible to modify this value entering the ADV menu (see “Antifreeze temperature” on page 29). is displayed (field (9)). To switch the device off press the key until the symbol - 33 - Iride Chronothermostat User Manual... - Page 36 3 seconds. Remotely switching off (battery powered model only) The battery powered Iride have got an input for the connection to a clean contact to whom to connect for example a telephone dialler to switch on or to switch off remotely the chronothermostat with their own telephone.
-
Page 37: Backlighting Management
BACKLIGHTING MANAGEMENT The chronothermostats of the Iride series have got a backlit display with led. There are some differences between battery powered models and mains powered models. Battery Iride The battery powered model has got a backlighting of blue colour, which is activated only if they are inside any menu of programming or if any key is pressed. -
Page 38: Minimum And Maximum Value
Sunday of October at 3 o’clock in accordance with Europe convention. However it’s possible to deactivate the automatic time change or to change the date or the hour of the time change. - 36 - Iride Chronothermostat User Manual... - Page 39 . The sequence requires the insertion of: i. day (1…7) of the week ii. the week of the month (first, second, third, fourth, last – LA) iii. the month (1…12) iv. the hour - 37 - Iride Chronothermostat User Manual...
-
Page 40: Regulation Type
(30 seconds about). REGULATION TYPE Iride has got two types of regulation: On/off regulation During on/off regulation the chronothermostat measures once a minute the environment temperature and it carries out the regulation on the basis of the following... - Page 41 To modify the regulation type, dIF value (on/off regulation), band and period (proportional regulation) see chapter “Regulation parameters” at page 29. - 39 - Iride Chronothermostat User Manual...
-
Page 42: Timings: What They Are
Timed manual If in manual status you set a timing, such off status will be maintained until the end of the timing; operation will then switched to automatic mode. - 40 - Iride Chronothermostat User Manual... - Page 43 - manual modification of the operating mode - switching of digital input (only for battery models) - change of the operating logic from winter to summer (or viceversa) To set a timing, see chapter “Timing setting” at page 26. - 41 - Iride Chronothermostat User Manual...
-
Page 44: Device Reset
Default values are indicated on page 42 of this manual. BATTERY REPLACEMENT The model Iride (batteries) signals the status of depleted batteries switching on the (field (10)) and making the display to flash. symbol In this status the regulation is always guaranteed, but it’s advisable to replace the... -
Page 45: Reference Standards
REFERENCE STANDARDS Compliance with Community Directives 2014/35/EU (LVD) 2014/30/EU (EMCD) is declared in reference to the harmonized standards: EN 60730-2-7, EN 60730-2-9 - 43 - Iride Chronothermostat User Manual... -
Page 46: Default Values
10’ password (deactivated) winter hour meter summer hour meter winter/summer time, enable Summer: LAST DAY7 march 02:00 winter/summer time change Winter: LAST DAY7 october 03:00 activation delay 0’ 45’ 15’ 0’ timed operations - 44 - Iride Chronothermostat User Manual... -
Page 47: Winter Preset Programs
T1 ■ ■ ■ ■ ■ ■ ■ ■ ■ ■ ■ ■ ■ ■ ■ ■ ■ ■ ■ ■ ■ ■ ■ ■ 0 1 2 3 4 5 6 7 8 9 10 11 12 13 14 15 16 17 18 19 20 21 22 23 - 45 - Iride Chronothermostat User Manual... -
Page 48: Summer Preset Programs
T1 ■ ■ ■ ■ ■ ■ ■ ■ ■ ■ ■ ■ ■ ■ ■ ■ ■ ■ ■ ■ ■ ■ ■ ■ 0 1 2 3 4 5 6 7 8 9 10 11 12 13 14 15 16 17 18 19 20 21 22 23 - 46 - Iride Chronothermostat User Manual... - Page 52 Vemer S.p.A. I - 32032 Feltre (BL) Via Camp Lonc, 16 Tel +39 0439 80638 Fax +39 0439 80619 e-mail: info@vemer.it - web site: www.vemer.it 06-2017...
Need help?
Do you have a question about the Iride and is the answer not in the manual?
Questions and answers