Advertisement
Advertisement
Table of Contents

Related Manuals for FLIR Imaging Moisture Meter Plus IGM MR176


Summary of Contents for FLIR Imaging Moisture Meter Plus IGM MR176
- Page 1 GETTING STARTED FLIR MR176 Imaging Moisture Meter Plus IGM ...
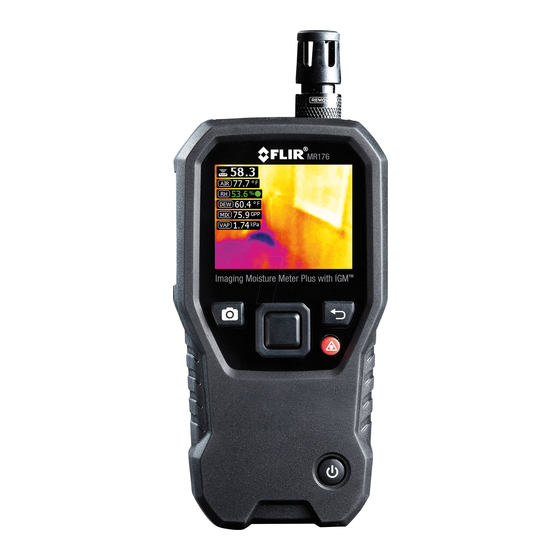
- Page 2 MR176 ‐ GETTING STARTED ‐ USER GUIDE LOCATION: Please read the detailed User Guide, located in the MR176 internal memory, for complete details on all MR176 features and functions. Connect the meter to a PC using the supplied USB cable and open the folder entitled ‘DOC’ to access the User Guide. The User Guide is also available on the website www.flir.com. Register for Extended Warranty and Product Updates at www.flir.com/testwarranty Quick Steps Charge the battery by connecting the supplied USB cable to a PC before first use. Press to power ON (press and hold to power OFF). The MR176 first powers up in the IGM Custom mode. Use the Main Menu to change modes (press Select for the Main Menu). View IR Thermal Image, Moisture, Air Temperature, Relative Humidity (RH %), Dew Point, and Mixing Ratio on the display. Press the Laser button to activate the laser and display crosshairs. Place the internal pinless moisture sensor against a test surface (apply light pressure) to take relative moisture measurements. Press the image capture button to freeze the view and store a screen‐shot. Press image capture again to confirm, or back to cancel. Use Image Review mode (from Main Menu) to view/delete stored images. Transfer images to PC using supplied USB cable. Refer to the informative User Guide for detailed instructions on External Probe use, Material Groups, Relative (Set Reference) mode, High Alarm, Psychrometrics, and more. For Fig. 1 at right, see the descriptions below: ...
- Page 3 2. Set Relative icon and reference value 3. Alarm icon and Alarm Threshold value 4. Moisture Mode icon (Pinless mode shown) 5. Moisture reading 6. Laser pointer icon 7. Cross‐hairs IGM Custom Mode Fig 5(b) 1. Thermal image 2. Mixing ratio Fig. 5 (a) IGM Moisture mode Fig. 5 (b) IGM Custom mode 3. Dew Point temperature 4. RH% (solid green dot & green reading when stabilized) 5. Air Temperature reading 6. Moisture mode icon (Pinless mode shown) Copyright © 2015 FLIR Systems, Inc. 7. Moisture reading All rights reserved including the right of reproduction in whole or in part in any form. 8. Alarm icon www.flir.com 9. Set Reference mode icon FLIR MR176 ‐ GETTING STARTED Document Identifier: MR176‐QS‐mul_AA ...
- Page 4 USA – NASHUA USA – PORTLAND Support Site Corporate Headquarters FLIR Commercial Systems, Inc. FLIR Systems, Inc. 9 Townsend West 2770 SW Parkway Avenue Nashua, NH 03063 USA Wilsonville, OR 97070 USA Telephone +1 855‐499‐3662 Telephone: +1 503‐498‐3547 Customer Support Technical Support Website http://support.flir.com Technical Support Email TMSupport@flir.com Service and Repair Email Repair@flir.com Customer Support Telephone +1 855‐499‐3662 option 3 (toll free) Firmware Updates To check for MR176 firmware updates please visit the technical support website (above) for complete installation instructions. Certificate of Conformity and ISO‐9001 Quality Management System FLIR Commercial Systems, Inc., an ISO 9001:2008 certified company, hereby certify that our instruments meet or exceed the specifications stated in the user manuals. This instrument was produced under the stringent guidelines of FLIR Commercial System’s certified ISO‐9001 Quality Management System from design to delivery. All instruments are calibrated and inspected to meet the stated specifications. FLIR Commercial Systems, Inc. inspects its incoming shipments using an approved sampling plan with an Acceptable Quality Level (AQL). All incoming inspections are performed using test equipment that is traceable to National Standards. Our ISO‐9001 Quality Management System extends to aftermarket support where tested quality procedures are applied to customer support, service, calibration and repair processes. This instrument will provide years of reliable service when used in accordance with the instructions provided in the User Guide. To have this device certified please contact your local service center. Quality Assurance Management ...
Need help?
Do you have a question about the Imaging Moisture Meter Plus IGM MR176 and is the answer not in the manual?
Questions and answers