Advertisement
Quick Links
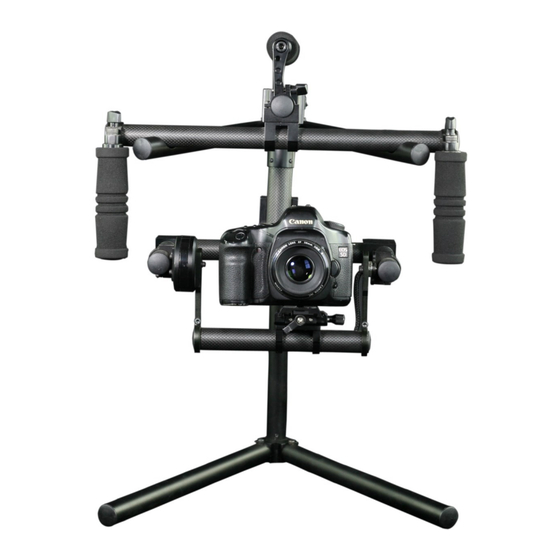
Buddy - 2 Axis Gimbal Camera Stabilizer
(FLCM-BDY)
I N S T R U C T I O N M A N U A L
All rights reserved.
No part of this document may be reproduced, stored in a retrieval system, or transmitted by any form or by any
means, electronic, mechanical, photocopying, recording, or otherwise, except as may be expressly permitted
by the applicable copyright statutes or in writing by the Publisher.
Advertisement

Related Manuals for Flycam buddy flcm-bdy


Summary of Contents for Flycam buddy flcm-bdy
- Page 1 Buddy - 2 Axis Gimbal Camera Stabilizer (FLCM-BDY) I N S T R U C T I O N M A N U A L All rights reserved. No part of this document may be reproduced, stored in a retrieval system, or transmitted by any form or by any means, electronic, mechanical, photocopying, recording, or otherwise, except as may be expressly permitted by the applicable copyright statutes or in writing by the Publisher.
- Page 2 I N T R O D U C T I O N FLYCAM showcased its new Buddy - 2 Axis Gimbal Camera Stabilizer, an ultimate gimbal for smaller cameras with a payload of 1.5kg. It’s expertly designed to transform your shaky handheld shots into silky smooth professional looking footage.
- Page 3 Flycam Buddy - 2 Axis Gimbal Camera Stabilizer (FLCM-BDY) A s s e m b l i n g S t e p s o f G i m b a l S t a n d Loosen the Allen bolts with provided Allen key from both jointers.
- Page 4 A s s e m b l i n g S t e p s o f F l y c a m B u d d y - 2 A x i s G i m b a l S t a n d Attach the top handle onto the top rod of Flycam Buddy and tighten the knob. Handle can be moved front and back for adjustment.
- Page 5 Flycam Buddy - 2 Axis Gimbal Camera Stabilizer (FLCM-BDY) Attach the side handles with top central support rod and tighten the knobs. Now put the Flycam Buddy on gimbal stand. Attach the quick release plate with your camera, tighten it properly. Then attach the camera with the quick release adapter and secure it well with knob provided on the side of quick release adapter as shown below.
- Page 6 You can check the battery voltage through provided Voltage meter. NOTE : Attach the buzzer with battery when you are using the Flycam Buddy. When the battery remains low the buzzer will start beeping which means that you need to recharge the battery now.
- Page 7 Flycam Buddy - 2 Axis Gimbal Camera Stabilizer (FLCM-BDY) Exclusive of Camera M o d e s e t t i n g o f F l y c a m B u d d y : Click on the marked button as shown in the image to set the mode of Flycam Buddy.
- Page 8 F l y c a m B u d d y S e t u p & C a l i b r a t i o n t h r o u g h P C You can calibrate the Flycam Buddy through your PC using the provided USB cable through software.
-
Page 9: Warranty
U s e t h e F l y c a m B u d d y w i t h f u l l f r e e d o m t o a c h i e v e b e s t f r a m e s . . WARNINGS Make sure that you are very careful when using the Flycam Buddy - 2 Axis Gimbal Camera Stabilizer at night or in low light conditions. Do not make the mistake of focusing too much on what you are shooting that you fall over something, or wander into something dangerous like a swimming pool etc. - Page 10 Flycam Buddy - 2 Axis Gimbal Camera Stabilizer (FLCM-BDY) We are not liable for incidental or consequential damages resulting from the use of the unit or occur- ring due to any breach of this warranty. Replacement parts of the product will be provided at nominal cost (covering the cost price of the re- placement parts only) to the customers after the Warranty Period has expired.
Need help?
Do you have a question about the buddy flcm-bdy and is the answer not in the manual?
Questions and answers