Table of Contents
Advertisement
Quick Links
Advertisement
Table of Contents

Related Manuals for SMART M1 Plus


Summary of Contents for SMART M1 Plus
- Page 1 DIGITAL SATELLITE RECEIVER User's Guide...
- Page 2 Note: This equipment has been tested and found to comply with the limit for a Class B digital device, pursuant to part 15 of the FCC Rules. These limits are designed to provide reasonable protection against harmful interference in a residential Installation.
-
Page 3: Table Of Contents
CONTENTS FOR YOUR SAFETY ------------------------------------------------------------------------ BEFORE GETTING STARTED ----------------------------------------------------------- CONTROLS AND FUNCTION ------------------------------------------------------------ Front Panel ------------------------------------------------------------------ Rear Panel -------------------------------------------------------------------- Remote Control Unit ------------------------------------------------------ 6- 8 CONNECTIONS ------------------------------------------------------------------------------- Connecting to the TV,VCR and Satellite Antenna --------------- Connecting to the TV, HiFi system and 0/12V switch ---------- Connecting DiSEqC switch---------------------------------------------- SETTINGS AND OPERATIONS ---------------------------------------------------------- Basic Setting -----------------------------------------------------------------... -
Page 4: For Your Safety
FOR YOUR SAFETY GERNERAL INFORMATION FOR YOUR SAFETY To avoid the risk of fire, shock or other hazards, ● The receiver shall not be exposed to dripping or splashing and that no objects filled with liquids,such as vases,shall be placed on the receiver. ●... -
Page 5: Before Getting Started
BEFORE GETTING STARTED MAIN FEATURES ? MULTI LANGUAGE EPG INCLUDING ARABIC ? ENGLISH / ARABIC WRITING FUNCTION ? SUBTITLE DISPLAY FUNCTION ? AUTO AUDIO LANGUAGE DETECTION ? CHANNEL VOLUME SAVING FUNCTION ? FULL PARENTAL CONTROL ON ALL MENUS INCLUDING RECEIVER LOCK ? OSD &... -
Page 6: Controls And Function
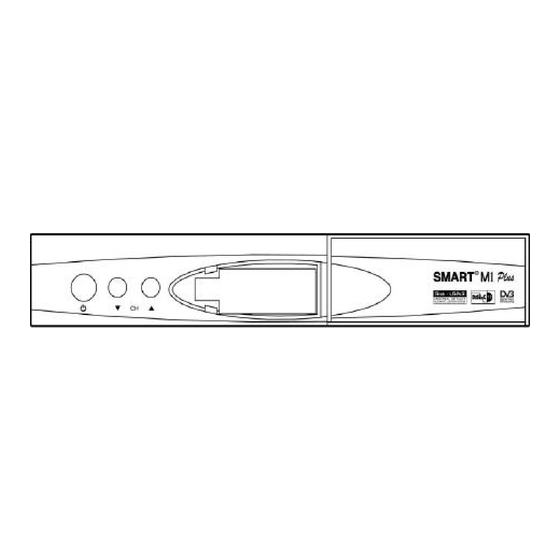
CONTROLS AND FUNCTION Front Panel The 4-digit displays channel information. In stand by mode, 7-segment displays local time & red LED indicator. The green LED is the antenna signal indicator. POWER Turn the power on/off. CH ▼ ▲ Change channel,move menu, or input frequency value. -
Page 7: Rear Panel
Rear Panel VIDEO It provides composite video output. Connect the Video on TV to VIDEO with RCA cable. Audio(R,L) It provides stereo audio output. Connect the audio on TV to AUDIO with RCA cable. 0/12V It provides LNB selection for the different satellite. It provides stereo audio,RGB video &... -
Page 8: Remote Control Unit
Remote Control Unit Open the controller cover on the back and insert two batteries(AAA-1.5V). STAND BY MUTE Turn the power on/off Deactivate current sound. Numeric(0~9) Move menu, change channel or input Change to TV mode from radio channel. RADIO It is for fast change to radio mode from TV channel. Shows the current Radio program list. - Page 9 Channel ▼ ▲ Change channel, move menu, or input frequency value. Select menu or value on menu item. MENU Shows the menu application. EXIT Exit from the menu. SAT LIST Shows the current captured satellite list SIZE Select between standard 4 : 3 and wide 16 : 9 screen sizes. RECALL It is to move to previous channel.
- Page 10 SKIP In the channel edit menu, you can skip specific channel. Skipped channel will not display in the channel list. SL/ RP Press one for the slow display for the live picture. Press one more for the repeat the live picture for certain time. INFO Shows the information of current channel.
-
Page 11: Connections
Connections Connecting to the TV,VCR and Satellite Antenna It is not necessary to adjust power, as the product is of free-voltage(100-240V) 1.Connect the RF cable from the TV OUTPUT on the satellite receiver to a TV and connect the RF modulate on the VCR and the TV ANT.IN. 2. -
Page 12: Connecting To The Tv, Hifi System And 0/12V Switch
Connecting to the TV, HiFi system and 0/12V switch 1.Connect the RCA cable from the VIDEO INPUT on the TV to the VIDEO on the satellite receiver. 2. To use 0/12V switch, connect one cable of the 0/12V switch to the 0/12V on the satellite switch and connect another cable to the DIGITAL on the satellite receiver. -
Page 13: Connecting Diseqc Switch
Connecting DiSEqC switch If you have one antenna equipped with many LNBs or two antennas with one LNB on each, you need a DiSEqC switch. 1. Connect the LNBs to a DiSEqC switch at first. 2. Connect the antenna cable to the OUT connector on the DiSEqC switch and connect the end of the cable to the DIGITAL on the satellite receiver. -
Page 14: Settings And Operations
Settings and Operations Basic Setting If it is first time using a receiver, you should set parameters for system configuration. Refer to the following section. 1. Turn on your TV and Satellite receiver. 2. Press the MENU button, main menu screen will appear as shown below. -
Page 15: Diseqc 1.2 Limit Setting
<DiSEqC 1.2 Limit Setting> If you have a DiSEqC 1.2 motorized system to control your satellite antenna you have to make the following setting. First, you must select ON on DiSEqC 1.2 of LNB Setting in the TP Configuration.<♣ Please refer to the TP Configuration section> 1. -
Page 16: Tp Configuration
<TP Configuration> You have to know valid value for your LNB at first. 1. Select TP Configuration of the installation. 2. Select correct name of Satellite. If there is no proper satellite name in the item, select one from any of USER1 ~ USER8. - Page 17 6. USALS If you want to set USALS (Universal Satellite Automatic Location System), you must enter your longitude value and you must set USALS menu to "ON" and enter position value at LNB menu in the TP configuration. The DiSEqC code value will be automatically sended to Motor.
-
Page 18: Viewing Tv(Or Radio)
10. After all the values are input, select Search Channels and wait until the automatic search is completed. If FTA only is selected as Yes,only free channels will be searched without scrambled pay channels. Otherwise all channel with scrambled pay channels will be searched. Scrambled pay channels is marked as $ at the beginning of the channel name. -
Page 19: Other Function
Viewing Favorite Channel 1. Press FAV key. 2. Select a CH ▼ ▲ . To move to next or previous page, press PAGE UP/DOWN(Double Arrow) buttons on Favorite TV(or Radio) List. 3. Press FAV key more will bring you to another Favorite TV (or Radio) List. Other Function Edit TV Channels/Edit Radio Channels From these menus you can create and... -
Page 20: Lock
Help function You can see the functions of each button in Edit TV List. Select the HELP button. Sort If you want to sort channels in order,select the SORT button in Edit channels. You can select the order you want. LOCK Lock Channels From here you can lock channels in... -
Page 21: Parental Control
Parental Control If you use this function you have to enter the password every time you start this satellite receiver. 1. Select Parental Control on the Main Menu. 2. To secure program setting and installation, select Change Password. 3. Input 4 digit New Password. And input password Confirm Password once more. - Page 22 Time & Date Adjustment To set the GMT(Greenwich Mean Time) for EPG(Electronic Program Guide) by using VOL ◀ ▶. If EPG in England is needed to set, adjust as 00:00. In case of Beijing, adjust as 08:00. Set Time and Date for the receiver LED display and Calendar.
- Page 23 TV Standard Except for few, most countries are using PAL system for TV signal, accordingly set TV Standard as PAL. To be more flexible for NTSC or PAL signal from different satellites, select MULTI for automatic signal conversion. Then press OK button for its confirmation.
- Page 24 Software Press OK button from Software menu in System Setting. You can select available option at there. If you want initialization, select OK button at CLEAR DATA. Receiver will ask you the password and select the item you want to initialize.
-
Page 25: Application
<Application> Check the various kind of functions for your convenience and fun. Favorite Program You can save 5 favorite channels and the receiver will show you automatically at that time even you are watching other channels in different satellite. You can set up date and time of the favorite programs and will be notice you by daily, weekly, monthly as your selection. -
Page 26: Troubleshooting
Troubleshooting Troubleshooting SYMPTOM SOLUTION No picture display and no LCD chennel Chenk the power connection display No picture display with normal LCD 1. Check the connection with TV channel display 2. Check the connection between TV outside input and receiver cable No sateillite channel with MAIN MENU 1.
Need help?
Do you have a question about the M1 Plus and is the answer not in the manual?
Questions and answers