Table of Contents
Advertisement
Quick Links
Advertisement
Table of Contents

Related Manuals for POLA Xfarm


Summary of Contents for POLA Xfarm
- Page 1 S.L. 1.10 Farm management User’s handbook EN 200616...
-
Page 3: Table Of Contents
Index Introduction.........................5 Home..........................6 Zoom on farm ambient......................6 Zoom on ventilation......................7 Set diagrams......................8 Cooling/Humidification....................9 Zoom on flap........................10 Zoom on heating........................11 Zoom on animal weighing....................12 Zoom on feeding........................12 Zoom on feed distribution....................13 Zoom on silo........................13 Alarm..........................14 Silence alarm......................15 Reactivate alarm......................15 Restart feed system.....................15 Alarm state........................16 Settings........................17 Climate.......................18... - Page 4 Index D.1.4 Cooling.....................55 D.1.6 Humidification...................57 D.1.7 Special inputs....................58 D.1.8 Alarm.......................59 D.1.8.1 Temperature................60 D.1.8.2 Humidity..................61 D.1.8.3 Pressure..................61 D.1.8.4 C02/NH3..................62 Feeding......................63 D.2.1 Feed weighing....................63 D.2.1.1 External counters................64 D.2.1.2 Volumetric..................64 D.2.1.3 Silo weighing..................65 D.2.1.3.1 Load cell data..............65 D.2.1.3.2 Silo calibration..............66 D.2.1.3.3 Automatic upload.............67 D.2.2 Distribution....................68 D.2.3...
-
Page 5: Introduction
Introduction Introduction The main feature of the range is the color display screen (4.3”) with WQVGA 480x272 dots resolution. The user interface is easy and friendly. The easy touch screen systems gives both the typical “easy to use” approach of a touch screen system and the strength and mechanical protection of a polycarbonate IP65 keyboard. -
Page 6: Home
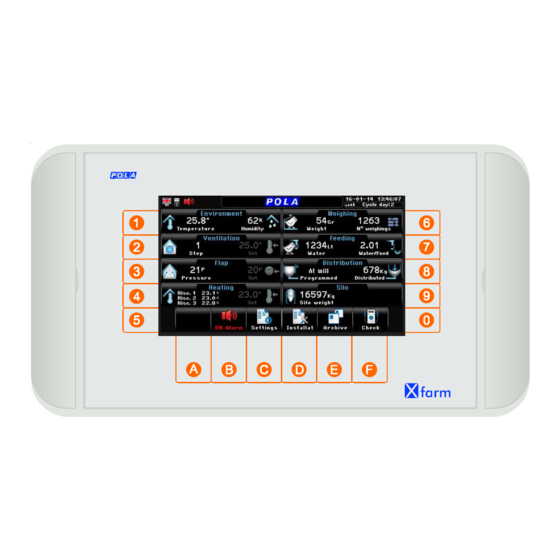
VIEWING Home It’s the main reference screenshot of Only if Feeding is active. It’s the main reference screenshot of which display the main system parameters. It pops up when you switch the unit on or when you press the key The various screenshots and some settings too are displayed according to the basic setting made by configuration (see Configuration par. -
Page 7: Zoom On Ventilation
VIEWING 2. Zoom on ventilation Path: Home> Ambient temperature Outdoor climate* Ambient humidity* Ambient C02* Variation set. It is displayed only if it’s not 0.0°. It means there is a set conditioning. In Air exchanges On: Hit key F to display. remaining time to end of On In Air exchanges Off: remaining time to end of Off... -
Page 8: D Set Diagrams
VIEWING Set diagrams Path: Home> > In these screenshots are shown the various working configurations as set on... -
Page 9: Cooling/Humidification
VIEWING 2.E Zoom on Cooling / Humidification path: Home> > Ambient temperature Outdoor climate* Ambient humidity* Ambient C02* Variation set. It is displayed only if it’s not 0.0°. It means there Humidification is a set conditioning. Hit key F to display. See paragraph Cooling Temp. -
Page 10: Zoom On Flap
VIEWING 3. Zoom on Flap path: Home> Variation set. It is displayed only if it’s Outdoor/indoor static not 0.0°. It means there pressure difference is a set conditioning. Hit key F to display. See paragraph Flap 1 (winter ventilation) Temperature Flap 1 ambient temperature (only when running in “natural”... -
Page 11: Zoom On Heating
VIEWING 4. Zoom on Heating path: Home> Variation set. Temperature Set Heating: It is displayed only if it’s To be programmed in not 0.0°. It means there Setting>Climate>Heating is a set conditioning. Hit key F to display. See paragraph Heating 1 Temperature Heating 1 ambient temperature. -
Page 12: Zoom On Animal Weighing
VIEWING 6. Zoom on animal weighing path: Home> Only if Bird-weighing is active. It shows the percentage of recorded weights which differs by more than 5% (+ and -) from the average weight. See paragraph 7. Zoom on feeding path: Home> Only if Feeding is active. -
Page 13: Zoom On Feed Distribution
Meal hours. Off= not operational On= operational Delay= Delay on start-up: only when Hopper level sensor is connected to Xfarm and the Hopper sens. delay option is activated (see D.2.2.1). See paragraph 9. Zoom on silos path: Home>... -
Page 14: Alarm
B. Alarm B. Alarm The icon displayed on top of key gives the situation of the alarm: this icon is also shown in the upper left corner in all screenshot (with exception of icon). No alarm is running now. Alarm is anyway enabled. Delay in alarm intervention: one or more alarms are activated. -
Page 15: Silence Alarm
B. Alarm B.C Silence alarm path: Home> Alarm> Silence Using this procedure you can silence the current alarm: to confirm. When the alarm is deactivated, homepage displays the icon. Warning: this procedure only operates on the current alarm, future alarms will not be affected. When a new alarm is activated the icon of the alarm key goes back to B.D Reactivate alarm path: Home>... -
Page 16: Alarm State
B. Alarm B.F Alarm state path: Home> Alarm> Alarm state Only if Humidity or Static pressure is active. Only if C02 or NH3 is active. Only if Feeding is active. -
Page 17: Settings
C. Settings C. Settings path: Home> Settings Only if Feeding is active. Only if Bird-weighing is active. All the end-user parameter settings which are related to the system functionning are in this section You can directly go to setting from every Zoom screenshot by the key... -
Page 18: Climate
C. Settings C.1 Climate path: Home> Settings> Climate C.1.F Heating Temperature set of the heating system. (Range: -30.0°...23.0°...50.0°) Ventilation Temperature set of the starting ventilation (step 1). Below this temperature the system ventilation using air exchange (Range: -30.0°...25.0°...50.0°) (if activated Air exchange Minimum ventilation rate during step 0, programmed as a % of the cycle duration. - Page 19 C. Settings C.1.F Temporary change setting path: Home> Settings> Climate> Temporary Duration of change Duration of the temporary change. When set to 23:59 the change(s) will remain active until the next starting cycle is carried out (C.9). (Range: 0 ...23 ‘Ventilation’...
-
Page 20: Feeding
C. Settings C.2 Feeding path: Home> Settings> Feeding Only if Feeding is active. C.2.1 Meal times path: Home> Settings> Feeding> Meal times continue untill meal 12 You can program up to 12 daily meals (digit 'Separator' key to separate hours from minutes). Note: by setting a 00:00 period the following meals (if any) will not be executed. -
Page 21: Light Times
C. Settings C.2.2 Light times path: Home> Settings> Feeding> Light timesci continue untill period 12 You can program up to 15 daily periods (digit 'Separator' key to separate hours from minutes). Note: by setting a 00:00 period the following periods (if any) will not be executed. -
Page 22: Free Timer Times
C. Settings C.2.4 Free timer times path: Home> Settings> Feeding> Free timer times continue untill period 12 You can program up to 15 daily periods (digit 'Separator' key to separate hours from minutes). Note: by setting a 00:00 period the following periods (if any) will not be executed. -
Page 23: C.2.D Feed
C. Settings C.2.D Feed path: Home> Settings> Feeding> Meal times> Feed Feed programmed Kg of feed to be distributed on daily basis. By setting 9999 the feed distribution is given at will. (Range: 9999K) C.2.E K count path: Home> Settings> Feeding>... -
Page 24: Bird Weighing
Home> Settings> Calendar Xfarm allows to calendarize the following settings: CLIMATE= Heating, Ventilation, Exchange air. The calendar program works in a way that allows to input data on several points (up to 10) which represent the days of life of animals. -
Page 25: Calendar Curves
C. Settings C.4.1 Curves setting path: Home> Settings> Calendar> Curve setting Only Bird- weighing is active. By pressing you go to next step (continue to point 9) To activate the CLIMATE section of calendar (see par. C.4.2). CALENDAR CURVE Day of life of animals at this point of the growth curve. Age of animals Cannot be changed (=0) at point zero of curve. -
Page 26: Curves Activaction
C. Settings Curve activation C.4.2 path: Home> Settings> Calendar> Curve activation Heating curve Heating curve status. No = Curve not active (Range: No...Yes) Yes = Curve active. Ventilation curve Ventilation curve status. No = Curve not active (Range: No...Yes) Yes = Curve active. Air-exchange curve status. - Page 27 C. Settings The change of the set of the Heating implies changes in other settings related to this set, according to the following scheme: HEAT HEAT HEAT When this parameter has a negative value, it’s deducted from the Heating set. Heating 1 (relative set) Heating 2 (relative set) Heating 3 (relative set)
-
Page 28: Starting Cycle
C. Settings C.9 Starting cycle path: Home> Settings> Starting cycle ATTENTION Pressing ‘Start’ will start a new cycle and delete all information from the previous cycle! Cycle must be started up in order to enable the feed distribution and animal weighing functions! Important: At the beginning of a new cycle, the program automatically performs the following operations:... -
Page 29: Installation
D. Installation D. Installation Path: Home> Installation Only if Bird- weighing is active Only if Feeding is active. D.1 Climate Path: Home> Installation> Climate... -
Page 30: Climate
Path: Home> Installation> Climate> Heating Foreword According to what was set in Configuration (see par. D.C) Xfarm can control up to 3 Heaters. The Temperature Settings of the Heating (relative set) refer to the set Heating programmed in Settings >... -
Page 31: Temperature Set
D. Installation - Heating D.1.1.1 Temperature set Path: Home> Installation> Climate> Heating> Temperature set These parameters refer to the functioning sets of Heating. Heating 1 Temperature set of Heating 1 referred to the Heating set programmed in Settings>Climate (par. C.1). (Range: -30.0°...0.0°...30.0°) Heating 2 Temperature set of Heating 2 referred to the Heating set... -
Page 32: Conditionings
D. Installation - Heating D.1.1.2 Conditionings Path: Home> Installation> Climate> Heating> Conditionings Normal heating functioning can be influenced by some block condition. The intervention of those blocks is visualized in Zoom on heating and in Climate blocks (par. F.1). D.1.1.2.1 Night heating change Path: Home>... -
Page 33: Flap
Climate> Flap Foreword According to what was set in Configuration (see par. D.C) Xfarm can control up to 2 Flaps according to following typical actioning: > Pressure drop (thru the DP59/W pressure drop control module). > Associative mode, without DP59/W pressure drop control module. -
Page 34: D.1.2.1 Pressure
D. Installation - Flap D.1.2.1 Pressure Path: Home> Installation>> Climate> Flap> Pressure When the flap is set to be controlled by pressure sensor, the flap position is set to give the required negative pressure of the system (measured by the DP59/W unit). -
Page 35: Associative
D. Installation - Flap D.1.2.2 Associative % Path: Home> Installation>> Climate> Flap> Associative % D.1.2.2.1 Flap 1 (winter) Path: Home> Installation>> Climate> Flap> Associative %> Flap 1 (winter) With set the Associative Flap working the Flap associative 1 is positioned to the various % of opening according to the step of ventilation inserted (with feedback potentiometer or with 0-10V output). -
Page 36: Natural
D. Installation - Flap D.1.2.3 Natural Path: Home> Installation>> Climate> Flap> Natural D.1.2.3 Natural> Temperature set Path: Home> Installation>> Climate> Flap> Natural> Temperature set When Natural Air Flaps is selected, flaps works according to the signal given by the indoor temperature probe. -
Page 37: Floating
D. Installation - Flap D.1.2.3.2.1 Natural> Floating> Flap 1 Path: Home> Installation>> Climate> Flap> Natural> Floating> Flap 1 No Flap 1 action neutral band. Neutral band (Range: 0.0°...0.2°...30.0°) Working time Flap 1. On time (Range: 0.0”...1.0”...900.0”) Maximum off time Max Off time Flap 1. (Range: 0.0”...10.0”...900.0”) Close band Extension in °... -
Page 38: Proportional
D. Installation - Flap D.1.2.3.3.1 Natural> Proportional> Flap 1 Path: Home> Installation>> Climate> Flap> Natural> Proportional> Flap 1 When flap working is set on Proportional 0-10V or with Feedback Potentiometer, flap works in natural ventilation mode and is actioned according to the temperature probe in a proportional way according to the position of the flap (when controlled by potentiometer a feedback potentiometer is required). -
Page 39: Potentiometer Recording
D. Installation - Flap Potentiometer recording > D.1.2.4.1 Flap 1 Path: Home> Installation> Climate> Flap> Potentiometer recording> Flap 1 ATTENTION: before running this calibration procedure ensure that the flap operates correctly in manual mode. This recording procedure refers to Flap 1 only; the recording of the Flap 2 settings can be programmed by getting to “settings”. -
Page 40: Conditionings
D. Installation - Flap D.1.2.6 Conditionings Path: Home> Installation> Climate> Flap> Conditionings Normal heating functioning can be influenced by some block condition. The intervention of those blocks is visualized in Zoom on Flap and in Climate blocks (par. F.1). D.1.2.6.1 Increase pressure Path: Home>... -
Page 41: Ventilation
Climate> Ventilation Foreword According to what was set in Configuration (see par. D.C) Xfarm can control up to 10 ventilation steps. Influence of Blocks on Ventilation operation. Normal Ventilation’s working can be influenced by some block condition (par. D.1.3.6). The intervention of those blocks is visualized in Zoom on ventilation and in Climate blocks (par. F.1). -
Page 42: Temperature Set
D. Installation - Ventilation D.1.3.1 Temperature Set Path: Home> Installation> Climate> Ventilation> Temperature set The Temperature Settings of the Ventilation steps (marked with Step 1 relative set) refer to the set Ventilation programmed in Settings>Climate (par. C.1): this Set can be set by Calendar (par. C.4). For example with a Ventilation Set = 25.0°... -
Page 43: Air Exchange
D. Installation - Ventilation D.1.3.2 Air exchange Path: Home> Installation> Climate> Ventilation> Air exchange Setting the working parameters of Air exchanges. When Step 0 is activated (it happens when indoor temperature is lower than the set Ventilation, programmed in Settings>Climate par. - Page 44 D. Installation - Ventilation Working structure of “Air-exchanges” in ON-OFF Normal Ventilation Mode Exchange band *1 Relay output in the time 100% Maximum % controlled by Time cycle Exchange maximum % Time cycle STEP 0 STEP 1 VENTIL. VENTIL. Time cycle Minimum % controlled by Air exchange % Minimum time on the relay=...
-
Page 45: 0-10V Ventilation
D. Installation - Ventilation D.1.3.3 0-10V Ventilation Path: Home> Installation> Climate> Ventilation> 0-10V Ventilation Step 0 exchanges % of fan speed referred to the Step 0 (in On working period): during the Off time, ventilation is switched off. (Range: 0 ...100 Step 1 ventilation Minimum % of fan speed at Step 1 of ventilation. - Page 46 D. Installation - Ventilation Type 2 By a small inverter or triac controller more fans can be controlled by regulation the speed of a single fan. Once the fan has reached 100% of speed: when reached the max fan speed of step you can set the next fan (step 2) at 100% speed and go back to regulate the speed of the step 1.
-
Page 47: Probes Average
D. Installation - Ventilation D.1.3.4 Probe average Path: Home> Installation> Installation> Climate> Probe average When the “Average probes” is activated, this average value of temperature is the working temperature referred to Ventilation, Humifìdification, Cooling and temperature alarms. Ventilation 1 Is the Ventilation 1 probe considered when calculating the average temperature value? Yes-No. -
Page 48: Increase For Humidity
D. Installation - Ventilation D.1.3.6.1 Increase for humidity Path: Home> Installation> Climate> Ventilation> Conditionings> Increase for humidity This function allows increase of ventilation rate (by reducing the Ventilation temperature Set) whenever %RH goes beyond desired value: so the ambient is de-humidified. Maximum humidity %RH value over which Dehumidification is activated, so indoor humidity is decresed by increasing the ventilation rate. -
Page 49: Decrease For Humidity
D. Installation - Ventilation D.1.3.6.2 Decrease for humidity Path: Home> Installation> Climate> Ventilation> Conditionings> Decrease for humidity This function allows decrease of ventilation rate (by increasing the Ventilation temperature Set) whenever %RH goes above desired value: it permits a saving on heating. Minimum humidity %RH value under which works on the increase of the Ventilation set, reducing the ventilation rate. -
Page 50: Decrease Air Exchange
D. Installation - Ventilation D.1.3.6.3 Decrease air exchange Path: Home> Installation> Climate> Ventilation> Conditionings> Decrease air-exchage This function allows decrease the % of air changes when outdoor temperature is very cold. Outdoor temp. set Outdoor temperature under which the decrease of Air exchange set is activated (see par. -
Page 51: Increase For C02/Nh3
D. Installation - Ventilation D.1.3.6.4 Increase for C02/NH3 Path: Home> Installation> Climate> Ventilation> Conditionings> Increase for CO2/NH3 This function can increase ventilation rate (by reducing the Ventilation temperature set or by increasing the % of Air changes) whenever CO2 or NH3 will be increasing some preset values. Maximun CO2 ppm CO2 set (over this value, ventilation rate is increased). - Page 52 D. Installation - Ventilation Decrease of Ventilation set for C02 intervent CO2 intervent. step * Decrease of Ventilation set controlled by VENTILAT. Maximum set decr. DECREASE indoor Maximun CO2 For every CO2 intervent. step in excess when the Block is activated (Maximun CO2), the temperature Set of the Ventilation is decrease of value as set in Ventilation set decr., until a maximum value set in Maximum set decr.
-
Page 53: Max. For Outdoor Temperature
D. Installation - Ventilation D.1.3.6.6 Max. for outdoor temperature Path: Home> Installation> Climate> Ventilation> Conditionings> Max. for outdoor temp. This function allows to set a safety block on maximum ventilation. Outdoor temp. set Sets the outdoor temperature which activates the ‘Outdoor temperature block’. -
Page 54: Winter / Summer
D. Installation - Ventilation D.1.3.6.8 Winter / Summer Path: Home> Installation> Climate> Ventilation> Conditionings> Winter / Summer In case of winter/summer Ventilation, by this setting you can differentiate some parameters in the 2 ventilation systems. Transit differential °Temperature differential from summer to winter ventilation: by this differential (different from normal Ventilation different. -
Page 55: Cooling
D. Installation - Cooling D.1.4 Cooling Path: Home> Installation> Climate> Cooling The temperature control activates the Cooling system in case of high indoor temperature. The %Rh control switches the cooling off in case of high indoor %Rh. Cooling set mode How to set the cooling system settings: Absolute = absolute value setting (Range: Absolute...Relative) - Page 56 D. Installation - Cooling Cooling working On-Off (with On time= 0 .00) Temperat. differ. * Controlled by ON MAX HUMIDITY COOL 1 BLOCK if Humidity control is This set can be either an absolute or a COOL present. relative setting according to what has been selected in the previous option Cooling setting mode.
-
Page 57: Humidification
D. Installation - Humidification D.1.6 Humidification Path: Home> Installation> Climate> Humidification The %Rh control activates the Humidification in case of low indoor %Rh, the temperature control switches the humidification off in case it goes below the minimum indoor temperature. Humidity start set Set of the humidity control (absolute setting). -
Page 58: Special Inputs
D. Installation - Humidification D.1.7 Special inputs Path: Home> Installation> Climate> Special inputs CO2 value at 4mA CO2 probe value at 4mA. (Range: 0 ...30000 CO2 value at 20mA CO2 probe value at 20mA. (Range: 0 ..10000 ...30000 NH3 value at 4mA NH3 probe value at 4mA. -
Page 59: Alarm
Path: Home> Installation> Climate> Alarm Foreword According to what was set in Configuration (see par. D.C) Xfarm can control these types of alarms: - Minimum/Maximum Temperature Alarm - Minimum/Maximum Humidity Alarm - Minimum/Maximum Pressure Alarm - Maximum C02 Alarm - Maximum NH3 Alarm... -
Page 60: Temperature
D. Installation - Climate alarm D.1.8.1 Alarm> Temperature Path: Home> Installation> Climate> Alarm> Temperature This alarm can keep under control the minimum and maximum ambient temperature level. Set can be either absolute or relative ones (following the Ventilation set as programmed SETTING>Climate, see par. -
Page 61: Humidity
D. Installation - Climate alarm D.1.8.2 Alarm> Humidity Path: Home> Installation> Climate> Alarm> Humidity This alarm can keep under control the minimum and maximum ambient humidity level. Minimum (absol. set) Humidity setting of the Minimum alarm (absolute setting). Below this setting the alarm is on. (Range: 0 ...100 Maximum (absol. -
Page 62: C02/Nh3
D. Installation - Climate alarm D.1.8.4 Alarm> C02/NH3 Path: Home> Installation> Climate> Alarm> C02/NH3 This alarm can keep under control the maximum ambient CO2 and NH3 level. Maximum C02 C02 setting of the maximum alarm (absolute setting). (Range: 0 ...3000 ...10000 Above this setting the alarm is on. -
Page 63: Feeding
Installation> Feeding> Feed weighing According to what was set in Configuration (see par. D.C) Xfarm can control the feed weight in the following ways: 1> External contact: without load cells. The feed weighing unit is an external one. The interface signal is an electric contact. -
Page 64: External Counters
D. Installation - Feeding D.2.1.1 External counters Path: Home> Installation> Feeding> Feed weighing> External counters Liters of water supplied for each pulse of the Water meter. Lt per pulse (Range: 0.00Lt...1.00Lt...100.00Lt) Kg per pulse Kg of feed supplied for each pulse of the Feed counter. (Range: 0.00k...1.00k...100.00k) D.2.1.2 Volumetric Path: Home>... -
Page 65: Silo Weighing
D. Installation - Feeding D.2.1.3 Silo weighing Path: Home> Installation> Feeding> Feed weighing> Silo weighing D.2.1.3.1 Load cell data Path: Home> Installation> Feeding> Feed weighing> Silo weighing> Load cell data Number of load cells Number of cells mounted on the silo. (Range: 0...4...8) Kg full scale of the loading cell (see technical features of the load cell). -
Page 66: Silo Calibration
D. Installation - Feeding D.2.1.3.2 Silo calibration Path: Home> Installation> Feeding> Feed weighing> Silo weighing> Silo calibration By this procedure you can calibrate the weighing system. Silo calibration Make sure the weigher is empty and the readout= 0 (if not then perform the 'Tare' procedure). -
Page 67: Automatic Upload
D. Installation - Feeding D.2.1.3.3 Automatic upload Path: Home> Installation> Feeding> Feed weighing> Silo weighing> Automatic upload Autom. upload weight Kg of feed to be loaded in the silos beyond which the Automatic silo uploading procedure is activated (Range: 0k...90k...100k) Time check upload Duration time allowed for the weight in the silos to increase. -
Page 68: Distribution
Installation> Feeding> Distribution Hopper sens. delay Active only if the ‘Hopper max. level sensor’ connected to Xfarm (see Feeding config. par. D.C): defines the delay in activating the (Range: 0 ...0 ...10 hopper auger after the feed sensor start signal. -
Page 69: Alarm
These alarms are automatically reset on next day. This alarm is operation only if the ‘Hopper max. level sensor’ connected to Xfarm (see Feeding config. par. D.C). During Water flow time the value of distributed water should not be lower than Minimum water flow and during Maximum water flow check time the value of distributed water should not be exceed than Maximum water flow otherwise the Water Alarm will be activated (0= alarm disabled). -
Page 70: Bird Weighing
D. Installation - Bird weighing D.3 Bird weighing Path: Home> Installation> Bird weighing Only if Bird weighing is active. According to what was set in Configuration (see par. D.C) Xfarm can control weigher plate: D.3.1 Load cell data Path: Home> Installation> Animal weighing>... -
Page 71: Plate Calibration
D. Installation - Bird weighing D.3.2 Plate calibration Path: Home> Installation> Animal weighing> Plate calibration By this procedure you can calibrate the weighing system. Plate calibration Make sure the weigher is clear and the readout = 0 (if not then perform the 'Tare' procedure). -
Page 72: Clock
D. Installation D.4 Clock Path: Home> Installation> Clock Minutes setting. Minutes Hour setting. Hours Day of the week Day of the current week setting. Day of the month Day of the current month setting. Month Month setting. Year Year setting. D.6 Language Path: Home>... -
Page 73: Password
D. Installation D.7 Password Path: Home> Installation> Password Setting password of access to the program. Settings password User password to access to the ‘Settings’ and ‘Installation’ settings (4 digits). (Range: 0000...9999) NOTE: Trying to access a password-protected area displays the following message: (example of Settings password) enter the password required and press to confirm. -
Page 74: Display
D. Installation D.8 Display Path: Home> Installation> Display Title bar Title bar (Range: Invisible...Short...Long) Display brightness Display brightness (Range: 0 ...100 Minimum brightness Display brightness after Waiting time (time is calculated from the last time one key was hit). (Range: 0 ...20 ...50 Waiting time... -
Page 75: Manual
Testing procedure is not recommended for the manual functionning of the system but only for testing purposes. D.9.1 Relay outputs Path: Home> Installation> Manual> Relay outputs ---Xfarm alarm Alarm relays on board of Xfarm are set into hand mode When quitting the procedure, the relay automatically goes back to OFF. -
Page 76: Configuration
Path: Home> Installation> Bootstrap Procedure of Bootstrap. The 'bootstrap' procedure resets all the setting in the Xfarm back to those as originally set at the factory. Bootstrap password Bootstrap password setting (4 digit). ATTENTION: the 'bootstrap' procedure will delete all the settings, made by the user, since the Xfarm was installed. -
Page 77: D.fusb Management
(if any) and the RECORDINGS of the load cells calibrations (if any). Attention: when importing a new Configuration set the Xfarm working configuration might change. Data transfer Communication with external world is by USB pen drive. The main programming parameters, the archive downloads and software updates can be made by PC connection via the USB pen drive. -
Page 78: Archive
E. Archive E. Archive Path: Home> Archive Only Silo weighing is active. Only if Feeding active. Only if Bird weighing is active. In the archives are recorded all the parameters related to the running cycle. ATTENTION: the start of a new cycle resets all the files of the previous cycle. E.1 Alarms/Events Path: Home>... - Page 79 E. Archive Absolute minimum temperature Absolute maximum temperature Relative minimum temperature Relative maximum temperature Minimum humidity Climate Maximum humidity alarms Minimum air pressure Maximum air pressure Maximum C02 Maximum NH3 External Ventilation 1 temper. probe Ventilation 2 temper. probe Heat 1 temper. probe Heat 2 temper.
-
Page 80: Climate
E. Archive E.2 Climate Path: Home> Archive> Climate In this archive are recorded the daily values of indoor and outdoor climate conditions. The Mediumvalues refer to the average weighted values recorded every 30 min. Previous day Next day Last 48 hours Previous registration Next registration Graphics... -
Page 81: Feeding
E. Archive E.3 Feeding Path: Home> Archive> Feeding Only if Feed ing is active. In this archive are recorded the daily feeding parameters. Previous day Next day Graphics... -
Page 82: Bird Weighing
E. Archive E.4 Bird weighing Path: Home> Archive> Animal weighing Only if Bird weighing is active. In this archive are recorded the daily bird weighing. Previous day Next day E.6 Silo upload Path: Home> Archive> Silo upload Only if Weighing silo is active. In this archive are recorded all the silo uploads. -
Page 83: Cycle Total
E. Archive E.7 Cycle total Path: Home> Archive> Cycle total In this archive the cycle total values are recorded. E.7.1 Climate Path: Home> Archive> Cycle total> Climate Working time periods for running cycle. They are erased by starting a new cycle. Total system times. -
Page 84: Check Control
F. Check Control F. Check Control Path: Home> Check Control Only 0-10V outputs are active. Only if Bird Only if Feeding weighing or Silo is active. weighing are active. Through CHECK CONTROL you can display all the working states of Xfarm... -
Page 85: Climate Blocks
F. Check Control F.1 Climate blocks Path: Home> Check control> Climate blocks This screen gives the situation of the Climate blocks state and also shows the current conditionings (if any). Max number of blocks displayed is 10. Each block intervention is displayed in the Zoom 1...4 pages (Block state). Ventilation blocks Minimum ventilation See par. -
Page 86: Probes Average
F. Check Control F.2 Probes average Path: Home>> Check Control> Probes average These are the probes on which the average temperature is calculated. The procedure for allocation of Probe average is explained to par. D.1.3.4 F.3 Flap analysis Path: Home>> Check Control>... -
Page 87: Feeding
F. Check Control F.4 Feeding Path: Home> Check Control> Feeding No if Feed time is ON but the meal is over (with rationed feed). -
Page 88: Inputs
F. Check Control F.6 Inputs Path: Home>> Check Control> Inputs This screen sums up the configuration of the Inputs state of the HXNE extensions. This is very useful at system start-up to check if extensions were properly connected. INPUTS HXNE N.1 INPUTS (CLIMATE) 1= Temperature probe Ventilation 1 2= Temperature probe Heating 1 3= Temperature probe Heating 2... -
Page 89: Relay Ouputs
F. Check Control F.7 Relay outputs Path: Home>> Check Control> Relay ouputs This screen sums up the configuration of the Outputs relays state of the HDY6 extensions. This is very useful at system start-up to check if extensions (HXNE-HDY6) were properly connected. OUTPUTS HDY6 N.1 OUTPUTS (CLIMATE) 1= Ventilation 1... -
Page 90: 0-10V Outputs
Path: Home>> Check Control> Load cells This screen sums up the configuration of the load cells. This is very useful at system start-up to check if extensions (TLC2-TLCO) and Xfarm were properly connected. Dip-switch position on amplifier Dip-switch position on amplifier... -
Page 91: Info
F . Check Control F.F Info Path: Home> Check Control> Info This screens identifyes the plant’s characteristics to control and the settings of the Configuration. - Page 92 User’s handbook EN 200616...
Need help?
Do you have a question about the Xfarm and is the answer not in the manual?
Questions and answers