Cisco ASA 5505 Getting Started Manual
Hide thumbs
Also See for ASA 5505:
- Configuration manual (1822 pages) ,
- Getting started manual (168 pages) ,
- Administrator's manual (118 pages)
Table of Contents
Advertisement
Quick Links
Advertisement
Table of Contents

Related Manuals for Cisco ASA 5505


Summary of Contents for Cisco ASA 5505
- Page 1 Cisco ASA 5505 Getting Started Guide Corporate Headquarters Cisco Systems, Inc. 170 West Tasman Drive San Jose, CA 95134-1706 http://www.cisco.com Tel: 408 526-4000 800 553-NETS (6387) Fax: 408 526-4100 Customer Order Number: DOC-7817612= Text Part Number: 78-17612-01...
- Page 2 COPY. The Cisco implementation of TCP header compression is an adaptation of a program developed by the University of California, Berkeley (UCB) as part of UCB’s public domain version of the UNIX operating system. All rights reserved. Copyright © 1981, Regents of the University of California.
-
Page 3: Table Of Contents
Installing the Chassis Connecting to Network Interfaces Powering on the ASA 5505 Setting Up a PC for System Administration Optional Procedures Connecting to the Console Installing a Cable Lock Ports and LEDs Front Panel Components Cisco ASA 5505 Getting Started Guide 78-17612-01... - Page 4 What to Do Next Scenario: Easy VPN Hardware Client Configuration C H A P T E R Using an ASA 5505 as an Easy VPN Hardware Client Client Mode and Network Extension Mode Configuring the Easy VPN Hardware Client Configuring Advanced Easy VPN Attributes...
- Page 5 Example IPsec Remote-Access VPN Network Topology Implementing the IPsec Remote-Access VPN Scenario Information to Have Available Starting ASDM Configuring the ASA 5505 for an IPsec Remote-Access VPN Selecting VPN Client Types Specifying the VPN Tunnel Group Name and Authentication Method Specifying a User Authentication Method...
- Page 6 Viewing VPN Attributes and Completing the Wizard 8-11 Configuring the Other Side of the VPN Connection 8-13 What to Do Next 8-13 Obtaining a DES License or a 3DES-AES License A P P E N D I X Cisco ASA 5505 Getting Started Guide 78-17612-01...
-
Page 7: Chapter 1 Before You Begin
Use the following table to find the installation and configuration steps that are required for your implementation of the adaptive security appliance. To Do This ... See ... Learn about deploying the ASA 5505 Chapter 2, “Planning for a VLAN using VLANs Configuration”... - Page 8 To Do This ... (continued) See ... Refine configuration Cisco Security Appliance Command Line Configuration Guide Configure optional and advanced features Cisco Security Appliance Command Reference Cisco Security Appliance Logging Configuration and System Log Messages Cisco ASA 5505 Getting Started Guide 78-17612-01...
-
Page 9: Chapter 2 Planning For A Vlan Configuration
ASA 5505 in a VLAN configuration and presents several typical VLAN scenarios. If you do not want to use VLANs in your ASA 5505 configuration, continue with Chapter 3, “Installing the ASA 5505.” This chapter includes the following sections: Understanding VLANS, page 2-1 •... -
Page 10: Deployment Scenarios With Vlans
In transparent mode, forwarding is done based on the Layer 2 bridge table.) Deployment Scenarios with VLANs This section describes several deployment scenarios using the ASA 5505 in which the network is divided into VLANs. This section includes the following topics: Scenario 1: Inside VLAN with External Connectivity, page 2-3 •... -
Page 11: Scenario 1: Inside Vlan With External Connectivity
PIX 501 security appliances in which devices behind the firewall can communicate internally and externally, you can keep the same deployment and replace the PIX 501 devices with ASA 5505 devices. Cisco ASA 5505 Getting Started Guide... -
Page 12: Scenario 2: Multiple Vlans
Figure 2-2, an ASA 5505 is installed in a home office environment and is configured for three VLANs: a Business VLAN that consists of all devices used for a home-based business, a Personal VLAN that consists of devices that can be used by all members of the family, and an Internet VLAN that provides Internet connectivity for both the Personal and Work VLANs. -
Page 13: Scenario 3: Network With An Inside Vlan And Dual Isp Connectivity
Chapter 2 Planning for a VLAN Configuration Deployment Scenarios with VLANs In this example, the physical ports of the ASA 5505 are used as follows: The Business VLAN consists of four physical switch ports: three Ethernet • switch ports for desktop computers, printers and other devices, and one Power over Ethernet (PoE) switch port for an IP phone. -
Page 14: Scenario 4: Private Vlan Services
Planning for a VLAN Configuration Deployment Scenarios with VLANs In this example, the physical ports on the ASA 5505 are used as follows: the Inside VLAN includes three Ethernet switch ports and a PoE switch port for an IP phone and other PoE devices. The number of ports can be increased by adding an additional switch or hub to the Inside VLAN. -
Page 15: Maximum Number And Types Of Vlans
License Type Mode Connections Base License Transparent Mode Up to two active VLANs. Routed Mode Up to three active VLANs. One of these VLANs can only be configured to initiate traffic to the Internet. Cisco ASA 5505 Getting Started Guide 78-17612-01... -
Page 16: What To Do Next
Transparent Mode Up to three active VLANs, one of which must be for failover. The ASA 5505 adaptive security appliance supports active and standby failover, Note but not stateful failover. For more information about VLANs, see the Cisco Security Appliance Command Line Configuration Guide. - Page 17 C H A P T E R Installing the ASA 5505 This chapter describes how to install the ASA 5505 security appliance. This chapter includes the following sections: Verifying the Package Contents, page 3-2 • PoE Ports and Devices, page 3-3 •...
-
Page 18: Verifying The Package Contents
Installing the ASA 5505 Verifying the Package Contents Verifying the Package Contents Verify the contents of the packing box to ensure that you have received all items necessary to install your Cisco ASA 5505 adaptive security appliance, as shown Figure 3-1. Figure 3-1... -
Page 19: Poe Ports And Devices
PoE Ports and Devices PoE Ports and Devices On the ASA 5505, switch ports Ethernet 0/6 and Ethernet 0/7 support PoE devices that are compliant with the IEEE 802.3af standard, such as IP phones or wireless access points. If you install a non-PoE device or do not connect to these switch ports, the adaptive security appliance does not supply power to the ports and the device must be powered on its own. -
Page 20: Installing The Chassis
Installing the ASA 5505 Installing the Chassis Installing the Chassis To install the ASA 5505, perform the following steps: Place the chassis on a flat, stable surface. The chassis is not rack mountable. Step 1 Connect Port 0 to the public network (that is, the Internet): Step 2 Use the yellow Ethernet cable to connect the device to a switch or hub. -
Page 21: Powering On The Asa 5505
Step 3 computer, or printer. Powering on the ASA 5505 To power on the ASA 5505, perform the following steps: Connect the power supply with the power cable. Step 1 Connect the small, rectangular connector of the power supply cable to the power Step 2 connector on the rear panel. -
Page 22: Setting Up A Pc For System Administration
For more information about using ASDM for setup and configuration, see Chapter 4, “Configuring the Adaptive Security Appliance.” To set up a PC from which you can configure and manage the ASA 5505, perform the following steps: Make sure that the speed of the PC interface to be connected to one of the ASA Step 1 5505 inside ports is set to autonegotiate. -
Page 23: Optional Procedures
• Connecting to the Console You can access the command line for administration using the console port on the ASA 5505. To do so, you must run a serial terminal emulator on a PC or workstation as shown in Figure 3-3. -
Page 24: Installing A Cable Lock
1 stop bit. Installing a Cable Lock The ASA 5505 includes a slot that accepts standard desktop cable locks to provide physical security for small portable equipment, such as a laptop computer. The cable lock is not included. -
Page 25: Ports And Leds
Follow the directions from the manufacturer for attaching the other end of the Step 1 cable for securing the adaptive security appliance. Attach the cable lock to the lock slot on the back panel of the ASA 5505. Step 2 Ports and LEDs This section describes the front and rear panels of the ASA 5505. - Page 26 Chapter 3 Installing the ASA 5505 Ports and LEDs Figure 3-4 illustrates the front panel of the ASA 5505. Figure 3-4 ASA 5505 Front Panel LINK/ACT Power Status Active 100 MBPS Cisco ASA 5505 Series Adaptive Security Appliance LED / Component Color...
- Page 27 If the LINK/ACT LED does not light up, the link could be down if there is a duplex mismatch. You can fix the problem by changing the settings either on the ASA 5505 or on the other end. If auto-negotiation is disabled (it is enabled by default), you might be using the wrong type of cable.
-
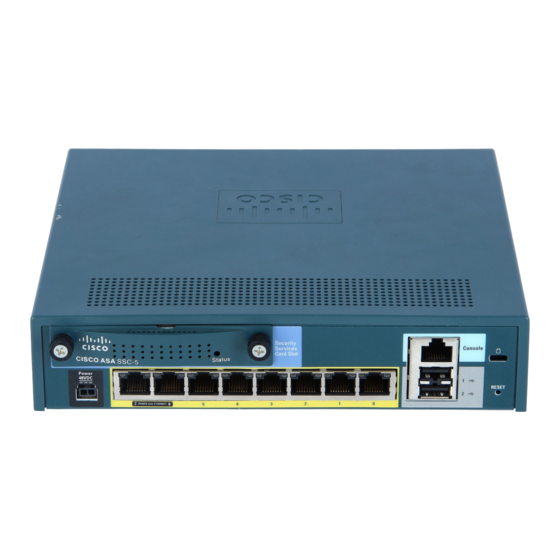
Page 28: Rear Panel Components
Chapter 3 Installing the ASA 5505 Ports and LEDs Rear Panel Components Figure 3-5 illustrates the back panel of the ASA 5505. Figure 3-5 ASA 5505 Rear Panel Security console Services Card Slot Cisco ASA SSC-05 Status power reset POWER over ETHERNET... -
Page 29: What To Do Next
Reserved for future use. RESET button Reserved for future use Cable lock slot Slot supports standard desktop cable locks. What to Do Next Continue with Chapter 4, “Configuring the Adaptive Security Appliance.” Cisco ASA 5505 Getting Started Guide 3-13 78-17612-01... - Page 30 Chapter 3 Installing the ASA 5505 What to Do Next Cisco ASA 5505 Getting Started Guide 3-14 78-17612-01...
-
Page 31: Configuring The Adaptive Security Appliance
Appliance This chapter describes the initial configuration of the adaptive security appliance. You can perform the configuration steps using either the browser-based Cisco Adaptive Security Device Manager (ASDM) or the command-line interface (CLI). However, the procedures in this chapter refer to the method using ASDM. -
Page 32: About The Adaptive Security Device Manager
All configuration changes can be made by using ASDM or by using the CLI. For more information about CLI configuration, see ASA 5500 Series Command-Line Configuration Guide About the Adaptive Security Device Manager Cisco ASA 5505 Getting Started Guide 78-17612-01... -
Page 33: Using The Startup Wizard
In addition to the ASDM web configuration tool, you can configure the adaptive security appliance by using the command-line interface. For more information, see Cisco Security Appliance Command Line Configuration Guide and the Cisco Security Appliance Command Reference. - Page 34 Easy VPN servers; whether the client is to run in client or network extension mode; and user and group login credentials to match those configured on the primary and secondary Easy VPN servers. Cisco ASA 5505 Getting Started Guide 78-17612-01...
-
Page 35: Running The Startup Wizard
To use the Startup Wizard to set up a basic configuration for the adaptive security appliance, perform the following steps: If you have not already done so, connect a PC to a switch port on the ASA 5505. Step 1 Locate an Ethernet cable, which has an RJ-45 connector on each end. - Page 36 ICMP traffic through the outside interface or any other interface that is necessary. You can configure this access control policy using the icmp command. For more information about the icmp command, see the Cisco Security Appliance Command Reference. Cisco ASA 5505 Getting Started Guide 78-17612-01...
-
Page 37: What To Do Next
DMZ web server Configuration” Configure the adaptive security Chapter 7, “Scenario: IPsec appliance for remote-access VPN Remote-Access VPN Configuration” Configure the adaptive security Chapter 8, “Scenario: Site-to-Site appliance for site-to-site VPN VPN Configuration” Cisco ASA 5505 Getting Started Guide 78-17612-01... - Page 38 Chapter 4 Configuring the Adaptive Security Appliance What to Do Next Cisco ASA 5505 Getting Started Guide 78-17612-01...
-
Page 39: Scenario: Easy Vpn Hardware Client Configuration
Easy VPN server at the main site and Easy VPN hardware clients at the remote offices. The Cisco ASA 5505 can function as a Cisco Easy VPN hardware client or as a Cisco Easy VPN server (sometimes called a “headend device”), but not both at the same time. -
Page 40: Client Mode And Network Extension Mode
Cisco VPN 30xx, or Cisco IOS 12.2(8)T) When used as an Easy VPN hardware client, the ASA 5505 can also be configured to perform basic firewall services, such as protecting devices in a DMZ from from unauthorized access. However, if the ASA 5505 is configured to function as an Easy VPN hardware client, it cannot establish other types of tunnels. - Page 41 ASA 5505 running in Easy VPN Client Mode. When configured in Client Mode, devices on the inside interface of the ASA 5505 cannot be accessed by devices behind the Easy VPN server. Cisco ASA 5505 Getting Started Guide...
- Page 42 LAN from remote LAN When configured in Easy VPN Network Extension Mode, the ASA 5505 does not hide the IP addresses of local hosts by substituting a public IP address. Therefore, hosts on the other side of the VPN connection can communicate directly with hosts on the local network.
-
Page 43: Configuring The Easy Vpn Hardware Client
Configuring the Easy VPN Hardware Client The Easy VPN server controls the security policies enforced on the ASA 5505 Easy VPN hardware client. However, to establish the initial connection to the Easy VPN server, you must complete some configuration locally. - Page 44 ASDM. To configure the ASA 5505 as an Easy VPN hardware client, perform the following steps: At a PC that has access to the inside interface of the ASA 5505, start ASDM. Step 1 Start a web browser. In the address field of the browser, enter the factory default IP address in the address field: https://192.168.1.1/.
- Page 45 Group Password radio button and enter a Group Name and Group Password. In the User Settings area, specify the User Name and User Password to be used Step 7 by the ASA 5505 when establishing a VPN connection. Cisco ASA 5505 Getting Started Guide 78-17612-01...
-
Page 46: Configuring Advanced Easy Vpn Attributes
Easy VPN connection through the tunnel. The public address of the ASA 5505 is not accessible when behind the Note NAT device unless you add static NAT mappings on the NAT device. -
Page 47: What To Do Next
Cisco Security Appliance Logging Configuration and System Log Messages An ASA 5505 configured as an Easy VPN hardware client can also be configured to perform basic firewall services. To configure the ASA 5505 to protect a DMZ web server, see Chapter 6, “Scenario: DMZ Configuration.”... - Page 48 Chapter 5 Scenario: Easy VPN Hardware Client Configuration What to Do Next Cisco ASA 5505 Getting Started Guide 5-10 78-17612-01...
-
Page 49: Scenario: Dmz Configuration
(DMZ). A DMZ is a separate network located in the neutral zone between a private (inside) network and a public (outside) network. Cisco ASA 5505 DMZ configurations are possible only with the Security Plus Note license. -
Page 50: Chapter 6 Scenario: Dmz Configuration
IP address of the DMZ web server (209.165.200.226). Figure 6-2 shows the outgoing traffic flow of HTTP requests from the private network to both the DMZ web server and to the Internet. Cisco ASA 5505 Getting Started Guide 78-17612-01... - Page 51 IP address of the adaptive security appliance. Outgoing traffic appears to come from this address. Figure 6-3 shows HTTP requests originating from the Internet and destined for the public IP address of the DMZ web server. Cisco ASA 5505 Getting Started Guide 78-17612-01...
-
Page 52: Configuring The Security Appliance For A Dmz Deployment
Configuring the Security Appliance for a DMZ Deployment This section describes how to use ASDM to configure the adaptive security appliance for the configuration scenario shown in Figure 6-1. The procedure uses sample parameters based on the scenario. Cisco ASA 5505 Getting Started Guide 78-17612-01... -
Page 53: Configuration Requirements
For the internal clients to have access to HTTP and HTTPS resources on the • Internet, you must create a rule that translates the real IP addresses of internal clients to an external address that can be used as the source address. Cisco ASA 5505 Getting Started Guide 78-17612-01... -
Page 54: Starting Asdm
Remember to add the “s” in “https” or the connection fails. HTTPS over Note SSL (HTTPS) provides a secure connection between your browser and the adaptive security appliance. The Main ASDM window appears. Cisco ASA 5505 Getting Started Guide 78-17612-01... -
Page 55: Creating Ip Pools For Network Address Translation
DMZ interface and outside interface can use for address translation. A single IP pool can contain both NAT and PAT entries, and it can contain entries for more than one interface. Cisco ASA 5505 Getting Started Guide 78-17612-01... - Page 56 Click Add to create a new global pool for the DMZ interface. The Add Global Address Pool dialog box appears. For most configurations, IP pools are added to the less secure, or public, Note interfaces. Cisco ASA 5505 Getting Started Guide 78-17612-01...
- Page 57 Enter the Starting IP address and Ending IP address of the range. In this – scenario, the range of IP addresses is 10.30.30.50–10.30.30.60. (Optional) Enter the Netmask for the range of IP addresses. – Cisco ASA 5505 Getting Started Guide 78-17612-01...
- Page 58 Specify a Pool ID for the Outside interface. You can add these addresses to the same IP pool that contains the address pool used by the DMZ interface (in this scenario, the Pool ID is 200). Cisco ASA 5505 Getting Started Guide 6-10 78-17612-01...
- Page 59 To the devices on the Internet, it appears that all traffic is coming from this one IP address. Click the Add button to add this new address to the IP pool. Click OK. Cisco ASA 5505 Getting Started Guide 6-11 78-17612-01...
-
Page 60: Configuring Nat For Inside Clients To Communicate With The Dmz Web Server
Configuring NAT for Inside Clients to Communicate with the DMZ Web Server In the previous procedure, you created a pool of IP addresses that could be used by the adaptive security appliance to mask the private IP addresses of inside clients. Cisco ASA 5505 Getting Started Guide 6-12 78-17612-01... -
Page 61: Server
Select check box next to Global Pool ID. In this scenario, the IP pool ID is 200. In this scenario the IP pool that we want to use is already created. If it was not already created, you would click Add to create a new IP pool. Cisco ASA 5505 Getting Started Guide 6-13 78-17612-01... - Page 62 A translation rule between the inside and outside interfaces to be used when • inside clients communicate with the Internet. ASDM is able to create both rules because the addresses to be used for translation are both in the same IP pool. Cisco ASA 5505 Getting Started Guide 6-14 78-17612-01...
-
Page 63: Configuring Nat For Inside Clients To Communicate With Devices On The Internet
In the previous procedure, you configured a Network Address Translation (NAT) rule that associates IP addresses from the IP pool with the inside clients so they can communicate securely with the DMZ web server. Cisco ASA 5505 Getting Started Guide 6-15 78-17612-01... -
Page 64: Configuring An External Identity For The Dmz Web Server
From the Interface drop-down list, choose the DMZ interface. Enter the real IP address of the DMZ web server. In this scenario, the IP address is 10.30.30.30. From the Netmask drop-down list, choose the Netmask 255.255.255.255. Cisco ASA 5505 Getting Started Guide 6-16 78-17612-01... - Page 65 Click OK to add the rule and return to the list of Address Translation Rules. Step 6 This rule maps the real web server IP address (10.30.30.30) statically to the public IP address of the web server (209.165.200.226). Cisco ASA 5505 Getting Started Guide 6-17 78-17612-01...
-
Page 66: Providing Public Http Access To The Dmz Web Server
You must create an access control rule on the adaptive security appliance to permit specific traffic types from the public network to resources in the DMZ. This access control rule specifies the interface of the adaptive security Cisco ASA 5505 Getting Started Guide 6-18 78-17612-01... - Page 67 Click the Configuration tool. In the Features pane, click Security Policy. Click the Access Rules tab, then from the Add pull-down list, choose Add Access Rule. The Add Access Rule dialog box appears. Cisco ASA 5505 Getting Started Guide 6-19 78-17612-01...
- Page 68 Step 3 From the Type drop-down list, choose IP Address. Enter the IP address of the source host or source network. Use 0.0.0.0 to allow traffic originating from any host or network. Cisco ASA 5505 Getting Started Guide 6-20 78-17612-01...
- Page 69 Service drop-down list, and then choose Any from the next drop-down list. In the Destination Port area, click the Service radio button, choose “=” (equal to) from the Service drop-down list, and then choose HTTP/WWW from the next drop-down list. Cisco ASA 5505 Getting Started Guide 6-21 78-17612-01...
- Page 70 At this point, the entries in the Add Access Rule dialog box should be similar to the following: Click OK. The displayed configuration should be similar to the following. Verify that the Step 6 information you entered is accurate. Cisco ASA 5505 Getting Started Guide 6-22 78-17612-01...
- Page 71 The address translation (209.165.200.226 to 10.30.30.30) allows the traffic to be permitted. For information about creating the translation rule, see the “Configuring NAT for Inside Clients to Communicate with the DMZ Web Server” section on page 6-12. Cisco ASA 5505 Getting Started Guide 6-23 78-17612-01...
-
Page 72: What To Do Next
To Do This ... See ... Configure a remote-access VPN Chapter 7, “Scenario: IPsec Remote-Access VPN Configuration” Configure a site-to-site VPN Chapter 8, “Scenario: Site-to-Site VPN Configuration” Cisco ASA 5505 Getting Started Guide 6-24 78-17612-01... -
Page 73: Scenario: Ipsec Remote-Access Vpn Configuration
Example IPsec Remote-Access VPN Network Topology Figure 7-1 shows an adaptive security appliance configured to accept requests from and establish IPsec connections with VPN clients, such as a Cisco Easy VPN hardware client, over the Internet. Cisco ASA 5505 Getting Started Guide 78-17612-01... -
Page 74: Implementing The Ipsec Remote-Access Vpn Scenario
This section includes the following topics: Information to Have Available, page 7-3 • Starting ASDM, page 7-4 • Configuring the ASA 5505 for an IPsec Remote-Access VPN, page 7-5 • Selecting VPN Client Types, page 7-6 • Cisco ASA 5505 Getting Started Guide... -
Page 75: Information To Have Available
IP addresses for the primary and secondary WINS servers – Default domain name – List of IP addresses for local hosts, groups, and networks that should be – made accessible to authenticated remote clients Cisco ASA 5505 Getting Started Guide 78-17612-01... -
Page 76: Starting Asdm
Remember to add the “s” in “https” or the connection fails. HTTP over Note SSL (HTTP) provides a secure connection between your browser and the adaptive security appliance. The Main ASDM window appears. Cisco ASA 5505 Getting Started Guide 78-17612-01... -
Page 77: Configuring The Asa 5505 For An Ipsec Remote-Access Vpn
Chapter 7 Scenario: IPsec Remote-Access VPN Configuration Implementing the IPsec Remote-Access VPN Scenario Configuring the ASA 5505 for an IPsec Remote-Access VPN To begin the process for configuring a remote-access VPN, perform the following steps: In the main ASDM window, choose VPN Wizard from the Wizards drop-down Step 1 menu. -
Page 78: Selecting Vpn Client Types
Specify the type of VPN client that will enable remote users to connect to this Step 1 adaptive security appliance. For this scenario, click the Cisco VPN Client radio button. You can also use any other Cisco Easy VPN remote product. -
Page 79: Specifying The Vpn Tunnel Group Name And Authentication Method
To use a static preshared key for authentication, click the Pre-Shared Key • radio button and enter a preshared key (for example, “Cisco”). This key is used for IPsec negotiations between the adaptive security appliances. To use digital certificates for authentication, click the Certificate radio •... -
Page 80: Specifying A User Authentication Method
Chapter 7 Scenario: IPsec Remote-Access VPN Configuration Implementing the IPsec Remote-Access VPN Scenario Enter a Tunnel Group Name (such as “Cisco”) for the set of users that use Step 2 common connection parameters and client attributes to connect to this adaptive security appliance. - Page 81 Click the Authenticate Using an AAA Server Group radio button. Choose a preconfigured server group from the drop-down list, or click New to add a new server group. Click Next to continue. Step 3 Cisco ASA 5505 Getting Started Guide 78-17612-01...
-
Page 82: (Optional) Configuring User Accounts
In Step 5 of the VPN Wizard, perform the following steps: To add a new user, enter a username and password, and then click Add. Step 1 When you have finished adding new users, click Next to continue. Step 2 Cisco ASA 5505 Getting Started Guide 7-10 78-17612-01... -
Page 83: Configuring Address Pools
Enter the Starting IP address and Ending IP address of the range. (Optional) Enter the Netmask for the range of IP addresses. Click OK to return to Step 6 of the VPN Wizard. Cisco ASA 5505 Getting Started Guide 7-11 78-17612-01... -
Page 84: Configuring Client Attributes
Easy VPN hardware client when a connection is established. Make sure that you specify the correct values, or remote clients will not be able to use DNS names for resolution or use Windows networking. Cisco ASA 5505 Getting Started Guide 7-12 78-17612-01... -
Page 85: Configuring The Ike Policy
IKE is a negotiation protocol that includes an encryption method to protect data and ensure privacy; it is also an authentication method to ensure the identity of the peers. In most cases, the ASDM default values are sufficient to establish secure VPN tunnels. Cisco ASA 5505 Getting Started Guide 7-13 78-17612-01... - Page 86 Click the Encryption (DES/3DES/AES), authentication algorithms (MD5/SHA), Step 1 and the Diffie-Hellman group (1/2/5/7) used by the adaptive security appliance during an IKE security association. Click Next to continue. Step 2 Cisco ASA 5505 Getting Started Guide 7-14 78-17612-01...
-
Page 87: Configuring Ipsec Encryption And Authentication Parameters
Configuring IPsec Encryption and Authentication Parameters In Step 9 of the VPN Wizard, perform the following steps: Click the Encryption algorithm (DES/3DES/AES) and authentication algorithm Step 1 (MD5/SHA). Step 2 Click Next to continue. Cisco ASA 5505 Getting Started Guide 7-15 78-17612-01... -
Page 88: Specifying Address Translation Exception And Split Tunneling
Specify hosts, groups, and networks that should be in the list of internal resources Step 1 made accessible to authenticated remote users. To add or remove hosts, groups, and networks dynamically from the Selected Hosts/Networks pane, click Add or Delete, respectively. Cisco ASA 5505 Getting Started Guide 7-16 78-17612-01... -
Page 89: Verifying The Remote-Access Vpn Configuration
Step 2 Verifying the Remote-Access VPN Configuration In Step 11 of the VPN Wizard, review the configuration attributes for the new VPN tunnel. The displayed configuration should be similar to the following: Cisco ASA 5505 Getting Started Guide 7-17 78-17612-01... -
Page 90: What To Do Next
Configuration and System Log Messages You can configure the adaptive security appliance for more than one application. The following sections provide configuration procedures for other common applications of the adaptive security appliance. Cisco ASA 5505 Getting Started Guide 7-18 78-17612-01... - Page 91 To Do This ... See ... Configure the adaptive security Chapter 6, “Scenario: DMZ appliance to protect a web server in a Configuration” Configure a site-to-site VPN Chapter 8, “Scenario: Site-to-Site VPN Configuration” Cisco ASA 5505 Getting Started Guide 7-19 78-17612-01...
- Page 92 Chapter 7 Scenario: IPsec Remote-Access VPN Configuration What to Do Next Cisco ASA 5505 Getting Started Guide 7-20 78-17612-01...
-
Page 93: Scenario: Site-To-Site Vpn Configuration
Configuring the Other Side of the VPN Connection, page 8-13 • What to Do Next, page 8-13 • Example Site-to-Site VPN Network Topology Figure 8-1 shows an example VPN tunnel between two adaptive security appliances. Cisco ASA 5505 Getting Started Guide 78-17612-01... -
Page 94: Implementing The Site-To-Site Scenario
IP addresses of local hosts and networks permitted to use the tunnel to communicate with resources on the remote site IP addresses of remote hosts and networks permitted to use the tunnel to • communicate with local resources Cisco ASA 5505 Getting Started Guide 78-17612-01... -
Page 95: Configuring The Site-To-Site Vpn
Remember to add the “s” in “https” or the connection fails. HTTP over Note SSL (HTTPS) provides a secure connection between your browser and the adaptive security appliance. The Main ASDM window appears. Cisco ASA 5505 Getting Started Guide 78-17612-01... -
Page 96: Configuring The Security Appliance At The Local Site
To configure the Security Appliance 1, perform the following steps: In the main ASDM window, choose the VPN Wizard option from the Wizards Step 1 drop-down menu. ASDM opens the first VPN Wizard screen. Cisco ASA 5505 Getting Started Guide 78-17612-01... - Page 97 VPN concentrators, or other devices that support site-to-site IPsec connectivity. From the drop-down list, choose Outside as the enabled interface for the current VPN tunnel. Click Next to continue. Cisco ASA 5505 Getting Started Guide 78-17612-01...
-
Page 98: Providing Information About The Remote Vpn Peer
To use a static preshared key for authentication, click the Pre-Shared Key • radio button and enter a preshared key (for example, “Cisco”). This key is used for IPsec negotiations between the adaptive security appliances. When using preshared key authentication, the Tunnel Group Name Note must be the IP address of the peer. -
Page 99: Configuring The Ike Policy
In Step 3 of the VPN Wizard, perform the following steps: Click the Encryption (DES/3DES/AES), authentication algorithms (MD5/SHA), Step 1 and the Diffie-Hellman group (1/2/5) used by the adaptive security appliance during an IKE security association. Cisco ASA 5505 Getting Started Guide 78-17612-01... - Page 100 Note of the options that you chose for Security Appliance 1. Encryption mismatches are a common cause of VPN tunnel failures and can slow down the process. Click Next to continue. Step 2 Cisco ASA 5505 Getting Started Guide 78-17612-01...
-
Page 101: Configuring Ipsec Encryption And Authentication Parameters
Configuring IPsec Encryption and Authentication Parameters In Step 4 of the VPN Wizard, perform the following steps: Choose the Encryption algorithm (DES/3DES/AES) and authentication algorithm Step 1 (MD5/SHA) from the drop-down lists. Click Next to continue. Step 2 Cisco ASA 5505 Getting Started Guide 78-17612-01... -
Page 102: Specifying Hosts And Networks
Enter the local IP Address and Netmask. Step 2 In the Destination area, choose IP Address from the Type drop-down list. Step 3 Enter the IP address and Netmask for the remote host or network. Step 4 Cisco ASA 5505 Getting Started Guide 8-10 78-17612-01... -
Page 103: Viewing Vpn Attributes And Completing The Wizard
In Step 6 of the VPN Wizard, review the configuration list for the VPN tunnel you just created. If you are satisfied with the configuration, click Finish to apply the changes to the adaptive security appliance. Cisco ASA 5505 Getting Started Guide 8-11 78-17612-01... - Page 104 ASDM. If you do not save the configuration changes, the old configuration takes effect the next time the device starts. This concludes the configuration process for Security Appliance 1. Cisco ASA 5505 Getting Started Guide 8-12 78-17612-01...
-
Page 105: Configuring The Security Appliance At The Local Site
Refine configuration and configure Cisco Security Appliance Command optional and advanced features Line Configuration Guide Learn about daily operations Cisco Security Appliance Command Reference Cisco Security Appliance Logging Configuration and System Log Messages Cisco ASA 5505 Getting Started Guide 8-13 78-17612-01... - Page 106 To Do This ... See ... Configure the adaptive security Chapter 6, “Scenario: DMZ appliance to protect a web server in a Configuration” Configure a remote-access VPN Chapter 7, “Scenario: IPsec Remote-Access VPN Configuration” Cisco ASA 5505 Getting Started Guide 8-14 78-17612-01...
- Page 107 If you ordered your adaptive security appliance with a DES or 3DES-AES license, the encryption license key comes with the adaptive security appliance. If you are a registered user of Cisco.com and would like to obtain a 3DES/AES encryption license, go to the following website: http://www.cisco.com/go/license...
- Page 108 Step 4 Exits global configuration mode. hostname(config)# exit Step 5 Saves the configuration. hostname# copy running-config startup-config Step 6 Reboots the adaptive security appliance and hostname# reload reloads the configuration. Cisco ASA 5505 Getting Started Guide 78-17612-01...
Need help?
Do you have a question about the ASA 5505 and is the answer not in the manual?
Questions and answers