Table of Contents
Advertisement
Quick Links
Download this manual
See also:
Instruction Manual
Advertisement
Table of Contents

Related Manuals for StarTech.com WIFI2HDVGAGE


Summary of Contents for StarTech.com WIFI2HDVGAGE
- Page 1 Presentation Hub for Wireless Video Actual product may vary from photos User Manual SKU#: WIFI2HDVGA/WIFI2HDVGAGE For the latest information and specifications visit www.startech.com/WIFI2HDVGA www.startech.com/WIFI2HDVGAGE Manual Revision: 03/19/2019...
-
Page 2: Compliance Statements
This manual may make reference to trademarks, registered trademarks, and other protected names and/or symbols of third-party companies not related in any way to StarTech.com. Where they occur these references are for illustrative purposes only and do not represent an endorsement of a product or service by StarTech.com, or an endorsement of the product(s) to which this manual... -
Page 3: Safety Statements
• Montering av kabelavslutningar får inte göras när produkten och/eller elledningarna är strömförda. • Kablar (inklusive elkablar och laddningskablar) ska dras och placeras på så sätt att risk för snubblingsolyckor och andra olyckor kan undvikas. To view manuals, videos, drivers, downloads, technical drawings, and more visit www.startech.com/support... -
Page 4: Table Of Contents
Changing the Screen Language ......................11 Viewing the Presentation Hub Status and General Information..........13 Configuring Network Settings......................15 Creating a Network Bridge ........................17 Configuring Audio Settings ........................18 To view manuals, videos, drivers, downloads, technical drawings, and more visit www.startech.com/support... - Page 5 Configuring Display Resolution ......................36 Configuring the Display’s Aspect Ratio ..................... 37 Enabling Conference Mode ........................38 Configuring Basic Settings ........................39 Exiting the nScreenShare App ......................41 To view manuals, videos, drivers, downloads, technical drawings, and more visit www.startech.com/support...
-
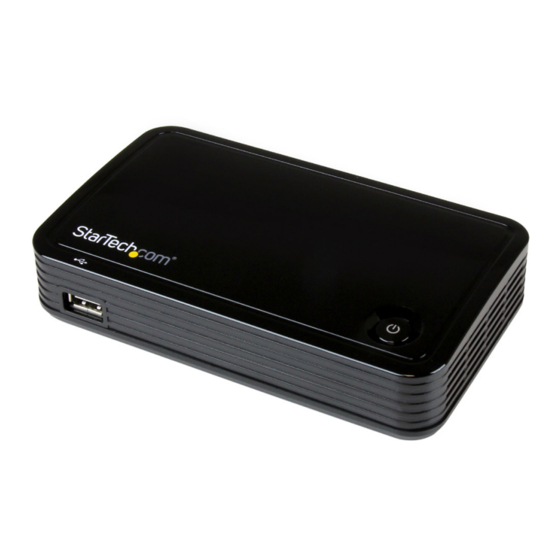
Page 6: Product Diagram
Product Diagram Front View USB-A Port Power Button Side View Fireware Upgrade Button To view manuals, videos, drivers, downloads, technical drawings, and more visit www.startech.com/support... -
Page 7: Rear View
Rear View DC 5V Port HDMI Port TosLink Port VGA Port Left Audio Port RJ45 Port Right Audio Port Bottom View Reset Button To view manuals, videos, drivers, downloads, technical drawings, and more visit www.startech.com/support... -
Page 8: Product Information
WiDi or Miracast Enabled Video Source Device (i.e. • Smartphone, Tablet, or Computer) with: Microsoft Windows® 8 / 8.1 (32/64), 7(32/64), Vista (32/64) • Android (v.4.3 and above) • To view manuals, videos, drivers, downloads, technical drawings, and more visit www.startech.com/support... -
Page 9: Installation
Note: A fixed or static IP address cannot be manually as- signed using the Web GUI. The Presentation Hub will auto- matically assign an IP address via Dynamic Host Configura- tion Protocol (DHCP). To view manuals, videos, drivers, downloads, technical drawings, and more visit www.startech.com/support... -
Page 10: Connecting To A Wireless Network
When the Presentation Hub has successfully disconnected from the wireless access point, the access point’s name will disappear from the bottom right hand corner of your standby screen. To view manuals, videos, drivers, downloads, technical drawings, and more visit www.startech.com/support... -
Page 11: Webui
Open a web browser. On the address line enter the Presentation Hub’s IP Address. The IP Address can be found on the Presentation Hub’s Home screen. Home screen To view manuals, videos, drivers, downloads, technical drawings, and more visit www.startech.com/support... -
Page 12: Changing The Screen Language
Changing the Screen Language From the WebUI Home screen. WebUI Home screen Click on the Language drop down list located on the upper right hand corner on the WebUI Home screen. To view manuals, videos, drivers, downloads, technical drawings, and more visit www.startech.com/support... - Page 13 Language drop down Select the desired language you wish to use from the drop down list. To view manuals, videos, drivers, downloads, technical drawings, and more visit www.startech.com/support...
-
Page 14: Viewing The Presentation Hub Status And General Information
Network Status, etc. From the WebUI Home screen, click on the Status & Info link. Status & Info link The Status & Info screen will appear. Status & Info screen To view manuals, videos, drivers, downloads, technical drawings, and more visit www.startech.com/support... - Page 15 Mac Address. Wireless IP Address: The Presentation Hub’s wireless IP • Address. Network Status: The Presentation Hub’s network status. • Security: The Presentation Hub’s current security setting. • To view manuals, videos, drivers, downloads, technical drawings, and more visit www.startech.com/support...
-
Page 16: Configuring Network Settings
The Network Settings screen will appear. Network Settings screen Enter the network settings information in the following fields: Device Name (SSID): Enter a device name for the • Presentation Hub. To view manuals, videos, drivers, downloads, technical drawings, and more visit www.startech.com/support... - Page 17 36,40 44,48 149,153 or 157,167. Once you have set the desired network setting click on the Apply button to save changes. - or - Click the Cancel button to discard any changes. To view manuals, videos, drivers, downloads, technical drawings, and more visit www.startech.com/support...
-
Page 18: Creating A Network Bridge
Network Settings screen Click on the Wi-Fi Connection button. A list of available wireless networks will be listed. Select the network you wish to bridge the Presentation Hub to. To view manuals, videos, drivers, downloads, technical drawings, and more visit www.startech.com/support... -
Page 19: Configuring Audio Settings
Once the password is entered click the Submit button to connect the Presentation Hub to the selected wireless network. Configuring Audio Settings From the WebUI Home screen, click on the Hardware Settings link. Hardware Settings link To view manuals, videos, drivers, downloads, technical drawings, and more visit www.startech.com/support... - Page 20 • • Confort • Surround Sound: Allows you to set a surround sound • option: Auto • 5.1 CH • HD Auto • To view manuals, videos, drivers, downloads, technical drawings, and more visit www.startech.com/support...
- Page 21 No Device: Sets HDMI Audio to no device. • Once you have set the desired settings click on the Apply button to save changes. - or - Click the Cancel button to discard any changes. To view manuals, videos, drivers, downloads, technical drawings, and more visit www.startech.com/support...
-
Page 22: Configuring Video Settings
Hardware Settings link The Hardware Settings screen will appear. Hardware Settings screen Under the Video section on the Hardware Settings screen, the following video setting can be configured: To view manuals, videos, drivers, downloads, technical drawings, and more visit www.startech.com/support... - Page 23 (1 - 50). Once you have set the desired settings click on the Apply button to save changes. - or - Click the Cancel button to discard any changes. To view manuals, videos, drivers, downloads, technical drawings, and more visit www.startech.com/support...
-
Page 24: Resetting The Presentation Hub Password
The Password Settings screen will appear. Password Settings screen Enter the Current Password: Enter a New Password. The password is a maximum of 20 character alphanumeric and is case sensitive. To view manuals, videos, drivers, downloads, technical drawings, and more visit www.startech.com/support... -
Page 25: Configuring Advance Settings
- or - Click the Cancel button to discard any changes. Configuring Advance Settings From the WebUI Home screen, click on the Advance Settings link. Advance Settings link To view manuals, videos, drivers, downloads, technical drawings, and more visit www.startech.com/support... - Page 26 P2P files. Once you have set the desired settings, click on the Apply button to save changes. - or - Click the Cancel button to discard any changes. To view manuals, videos, drivers, downloads, technical drawings, and more visit www.startech.com/support...
-
Page 27: Applying A Firmware Update
From the WebUI Home screen, click on the Firmware Upgrade link. Firmware Upgrade link The Firmware Upgrade screen will appear. Firmware Upgrade screen Click on the Choose File button and search for a compatible firmware file. To view manuals, videos, drivers, downloads, technical drawings, and more visit www.startech.com/support... -
Page 28: Using The Media Remote
Note: Firmware files can be found under the support tab, at www.startech.com/WIFI2HDVGA Using the Media Remote From the WebUI Home screen, click on the Media Remote link. Firmware Upgrade link To view manuals, videos, drivers, downloads, technical drawings, and more visit www.startech.com/support... -
Page 29: Restarting The Presentation Hub
(play, pause, volume, settings, etc.) of the Presentation Hub using the remote control. Restarting the Presentation Hub From the WebUI Home screen, click on the Restart Device link. Firmware Upgrade link To view manuals, videos, drivers, downloads, technical drawings, and more visit www.startech.com/support... - Page 30 Restart screen Click on the OK button to restart the Presentation Hub. - or - Click the Cancel button to exit the Restart screen without restarting the Presentation Hub. To view manuals, videos, drivers, downloads, technical drawings, and more visit www.startech.com/support...
-
Page 31: Operation
Reset Button To reset the Presentation Hub to the factory default settings: Press and hold the Reset button on the bottom of the Presentation Hub for five seconds. To view manuals, videos, drivers, downloads, technical drawings, and more visit www.startech.com/support... -
Page 32: Boardroom Collaboration Mode
If you’re installing the software on a Mac Computer, locate • and click the software package (nScreenShare.pkg). This file will be located in the macOS folder of the downloaded file. To view manuals, videos, drivers, downloads, technical drawings, and more visit www.startech.com/support... -
Page 33: Accessing Nscreenshare
The IP address will need to be on the same subnet as the Presenta- tion Hub. Once you have connected to the Presentation Hub, click on the nScreenShare icon To view manuals, videos, drivers, downloads, technical drawings, and more visit www.startech.com/support... - Page 34 Login screen Enter the Login Code. The Login Code is located on the lower left-hand corner of the Launch screen. Login Code Click OK to launch the nScreenShare application. To view manuals, videos, drivers, downloads, technical drawings, and more visit www.startech.com/support...
-
Page 35: Nscreenshare Panel Controls
Information: Displays application information (adapter • name, IP address, radio band, version). Minimize: Minimizes the Panel Control screen to the • Taskbar. Close: Closes the Panel Control screen. • To view manuals, videos, drivers, downloads, technical drawings, and more visit www.startech.com/support... -
Page 36: Configuring Display Mode
Mirror Mode: Mirrors the content on the main display. • Extend Mode: Extends the main display’s viewing area • two multiple displays allow for a larger display area. To view manuals, videos, drivers, downloads, technical drawings, and more visit www.startech.com/support... -
Page 37: Configuring Display Resolution
From the Panel Control screen, select the Menu icon. The Menu screen will appear. Menu screen Select the HDMI Resolution link, a pop-up screen will extend. HDMI Resolution screen To view manuals, videos, drivers, downloads, technical drawings, and more visit www.startech.com/support... -
Page 38: Configuring The Display's Aspect Ratio
Select the Aspect Ratio link, a pop-up screen will extend. Aspect Ratio screen Select an Aspect Ratio from the pop-up screen, which allows you to set the width and height ratio of the display. To view manuals, videos, drivers, downloads, technical drawings, and more visit www.startech.com/support... -
Page 39: Enabling Conference Mode
There are two types of roles within the software: Adminis- trator and Client. It’s the administrator’s responsibility to control which Client will be actively presenting their screen through the Presentation Hub. Click the Ok button. To view manuals, videos, drivers, downloads, technical drawings, and more visit www.startech.com/support... -
Page 40: Configuring Basic Settings
Configuring Basic Settings From the Panel Control screen, select the Menu icon. The Menu screen will appear. Menu screen Click on the Settings link, the Settings screen will appear. To view manuals, videos, drivers, downloads, technical drawings, and more visit www.startech.com/support... - Page 41 Remote Cursor: Allows you to enable a remote cursor. • Language: Allows you to select a screen language. • Click the Apply button to apply settings changes. To view manuals, videos, drivers, downloads, technical drawings, and more visit www.startech.com/support...
-
Page 42: Exiting The Nscreenshare App
Exiting the nScreenShare App From the Panel Control screen, select the Menu icon. The Menu screen will appear. Menu screen Click on the Exit link to exit the nScreenShare app. To view manuals, videos, drivers, downloads, technical drawings, and more visit www.startech.com/support... - Page 43 Limitation of Liability In no event shall it be the liability of StarTech.com Ltd. and StarTech.com USA LLP (or their officers, directors, employees or agents) for any damages (whether direct or indirect, special, punitive, incidental, consequential, or otherwise), loss of profits, loss of business, or any pecuniary loss, arising out of or related to the use of the product exceed the actual price paid for the product.
- Page 44 StarTech.com is an ISO 9001 Registered manufacturer of connectivity and technology parts. StarTech.com was founded in 1985 and has operations in the United States, Canada, the United Kingdom and Taiwan servicing a worldwide market.
Need help?
Do you have a question about the WIFI2HDVGAGE and is the answer not in the manual?
Questions and answers