Table of Contents
Advertisement
Quick Links
Advertisement
Table of Contents

Subscribe to Our Youtube Channel
Related Manuals for Gaggenau RW 464260AU


Summary of Contents for Gaggenau RW 464260AU
- Page 1 Gaggenau Operating instructions RW 464260AU...
-
Page 3: Table Of Contents
Table of Contents Congratulations ............. Re-arranging the interior........Pull outs ..............Safety and warning information ......Presentation attachment ......... Before you switch ON the appliance ......LED presentation light ..........Technical safety ............Setup mode ............Important information when using the appliance ..Children in the household ........ - Page 4 Odours ..............20 Warning messages via the display ....... 20 Door alarm............... 20 Sensor failure............20 Low voltage ............. 20 Appliance self-test..........21 Eliminating minor faults yourself......21 Change the light bulbs .......... 22 Upper halogen lamp ..........22 LED presentation light..........22 Exchange the odour filter ........
-
Page 5: Congratulations
Congratulations Safety and warning information Before you switch ON the appliance By buying our temperature-controlled wine unit you have chosen a modern, high-quality domestic appliance. Please read the operating and installation instructions Only when they have reached the right drinking carefully. -
Page 6: Important Information When Using The Appliance
Important information when using Children in the household the appliance Do not allow children to play with the appliance! Never use electrical appliances inside the appliance If the appliance features a lock, keep the key out of the (e. g. heater, etc.). Risk of explosion! reach of children. -
Page 7: Information Concerning Disposal
Information concerning disposal Disposal of packaging The packaging protects your appliance from damage during transit. All utilised materials are environmentally safe and recyclable. Please help us by disposing of the packaging in an environmentally friendly manner. Please ask your dealer or inquire at your local authority about current means of disposal. -
Page 8: Your New Appliance
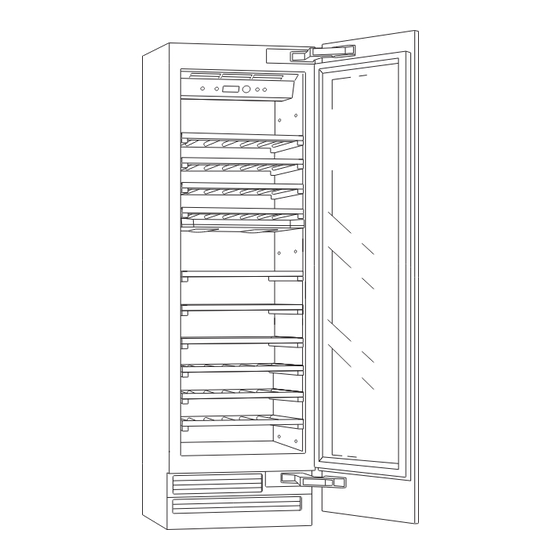
Your new appliance These operating instructions refer to several models. Illustrations can differ. Upper temperature zone Fascia Lower temperature zone Lighting for the upper temperature zone Pull out for storing wine bottles lying down Division wall for dividing up the different temperature zones Light LED presentation light for the lower temperature zone Presentation attachment *... -
Page 9: Fascia
Fascia On/off button Setup button This button starts and ends the setup mode. If the setup Serves to switch the appliance on and off. mode is ended using the setup button , the changes which have been made are stored. Caution The appliance is not seperated from the mains when it is Holiday button... -
Page 10: Installation
Installation Installation location Fixing For secure installation, the appliance screwed A dry, well ventilated room is suitable as an installation to neighbouring kitchen furniture and/or units. location. The installation location should neither be exposed to direct sunlight nor near a heat source, e.g. It is very important therefore that all bordering furniture a cooker, radiator, etc. -
Page 11: Electrical Connection
Electrical connection Factory settings Do not use extension cables or distributors. Upon leaving the factory, the appliance has been supplied with the following settings: The plug to secure the appliance must be freely – accessible. Connect the appliance to a 220 240 V/50 Hz –... -
Page 12: Selecting The Temperature
Selecting the temperature Set the language The temperatures in both compartments can be set When the appliance is operated, all messages are independently of each other from +5 °C to +18 °C. displayed in fascia in English. We recommend a setting of +11 ° C. Alternatively, the display languages can be selected The temperature setting can be changed using the corresponding to the table on page 14. -
Page 13: Re-Arranging The Interior
Re-arranging the interior Presentation attachment You can vary the shelves inside the appliance and the containers in the door to suit your requirements. In order to be able to use the presentation part, Pull outs the uppermost pull out must be taken out of the lower temperature zone. -
Page 14: Setup Mode
Setup mode Individual adjustments To make a selection within the setting options of a menu: There are menus for adapting the appliance to the individual user requirements. These adaptions are carried out in the setup mode. To activate the setup mode: Press setup button –... -
Page 15: Temperature Unit
Menu Setting options Displayed text ECO MODE Energy saving mode (eco function) On / Off / HUMIDITY Humidity (upper temperature zone) On / Off / HUMIDITY Humidity (lower temperature zone) On / Off / Temperature unit Language setting The temperature can be displayed in degrees Celsius (° C) When the appliance is operated, all messages are or degrees Fahrenheit (°... -
Page 16: Energy Saving Mode
Energy saving mode Humidity function If the energy saving function (eco function) is activated, Independent from one another, the air humidity in the the appliance switches to energy saving operation. two temperature zones can be increased.2. This energy saving function is preset at the factory in In order to switch the increased air humidity on: order to reduce energy consumption. -
Page 17: Holiday Mode
Holiday mode11 Sabbatical mode If leaving the appliance for a long period of time, you can Sabbatical mode settings: switch the appliance over to the energy-saving holiday – the accoustic signal is switched off when the button mode. is actuated (if activated); Holiday mode settings: –... -
Page 18: Storage Examples
Storage examples 45.7 cm appliance 61.0 cm appliance 70 bottles (0.75 l) 98 bottles (0.75 l) Practical tips for storing wine Drinking temperatures Always unpack bottles of wine – do not store in crates The correct serving temperature is crucial for the taste and or boxes. -
Page 19: How To Save Energy
How to save energy Switching off and disconnecting the appliance Install the appliance in a cool, well ventilated room, but not in direct sunlight and not near a heat source Switching off the appliance (radiator, cooker, etc.). If required, use an insulating plate. -
Page 20: Odours
Odours Sensor failure If you experience unpleasant odours: Press the on/off button and switch the appliance off! Pull out the mains plug or switch off the fuse! Take all food out of the appliance. Clean the appliance interior (see “Cleaning the appliance”, page 19). -
Page 21: Appliance Self-Test
Appliance self-test The self-test programme starts. Various messages appear Before you call customer service, conduct a self-test in the facia one after the other. on the appliance. If an error is established during the appliance self-test, Switch off the appliance and wait 5 minutes. Keep the door closed during this time. -
Page 22: Change The Light Bulbs
Change the light bulbs LED presentation light Warning Pull out mains plug or switch off fuse. A new LED can be obtained from customer service. Risk of electric shock! Caution! Do not touch the halogen bulb with your fingers. Always use a soft cloth when inserting a halogen bulb. Upper halogen lamp Halogen lamp type: 12 V/20 W/bulbholder G4... -
Page 23: Exchange The Odour Filter
Exchange the odour filter Customer service Spare filters are available from your dealer. Check whether you can remedy the fault yourself on the basis of information provided in the “Eliminating minor faults yourself” section (page 21). Your local customer service can be found in the telephone directory or in the customer-service index. - Page 24 Gaggenau Hausgeräte GmbH Carl-Wery-Straße 34 D-81739 München www.gaggenau.com 9000 438 588 Subject to alterations. en (8902)
Need help?
Do you have a question about the RW 464260AU and is the answer not in the manual?
Questions and answers