Gaggenau RB 491 Use And Care Manual
Hide thumbs
Also See for RB 491:
- Installation instruction (40 pages) ,
- Installation instruction (40 pages) ,
- Installation instructions manual (112 pages)
Table of Contents
Advertisement
Advertisement
Table of Contents

Related Manuals for Gaggenau RB 491


Summary of Contents for Gaggenau RB 491
- Page 2 English ..............Français ..............35 Español ..............68...
-
Page 3: Table Of Contents
Contents IMPORTANT SAFETY INSTRUCTIONS ....Switching off and disconnecting the appliance ..12 DEFINITIONS ............Switching off the appliance ........GENERAL SAFETY PRECAUTIONS ......Disconnecting the appliance ........RISK OF CHILD ENTRAPMENT ......Door alarm ............ELECTRICAL CONNECTION ........French door style ..........GROUNDING INSTRUCTION ........ - Page 4 Refrigerating ............22 Troubleshooting ........... Appliance ............... Freezing and storing ..........22 IceMaker ..............Store the frozen produce ........22 Changing the bulb ..........Freezing food yourself ..........22 How to wrap food correctly ........22 Halogen bulbs above ..........Thawing the frozen food .........
-
Page 5: Important Safety Instructions
IMPORTANT SAFETY INSTRUCTIONS Do not refreeze frozen foods which have thawed WARNING completely. READ AND SAVE THESE INSTRUCTIONS! For cleaning and exchanging the bulb, pull the mains plug out or switch off the fuse. Do not pull out the mains plug by tugging the cable. -
Page 6: Grounding Instruction
GROUNDING INSTRUCTION Do not store bottled or canned drinks (especially carbonated drinks) in the freezer compartment. Bottles and cans may explode! This appliance must be grounded. In the event of a mal- function or breakdown, grounding will reduce the risk Never put frozen food straight from the freezer compartment of electric shock by providing a path of least resistance into your mouth. -
Page 7: General Information For Use
Congratulations GENERAL INFORMATION FOR USE With the purchase of your new bottom freezer you have opted for a modern, high-quality domestic appliance. The refrigerator compartment of this appliance is suitable Your bottom freezer is distinguished by its economical for refrigerating food. energy consumption. -
Page 8: Your New Appliance
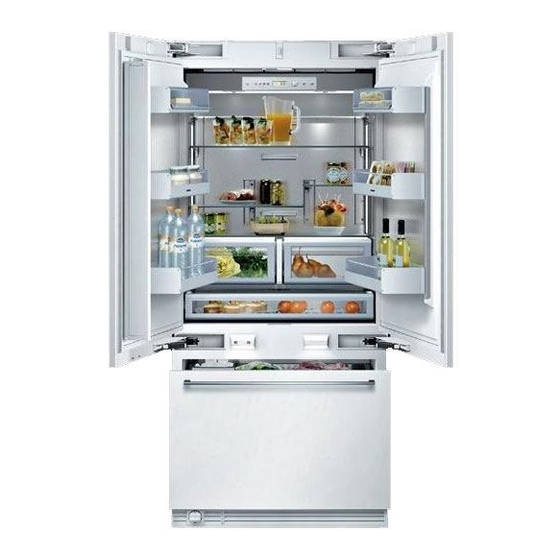
Your new appliance 2-door model These operating instructions refer to several models. Diagrams may vary. Refrigerator compartment Freezer compartment Capacity: 14.3 cu.ft. (396 l) Capacity: 5.4 cu.ft. (154 l) Control panel 10 Ice Maker * Butter and cheese compartment for storage 11 Ice cube container of various, condiments, bottles and jars Capacity max. -
Page 9: 3-Door Model (French Door)
3-door model (French door) These operating instructions refer to several models. Diagrams may vary. Refrigerator compartment Freezer compartment Capacity: 14.3 cu.ft. (396 l) Capacity: 5.4 cu.ft. (154 l) Control panel 10 Ice Maker * Butter and cheese compartment for storage 11 Ice cube container of various, condiments, bottles and jars Capacity max. -
Page 10: Installation
Installation Installation cavity WARNING It is important to observe the specified dimensions of the installation cavity for a trouble-free installation Do not install the appliance: of the appliance and for the subsequent general view of the furniture front. – outdoors, In particular ensure that the cavity is square. -
Page 11: Installing And Connecting The Appliance
Installing and connecting the appliance Connection to the power supply CAUTION WARNING Have the appliance installed by an electrician according Avoid Electrical Shock Hazard to the enclosed installation instructions. – Plug into a grounded 3 prong outlet. After installing the appliance, wait at least 8 hours before –... -
Page 12: Switching On The Appliance
Switching on the appliance Press the POWER button Pull out the mains plug or switch off the fuse. Empty the ice cube container. When the appliance has been switched on, the appliance begins to cool down. When the doors are open, the interior ... -
Page 13: Motorized Shelf
Motorized shelf The appliance features a motorized height-adjustable shelf. Care should be taken when closing the door. The bar fitted to the left door has to be folded back when closing the door, otherwise damage can be done to the appliance or the furniture fronts. -
Page 14: Variable Interior Design
Variable interior design Door storage compartment Refrigerator compartment You can re-arrange the shelves and the containers in the door inside the refrigerator compartment as required. Glass shelves The height of the shelves can be adjusted. Lift the container and remove. ... -
Page 15: Freezer Compartment
Drawers Freezer compartment The drawers in the freezer compartment can be taken out for cleaning. NOTE While taking out the big freezer drawer, the upper drawer has to be taken out first. To remove the drawer, lift them slightly and remove. ... -
Page 16: Control Panel
Control panel To utilize all the functions of your appliance, we recommend that you familiarize yourself thoroughly with the control panel and the setting options. POWER button SETUP button Switches the appliance on and off. This button activates and also ends setup mode. When setup mode is ended with the SETUP button, ICE button the changed settings are saved. -
Page 17: Setting The Temperature
Setting the temperature To adjust the required temperature: Freezer Activate the setup mode with the < or > buttons. The temperature can be set from 7 °F to –9 °F (–14 °C to –23 °C). We recommend a setting of 0 °F (–18 °C). -
Page 18: Fast Cooling Function
FAST COOLING function FAST FREEZING function The FAST COOLING function is ideal for the rapid cooling of The FAST FREEZING function is used to freeze large drinks and refrigerating large quantities of food. quantities of fresh food and should be switched on some hours before the fresh food is placed in the freezer. -
Page 19: Setup Mode
Setup mode There are several menus for adjusting the appliance func- To select between the different setting options within tions to individual requirements. These adjustments can one menu: be made in setup mode. To activate setup mode: Press the SETUP button ... -
Page 20: Temperature Unit
Temperature unit Energy-saving mode The temperature can be displayed in degrees Fahrenheit (°F) When the Economy function (Eco) is activated, the appliance or degrees Celsius (°C) switches to an energy-saving mode. This Economy functions set at the factory to be energetically more favorable. ... -
Page 21: Vacation Mode
Vacation mode Rest mode If you are away for a prolonged period, you can switch When Rest mode is active the appliance to an energetically more favourable mode. When Vacation mode is active, – the FAST COOLING/FAST FREEZING function ends (if switched on), –... -
Page 22: Refrigerating
Refrigerating Freezing and storing Arrange food as follows: Store the frozen produce – On the shelves: CAUTION Cakes and pastries, ready meals, dairy products, meat and sausage Do not refreeze frozen food which is thawing or which – In the vegetable container: has thawed. -
Page 23: Thawing The Frozen Food
Ice Maker The following products are suitable for sealing As soon as the freezer has cooled down to freezing the wrapped food: temperature, the ice cube tray fills with water. Cold air is blown directly over the tray. Rubber bands, plastic clips, string, cold-resistant adhesive tape or similar. -
Page 24: Removing And Cleaning The Ice Cube Container
How to save energy Removing and cleaning the ice cube – Install the appliance in a dry, ventilated room; do not expose to direct sunlight and do not place container near a heat source (e.g. radiator, cooker). If required, use an insulating plate. If ice cubes have not been dispensed for a prolonged period, –... -
Page 25: Odors
Warning messages via the display Clean the appliance with lukewarm water and a little If several warning messages are displayed simultaneously, dishwashing liquid. deal with each message individually. Do not let the water used for cleaning drip onto the control panel or light. While a warning message is displayed, buttons cannot be pressed. -
Page 26: Door Alarm
Water fiIter Door alarm WARNING To avoid serious illness or death, do not use water that is microbiological or chemical unsafe or of unknow quality without adequate disinfection or other treatment before or after use of filter. Exchanging the filter Cause CAUTION An appliance door has not been closed properly... -
Page 27: Resetting The Filter Display
Resetting the filter display NOTE If the filter display is not reset, the next required filter change cannot be signalled by the display. Rotate the filter cap on the base panel by 90°–180° After each filter change: in an anti-clockwise direction (1.). ... -
Page 28: Filter - Product Data Sheet
Filter – Product Data Sheet Performance Data Sheet For Filter Model 9000 077 095 Using Replacement Cartridge 9000 077 104 This system has been tested according to NSF/ANSI Standards 42 and 53 for the reduction of the substances liste below. The concentration of the indicated substances in water entering the system was reduced to a concentration less than or equal to the permissible unit for water leaving the system, as specified in NSF/ANSI 42 and 53. -
Page 29: Troubleshooting
Troubleshooting Appliance Fault Possible cause Remedial action Appliance has no cooling capacity. Power failure; the fuse has actuated; Check that the power is on. The interior light does not function. the mains plug is not in properly. The fuse must be switched on. The display does not come on. - Page 30 Fault Possible cause Remedial action Ice cubes have an unpleasant Ice which is stored for a long time may Dispose of old ice cubes. Use the ice odor/flavor. absorb odors which impair their taste. maker more frequently. The ice cube container is dirty. Empty and wash out the ice cube container.
-
Page 31: Changing The Bulb
Changing the bulb Halogen bulb at the side WARNING Halogen bulb type: 10 W/12 V/socket G4 To avoid electrical shock which can cause severe personal injury or death, disconnect power to appliance before making repairs. After making repairs, reconnect power. ... -
Page 32: Changing The Activated Charcoal Air Filter
Changing the activated charcoal air filter NOTE Replacement filters are available from your dealer. Open the filter holder. Insert the disc. Insert the cover rail. Pull out used filter. Insert a new filter. Close the filter holder. -
Page 33: Service
Please make sure to return your registration card; while not Phone number: necessary to effectuate warranty coverage, it is the best way for Gaggenau to notify you in the unlikely event of a safety notice or product recall. Purchase date:... - Page 34 NEGLIGENCE) OR OTHERWISE. THIS WARRANTY IS IN event, if you request, Gaggenau would still pay for labor and parts LIEU OF ALL OTHER WARRANTIES, WHETHER EXPRESS and ship the parts to the nearest authorized service provider, but OR IMPLIED.
- Page 35 Telephone: 800.828.9156 www.g a g g e na u - u sa . c o m...
Need help?
Do you have a question about the RB 491 and is the answer not in the manual?
Questions and answers