Sign In
Upload
Download
Table of Contents
Contents
Add to my manuals
Delete from my manuals
Share
URL of this page:
HTML Link:
Bookmark this page
Add
Manual will be automatically added to "My Manuals"
Print this page
×
Bookmark added
×
Added to my manuals
Manuals
Brands
Kramer Manuals
Amplifier
PA-120Net
User manual
Kramer PA-120Net User Manual
120w & 240w networked power amplifiers
Hide thumbs
1
Table Of Contents
2
3
4
5
6
7
8
9
10
11
12
13
14
15
16
17
18
19
20
21
22
23
24
25
26
27
28
29
30
31
32
33
34
35
36
37
38
39
40
41
42
43
44
page
of
44
Go
/
44
Contents
Table of Contents
Bookmarks
Table of Contents
Table of Contents
Introduction
Getting Started
Overview
Typical Applications
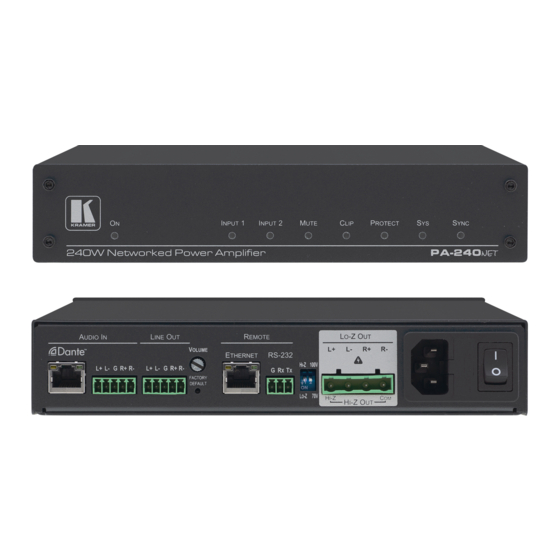
Defining the PA-240Net and PA-120Net Power Amplifier
Connecting the PA-240Net
Connecting the Output to a Balanced/Unbalanced Stereo Audio Acceptor
Connecting a Balanced/Unbalanced Stereo Audio Source to the Balanced Input
Connecting to PA-240Net Via RS-232
RJ-45 Pinout
Connecting PA-240Net Via the Ethernet Port
Operating the PA-240Net
Setting the DIP-Switches
Adjusting the Master Volume
Using the Embedded Web Pages
Setting the Speaker Output Parameters
Setting the Line Level Output Parameters
Selecting Hi-Z Mono Settings
Changing Standby Settings
Setting Device Parameters
Managing Web Page Security
Viewing the about Page
Using the Web-Based Dante Controller
Technical Specifications
Default Communication Parameters
Protocol 3000
Understanding Protocol 3000
Kramer Protocol 3000 Syntax
Protocol 3000 Commands
Advertisement
Quick Links
1
Connecting Pa-240Net Via the Ethernet Port
Download this manual
USER MANUAL
MODEL:
PA-240Net
240W Power Amplifier
PA-120Net
120W Power Amplifier
P/N: 2900-301040 Rev 2
www.KramerAV.com
Table of
Contents
Previous
Page
Next
Page
1
2
3
4
5
Advertisement
Table of Contents
Need help?
Do you have a question about the PA-120Net and is the answer not in the manual?
Ask a question
Questions and answers
Related Manuals for Kramer PA-120Net
Amplifier Kramer PA-150 User Manual
70v/100v 50w power amplifier (18 pages)
Amplifier Kramer PA-120Z Quick Start Manual
(4 pages)
Amplifier Kramer PA-120Z User Manual
240w/120w power amplifier (50 pages)
Amplifier Kramer PA-50HZ User Manual
50w power amplifier (10 pages)
Amplifier Kramer PA-50HZ Quick Start Manual
(2 pages)
Amplifier Kramer PA-50HZ Quick Start Manual
50w power amplifier (2 pages)
Amplifier Kramer PA-240Net User Manual
120w & 240w networked power amplifiers (44 pages)
Amplifier Kramer PA-225NET Preliminary User's Manual
(19 pages)
Amplifier Kramer PT-102A User Manual
Distribution amplifier (14 pages)
Amplifier Kramer PT102A User Manual
Pico tool models (16 pages)
Amplifier Kramer PT-102S User Manual
Pico tool models (16 pages)
Amplifier Kramer PT-102VN User Manual
1:2 composite video distribution amplifier (14 pages)
Amplifier Kramer PT-103V User Manual
1:3 video da (12 pages)
Amplifier Kramer PT-102AN User Manual
Da (13 pages)
Amplifier Kramer PT-102AN User Manual
1:2audio da, 1:2 s-video da (13 pages)
Amplifier Kramer PT102V User Manual
Pico tool models (16 pages)
This manual is also suitable for:
Pa-240net
Table of Contents
Print
Rename the bookmark
Delete bookmark?
Delete from my manuals?
Login
Sign In
OR
Sign in with Facebook
Sign in with Google
Upload manual
Upload from disk
Upload from URL


Need help?
Do you have a question about the PA-120Net and is the answer not in the manual?
Questions and answers