StarTech.com WIFI2HDMCGE User Manual
Wireless display adapter for mobile devices
Hide thumbs
Also See for WIFI2HDMCGE:
- User manual (11 pages) ,
- Manual (34 pages) ,
- User manual (20 pages)
Table of Contents
Advertisement
Quick Links
Download this manual
See also:
Manual
Advertisement
Table of Contents

Subscribe to Our Youtube Channel
Related Manuals for StarTech.com WIFI2HDMCGE


Summary of Contents for StarTech.com WIFI2HDMCGE
- Page 1 Wireless Display Adapter for Mobile Devices Actual product may vary from photos User Manual SKU#: WIFI2HDMC/WIFI2HDMCGE For the latest information and specifications visit www.startech.com/WIFI2HDMC www.startech.com/WIFI2HDMCGE Manual Revision: 03/14/2019...
- Page 2 This manual may make reference to trademarks, registered trademarks, and other protected names and/or symbols of third-party companies not related in any way to StarTech.com. Where they occur these references are for illustrative purposes only and do not represent an endorsement of a product or service by StarTech.com, or an endorsement of the product(s) to which this manual...
-
Page 3: Safety Statements
• I cavi (inclusi i cavi di alimentazione e di ricarica) devono essere posizionati e stesi in modo da evitare pericoli di inciampo, rischi di scosse elettriche o pericoli per la sicurezza. To view manuals, videos, drivers, downloads, technical drawings, and more visit www.startech.com/support... - Page 4 • Make sure to assemble this product according to the instructions. Failure to do so might result in personal injury or property damage. • Never use this product if parts are missing or damaged. To view manuals, videos, drivers, downloads, technical drawings, and more visit www.startech.com/support...
-
Page 5: Table Of Contents
Accessing the Remote Control Interface ..................19 Configuring a Wired Connection ......................22 Changing the Device Name ........................23 Configuring a WiFi Connection ......................25 Configuring Virtual AP ..........................27 To view manuals, videos, drivers, downloads, technical drawings, and more visit www.startech.com/support... - Page 6 Configuring the Display’s Aspect Ratio ..................... 54 Enabling Auto Resolution ........................55 Enabling Auto Save ..........................56 Exiting the ScreenShare App ........................ 57 Playing Media from a USB Stick ............58 To view manuals, videos, drivers, downloads, technical drawings, and more visit www.startech.com/support...
- Page 7 AirFun Utility ...................58 Installation ..............................58 Operation ..............................59 To view manuals, videos, drivers, downloads, technical drawings, and more visit www.startech.com/support...
-
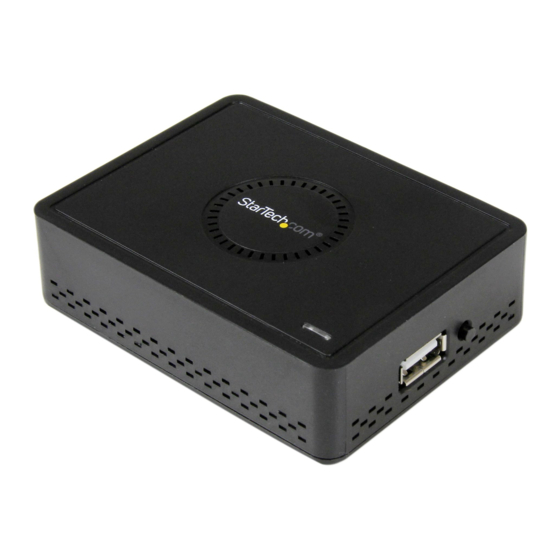
Page 8: Product Diagram
Product Diagram Side View USB Media Input Mode Selection Button To view manuals, videos, drivers, downloads, technical drawings, and more visit www.startech.com/support... -
Page 9: Rear View
Rear View Analog Audio/Video Out Port HDMI Out Port RJ45 Port Power Button Power Adapter Port To view manuals, videos, drivers, downloads, technical drawings, and more visit www.startech.com/support... -
Page 10: Product Information
HDMI-enabled display device w/ cabling (i.e. television, • projector) Miracast, or 802.11n/g Wireless-enabled video source device • (i.e. Smartphone, tablet, Computer system) USB Flash Drive (For updating the device’s firmware) • To view manuals, videos, drivers, downloads, technical drawings, and more visit www.startech.com/support... -
Page 11: Installation
Notes: The Launch screen may take several seconds to load. The appearance of the Launch screen may vary depending on the firmware version you are using. To view manuals, videos, drivers, downloads, technical drawings, and more visit www.startech.com/support... -
Page 12: Upgrading Firmware
Hold down the Mode Select Button and turn on the Display Adapter by pressing the Power Button. Continue to hold down the Mode Select Button while the device powers on. To view manuals, videos, drivers, downloads, technical drawings, and more visit www.startech.com/support... - Page 13 Release the Mode Select Button after the Please wait for USB update appears on your Display Device. The firmware on your Display Adapter will now update. Once the update has completed the Launch screen will appear. To view manuals, videos, drivers, downloads, technical drawings, and more visit www.startech.com/support...
-
Page 14: Connecting To A Smartphone Or Tablet
Connect to the Display Adapter using your Miracast- enabled smartphone or tablet. Note: Exact steps regarding Miracast setup will vary de- pending on your device. Please review the documentation included with your smartphone or tablet. To view manuals, videos, drivers, downloads, technical drawings, and more visit www.startech.com/support... -
Page 15: Connecting To A Computer
Display Adapter screen and click Next. If you are prompted for a PIN code, enter the PIN code that pops up on the Display Adapter screen and click Next. To view manuals, videos, drivers, downloads, technical drawings, and more visit www.startech.com/support... -
Page 16: Allsharecast/Screen Mirror Device (Samsung)
AllShareCast/Screen Mirror Device (Samsung) Open the Settings menu. Select More Settings. Settings screen To view manuals, videos, drivers, downloads, technical drawings, and more visit www.startech.com/support... - Page 17 Turn AllShare Cast ON and select the device name from the list. By default Display Adapter will be listed as the device name. Tap the device to connect. To view manuals, videos, drivers, downloads, technical drawings, and more visit www.startech.com/support...
- Page 18 AllShare Cast screen The smartphone or tablet screen will now be shared on your Display Device. To view manuals, videos, drivers, downloads, technical drawings, and more visit www.startech.com/support...
-
Page 19: Android Nexus Device 4.2 Or Higher
Turn Wireless display ON and select the device name from the list. By default Display Adapter will be listed as the device name. Tap the device to connect. To view manuals, videos, drivers, downloads, technical drawings, and more visit www.startech.com/support... -
Page 20: Configuration
Display Adapter. Connect your Smartphone, Tablet, or Laptop to the SSID of the device. By default the SSID for the device is WIFI2HDMC xxx with no security key. To view manuals, videos, drivers, downloads, technical drawings, and more visit www.startech.com/support... - Page 21 IP address (http://192.168.59.254) in the address bar. The Airfun Launch screen will appear. Note: The IP address is also listed on the display The default is http://192.168.59.254. Airfun Launch screen To view manuals, videos, drivers, downloads, technical drawings, and more visit www.startech.com/support...
-
Page 22: Configuring A Wired Connection
From the Remote Control screen, click on the Setup Button, the Setup screen will appear. Setup screen From the Setup screen, click on the Network tab. Click on the Wired Connection link. To view manuals, videos, drivers, downloads, technical drawings, and more visit www.startech.com/support... -
Page 23: Changing The Device Name
ScreenShare software. From the Remote Control screen, click on the Setup Button, the Setup screen will appear. To view manuals, videos, drivers, downloads, technical drawings, and more visit www.startech.com/support... - Page 24 From the Setup screen, click on the Network tab. Click on the Device Name link. Device Name Link Enter the Device Name of the presentation gateway. Note: The Device Name default is WIFI2HDMC. To view manuals, videos, drivers, downloads, technical drawings, and more visit www.startech.com/support...
-
Page 25: Configuring A Wifi Connection
From the Remote Control screen, click on the Setup Button, the Setup screen will appear. Setup screen From the Setup screen, click on the Network tab. Click on the Wifi Connection link. Wifi Connection link To view manuals, videos, drivers, downloads, technical drawings, and more visit www.startech.com/support... -
Page 26: Configuring Virtual Ap
Configuring Virtual AP From the Remote Control screen, click on the Setup Button, the Setup screen will appear. Setup screen From the Setup screen, click on the Network tab. To view manuals, videos, drivers, downloads, technical drawings, and more visit www.startech.com/support... - Page 27 WPA encryption and know the encryption pass- phrase you set here. Region: Choose your region. • Click the Save button to save the changes to the virtual AP configuration. To view manuals, videos, drivers, downloads, technical drawings, and more visit www.startech.com/support...
-
Page 28: Creating A Bridge To A Wireless Connection
From the Remote Control screen, click on the Setup Button, the Setup screen will appear. Setup screen From the Setup screen, click on the Network tab. Network tab Click on the Wifi Connection link. To view manuals, videos, drivers, downloads, technical drawings, and more visit www.startech.com/support... -
Page 29: Creating A Bridge To A Wired Connection
Connect a LAN Cable from the Display Adapter to the AP Router. From the Remote Control screen, click on the Setup Button, the Setup screen will appear. Setup screen From the Setup screen, click on the Network tab. To view manuals, videos, drivers, downloads, technical drawings, and more visit www.startech.com/support... - Page 30 Subnet Mask: Enter the Subnet Mask e.g. 255.255.255.0 • Gateway Address: Enter the Routers address • DNS Server: Enter the IP address of the DNS (Domain • Name Service) server. To view manuals, videos, drivers, downloads, technical drawings, and more visit www.startech.com/support...
-
Page 31: Configuring Night Mode
It increases the level of low level audio while decreasing the level of high level audio. From the Remote Control screen, click on the Setup Button, the Setup screen will appear. Setup screen To view manuals, videos, drivers, downloads, technical drawings, and more visit www.startech.com/support... -
Page 32: Setting Hdmi Output Method
Setting HDMI Output Method From the Remote Control screen, click on the Setup Button, the Setup screen will appear. Setup screen From the Setup screen, click on the Audio tab. To view manuals, videos, drivers, downloads, technical drawings, and more visit www.startech.com/support... -
Page 33: Configuring A Surround Sound Mode
Configuring a Surround Sound Mode From the Remote Control screen, click on the Setup Button, the Setup screen will appear. Setup screen From the Setup screen, click on the Audio tab. To view manuals, videos, drivers, downloads, technical drawings, and more visit www.startech.com/support... -
Page 34: Configuring Lip Sync Mode
Lip Sync mode synchronizes audio and video together so no audio delay is visible within the video. From the Remote Control screen, click on the Setup Button, the Setup screen will appear. Setup screen To view manuals, videos, drivers, downloads, technical drawings, and more visit www.startech.com/support... - Page 35 From the Setup screen, click on the Audio tab. Audio screen Click the Lip Sync link and select a mode from the drop- down list. To view manuals, videos, drivers, downloads, technical drawings, and more visit www.startech.com/support...
-
Page 36: Configuring Aspect Ratio
From the Remote Control screen, click on the Setup Button, the Setup screen will appear. Setup screen From the Setup screen, click on the Video tab. Video screen To view manuals, videos, drivers, downloads, technical drawings, and more visit www.startech.com/support... -
Page 37: Configuring A Tv System
From the Remote Control screen, click on the Setup Button, the Setup screen will appear. Setup screen From the Setup screen, click on the Video tab. Video screen To view manuals, videos, drivers, downloads, technical drawings, and more visit www.startech.com/support... -
Page 38: Scaling Video Output
From the Remote Control screen, click on the Setup Button, the Setup screen will appear. Setup screen From the Setup screen, click on the Video tab. Video screen To view manuals, videos, drivers, downloads, technical drawings, and more visit www.startech.com/support... -
Page 39: Configuring Video Output
From the Remote Control screen, click on the Setup Button, the Setup screen will appear. Setup screen From the Setup screen, click on the Video tab. Video screen To view manuals, videos, drivers, downloads, technical drawings, and more visit www.startech.com/support... -
Page 40: Setting The On-Screen Display Language
From the Remote Control screen, click on the Setup Button, the Setup screen will appear. Setup screen From the Setup screen, click on the System tab. System screen To view manuals, videos, drivers, downloads, technical drawings, and more visit www.startech.com/support... -
Page 41: Resetting The Display Adapter To Factory Settings
From the Remote Control screen, click on the Setup Button, the Setup screen will appear. Setup screen From the Setup screen, click on the System tab. System screen To view manuals, videos, drivers, downloads, technical drawings, and more visit www.startech.com/support... -
Page 42: Resetting The Display Adapter's Ip Address
Using a Pen gently press and hold the recessed Reset button for 10 seconds while the Display Adapter is still connected to the AC Power Adapter. The IP Address and Name will return to the factory default setting. To view manuals, videos, drivers, downloads, technical drawings, and more visit www.startech.com/support... -
Page 43: Checking The Current Firmware Version
Note: the firmware version can also be found on the Screen- Share Home screen. From the Remote Control screen, click on the Setup Button, the Setup screen will appear. Setup screen To view manuals, videos, drivers, downloads, technical drawings, and more visit www.startech.com/support... - Page 44 System screen Click on the Version Info link to see the current firmware version. Note: To update the firmware please refer to the Updating Firmware section of the manual. To view manuals, videos, drivers, downloads, technical drawings, and more visit www.startech.com/support...
-
Page 45: Screenshare Mode
Autoplay is disabled on your system, browse to your CD/DVD drive and run the application. Choose Typical Installation from the following screen and click Install. Quick Installer screen Follow the on screen instructions to complete the installation. To view manuals, videos, drivers, downloads, technical drawings, and more visit www.startech.com/support... -
Page 46: Logging Into Screenshare
Adapter (located next to the USB connector). The Home screen will appear on the Display. Note: The Login Code will be displayed at the bottom of the screen. To view manuals, videos, drivers, downloads, technical drawings, and more visit www.startech.com/support... - Page 47 Login Code On your Notebook / PC, search and connect to the Display Adapter’s SSID (wireless network) on the Wireless Network Connection screen. To view manuals, videos, drivers, downloads, technical drawings, and more visit www.startech.com/support...
- Page 48 ScreenShare will auto detect the Display Adapter. Enter the input Login Code that is located in the top right-hand corner of the Home screen as indicated in step 2, then click To view manuals, videos, drivers, downloads, technical drawings, and more visit www.startech.com/support...
-
Page 49: Checking The Mac Address
Checking the MAC Address The MAC address can be found on the Home screen, and is • located on the bottom right of the Home screen. Checking the MAC Address To view manuals, videos, drivers, downloads, technical drawings, and more visit www.startech.com/support... -
Page 50: Screenshare Panel Controls
Information: Displays application information (adapter • name, IP address, radio band, version). Minimize: Minimizes the Panel Control screen to the • Taskbar. Close: Closes the Panel Control screen. • To view manuals, videos, drivers, downloads, technical drawings, and more visit www.startech.com/support... -
Page 51: Configuring A Display Mode
Mirror Mode: Mirrors the content on the main display. • Extend Mode: Extends the main display’s viewing area • two multiple displays allow for a larger display area. To view manuals, videos, drivers, downloads, technical drawings, and more visit www.startech.com/support... -
Page 52: Configuring A Display Resolution
Select which display the mode will apply to. Select a display Configuring a Display Resolution From the Panel Control screen, select the Menu icon. The Menu screen will appear. Menu screen To view manuals, videos, drivers, downloads, technical drawings, and more visit www.startech.com/support... - Page 53 Select the HDMI Resolution link, a pop-up screen will extend. HDMI Resolution screen Select a Resolution from the pop-up screen. To view manuals, videos, drivers, downloads, technical drawings, and more visit www.startech.com/support...
-
Page 54: Configuring The Display's Aspect Ratio
Select the Aspect Ratio link, a pop-up screen will extend. Aspect Ratio screen Select an Aspect Ratio from the pop-up screen, which allows you to set the width and height ratio of the display. To view manuals, videos, drivers, downloads, technical drawings, and more visit www.startech.com/support... -
Page 55: Enabling Auto Resolution
The Menu screen will appear. Menu screen Select the Settings link, the Settings screen will appear. Setting screen Select Enable Auto Adjust Resolution to enable/disable automatic resolution adjustments. To view manuals, videos, drivers, downloads, technical drawings, and more visit www.startech.com/support... -
Page 56: Enabling Auto Save
Enabling Auto Save From the Panel Control screen, select the Menu icon. The Menu screen will appear. Menu screen Select the Settings link, the Settings screen will appear. Setting screen To view manuals, videos, drivers, downloads, technical drawings, and more visit www.startech.com/support... -
Page 57: Exiting The Screenshare App
A Confirmation screen will appear asking Do you really want to exit? click the Yes button to exit to the Login screen. - or - Click the No button to return to the ScreenShare App. To view manuals, videos, drivers, downloads, technical drawings, and more visit www.startech.com/support... -
Page 58: Playing Media From A Usb Stick
Run the Autorun.exe application from the Autoplay menu. If Autoplay is disabled on your system, browse to your CD/DVD drive and run the application. Select Software Installation from the menu. To view manuals, videos, drivers, downloads, technical drawings, and more visit www.startech.com/support... - Page 59 Open the AirFun app, it will begin to automatically search for the Display Adapter. Searching for a Device Once found, tap the buttons for either Photo/Music Playback or Video Playback and choose the file you wish to view/play. To view manuals, videos, drivers, downloads, technical drawings, and more visit www.startech.com/support...
- Page 60 AirFun Icon The AIRFUN utility will begin to search for the WIFI2HDMC device. If the device is not found before the timeout period, it will display No device found. To view manuals, videos, drivers, downloads, technical drawings, and more visit www.startech.com/support...
- Page 61 Drag the video/photo/music file to the Airfun main menu directly. For video files, drag files to the Video Playback folder. For photo/music files, drag files to the Photo/Music Playback folder. To view manuals, videos, drivers, downloads, technical drawings, and more visit www.startech.com/support...
- Page 62 Limitation of Liability In no event shall it be the liability of StarTech.com Ltd. and StarTech.com USA LLP (or their officers, directors, employees or agents) for any damages (whether direct or indirect, special, punitive, incidental, consequential, or otherwise), loss of profits, loss of business, or any pecuniary loss, arising out of or related to the use of the product exceed the actual price paid for the product.
- Page 63 StarTech.com is an ISO 9001 Registered manufacturer of connectivity and technology parts. StarTech.com was founded in 1985 and has operations in the United States, Canada, the United Kingdom and Taiwan servicing a worldwide market.
Need help?
Do you have a question about the WIFI2HDMCGE and is the answer not in the manual?
Questions and answers