Table of Contents
Advertisement
Quick Links
Advertisement
Table of Contents

Related Manuals for MakerBot Replicator


Summary of Contents for MakerBot Replicator
- Page 1 Setup Guide Read me BefoRe unPackIng!
-
Page 2: Package Contents
‰ safety InfoRmatIon CAUTion: The Replicator generates high temperatures and includes moving parts that can cause injury. never reach inside The Replicator while it is in operation and allow time for The Replicator to cool down after operation. waRnIng Vapors / fumes may be irritating at operating temperatures. - Page 3 3D. Today, you’ll set up The Replicator for the first time and make your first prints. Then you’ll set out on the path to finding new designs to print and even create models of your own.
- Page 4 Filament Guide Tube(s). Take these out and set them aside. Step 1. Lift The Replicator from the outside edge. Avoid pinching internal belts and rods. STeP 2. open The acceSSoRy Box Follow the thick black cable to the Accessory Box.
- Page 5 MakerBot Filament. Remove the packing material and the filament. You have now finished unpacking The Replicator! We’re really proud of it! We recommend that you keep the box it was shipped in for future transport and long-term storage.
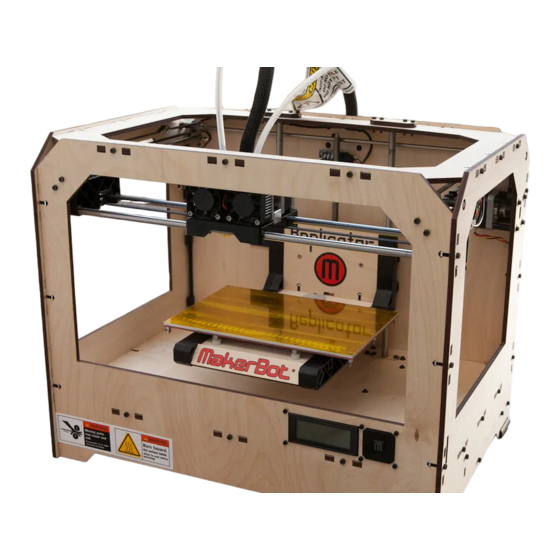
- Page 6 RePlIcatoR™ dIagRam Before we continue, let’s familiarize ourselves with some of the main features of The Replicator fRont 1. Single or Dual Stepstruder ® (attached to mount) 2. Build Platform 3. LCD interface Panel 4. Filament Guide tubes 5. SD Card slot (on side panel) Back 1.
-
Page 7: Initial Hardware Setup
Place it on the stepstruder mk8 mount so the bolt holes line up and the fans face forward. Secure it with the bolts and wrench. Step 6. Secure the Stepstruder MK8 with the bolts from your Feet and Bolts kit. makerbot.com/docs/replicator 7... - Page 8 The Replicator. They work best on the side panels. Step 7. Slide the feet onto The Replicator's side panels. STeP 8. Slide The Spool holdeR(S) inTo place now, grab the Spool Holder(s). if you have two spool holders, put one on each side.
- Page 9 Power Supply, and the Power Supply into the power input port. Before connecting anything, make sure that The Replicator’s power switch is in the off position. The next step is to locate the usB-a to usB-B cable and plug into the usB-B port on The Replicator.
-
Page 10: Next Steps
Here’s a preview of what you’ll learn: LeT YoUR RePLiCAToR TeLL YoU WHAT To Do The LCD Interface Panel will give you instructions the first time you boot up. Just follow its directions carefully and you’ll be up and running in a few minutes. - Page 11 Here are a few tips about using the LCD Interface Panel: • A solid red m means The Replicator is working. Look at the LCD screen or the application for status. A blinking red M means The Replicator is waiting for user input.
- Page 12 For technical assistance please call 347.334.6801 or email support@makerbot.com ©2012 MakerBot industries LLC. 87 3 Ave., 1 floor Brooklyn, NY 11217...
Need help?
Do you have a question about the Replicator and is the answer not in the manual?
Questions and answers